A book table is a very popular and versatile type of furniture. When folded, it takes up little space, but if necessary, turns into a large table.
Stores sell book-tables for every taste, but they also cost a lot. But such a necessary and practical thing can be made independently.
How to make a book-table with your own hands and what is needed for this, read our article.
Types of book tables
There are many types of book tables, and each has its own pros and cons. Therefore, you need to decide which one is right for you. Let's consider several options:
- Book table with shelves You may remember such tables from the times of the USSR, but similar models are still produced today. The table consists of one narrow tabletop-frame, which is framed on both sides by large ones; they fold out. When assembled, they resemble a bedside table. Only one half can be opened.
- Table-book with chairs The interior space of this model of table-book is not occupied by drawers or shelves; several folding chairs can be compactly placed there. Very convenient for a small apartment: a small cabinet can accommodate an entire dining set.
- Book-table with barAn interesting option for the kitchen or living room is a mini-bar on the table. If necessary, drinks leave the cabinet in a roll-out basket.
- Coffee table-book has standard functions of a table-book. They just make it smaller to match the characteristics of a coffee table. A very comfortable and stylish thing, perfect for any interior.
Coffee table-transformer mini-book. A compact and practical book-table will fit perfectly into the modern design of a kitchen or living room. The use of different materials and a variety of colors allow you to choose a table to suit any interior, be it a red kitchen or a kitchen in brown and beige tones.
Please note: book tables with drawers and shelves filled with things are quite heavy, and it takes two people to move them. A good solution is to put the table on wheels. It can be easily moved indoors.
Materials for the book table
In nature, there are a great variety of materials from which a table can be made. But not all of them are suitable for a book-table - some will be too difficult to process, others will have excessive weight. Let's look at what materials are used most often:
- metal;
- tree;
- plastic;
- glass.
A metal desk-book will last you the longest. It is very strong and durable because it is difficult to break. Such a table will be stable, but heavy. True, it costs much more than others. Due to its heavy weight, it is difficult to move it alone, or even for two people. And besides, it does not suit all interior styles. People may refuse to make such tables to order, because they are very difficult to manufacture.
The book-table, made of particle board (chipboard), is characterized by good strength. It will fit well into any room. All thanks to the huge range of colors, textures and variety of models.
Wood is truly the most common material from which tables are made, and the book-table is no exception. For example, if we compare wood and metal, a wooden book-table will cost several times cheaper and ten times lighter in weight. In addition, wood is easy to process and you can make such a table even at home, spending a minimum of money and time. Wood is an environmentally friendly material that does not emit any toxic substances. A wooden book table will fit perfectly into a space where safety and non-toxicity are so necessary.
Plastic book tables are no less durable and resistant to all kinds of mechanical damage and temperature changes. This table will fit well into the interior of your kitchen. You can buy it inexpensively at. If you are going to choose such a table model, then take a closer look at tables with a transparent tabletop - it will be a great addition to the summer veranda at your dacha.
Much less often, tempered glass is used to make book tables. These tables are heavy in weight and difficult to manufacture. Tabletops made from them are durable, but chips may appear during use.
Book table with cabinet
When folded, this table resembles a cabinet with drawers and shelves. It is usually chosen by housewives. It is very convenient to store various things in it.
In addition, the table is perfect for a woman who sews, as it can easily be turned into a workspace (read how to make a sewing table in this article).
The book-table supports can be wooden or chrome-plated. They do not differ in quality, both supports are stable. You can choose the option that best suits the interior.
What kind of wood to make a table and book from?
It's difficult to advise anything here, because everyone has their own taste. However, to make your choice easier, we will describe the properties of the most popular types of wood that are used for manufacturing. Based on these properties, as well as looking at photos of tables and books made of different materials, you can determine what kind of wood to make your furniture from.
Nut
Durable, dense and strong wood. It is easy to glue and process. This wood holds screws and self-tapping screws well. It does not rot, and fungi do not form on it, so walnut tables can be made specifically for the kitchen. In addition, walnut wood has a wide range of colors - so you can always choose the color that suits you.
Wenge
This is one of the most expensive and best wood species in the world. It has an exquisite color and a rough texture. You can hit her hard - nothing will happen to her, you can put pressure on her - she will not bend. Fungus does not form on it, and insects do not eat.
Milky oak or bleached oak
Has all the characteristics of oak. It is obtained by treating it with chemicals that make the fibers whiter. After this, the wood is moistened with oil and varnished.
Characteristics of wood:
high strength, resistant to external influences. True, it gets dark over time.
And finally, a piece of advice: assembling the book table will go quickly and won’t take much effort if you have a diagram.
And in general, before you start searching for material, you first need to make a drawing of the table. If you can’t do it yourself, then find it on the Internet – you can download them for free.
And in order to consolidate the information received, we recommend that you watch several videos that show how to assemble a book table. That's all. See you.
Video on assembling a book table
Large furniture in the apartment does not contribute to the feeling of spaciousness. It is quite inconvenient to use, and it is quite difficult to rearrange and transport it. A folding option would be an excellent way out of the situation. If you figure out how to assemble a book table, you can see that this is a fairly simple process to perform. This will help free up space and make the interior modern and practical. Step-by-step instructions are accessible and simple.
The table book when assembled takes up very little space.
Materials and tools
To make such a model of a table-book, you need to cut the following blanks from laminated chipboard and fiberboard according to the specified dimensions: In addition, to make the table you will need:
You will also need the following tools:
- pencil, tape measure; Phillips screwdriver or screwdriver; hex wrench (4 mm); jigsaw; hammer.
Please note: Laminated particle boards are difficult to cut at home. You can draw up a cutting diagram and go to a workshop where specialists will cut out the table parts.
Stages of work
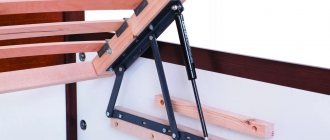
Step 1. Attach the ends to the sides of the table (3, 4). Do this with nails. Secure the roller guides to them with screws (3.5 x 16).
The sides of the table (3, 4) are connected by the bottom (8) and the drawer (7). Use dowels and a screw tie. Make holes in the sides and frame and insert eccentrics there.
Please note: the arrow on the eccentric must be directed towards the end of the part.
Step 2. Screw the eccentric rods into the holes on the table top (1). the card with screws (4 x 16) . Lower the tabletop onto the sides. This must be done so that the eccentric rods fit into the holes in the ends of the sidewalls and the frame. On the sidewalls and frame, turn the eccentrics 180 degrees clockwise.
Step 3. Attach the ends to the retractable sides (5) using nails. Insert eccentrics into their holes. Do the same with the mounting strips (6).
Take the double-sided eccentrics and insert them into the ends of the mounting strips. You need to insert it with the long side. Turn the eccentrics 180 degrees clockwise.
Drill holes on the mounting strips and insert dowels there. The extendable table support must be attached to the mounting strip.
Turn the eccentric 180 degrees clockwise. Using screws (4 x 16), you need to attach the card loops (5) to the mounting strips (6). Screw the hinges (3) already attached to the mounting strips to the sides of the table (4).
Step 4. Insert the shelf supports into the holes of the additional tabletops. Screw the additional table tops to the card loops that are attached to the main table top. The eccentric and screw couplers must be closed with plugs. Take screws (4 x 16) and use them to secure the mating parts of the four-hinged hinges on the side of the table (3).
Attach four-hinged hinges to the door (10). Do this with the same screws. Screw the handle with M4 x 20 screws and hang the doors.
Secure the hinges with fastening screws to the mating parts. Insert shelf holders into the holes on the sides (3, 4). Place the shelf (9) on them.
Step 5. It is necessary to assemble the boxes. Using a screw tie, connect the back wall of the box (13) with the side walls (14).
You need to screw the eccentric rods into the holes on the façade and insert the dowels. Connect the façade with the side walls. This must be done so that the eccentric rods and dowels fit into the holes on the side walls.
Insert the bottom of the drawer (14) into the groove. Secure it with nails. the mating to the sides of the drawer (6) . This needs to be done close to the facade, using screws (3.5 x 16). Attach the handles using M4 x 20 screws .
Insert the drawers into the cabinet. To do this, you need to tilt the drawer and place it so that the rollers of the drawer guides rest on the guides on the sides of the cabinet. Lower the drawer and push it into the cabinet.
Important: the box should move smoothly along the guides, without squeaking or rubbing, and slide out without effort.
How to make a table-book with your own hands, drawings and diagrams can be seen in this video:
- Author: Svetlana K. Print
PhotoLack of space often occurs among apartment owners, especially when it comes to furniture. A DIY book table, which is not too difficult to make, can help solve this problem. This table takes up very little space when folded, so it is the best option for small apartments or where several tables are needed at once.
Thanks to its simple and compact design, the book table is perfect for small spaces, such as the kitchen, since it can be folded if necessary.
The book table itself is not inferior to a regular table if it is made with high quality, but at the same time it also saves living space. In order to make such a book table with your own hands, you will need the following materials and tools:
- jigsaw; drill; iron; office cutter; square; pencil, marker; level; tape measure; screwdriver; chipboard sheet; furniture edge; self-tapping screws, screws; furniture hinges; corners.
A standard sheet of chipboard, when cut correctly, produces 2 tables, so there is no need to worry that there may not be enough material.
Photo of the book table
Photo Lack of space often occurs among apartment owners, especially when it comes to furniture. A DIY book table, which is not too difficult to make, can help solve this problem. This table takes up very little space when folded, so it is the best option for small apartments or where several tables are needed at once.
Thanks to its simple and compact design, the book table is perfect for small spaces, such as the kitchen, since it can be folded if necessary.
The book table itself is not inferior to a regular table if it is made with high quality, but at the same time it also saves living space. In order to make such a book table with your own hands, you will need the following materials and tools:
- jigsaw;
- drill;
- iron;
- office cutter;
- square;
- pencil, marker;
- level;
- roulette;
- screwdriver;
- chipboard sheet;
- furniture edge;
- self-tapping screws;
- furniture hinges;
- corners.
A standard sheet of chipboard, when cut correctly, produces 2 tables, so there is no need to worry that there may not be enough material.
How to make a table book: the preparatory process
Folding table diagram.
The purchased sheet of chipboard must be cut to size; you can entrust this to the craftsmen in the workshop, but if you have an electric jigsaw, cutting it yourself will not be difficult. It is preferable to take laminated and moisture-resistant chipboard for the table. When marking and sawing, it is enough to adhere to some rules, knowledge of which will greatly facilitate the work.
All lines drawn on the sheet must be cut through before final sawing. When working with a jigsaw to make a table book with your own hands, you should not guide the file clearly along the contour itself, but step back 2-3 mm from it outward. This will allow the resulting chips to appear outside the part.
Chips will inevitably appear when cutting yourself, so it is better to insure your work.
After cutting, the end must be treated with sandpaper with a fine or medium structure.
To make a book table, you will need to saw the following parts: a narrow central part of the table top, which acts as a binding, and two large covers for the table. Additionally, you will need racks for the central part or main supports and crossbars for the main part in the amount of 3 pieces.
You will need 4 pieces of stands for retractable legs. strips that will connect them to the sidewalls, also 4 pcs. To strengthen the design of the retractable legs, 2 more strips are used.
Table-book design options
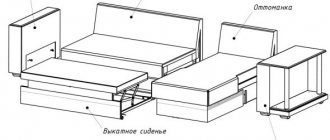
A book-table is a transformable furniture; its tabletop consists of 3 parts. The central one is motionless, and the 2 side ones can be lowered and raised.
When unfolded, the moving parts of the tabletop (wings) rest on the legs; when folded, the legs are retracted under the central part of the tabletop and covered on the sides. There are various design modifications, for example, legs can be made on wheels, the sides can be solid, closed, or made in the form of a frame made of timber. You can increase the length of the central part of the tabletop and place several shelves, drawers in the interior space, arrange a mini-bar, or use it to store folding chairs. And vice versa, there is a model of a particularly thin table-book, without a middle part. When such a table is not needed, it can be put under the bed or in the gap between the wall or other furniture.
As for the design of the legs of a classic book table, there are 2 main options:
- each wing of the tabletop rests on 1 leg, the legs of the legs (the element connecting the leg to the sidewall) are attached to different sides of the opposite sidewalls, and when unfolded are located diagonally;
- each wing rests on 2 legs, the drawers are attached to both sides of the sides and are located parallel to the long edges of the table.
The second option is more stable, but its production increases the consumption of materials, and the work will take a little more time and effort.
How to make a table: assembly
Drawing of a table-book.
Before the book table is assembled, the ends of all previously cut parts are processed by applying a furniture edge. In order to achieve maximum accuracy when working, the parts are clamped in a vice, lined with felt so that they do not leave marks. The tape placed at the end must have an allowance of at least 2 cm for each treated area, this is due to its ability to shrink.
The edge tape is applied to the end of the workpiece with the adhesive part facing down. Then the tape is smoothed along its entire length with a hot iron for at least 15 minutes.
The iron should not be too hot; after processing, the edge is additionally smoothed with a dry cloth to improve adhesion. The excess is cut off with a sharp knife. Defects that appear along the edge can be eliminated using sandpaper.
To make a book table, its retractable legs are assembled using Euroscrews. For this purpose, a through hole is made on the front side of one of the parts.
The same hole is drilled on the second part, but of a smaller diameter. The parts need to be fixed using the confirmat and then the location of it must be closed with a plug. All areas where fastening is carried out using a Euroscrew should be treated in the same way.
The next step, in order to make a table, should be to attach furniture hinges to the legs, of which 2 pieces will be required for each leg. To assemble the central leg, the lower jumper is mounted in a horizontal position, the height from the floor is 10 cm, its location should form a right angle with the racks.
On both sides, 7 cm is removed from the edge of the rack to accommodate the central jumper. The next jumper is mounted vertically in relation to the bottom one, and the last rib is fixed in the center. It is located between the tabletop and the second lintel
The finished base for the table book is placed on top of the central part of the table top. From the edge of the table, the support posts should be at a distance of 3 cm on both sides.
The entire structure is connected by corners; 2 pieces are taken for each side. The central part of the table is connected to the lids using furniture butterfly hinges. Before making a table, it is turned over, in this position the lids and retractable support legs are screwed on.
Content:
- 1. An economical option for a book-table. Necessary tools. Detailing of a book-table. Required accessories. Assembling a book-table. 2. A more elegant do-it-yourself book-tableRequired tools and accessoriesDetailingAssembling a second book-table
Initially, our apartments were not conceived as housing, but rather as a refuge. Shelter from rain and cold - no more. From this point of view, everything is absolutely correct: it’s warmer in close quarters.
But you can no longer receive guests - a large table takes up the entire living space. Although the furniture stores present such simple solutions that you can’t help but think: Do-it-yourself book-table - is it really that difficult to make? Everything is quite simple, especially if your hands are tailored to the desired format and you want to save money.
Making a table-book is quite simple
Here it makes sense to consider the manufacture of two different versions of tables, united by one common goal - to open to their full width only at the right moment.
Assembly order
Central part of the table:
- At a distance of 3 cm from the edges of the central part of the tabletop, they are attached to it using the corners of the sidewall.
- The sidewalls are connected to each other by stiffening ribs using confirmations. The lower stiffening rib (bottom) is attached parallel to the tabletop at some distance from the floor, the remaining 2 are directly above the bottom and under the tabletop, perpendicular to them.
- Adjustable supports or thrust bearings are attached to the bottom of the sidewalls (if supports are not used, the height of the sidewalls must be increased).
Legs (4 pieces)
- The box is being assembled. Its height is the sum of the height of the racks plus the double thickness of the overhead strips plus the height of the two wheels.
- Between the racks, at an equal distance from the overhead strips, a stiffener is mounted perpendicular to the ground.
- Loops are screwed to the racks that will face the central part of the table with self-tapping screws, 3 for each leg.
- Rollers are attached to the overhead strips at the top and bottom, closer to the outer edge, with self-tapping screws.
Final assembly
- The central part is turned over with the tabletop down, the wings are moved to the narrow part of the tabletop and fastened to it using hinges (3 for each wing).
- Loops attached to the legs are screwed to the sides.
- The legs are moved to their extreme working positions, the places where the wheels are located are marked, and in these places clamps are attached to the wings that will not allow the legs to move spontaneously.
The table is ready, all that remains is to turn it over and cover all the confirmation hats with caps.
Disclamer
So that I don’t get hit hard and straight away, I’ll make a reservation that I’m not a professional in either carpentry or writing. I will try to paint everything in as much detail as possible. If something is unclear, ask questions.
A short preface
I have been planning to make such a table for a long time. The most pressing question was about its design. I couldn't find anything on the Internet about book tables. I admit that I didn’t look well... I looked at furniture stores, measured and sketched many options. The cost of the book tables I saw varied between 1700-2200 rubles
I didn’t want to bother using wooden parts (boards, bars, etc.). What I mean by this is that the table had to be made exclusively from laminated chipboard (LDSP) that was available.
Design
I settled on this design. View from above:
I liked the compactness and the interesting solution for the side part. In the store, however, the length of the part 3
(see sheet cutting diagram) was shorter - about half the width of the table. I lengthened it so that the support point for the folding part was a little further. It’s more reliable and stable this way.
How to cut a sheet?
The sheet is cut according to the following pattern:
1,2
— Blanks of frame parts, vertical and horizontal.
3
- blanks for the vertical parts of the folding table legs.
4
- blanks for horizontal crossbars of folding table legs.
5
- table top blank.
!Basic scheme! During the process, I added 1 mm to each cut. It should be noted that it is better to cut with a circular saw (even better - on a machine). Because the jigsaw file “leads away” (this is clearly visible) But at the moment this is not critical. Where it is absolutely critical - I will explain below. Minor unevenness from the “walking” of the jigsaw file can be corrected with coarse sandpaper. First wrap it around a small wooden block. !I warn you! During the sawing process, the jigsaw makes small chips in the edge of the laminate on the top side.
First I sawed parts 1-4
. And he did the right thing! Because the unsawed tabletop came in handy a little later as an intermediate, convenient work surface (here, of course, I’m proceeding from my realities - a one-room apartment with a 6-meter kitchen).
Matching parts
Black numbers are numbering according to the sheet sawing pattern, Green numbers are from the “
Materials and Tools
” list.
Preparing parts for assembly
Now the critical moment has arrived.
When parts 1-4
are filed to length,
you must carefully ensure that their ends are strictly perpendicular to the side surfaces
. This is done so that in the future the designs of the frame and legs do not become like a propeller.
Edge tape
The edge tape is selected to match the tone of the chipboard. In my case - Buk Bavaria. Glued with an iron. I set the iron to “two”. The diagram has been copied from the packaging.
The excess is cut off with a stationery knife. The edges are processed with sandpaper stretched over a small wooden block.
You can use edge tape to cover all the ends, or only those that will be visible.
Assembling the base and legs of the table
In principle, there is nothing complicated here.
We place the processed parts ( 1-2
or
3-4
) on the table (we rest the horizontal crossbars (2 or 4) against the wall, we rest the vertical bar (1 or 3, respectively) against the ends of the crossbars), place a right angle between them and drill through with a drill diameter 5 mm (depending on the size of the Euroscrew).
The main thing is to cover the entire depth of the screw and at a right angle. Then we drill about one and a half centimeters with a 7 mm drill. If desired, we additionally countersink (to “sink” the screw head). Euroscrews:
After final assembly, the screws are closed with plugs. !Plugs for Phillips and hex screws are different! Please take this into account in the store.
Assembling the structure
Previously, the central hinges (
7
) were modernized - additional holes were drilled. For reliability.
Place the base on its side. Let's try on the legs. We mark the places where the hinges will be attached. We first screw the loops to the legs, then - in place - to the crossbars of the base. I recommend drilling a hole 1-1.2 cm deep for each self-tapping screw with a drill with a diameter of 1.5-2 mm.
We admire and... unscrew! Otherwise, it will be inconvenient to attach the tabletop.
Tabletop
As you can see, part
5
consists of three parts. First we cut out the central part. This should be done as carefully as possible - not just because of appearance. It is better to measure the width from the center so that there is a small margin for leveling the folding parts. Treat the long ends of the central part with edging tape. We are not touching this part of the width of the table yet. Let's put it aside for a moment...
The two halves have two smooth edges (we carefully sawed them off!) - these are the edges that will then be attached with loops to the central part.
Now let's align the sides. Fold the folding parts (like a sheet of paper). It is important here not to turn them over, that is, the front side of one part, when folded, should adhere to the front side of the other part. Why is this being done? In order for the folding parts to hang strictly vertically.
We get rid of the discrepancy, if there is one. The photograph shows that the folded halves have a certain (here – 9 mm) discrepancy. By the way, in the top view you can clearly see how the jigsaw “walked”. Using the example of the far (from the first photo) part: Measure 5 mm from the bottom left, 9.5 mm from the top (5+9/2). We measure 9.5 mm from the bottom right, 5 mm from the top. We draw lines and check that there is the same distance between them at the top and bottom. We cut it down. Accordingly, we align the near part in the opposite way.
Now, when applied to each other, the folding parts of the tabletop should converge at the bottom and sides.
We measure and saw off the folding parts according to the height. I ended up with 63 cm. We rounded the corners with a compass. We cut it down.
All that remains is to refine the edges of the tabletop with an edge profile. Of course, no one is forcing you to do this. You can use the same edge tape...
Edge profile
Also selected to match the surface tone. It is better to glue on liquid nails. I glued it on silicone - it doesn't stick well. I waited, however, one day. It may well be that the silicone did not set completely within a day. But I didn’t redo it and, just in case, I grabbed the profile with nails in several places.
Putting the tabletop in place
Furniture manufacturers secure tabletops using wooden dowels.
But this requires high-precision equipment, which we initially do not have. Therefore, I decided to use furniture corners ( 10
), which have a fairly strong fastening.
For reliability, two corners are located on the side parts of the base ( 1
), and four more are evenly distributed along the top crossbar of the base (
2
) in a checkerboard pattern.
The corner fastenings are plastic bushings (metal bushings are also available), with a diameter of approximately 11 mm. They are driven or screwed into a pre-drilled hole. Then a screw is screwed into the mount.
Can be mounted on the floor. To try on the drilling locations for the corner fasteners, you must first turn the central part of the tabletop face down. We drill holes in the central part of the table top and in the base (diameter 10 mm, depth 11-12 mm), drive in bushings, attach the base to the central part of the table top using corners.
We apply piano loops. We fasten it like this - two self-tapping screws in both halves of the loop on one side, two more at a third of the distance from the beginning of the loop, two more at two-thirds of the distance, two more at the opposite edge of the loop. All other screws are in random order.
After this, we fasten the legs in place.
We put the table in its normal position like this - we fold the legs, lift the folding parts of the tabletop, then carefully lay the entire structure flat on the floor, and only then put it on its feet.
At points of contact with the floor
You can attach wheels, you can add plastic furniture pads, and, in the end, you can attach whatever your heart desires! I glued the remains of the edge profile. And secured it with nails.
Actual dimensions:
The width of the folded table is 195 mm, the height is 742 mm, the tabletop (when unfolded) is 787x1420 mm.
Materials and tools
1.
Laminated chipboard (residue after making a table, a work surface for a washing machine and a pair of shelves (,) for the kitchen) 1500x1280x16 mm.
The original sheet 2750x1830x16 costs 1149.22 rubles. 2.
Edge tape (19 mm).
According to calculations, 17.5 m, in reality a little less. 2.50 per meter. Cost – 43.75 rub. 3.
PVC edge profile (16.5 mm) – 5 m. 105 rub.
4.
Euroscrews.
24 pcs. 70 kopecks each. Total 16.8 rubles. 5.
Plugs for Euroscrews.
24 pcs. 1 rub. Total 24 rub. 6.
Piano loop.
2 pcs. 7.
Central loop.
4 things. I don't remember the exact cost. All hinges (these + previous ones) cost 150.4 rubles 8.
Liquid nails.
70 rub. 9.
Self-tapping screws 3.5x16.
70 pcs. I bought 100 pcs last year. about 40r. 10.
Furniture corners.
6pcs. 30 rub. 11.
Self-tapping screws 3.5x40. 12 pcs. 0.1 rub per piece. Total 1.2 rub. Prices are retail.
+ Screwdriver. Jigsaw. Corner. Drills from 2 to 10 mm Pencil. Long ruler (1 m). Hammer. Iron. Stationery knife. Sandpaper. Compass.
Price
Let's estimate roughly, because it definitely won't work anyway: Based on the actual area of chipboard (
1
) it costs 438.45 rubles.
(however, no one will sell you such a piece) Self-tapping screws ( 9
) - 28 rubles Let's count... Total:
906.4 rubles.
+ electricity, transportation costs and nerves.
+ invaluable help from my wife
. Cleaning, in addition to being labor-intensive, is a very dusty job. Whether or not to bother with such crafts is up to you to decide. I believe that any normal man can make such a table. At the end I promise a genuine and completely sincere feeling of pride in myself :)
Detailed video instructions on how to make a book table. Everything is very simple and accessible. The most important thing is that it is much cheaper than buying a ready-made similar table.
With such a table you can use the space to the fullest. Arrange as many people as needed at the moment. And when folded, the table takes up almost no space.
- We make a sofa with our own hands. (0) It turns out there is nothing complicated about making a sofa with your own hands. I provide two visual videos where you can see the whole process and the necessary […]
- How to make frameless furniture yourself (0) The main classification feature of frameless furniture is the absence of a rigid frame, which allows you to create a very comfortable, […]
- Functional coffee table made of drawers. (0) It happens to get quite decent fruit boxes. Now I know what else can be made from them. By adding a base on wheels and […]
- Homemade garden furniture (0) A house as a place for your comfortable living cannot do without furniture. It is relevant both in residential and country houses or cottages. […]
- DIY laptop table. (0) A very original design of a laptop table was proposed by the author. I like the techniques of working with plywood because of their simplicity. The laptop is located […]
Book tables are still in demand in furniture stores. This piece of furniture, which takes up so little space, is relevant for small apartments, but the price at which retail stores sell it is too high. Nevertheless, you can start making your own book table using a diagram. The table will turn out no worse than furniture assembled in a furniture workshop.
Economical option for a book table
Such a table is cheaper to manufacture and more compact, but has a number of disadvantages. Which, however, is reconciled by the price.
Economical option for a book table
Dimensions when folded: 750x800x200 mm. When unfolded: 750x800x1600 mm.
In the picture it is shown with rounded corners, but this is additional expense for figured cutting and edging, so we will go quickly and cheaper, that is, without aesthetic delights.
Detailing of the book table
You must immediately and forever remember that sheets of laminated chipboard at home cannot be cut accurately and without chipping, so you will have to order the main cutting from a furniture company or a construction supermarket.
The details are given for a chipboard thickness of 16 mm and a melamine self-adhesive edge 0.5 mm thick:
- 733x200 – 2 pcs., table sides. 700x800 – 2 pcs., table “wings”. 200x800 – table top. 727x120 – 2 pcs., table drawers. 727x70 – 4 pcs., leg stands. 500x70 – 4 pcs., leg drawers.
The parts are edged as follows:
- The edge is placed on the end of the part with the adhesive side down and ironed with a hot (3/4 power) iron. Then, while the edge is still warm, you need to rub it over the top with a dry cloth several times, achieving uniform gluing. Remove the excess edge with a knife and clean the edges with sandpaper.
It should be noted that two and a half of these tables can be made from a standard (2440x1830x16) sheet of chipboard. So it makes sense to team up with a neighbor or accept an order for a second copy from a neighbor. This is worth considering before going to a specialized store to buy components.
Required accessories
Confirmats 5x70 (if you don’t stop at making a table, buy a package). Self-tapping screws 4x16 (similar). Window hinges or otherwise “butterfly hinges” with a “wingspan” of 30-35 mm, 10 pcs. Plastic L-shaped linings for furniture legs or so-called “hooves”, 3 mm thick, 4 pcs.
Let's take a closer look at this point right away. On each side of the table, one of the “hooves” is attached from below to the movable stand of the leg, extending the delta to the floor, and the second is attached to the “wing” of the table from the inside, finally fixing the height and position of the leg when open. Fastening with self-tapping screws 4x16. Furniture corners 4 pcs., for attaching the tabletop to the sides.
Assembling a book table
Assembling the base of the table.
Here and below: Drilling for confirmations in a plane - an 8 mm drill, through. At the end - a 5 mm drill, hole depth at least 60 mm.
We draw a vertical line in the center of each sidewall - this is the axis of the drawer fasteners. The drawers, oriented perpendicular to the floor, are pulled together with the sides.
The upper drawer is flush with the top, the second drawer is 50 mm away from the floor. We screw the table top onto the corners. The canopies protruding from the sides must be identical.
We screw the vent hinges to the tabletop along the axes, as shown in the figure. Side hinges – with a distance from the edge of the table top of 120 mm.
Screw the window hinges to the tabletop
The legs are a copy of the table with the difference that the upper drawer is oriented parallel to the floor. We fasten the legs with loops to the table frames (according to the picture), distributing the difference in height equally - these gaps are selected with “hooves”, as indicated above.
Attaching the legs of a book table
We turn the base over with the tabletop down and attach the “wings” of the table to the hinges simply in place.
Such a folded table can even be placed outside the door, and the cost compared to store prices is an order of magnitude lower.
Varieties of book tables
Go to your nearest furniture store. You see how many models of book tables exist - from small to large, from simple book tables to all kinds of computer ones. And that's not even all. Among them, the most common are:
- simple (primitive, without any frills or additions);
- with drawers (which is very convenient for zones, you can store cutlery and a cabinet table here);
- with shelves (additional storage space);
- on wheels (such models are convenient to move around the room).
Prices for such models vary based on the material of manufacture, the shape of the countertops (round, oval, square, rectangular) and the presence of additional functions. Let's look at each type in a little more detail.
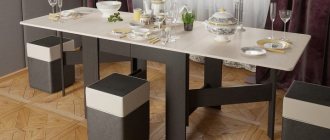
Table-book, color - hazelnut. Simple in design, complemented by two chairs with a soft seat.
Table-book, white. Its design includes several drawers. The chairs that come with it are stored in the niche of the table.
Book chair made of chipboard. Has a metal frame. Chairs from the set are stored in a niche.
A simple table-book. The table top is round and consists of two parts. Perfectly complemented by matching chairs.
Simple table-book
This is the most primitive one, having nothing superfluous: a common surface and one or two planes on the sides, by raising and lowering which you can vary the size of the tabletop at your discretion.
With drawers
This model already provides for the presence of drawers (from one to several) - a table-cabinet. This is convenient for storing cutlery and other useful items. For example, this type of table-book will fit well into a needlewoman’s room. Here she will be able to cut and sew, and keep everything she needs at hand - placing her accessories in separate drawers:
- threads;
- needles;
- beads;
- scissors;
- measuring tape and much more.
With shelves
A better solution for this cannot be found - a coffee table-book - on its shelves inside the table niche you can store magazines, books, and newspapers. And other equally necessary things (for example, the chairs that come with it).
On wheels
Such models have excellent mobility - they are easy to move not only inside the room itself, but throughout the house.
Detailing
Unfortunately, the edging on book tables does not look very good due to the joining in the most noticeable places. Therefore, we order sawing immediately with figure saws and factory pasting. In this case, for extra beauty, we recommend ordering 2 mm thick PVC edge gluing.
So:
- 900x400 – table top 900x700 – 2 pcs., table top wings 733x400 – 2 pcs., table sides 800x200 – 4 pcs., side drawer and box parts for storing stands.
Assembling the second book table
If you carefully read the first part, you will not have a question about how to make a book-table with your own hands, regardless of the modification. Refer to the attached picture and the drawings of the upper section.
There is, however, one important point.
When you begin to attach the bases for the metal legs to the tabletop, make sure that when closing (folding) the table they do not rest against the sides. In addition, the instructions for such legs show that after connecting the leg to the base, it must be secured with a fastening screw. In your case, this should not be done, because the legs should be freely removed and stored in the box.
Now a little about the difference between the two table models given. Without looking at the cost - constructively.
In the first case, the base of the table is narrow, and there is only one leg on each side, mobile and located at an angle. That is, the table turns out to be quite unstable, especially during a vigorous celebration of something. Although it is quite suitable for peaceful gatherings.
But, you shouldn’t find fault with the tables if you haven’t left the apartment. Enjoy your holidays at your new table!
The book table is made by hand using chipboard. The material is cut in specialized workshops. To make such furniture yourself, you will need a drill, iron, knife, tape measure, pencil, right angle and 5 and 8 mm wood drills.
Diagram of a folding book table.
DIY table-book
Advantages and disadvantages of a table-book
| Advantages: | Flaws: |
|
|
A book table is one of the most convenient table models. We will now tell you how to make it yourself.
How to make a table-book yourself
| Materials and tools: | Work process: |
|
|
Original do-it-yourself book-table:
Detailed video instructions on how to make a book table. Everything is very simple and accessible. The most important thing is that it is much cheaper than buying a ready-made similar table.
With such a table you can use the space to the fullest. Arrange as many people as needed at the moment. And when folded, the table takes up almost no space.
- We make a sofa with our own hands. (0) It turns out there is nothing complicated about making a sofa with your own hands. I provide two visual videos where you can see the whole process and the necessary […]
- How to make frameless furniture yourself (0) The main classification feature of frameless furniture is the absence of a rigid frame, which allows you to create a very comfortable, […]
- Functional coffee table made of drawers. (0) It happens to get quite decent fruit boxes. Now I know what else can be made from them. By adding a base on wheels and […]
- Homemade garden furniture (0) A house as a place for your comfortable living cannot do without furniture. It is relevant both in residential and country houses or cottages. […]
- DIY laptop table. (0) A very original design of a laptop table was proposed by the author. I like the techniques of working with plywood because of their simplicity. The laptop is located […]
It is often very difficult to furnish a small apartment or a small office space, for which you have to use comfortable multifunctional furniture in the interior: a sofa bed, a folding chair or a folding table, as shown in the photo of the book-table.
Such items save space and contribute to a more cozy and comfortable living environment.
Economical model
The book table consists of the following elements (mm):
- 2 sides (733x200); table tops (200x800); 2 drawers (727x120); 4 racks (727x70).
The end of the parts is finished with an edge. The edges of the elements are protected with sandpaper. The book table is made using the following materials (mm):
- confirmations 5x70; screws 4x16; butterfly hinges 30-35; plastic linings (thickness 3); furniture corners.
Scheme of fastening the legs of a table-book.
Before you make a book table with your own hands, prepare a drawing. The base of the furniture is assembled according to the diagram. To make a hole for confirmations, you will need an 8 mm drill.
The depth of the hole at the end is 60 mm. The axis of the drawer fasteners is located in the center of the sides. The last elements are pulled together with the drawers (a 50 mm distance from the floor is maintained).
The next step is to screw on the tabletop and window hinges. When fixing the side hinges, make an indent from the edge of the tabletop. The legs are attached to the drawers using loops.
The base of the table top is turned over. The wings are attached to hinges. An economical version of the book-table is ready for use.
To make an original book-table, you will need identical tools.
For accessories, you will need to buy confirmations, corners, hinges and stand legs with a base for fixing (diameter 100, height 730 mm). Experts recommend pre-cutting the chipboard at a furniture factory. To make furniture you will need a PVC edge 2 mm thick.
The components of an elegant book table are presented in the form of the following parts (mm):
- sides (733x400); 2 tabletop wings (900x400); 4 drawers (800x200).
This model is assembled according to a similar scheme (as in version 1).
When fixing the base for the legs to the tabletop, you need to pay attention so that when folding the furniture they do not rest against the sides. Metal supports are not secured with mounting screws. Otherwise, the legs will not move freely into the corresponding niche.
In the 1st version (unlike the 2nd model), a narrow table base is made. There is 1 mobile leg on each side, located at a certain angle. Therefore, an economical table-book is considered unstable furniture.