“Tili-bom, tili-bom, the cat’s house is on fire!” What does this line from a children's poem tell us? No, not that the cat violated fire safety rules. And not about the sluggishness of the firefighters, whom even the chickens with buckets were ahead of. An observant reader will draw the only correct conclusion from this line - any decent cat has its own living space. Naturally, each of us considers our pet to be decent. Therefore, it’s time to get worried and make a cat bed with your own hands.
Beds for a furry pet: main types
How to make a cat bed with your own hands? It all depends on the flight of your imagination. To encourage you to think creatively, we will tell you about the main types of beds for furry pets.
What is a bed for? The fact is that once the animal has settled in your house, sooner or later the cat will choose some corner for itself, which it will consider its rightful territory. But will her choice match your wishes? To provide for all disagreements and grievances, you will need a bed, which you place where you see fit, and accustom your cat to it.
The following types of beds are offered as a personal corner for a cat:
- a hanging hammock that stretches between the legs of a chair;
- in the cold season, a do-it-yourself battery-powered cat bed will be very handy;
- a bed in the form of a box;
- basket;
- various shapes of mattresses: round, heart-shaped, rectangular;
- mattress on a stand;
- houses made from large cardboard boxes with a pillow inside will also not leave your pets indifferent;
- hanging houses made of thick fabric.
Whatever option you choose, do not forget to take into account the features of the interior where the bed should fit. The material for the bed should be quite practical, because it needs to be cleaned or washed periodically. And now master classes on making some types of beds with your own hands.
Features and types
A bed (lounger) is a pet’s personal place to sleep and relax. Can be made in a variety of shapes and from a variety of materials. Usually the sleeping place is located where the animal is already accustomed to resting - near the radiator, scratching post or near the sofa. It is important that the chosen place is warm, dry, and cozy.
The modern market for cat products offers various options for beds:
- Baskets with cushion. Provide excellent air exchange. But practice shows that most animals begin to chew on the rods, so the product quickly loses its appearance.
- Plastic container with cushion. The advantage of the products is that they are hygienic and easy to clean.
- Hammock. Since cats naturally love to climb to high places, they feel great in hammocks and really love such “beds”. But keep in mind that this option is not suitable for kittens or old animals.
- Closed models. They are made in the form of a hut/hut. Also loved by pets, as they love the feeling of security. A similar lounger can be made even from a box.
- Soft beds with sides. Often made in the shape of donuts, soft materials are used for sewing.
- Tubes. They are made in the form of a cylinder, the inside of which is lined with soft, pleasant material. Can be installed at height.
However, many types of sun loungers can be sewn yourself using available materials.
Tip: when choosing fabric for a crib, pay attention to what the cat likes to sleep on - soft/hard, fluffy/smooth surface.
To make a sleeping place with your own hands, you can use the following types of fabrics or old things:
- jeans;
- sweaters;
- warm clothes with thick fabric (skirts, dresses, etc.);
- fur coats;
- unnecessary home textiles (blankets, bedspreads, rugs, etc.).
In any case, when choosing fabric, focus on the following criteria:
- Practical, easy to clean and wash. To avoid accumulation of wool and saw, the product will have to be washed and drained regularly.
- Strength. The pet will not mind sharpening its claws on the bed, so the fabric must withstand such loads.
- Comfort and convenience. In order for your pet to rest happily in a bed, it must correspond to his preferences. Keep track of what the cat usually sleeps on - the crib should have the same surface.
Also, when choosing a color/print of fabric, focus on the interior of the room, the shade of the walls or furniture, so that the crib does not stand out from the overall design of the room. However, this requirement is not mandatory.
DIY cat bed made from a sweater
Necessary materials:
- an old sweater, preferably without a high neck;
- old pillow;
- padding polyester, maybe from an old jacket;
- a piece of fabric measuring approximately 20x40 cm;
- threads, needles, scissors.
Process description:
- Sew up the neck of the sweater.
- We sew the sweater across the entire width from sleeve to sleeve.
- Sew the sleeves to the body.
- We stuff the sleeves and top of the sweater with padding polyester.
- We put a pillow inside the sweater and sew it up from the bottom.
- Sew the sleeves together. Distribute the padding polyester evenly along the entire length of the sleeves.
- We cover the junction of the sleeves with fabric.
- The bed-pillow is ready.
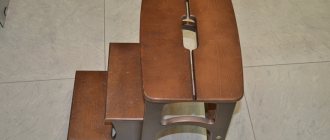
Making a house for a kitten
Necessary materials:
- Chipboard or plywood;
- fabric for upholstery;
- foam;
- wood screws.
Manufacturing process:
- We cut out blanks from chipboard:
- base - 34x34 cm;
- wall - 34x44 cm;
- sidewall - 30.5x44 cm (2);
- shelf - 30.5x30.5 cm;
- vertical slats - 5.5x44 cm (2);
- horizontal slats - 5.5x23 cm (2).
- On the top of the wall and sides we draw teeth 6.5 cm high. We mark the parts that need to be cut out. Using a jigsaw we cut out the teeth.
- As shown in the figure, we apply markings to one of the sidewalls to cut out the arched entrance. Using a jigsaw we cut out the arch.
- We drill recesses on the wall to hide the head of the self-tapping screw.
- We connect the wall with the sidewalls with screws, we get a U-shaped structure.
- Having turned the structure onto the teeth, we fasten the base with self-tapping screws.
- At a height of 30 cm from the base, we attach the shelf and screw the vertical and horizontal slats. The frame is ready.
- We cover the frame with upholstery fabric, not forgetting to glue the ends of the chipboard.
- We cut out mattresses from foam rubber to the size of the base and shelf and cover them with soft cloth.
- We place the finished mattresses on the upper and lower beds. The tower house is ready to move in.
Other cat house ideas
I suggest looking at some interesting cat house ideas for inspiration.
We use plywood and wood.
Cardboard house with a printed design.
Soft house with scratching post.
Soft house made of foam rubber.
Modern style cat bed.
I will be glad to see your comments. What type of cat house do you like best?
Source: mognotak.ru
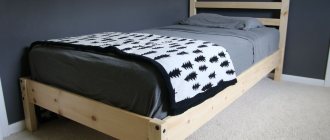
A bed out of a box - simple and convenient!
You can try making a simpler version of the bed from an ordinary cardboard box, for example, from a printer. And by covering it with a piece of old carpet, we will also get a scratching post, thereby keeping our furniture intact.
Necessary materials:
- boxes made of thick cardboard;
- carpet;
- construction water barrier material;
- wide tape.
Manufacturing process:
- On one of the blank sides of the box we cut out the entrance to the house.
- We secure all freely opening parts of the box with tape.
- We insulate the box from the inside with waterproofing material.
- We cover the outside of the box with carpet. On the front part, after the glue has dried in the carpet, we make an entrance hole by cutting it.
- We bend the free edges of the carpet inside the box and glue it.
- You can put a bedding or pillow in the finished box house for convenience.
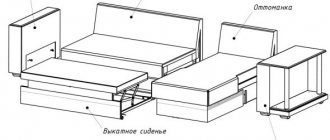
Instructions for making a home for two cats
Making a house for two pets is easy if you follow the instructions:
- Build two closed shelters in which furry fidgets could retire. As a rule, they are located at different levels.
- Cover hard surfaces with carpet and wrap posts with rope.
- Connect closed houses and auxiliary elements.
- Secure the gaming complex to a solid foundation.
Make structures for playing purposes (pillars, platforms, hammocks, etc.).
We recommend reading about how to catch a cat. From the article you will learn about how to make a trap for a stray and domestic cat, installing a trap and safety precautions, options for placing a caught cat.
And here is more information about how to find new owners for a cat.
Making a cat house yourself is not only a useful process, but also a creative one. A budget option could be cardboard shelters or a tent house. A play complex created on your own is the best fit for your beloved pet and will fit into the interior of the room. Fluffy fidgets will appreciate the efforts of the owner, and a house made independently will become an interior decoration, emphasizing the taste and style of its owner.
Foam rubber bed
Now let’s look at how to make a cat bed with your own hands using a pattern.
Necessary materials:
- foam rubber 20 mm thick;
- padding polyester;
- artificial fur;
- satin fabric;
- scotch.
Process description:
- We apply a drawing according to the pattern on the foam rubber.
- We cut out parts of the future bedroom for the cat.
- From the received parts we assemble the frame of the bed.
- At the bottom of the bed, using the dimensions from the pattern, we sew a pillow from faux fur and stuff it with synthetic padding. We also cut out parts from satin fabric according to the pattern and cover the frame, trimming the inside with faux fur.
- We attach the cover to the main body using tape. We hope your cat enjoys it.
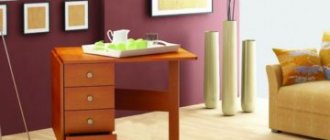
How to sew a comfortable cat bed with your own hands
Before you start making a bed with your own hands, you need to decide on the model, size, and also choose a suitable material that can be easily washed and cleaned, removing dead hairs and accumulated dust. There are the following options for “beds” for cats found in stores:
- Basket with pillow. It is safe and ventilated due to the many holes, but not very durable, since animals like to chew on rods.
- The lounger is made of plastic and a soft base. Durable, easy to clean if necessary, but the material has a specific odor and increased electrolysis.
- Donut shaped bed. It resembles a pillow with sides, is made of soft fabric with padding, and is comfortable for your pet. It has only one drawback - it is recommended to remove the filling when washing.
- Hammock. A simple design that is installed at a low height from the floor, most often between the legs of a chair. Not very suitable for small kittens and older pets.
- House. This is a closed version of the bed in which the cat can feel safe.
- A lounger that resembles a pipe. Warm version. Can be installed as a suspension to the battery.
- Combined varieties. These include, for example, a hammock with a canopy, a donut with a folding roof, etc.
It is more economical and reliable to make a cat bed yourself, focusing on the preferences of the pet, its dimensions and the interior of the room in which it is planned to install the structure . It is recommended to use non-toxic and natural materials that your pet will like. For a soft base, it is best to take the following types of fabrics:
- cotton;
- linen;
- knitted;
- fleece;
- corduroy;
- plush;
- material from old jeans, faux fur coats, jumpers, sweaters, etc.
Foam rubber, padding polyester, holofiber and similar synthetic fabrics that dry quickly when washed are suitable for padding. But you should not use natural bird down and feathers, because they can harbor parasites.
Rectangular lounger with ties
To make such a bed, you need to use a pattern, adjusting the size to the dimensions of your pet.
You will need the following materials and tools:
- thick fabric 105 x 90 cm;
- synthetic filler;
- sewing machine;
- needle;
- threads;
- ruler;
- chalk;
- scissors.
- Transfer the drawing onto paper and only then onto two pieces of fabric. Cut out the blanks along the contours. Additionally, cut out 8 ribbons from the remaining fabric.
- Put the resulting parts together. Mark the areas for sewing in the ties, place them with the long side inward, so that after turning the lounger out, the ends remain the desired length. Secure the ties with needles around the entire perimeter.
- Sew the workpiece from the inside out, leaving a small hole for stuffing at the bottom.
- Carefully turn the sewn fabric right side up.
- Leave gaps between the seams - 12 cm on each side. Sew seams according to markings. Place the padding polyester inside the fabric through the hole.
- Distribute the stuffing evenly. You should not put too much litter inside, otherwise it will be uncomfortable for the cat to sleep on it.
- Tie the ribbons tightly to form a “crib”. The lounger is ready.
The height of the sides can be adjusted. For furry animals, it is advisable to make them lower so that the pet does not feel hot. And for short-haired or hairless breeds that are not protected from the cold - tall and dense.
In the form of a “donut”
This bed will appeal to cats who like to sleep curled up in a ball.
For a donut-shaped bed you will need fabric with the following dimensions:
- for sides - 1.20 x 0.20 m;
- for the base - 0.40 x 0.60 m.
The sizes can be adjusted depending on the size of the animal. In addition to the material, for work you need to prepare foam rubber, thick cardboard, a pencil, a ruler, a needle, thread, and a pattern.
- From cardboard, cut out parts A (a long strip for the sides) and B (the bottom of the structure). In this case, the width of element A is equal to the height of the side of the sunbed, and the length corresponds to the diameter of the oval circumference.
- Transfer them to the fabric so that you get two elements A and B. Add 1-2 cm on each side for seam allowance.
- Sew the edges of the side together inside out, leaving a small hole for stuffing.
- Cut out a piece of similar shape and size from foam rubber, insert it into the side, and then sew up the hole.
- Fold the elements for the base together and stitch along the wrong side, leaving an unstitched area for stuffing.
- Cut out the foam rubber to fill part B using a cardboard blank. Insert it through the hole inside the base, distribute it evenly and mend the edges.
- Sew the bottom to the side.