Design options for plasterboard ceilings
There are different designs for plasterboard ceilings to suit different spaces. The initial stage of apartment renovation is drawing up a plan. Often, many spend hours on the Internet searching for interesting and original solutions before going to the store for building materials or picking up tools.
Even if a specific room design has been chosen, many amendments can be made during the renovation process, so it is often difficult to immediately imagine what the final version will be like. It is also not easy to choose the design of plasterboard ceilings for rooms.
Plasterboard ceilings are made in the following cases:
- If it has irregularities (displacement of reinforced concrete slabs relative to each other).
- If you need to create unique lighting in a room, which, for example, may consist of point light sources and a regular chandelier.
- To obtain a unique decorative ceiling consisting of two or more tiers (levels). In this case, the unique design of a multi-level plasterboard ceiling is welcome.
- In case of zonal division of a room or premises.
One of the simplest options for decorating the ceiling of a room is a single-level plasterboard ceiling. This is an excellent option for rooms with low ceilings. The design of a single-level plasterboard ceiling does not provide for an abundance of solutions, but if you use a ceiling plinth around its perimeter to hide the LED lamps, you can get a ceiling no worse than a unique multi-level one.
Lighting plays a big role in the design of plasterboard ceilings, since correctly installed lighting elements allow you to look at the interior differently, expressing its peculiarity and individuality. The options are very diverse and can include either single spotlights or a chandelier, or a combination of both.
An abundance of different design options for plasterboard ceilings is presented in the photo galleries below. Perhaps you will like one of them and become the basis for the ceiling in any room of the apartment. But first you need to know how they are installed.
Installation of plasterboard ceilings
For this, an aluminum profile is used, to which the sheets are attached with screws. The metal frame made of profiles is a lattice consisting of longitudinal and transverse elements. The connection of frame elements is made using special structures called “crabs” and screws. The end result should be a strong lattice that can support a fairly large mass.
The profile should be aligned using a level and a strong thread, which is pulled according to the markings. The gap between the slab ceiling and the suspended frame remains small, but can be increased depending on the lighting elements installed later.
Installation is carried out in the following order:
- marking the walls, tensioning the thread according to the level;
- preparation of frame elements and their installation;
- fastening sheets to the frame using screws;
- eliminating gaps at the joints of sheets;
- covering the ceiling with putty over its entire area;
- surface leveling;
- finishing using paints and varnishes.
To create a multi-level ceiling, it is necessary to mount a new frame on top of the already created level. New sheets of drywall will be attached to it. The process may seem complicated and time-consuming, but in fact even a non-professional builder can cope with this task.
Which one is stronger
It is unlikely that you will believe the unequivocal statement: yes, a vaulted ceiling is stronger - after all, such a summary must be somehow justified. Therefore, to compare, you need to consider both options.
Flat ceiling breaks
- First, let's look at a regular flat ceiling. As can be seen from the picture, this is a regular plane resting on the walls. The load from its mass is directed strictly downward. In other words, such a ceiling is constantly under stress from breaking.
- In order for such a ceiling to fulfill its functions, it must be sufficiently reinforced. The larger the area of the room, the larger the spans, and the more powerful the ceiling should be.
- This design works well in relatively small spaces. Otherwise, due to the large spans, it is necessary to install load-bearing structures.
- The larger the surface size, the more reinforcing material it requires. This makes the ceiling even heavier, plus additional load on the walls and foundation of the room.
The larger the area, the more supports it needs
Many people have probably seen powerful columns and ceiling beams in the buildings of large shopping centers and other similar objects. Their calculation and selection of structural materials is carried out so that the ceiling is resistant to fracture.
New materials that are quite strong and light at the same time make it possible to cope with this task, but even in these cases it is impossible to do without additional supports.
Features of vaulted ceilings
A vault is a structure in the form of a radius slab. It differs from a flat ceiling in that this spatial structure works not for bending, but for compression.
Thrust loads, depending on the design of the building, are carried by walls, frames, buttresses (protruding parts of the walls), or foundations - if it is, for example, a wine cellar.
- Such ceilings have been made by masons since time immemorial, and vaulted ceilings have always been considered the most durable. This is confirmed by the old buildings that have survived to this day, which have served for centuries and will last for the same amount of time. It’s not for nothing that almost all historical architecture is based on vaulted ceilings.
- There are at least six varieties of radius ceiling structures, as well as a double-curvature version developed in 1943. Being the most durable, it was used for covering industrial and large public buildings.
Note! For the construction of curved floors, all types of bricks can be used, including hollow bricks, natural and artificial stones (lightweight concrete blocks) of regular geometric shape. Vaulted surfaces allow you to cover a large area without installing columns.
This is what a buttress looks like
- The only condition is that the walls must be stronger and well reinforced along the axis. It is for this purpose that protruding parts (buttresses) are provided in buildings. Look at any ancient building, and you will find such elements everywhere, visible or disguised by other structures.
Architectural elements of buildings with vaulted ceilings
Have you ever wondered why ancient buildings, mainly churches and cathedrals, have the same architectural design as in the photo? Yes, because these buildings have vaulted surfaces!
The desire to cover as large an area as possible without the use of supporting columns in the center, as well as the lack of special materials and mechanisms for construction at that time, explain these architectural features.
Hallway 37 photos
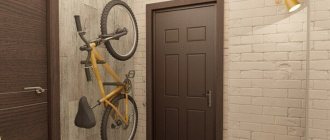
The hallway is the room that guests see first. It creates a first impression and it’s bad if it wasn’t the best. All design elements are important here: furniture, various accessories, beautiful floors, walls and, of course, the ceiling.
Depending on the dimensions and height of the room, you can choose a unique design for plasterboard ceilings in the hallway, consisting of one, two or more levels. Only the imagination of the ceiling designer is the limit for choosing a specific style. Well, and the financial capabilities of the owner of the premises.
Those who have a small hallway and a low ceiling should try to visually enlarge the room and make it comfortable and cozy for guests. A single-level ceiling is most suitable. Although it may seem quite simple, it gives good room for original solutions.
The design of single-level ceilings in the hallway can be improved with the use of ceiling plinths. If desired, you can make a suspended gypsum structure, but it will be more practical and easier to use a plinth.
This ceiling in the hallway has the following advantages:
- made from environmentally friendly materials;
- easy to clean thanks to the water-based coating;
- allows you to hide electrical wiring lines, of which there are usually a lot in hallways.
To visually enlarge the hallway and make it more illuminated, it is recommended to choose light-colored coatings. If a chandelier is to be installed, which can be very useful in the corridor, it is necessary to provide an embedded part in the metal frame of the ceiling. The order of arrangement of point light sources is any, depending on the design idea. The design of plasterboard ceilings in the hallway, photos of which can be seen above, can be different and can be chosen to suit the taste of the owner of the house or apartment.
Step-by-step instructions: marking ceiling installation
In order to do this, you must first make the correct markings of the walls and ceiling for installing the frame. First, walls are marked for attaching the guide profile of the first-level frame (closest to the surface of the main ceiling). First of all, it should be taken into account that the suspended structure must be parallel to the floor, therefore, it is necessary to take into account the actual deviation of the height of the walls at different points in the room. The first mark is made in the corner where the wall has the smallest height. The mark is placed at a distance of 7-8 cm from the ceiling. Then such a mark is placed in another corner of the wall, taking into account its actual height. A straight line is drawn between the marks using a pigment-painted construction cord. The opposite wall is marked in the same way, and then the lines are connected by drawing lines on adjacent walls. This line indicates the lower limit of the guide profile when it is mounted on the wall. The walls for the second ceiling level are marked in the same way.
Next, the shape and location of the second level of the suspended ceiling are marked on the ceiling. In this case, straight lines are marked with a colored cord. To mark a circle, mark its center; the end of the cord is fixed in it, and with its help a circle of the required radius is drawn. It should be remembered that the marking indicates the location of the suspension, therefore, the line (circle) should be shifted relative to the actual size of the second ceiling level by half the width of the suspension strip deep into this level.
Marking the installation of ceiling profiles is done by drawing parallel lines on the ceiling in the longitudinal and transverse directions. The first line is drawn at a distance of 25-30 cm from the wall, and the rest in increments of 50-60 cm.
It is necessary to make marks along the lines on the ceiling for drilling holes for hangers. The first mark is made at a distance of 10-15 cm from the wall, then in increments of 25-30 cm. On the second-level marking circles, the distance between the marks is 15-20 cm.
Return to contents
Bedroom 52 photos
A person spends most of the time he spends in the bedroom sleeping, so the design of the ceiling in this room is of no small importance. When falling asleep and waking up, the first thing a person often sees is the ceiling. The use of plasterboard sheets to create a ceiling in the bedroom is the most optimal solution.
Since the ceiling in such rooms is usually high, it is possible to implement a plasterboard ceiling design in a multi-level bedroom. The arrangement technology has long been developed and there are many ready-made solutions; choosing materials of the required shape will not be difficult. All that remains is to install them.
You should choose the right color for the coating, which can act both calmingly, cause joy, relax, and promote aggression (in the case of red or its shades). Therefore, the correct choice of color is very important for the design of any elements of the bedroom interior and especially its ceiling.
You can see what a plasterboard ceiling in a bedroom looks like in the photo in the gallery above. In many cases, the design of ceilings is unique and very unusual, but their installation is somewhat more complicated.
Multi-level structures
Two-level plasterboard walls are especially famous for their bright and unusual designs. These multi-level structures provide much more scope for implementing bold design solutions.
What are multi-level plasterboard structures? An ordinary wall, which is simply covered with plasterboard sheets, is covered with a second layer of plasterboard sheets. This can be done not only to increase the sound insulation and thermal insulation of the wall. Creating a second level also allows you to create structures that would not be possible with one layer of plasterboard sheets on the wall. With the help of this technology, special beautiful and quite useful niches are created. Something other than drywall is often built into such structures. For example, many can install a plasma TV in a two-level plasterboard niche, hiding its edges in the wall and leaving only the screen visible. The same thing is done with aquariums, but in this case it is important not to forget to leave the opportunity to feed the fish. This option is very popular nowadays and such a solution for the interior can be found quite often.
Many people like to perform similar manipulations with interior plasterboard partitions, which are also two-level structures, although this is not done to decorate the wall, but to enhance the reliability of the partition, create sound insulation and thermal insulation of the room. But, despite this, quite often an interior plasterboard partition simply turns into a beautiful decorative element. People with a developed imagination come up with various types of partitions that impress with their originality.
By covering your apartment with plasterboard sheets, you get the opportunity to create any interior you can imagine. This is perhaps one of the main advantages of this material. Therefore, you have the opportunity to independently develop your own unique and inimitable design. If this option does not suit you, you can use the provided options captured in the photographs, make your own adjustments and implement the style you like in your apartment.
The main thing to remember when creating a home interior is that you cannot combine elements of different styles in one design. You cannot use different designs for two walls of the same room or one for walls and another for ceilings. This immediately pushes the eye away from the room and spoils the entire impression of the style and interior. It is better to stick to a clear style and follow it throughout the entire renovation.
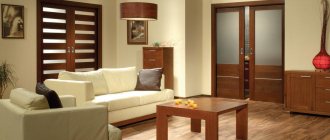
Living room 51 photos
A typical, boring living room ceiling that may be uneven due to misaligned tiles can be corrected by using plasterboard. The design of plasterboard ceilings in the living room can be of various types:
- use of a single-level design;
- creating a multi-level ceiling;
- combination with tension.
Using the latter option will give a unique look to the living room and surprise visitors with a bright and original design. The main thing here is not to overdo it, since the living room is intended for receiving guests and relaxing. The flashy colors of the ceiling design in the hall can spoil the impression of the entire room. To see options for a successful design of plasterboard ceilings in the living room, take a look at the photo above.
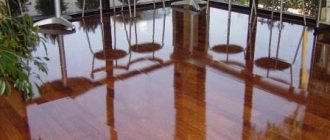
Bathroom 24 photos
The main reason why many will refuse the option of a plasterboard ceiling in the bathroom is the likelihood of flooding by neighbors. However, since this material is often used to level walls in such rooms, the risk of repair is basically the same.
The unique design of plasterboard ceilings in the bathroom will visually enlarge the space and give a cozy look to the room. It will allow you to hide elements of pipes and electrical wiring and it is very convenient to install lamps in it.
Light warm colors, greenish and yellow shades are most suitable for the bathroom. When combining white and black, you can set a strict style for the room. The plasterboard ceiling in the bathroom, the photo of which can be seen above, is single-level or multi-level. For the bathroom, the first option using a ceiling plinth is preferable.
The most popular design solutions and installation
The most common design option is plasterboard perimeter.
The most common type of design of combined ceilings is considered to be the one when a gypsum plasterboard box is installed around the perimeter of the room, and the remaining space is filled with a suspended ceiling. Lighting devices are often built into the plasterboard frame. An oval or round design filled with canvas is also popular. The combined version of a “circle within a circle” allows you to experiment with shades and colors. The last, most complex version of ceilings, when a complex structure in the form of various waves, streams and snails is installed from gypsum plasterboard, is more suitable for spacious rooms.
Before starting work, you need to draw up a design project in order to have an idea of the final option.
As for the development of the design and installation of a stretch ceiling, the first thing the specialist suggests is to make a design project on paper, makes a sketch and a drawing. Three-dimensional graphics can be used. At this stage, the customer can share his ideas. After the sketch is ready, all measurements are accurately transferred to the ceiling and walls. Then the gypsum plasterboard structure is installed to the ceiling; plasterboard is used for cladding. After this, the profile for the tension fabric is fixed, which is stretched onto the ceiling last. Today, experts offer several types of installation of combined ceilings, but most often the glazing bead and harpoon methods are used. If the first is more suitable for simple versions of tension fabrics, where the design has few angles and levels, then the second option is used if the design is complex.
Children's room 26 photos
The room in which a child sleeps, studies and plays must be safe. Drywall will not harm the health of children and adults.
The design of the plasterboard ceiling of a children's room plays a special role in dividing the room into study and relaxation areas. It should have good lighting, so a multi-level ceiling with a large number of lamps will be very useful. It is not recommended to install a chandelier in the center of the room, since it can be broken during games.
Most often, recently, the ceiling is made in the form of a starry sky. It looks attractive and has an educational function for the child. There are other options for fancy shapes that will interest your children. A variety of ceiling design options in the nursery can be seen on our website in the photo gallery.
Kitchen 45 photos
As in many other rooms, plasterboard ceilings here make it possible to hide all utilities and unevenness of the main ceiling slabs. The special design of the plasterboard ceiling in the kitchen can emphasize the division of this room into zones.
For a kitchen with a small area, a single-level ceiling is preferable to visually increase the space. This does not mean that it will look simple and inconspicuous. You can paint it with unique patterns, stick wallpaper that contains the same pattern as on the walls, etc. A multi-level design is more suitable for kitchens with a high standard ceiling.
For the kitchen, ceiling options with bizarrely shaped second-tier boxes are often chosen. Geometrically correct shapes will help emphasize the strict style of the room. Sometimes the zoning of the kitchen is emphasized with the help of an arrangement of boxes that corresponds to the arrangement of furniture on the floor. Any design is limited by budget and imagination.
Step by step description
Step 1: Mark the ceiling for the first level
First, we build a regular suspended ceiling, the installation of which begins with markings:
| Illustrations | Description of work |
We designate the level:
| |
| Drawing a line for the location of supporting profiles. Step back 100 mm from the wall and mark parallel lines on the ceiling in increments of 600 mm. | |
| Marking the location of hangers. Make marks on the resulting lines in increments of 50 cm. Place the marks perpendicular to the lines so that all hangers are parallel to each other. |
Step 2: Assembling the frame
Now you can begin installing the first level frame. The work is carried out like this:
| Illustrations | Description of work |
| Preparation of materials. To assemble the frame you will need:
| |
Installation of guides:
| |
| Installation of hangers. Fastening is also carried out using dowel nails. During the installation process, be sure to align the straight hangers according to the markings on the ceiling.
| |
Installation of PP profile:
The result should be a frame with a horizontal and perfectly flat surface. | |
| Installation of crossbars. Install jumpers between the supporting profiles from the same PP profile. Use tees to secure them. The spacing of the jumpers should be 50 cm. |
Step 3: Cover the frame with plasterboard
The process of covering the frame of the first level with plasterboard sheets (plasterboard sheets) is extremely simple and straightforward - the sheets are applied to the frame and fixed with self-tapping screws. However, this procedure requires compliance with a number of rules:
- Observe the pitch of the screws.
The optimal distance between them is 25 mm; - Maintain the optimal distance from the edge.
The self-tapping screw should not be closer than 10 mm from the edge, and you should not increase the distance either;
- Screw in the screws correctly.
The fasteners should be perpendicular to the drywall. The head of the screws must be recessed a little so that they do not interfere with the putty. At the same time, make sure that the cap does not break through the layer of cardboard, otherwise the screw will not fix the sheet;
- Position the sheets correctly on the frame.
The layout of the drywall sheets should be such that there are no cross-shaped joints. In addition, make sure that all joints are on the profile; - Do not attach sheets to the guide profile.
Fixing sheets to the PNP profile leads to the appearance of cracks in the ceiling.
For ceiling cladding, use sheets with a thickness of 8.0-9.5 mm.
Another important point is cutting plasterboard sheets, which you will have to deal with during their installation. This procedure is carried out as follows:
| Illustrations | Description of work |
| Cutting the cardboard :
| |
| We break the sheet. The plaster will break along the cut line; | |
| Cutting the cardboard from the back side :
|
To cut curved parts from plasterboard, you can use a jigsaw. After covering the frame, you need to make holes for lighting fixtures. To do this, use an electric drill with a crown of a suitable diameter.
Step 4: Apply markings for the second level
Installation of the second level also begins with markings. The work is carried out as follows:
| Illustrations | Description of work |
Determining the level:
| |
| We outline the contours of the second level. Typically, contours are curved lines. To carefully apply them to the ceiling, you can use templates. |
Step 5: Assembling the frame
Now you can begin assembling the frame. Instructions for doing this work look like this:
| Illustrations | Description of work performed |
| Preparation of materials. Before making the second level frame , prepare the same profiles as for the first frame. The only thing is that crabs and suspensions are, as a rule, not used. | |
| Manufacturing of upper curved guides. To obtain a curved guide profile, follow these steps:
| |
| Installation of the guide profile. To secure the profile to the ceiling, use special dowels for plasterboard. In areas where PP profiles pass, use self-tapping screws. | |
| Attaching the second tier guide to the wall. Align the profile with the markings and attach it to the wall with self-tapping screws. | |
We make pendants:
You need to make enough such segments so that you can secure them in the upper “snake” in increments of 25-30 cm. | |
| Installation of hangers. Insert the resulting CD-cuts into the guide profile and secure with self-tapping screws. | |
Installation of the lower guides:
| |
Installation of supporting profiles:
|
The height of the two-level ceiling is selected depending on the overall height of the room. You should not make too large a difference between levels if the room is low.
Step 6: Sheathing the second tier
Now you need to install the drywall yourself, following the rules outlined above:
| Illustrations | Description of work |
| Preparation of end strips. Cut strips of plasterboard 6 mm thick. The width of the stripes should correspond to the height of the second tier. | |
| Attaching gypsum board strips to the ends. Cover the ends of the frame, securing the prepared strips with self-tapping screws. If the bend radius is too small, you need to make cuts in the cardboard on the back side of the strips. | |
Bottom frame trim:
|
At this point, the installation of the two-level ceiling is completed.
Step 7: Do the rough finishing
Now all that remains is to finish the surface of the plasterboard ceiling. The work is carried out like this:
| Illustrations | Description of work |
| Preparing tools. To finish a plasterboard ceiling you will need:
| |
Padding:
| |
| Unstitching. In areas where there is no factory rounding of edges, cut chamfers approximately 5 mm wide. | |
Seam reinforcement:
Reinforce all seams in this way. | |
| Reinforcement of internal corners. The angle between the first and second levels must be reinforced as follows:
| |
Seam preparation:
Prepare the joint between the first and second tiers in the same way. | |
| Installation of arched corners. Glue arched corners to all external curved corners using putty. | |
| Puttying. Now you can begin to putty the two-level ceiling with your own hands:
| |
| Surface grinding. Grind the ceiling with a mesh with P80-P120 abrasive to get rid of uneven surfaces. | |
| Padding. Treat the surface with a primer according to the scheme described above. | |
| Finishing putty. Now the two-tier ceiling needs to be covered with finishing putty. Apply the composition in a smooth, even layer 1-2 mm thick. | |
| Final sanding. Smooth out any minor imperfections with the P150 mesh using a circular motion. |
For finishing putty, use polymer-based putty (acrylic or latex). Its price is slightly higher than gypsum, but it fits much better, which allows you to achieve a better result.
That's all the information on how to make a two-level ceiling from gypsum plasterboard. Upon completion of this work, all you have to do is paint it or cover it with other finishing materials.