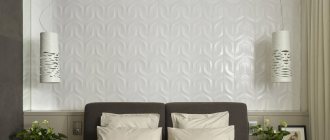
Today, textured wall paint is very popular among finishing materials. With its help, you can achieve a relief surface, create a unique texture, and even save on preparatory work. The consistency of the paint is very dense and viscous; when applied, the thickness of the coating is much greater than that of conventional paint. Consequently, the time for preparatory work is reduced, since there is no need to perfectly level the surface of the walls. If desired, this paint can be used for the ceiling.
Main advantages of the material
The texture dye contains a binder acrylic polymer. Thanks to this, the material has the following qualities:
- used for both external and internal work;
- with increased moisture resistance, resistant to temperature fluctuations and precipitation;
- prevents the appearance of mold;
- durable, resistant to chemical influences;
- decorative relief is not modified;
- easy to care for, environmentally friendly;
- used for texturing walls with uneven surfaces;
- By adding color pigment it is possible to achieve any shade.
On video: how to apply the Fur coat effect.
Types of paint and popular brands
Texture paint for walls is divided into categories that differ from each other in composition; with its help, a relief texture is achieved:
- finishing composition for facade surfaces;
- textured painting material for interior decoration;
- universal paint (for interior and exterior use);
- fine grain dye;
- texture paint with coarse composition.
When choosing a material for decorative painting of walls (or for the ceiling), you should not give preference to cheap compositions. First, consult with professional builders who have been performing finishing work for many years.
- "TEX Universal" - paint intended for interior and exterior decoration. Can be used to cover walls in the bathroom and kitchen, as it has increased moisture resistance. The durable composition of the paint allows it to be applied in one layer to cement or concrete surfaces.
- “Optimist” is an acrylic-based material, also intended for exterior and interior use. Its spectacular texture will help hide minor wall defects.
On video: a tutorial on applying decorative materials Optimist.
What you should pay special attention to
It would seem that everything is as simple as shelling pears. To beautifully paint the walls with your own hands, just choose a couple of colors and patterns you like and combine them with each other.
However, there are points that should be taken into account:
- the specifics of the layout: what looks great in one apartment will be unacceptable for another;
- lighting: if there is a lack of it, it is better not to use dark colors; It is better to “lighten” the most shaded corners with pastel-colored paints;
- the purpose of the room: everything seems to be clear here, for example, bright colors are quite acceptable in a children’s room; in other rooms they are used more carefully, to a minimum;
- When choosing shades, be sure to take into account the colors and textures that predominate in the interior: furniture, curtains, carpets, etc.
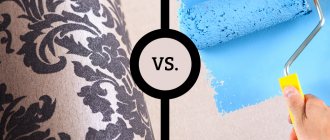
In recent years, designers are increasingly abandoning “heavy” interiors and giving preference to harmless and breathable water-based paint. A huge selection of color shades allows you to create the most unusual collages and entire paintings on the walls.
But you can decorate the walls in an original way using water emulsion with your own hands. It is enough to arm yourself with a brush, a roll of construction tape or a special stencil roller.
Tools and materials for work
To paint walls with texture paint you will need to purchase the following tools and materials:
- acrylic putty;
- primer;
- medium size spatula;
- cuvette (tray) for paint;
- rags;
- rollers (regular and structural);
- scraper;
- foam sponge;
- texture paint;
- workwear.
If you don't have a structure roller, you can easily make one yourself. For this you will need a rough rag. Attach the rag to the roller with thread and get to work.
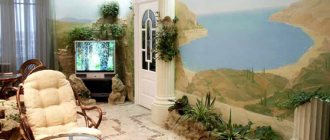
Classic wall design in one color
Wall painting technology
To paint walls and ceilings you will need the following tools:
- Telescopic handle for roller.
- Roller or spray gun.
- Masking tape.
- Small cyst.
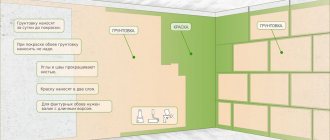
After priming and cleaning, begin painting. The ceiling must be smooth, since paint cannot hide the nuances. If the surface is not smooth, it is not recommended to use glossy paints; it is better to use matte or semi-matte. After each layer the surface dries. In order not to stain the surface, windows, baseboards, you need to carefully seal the joints with masking tape. The corners are painted with a brush, and the main plane with a roller.
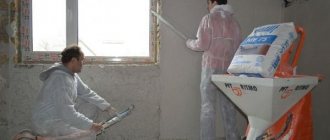
Preparing walls for painting
The walls must first be cleaned of dirt. This can be done with water, detergent and a cloth. Use a spatula or scraper to remove any remaining old coating. If there are cracks or gouges on the surface, fill them with acrylic putty. Once completely dry, coat the entire wall with primer. Leave to dry for approximately 12 hours.
Preparation before painting is required. Texture material can hide only minor wall imperfections. And the primer will help the paint adhere more firmly to the surface.
Paint is usually sold in powder or liquid form. First, read the instructions, dilute the powder with water using a construction mixer, and mix the finished paint thoroughly. Now you can add color pigment or mix several paints to achieve the desired shade. The pigment should be added while mixing, so the consistency of the paint will be as uniform as possible.
Do a test job before starting painting. Make a few test strokes with a roller on a small piece of cardboard.
Correct painting of walls
Correct painting has several rules, tips, and recommendations. For example, it is recommended to paint large areas of walls with a roller, but small areas will be better and more convenient to paint with a paint brush. It is recommended to first paint the stripes from the top under the ceiling and at the very bottom above the floor; the thickness of such a strip should be about 10 centimeters. The remaining area is then painted with a roller. It is very convenient to use a special paint cuvette when working with a roller; they are often sold in sets along with rollers: 1 cuvette and 1 paint roller suitable for the size of the cuvette. It is cheaper, however, in most cases it will be to buy a roller separately and a cuvette separately. When painting surfaces, pour a little paint into the cuvette in its special part for paint, dip the roller into the paint, then roll the roller along the ribbed surface of this plastic roller, thus removing excess paint from the tool.
Movements with the roller should be made first from top to bottom, and then vice versa - from bottom to top. This painting method will help the material not accumulate at the bottom of the wall. It is recommended to overlap the previous stroke with the next one by about 5 centimeters. Usually walls are painted in 1-2 layers. The surface can be painted with a second layer only after the first layer has completely dried. It is convenient to paint hard-to-reach places with a narrow brush.
With these simple tips, you can paint the walls in your apartment or private house yourself, without any extra hassle or expense.
Let your renovation be a pleasant and quick process for you!
Options for the resulting effects
In the process of applying texture paint, you should consider: whether the pigment is selected correctly, whether it is compatible with the dye, and also choose the desired technique for applying the material. Thanks to these components, you can get a unique relief. Conventionally, finishing can be divided into several types:
- Marseille wax. Externally, the surface resembles a combination of tree bark and natural stone. After the texture paint has completely dried, it is necessary to cover the surface with wax. This will give the walls more depth and a luxurious effect.
- Relief. If you want to create a relief transition of small dots and thin strokes on the wall, sawdust and quartz chips will help you with this. Materials should be added to the paint and mixed thoroughly. It is not difficult to adjust the degree of relief. If a minimum surface grain size is required, sand can be added instead of quartz chips. Here everything will depend on your imagination.
- Atacama. To create a three-dimensional wall surface, it is necessary to add fine metal shavings and sand to the acrylic dye in equal proportions. This composition will create an optical illusion. From different corners of the room it will seem to you that the wall has a reflective velvety base filled with volume.
- Mizuri. The most popular type of surface coating. It's quite easy to achieve this effect. Water and modified starch are added to the paint. After drying, the wall becomes glossy. Sometimes a pigment filler is added to the composition, which allows you to achieve a pearly shine. The paint is applied to the wall in chaotic patterns, resulting in the effect of a wet lye.
Before painting, be sure to wear protective clothing and safety glasses. This will protect your eyes and body from paint.
Choosing colors and painting walls in an apartment: important points
When painting walls in an apartment, you must adhere to the designers’ recommendations for combining and carrying out finishing work. This will allow you to achieve high quality and excellent results.
- In one room with any design, there can be no more than three primary colors; usually they try to use only two. In addition to them, shades from the same color range are used. As an example, it is proposed to combine neutrals: white or gray with cold (blue, cyan) or warm colors (all shades of red, orange, yellow, brown).
- A gradient fill, or a smooth transition of different shades of the same color, can significantly improve the effect of painting walls.
- To mark the boundaries between colors, use rich dark paint or textured details (polyurethane moldings).
- When adding color to white paint, you should take into account the area of the walls. If suddenly there is not enough paint, the next time you apply the composition, you may not get the color. It is better to immediately dilute the materials in a slightly larger volume.
From paint to surface painting
As soon as the conversation turns to coloring, the question immediately arises: to what extent will such a dye meet aesthetic needs? Let's just say that fire-retardant metal paints Polistil look great on metal structures, so water-based emulsion transforms any interior in any room.
Why should I use a tinted undercoat?
Where scratch and wash resistance is a high priority, enamel paints are preferred. Resistance properties generally improve with increasing gloss levels. Some shades, especially yellows and reds, do not have an opacity to provide good coverage, regardless of product brand or tone. The gray undercoat underneath helps these flowers have an even finish and provide a solid color.
Why You Shouldn't Use In-Grade Painting Just for Appearance
The exterior of my house was painted many years ago in enamel. A critical first step in preparing for this situation is to ensure the stability of the existing paint by performing a cross-adhesion test.
Color
Let's start talking about paint with color variety. The fact is that the initial color of the dye is always white, so you must either dilute the substance yourself to obtain the desired shade or order it from the seller.
This is done by using a sharp blade to cut a deep, close "scratch and cross" combination into the existing paintwork. Press a piece of masking tape onto the cut area and press firmly. If any paint comes off when the tape is masked quickly, the old paint is unstable and therefore must be completely removed. If the paint has not come off at all with masking tape, and as long as the surface is washed with warm soapy water and sanded thoroughly, an outer layer of acrylic designed to be applied to a surface without undercoat can be applied.
Advice! Albeit trivial, but still, it is best to leave the tinting process to the store where the dye is purchased. The price will remain the same, color selection is done free of charge, but using a computer, a shade will be selected that will fit perfectly into the interior of the room.
After the color has been selected and the color scheme has been obtained, the water emulsion can be diluted and mixed at home, and the process itself proceeds as follows:
Two coats of this acrylic are always required for protection. I have a metal balustrade in my house that has rust stains and some peeling paint. Answer: Remove any loose or flaking paint with a wire brush and sandpaper. Remove any remaining existing paint. With a rust converter, cover the rusty areas and allow to dry. Follow up the rust converter primed areas with a metal primer and finish with two coats of enamel or epoxy.
Is it better to use oil or water based paint for the exterior?
Use rust on rust. Answer: It depends on what is drawn. For most surfaces, acrylic will last longer. Acrylics are softer, more flexible and more resistant to chalking. This is because acrylics have much higher elasticity, so that when a surface, such as wood, expands and contracts with the weather, the paint moves without cracking. Ground primers, etc. necessary for any ferrous metal such as steel.
Is it possible to paint a new color with exterior acrylic "without primer"
It is then wise to use an etching primer before applying two coats of either acrylic or enamel.
- The color is diluted with a small amount of paint in a container of no more than 100 ml.
- The resulting composition is gradually poured into a bucket with the bulk of the dye.
- In a bucket, the color and water emulsion are mixed thoroughly with a mixer until a homogeneous mass is obtained.
What is the best product to use, acrylic or oil paint?
If, however, this is considered necessary, then the most effective method is probably the following. Apply an acrylic undercoat and let dry to a topcoat of either acrylic or enamel. This is not a guarantee of this procedure and may be considered inappropriate in some cases, however it is offered as advice in response to a question only. Answer: Acrylic paints have demonstrated outstanding durability in the most rugged environments, including direct sunlight, moisture from rain and snow, and the seashore.
Preparation
Since it is correct to paint walls with water-based paint on a clean surface, the walls will need to be prepared.
There are always two options here:
- The walls have just been erected, and the application will be on a plastered and putty surface.
- Painting is supposed to be done on an old wall that has one or more layers of paint.
Important! In the first case, before starting work, you just need to make sure that the surface is completely flat, treat it with a primer yourself and start painting.
In the second case, it will be necessary to remove all layers to the base and there are three methods for this:
- Mechanical.
- Thermal.
- Chemical.
Let's talk about each one separately, and start with the thermal one:
- You can often find advice in which “experts” suggest heating the coating layer before removing water-based paint from the walls. This method has the right to life, but heat treatment is not entirely suitable for this type of dye. There will be a lot of unpleasant smell, and the paint itself will be difficult to remove. Let's include the thermal method as a possible, but not priority, method for dismantling the old coating layer.
- The second way to remove water-based paint from walls is to use a chemical action on the surface. For this you can use either special solvents or simple ammonia. The recipe with alcohol involves mixing one part ammonia with two parts chalk and applying it to the painted surface. After two hours, the water emulsion can be easily scraped off, because the entire surface has softened. This method also has a huge disadvantage - the smell.
- And we left the easiest way for last. It requires the simplest water, since it is easiest to wash off water-based paint from walls this way! With a roller or brush, sponge, the old coating is moistened and after a while.
Here, during the preparation process, it is important to know what the material consumption will be. On average, approximately 150 ml is consumed per square meter of smooth surface. So the application instructions allow you to calculate how much material is required.
Paint selection
And here is the most interesting moment, because before whitewashing the walls with water-based paint, you need to choose the type of dye, and it is presented:
- Acrylic water emulsion. This type is excellent for residential premises, demonstrating complete environmental safety. You can paint concrete and...
- Acrylic-latex. The difference from simple acrylic is that latex allows the coating to be more elastic. The surface is durable and much better resistant to moisture. This is the ideal answer to the question of which water-based paint is best for walls in the bathroom or kitchen, where there is always high humidity.
- Silicate water-dispersion paint. This type can be used not only for internal, but also for external work, and can be used to paint almost any surface. True, for communications, for example, electrically conductive paint Zinga is more suitable, but as for the surface of the walls, the silicate option has no competition!
- Silicone water-based paint. This type can be safely declared a champion, since all the positive aspects of all types of paintwork materials are collected here. However, this type is more suitable due to its physical and operational characteristics.
Accordingly, before choosing water-based paint for walls, it is enough to simply decide for which room you plan to paint it, and what is required from the coating.
Coloring
The question of how to properly paint walls with water-based paint begins from the moment you cover baseboards or baguettes, ceiling joints, and door jambs with masking tape.
Next you can start painting. The paint is mixed again and brought to the consistency of milk. The density of this state of the material practically eliminates drips on the walls and visual joints of strips from application.
The instructions assume that the work will be carried out not from a bucket, but from a painting tray into which a small amount of dye is poured. It is convenient to dip a roller into it. The corners are painted with a brush, and the rest of the surface with a roller.
Before applying paint to the wall, the roller is dipped into the material and passed over the paper several times to ensure it is completely saturated.
Painting is always carried out from top to bottom, which eliminates the formation of drips on the wall, in vertical stripes the width of a roller so that the next strip slightly overlaps the previous one.