Plastering walls with your own hands using gypsum plaster is an effective method of leveling the surface for subsequent wallpapering. Such work is considered one of the dirtiest and most harmful. At the same time, they require highly qualified workers and the use of expensive equipment, the technical characteristics of which significantly exceed those of household appliances. Despite this, high-quality gypsum plaster of walls with your own hands is possible. To implement it, you only need desire and a certain set of materials and tools.
Why plaster the garage facade?
Plastering walls is a very labor-intensive and dirty process, during which quite a lot of building material is spent. Therefore, before starting work, you need to understand exactly what problems need to be solved, and whether it is worth taking on this work.
With plaster you can:
- level, compact and insulate the walls from the outside;
- seal unattractive seams;
- create a layer of wall that protects from precipitation, wind, sun, etc.;
- decorative and aesthetic effect.
If the garage is old, its walls are covered with cracks, but there is no money to build a new one, properly executed plaster will help increase strength, extend the service life and hide the shortcomings of the structure.
What plaster is suitable for the garage facade: cheap and high quality
If the main purpose of plastering the garage facade is aesthetics, the walls are smooth, there are no cracks, you can use almost any facade plaster, since they are all recommended for application in a layer up to 2 mm thick. If there is significant deformation of the wall and other obvious deficiencies, a thicker layer of protective coating is required. In such cases, you should opt for M150 sand concrete. This is a ready-made dry mixture, which includes fine-grained sand, Portland cement, lime and additives responsible for shrinkage and hardening of the screed.
Using sand concrete, you can do without installing a mesh if the planned layer of plaster does not exceed 30 cm. You can also use other plasters, cement, gypsum or lime, to decorate the outside of the garage. Let's tell you a little about the features of each of them.
Cement
From the name of the material it is clear that the main element is cement. This is a universal material that is perfect for both starting and finishing work.
The main advantages of the material include:
- environmental friendliness. The mixture consists of ingredients of natural origin, which minimizes the possibility of mold;
- protective function. The surface with cement plaster becomes much harder and stronger, the structure becomes more stable, in addition, the layer of plaster prevents the spread of fire in the event of a fire;
- noise and heat insulation;
- excellent adhesion to various types of wall surfaces;
- durability. If all the rules for using the material are followed during repairs, a wall with cement plaster can last up to 50 seasons without repair!
The disadvantages of cement plaster include:
- fragility of the finished mixture. Such a ready-made mixture must be used within 1-2 hours, otherwise the solution will begin to harden and become unsuitable for use;
- cement mixtures are not suitable for work in heat or cold; they are used only at air temperatures from 5 to 30 degrees;
- In order for such a coating to last as long as possible, an additional finishing layer of putty or a decorative layer must be applied on top of it;
- the cost of such material is quite high.
Plaster
The advantages of gypsum plaster are:
- environmental friendliness;
- low material weight. The layer of plaster will be light and will not create additional load on the building;
- After the plaster has dried, the surface will be perfectly smooth and without cracks;
- fungus does not grow on the surface of gypsum plaster;
- the gypsum surface of the wall helps maintain a normal microclimate in the room;
- heat and sound insulation;
- Gypsum plaster is consumed much more economically than cement plaster. It can be applied in a fairly thick layer. You also don't have to use a mesh.
- this type of plaster is suitable for rooms with high humidity;
The main disadvantage of gypsum plaster is its high price.
Limestone
Lime plaster is not used often, but it has a number of serious advantages. The appearance of walls plastered with this material is excellent, as is their strength. But the layer of material that can be applied can reach 100 mm.
Advantages of the material:
- the finished mixture of lime plaster after application hardens and acquires the strength of natural stone;
- lime plaster fits perfectly on walls made of various materials, including adobe, adobe and even wood;
- due to the plasticity and softness of the material, it is very easy to level and rub;
- this is the cheapest plaster;
- The prepared solution can be stored for quite a long time.
Other modern materials
An excellent material for exterior wall finishing can be called putty. Its disadvantage is its rather high cost. Therefore, it is usually used only as a top layer on already smooth walls. And the elimination of surface imperfections and insulation are achieved through the use of additional materials, such as foam plastic, etc.
Preparation for the procedure
A high-quality result is only possible on a properly prepared surface and with an optimally selected plaster composition. It is also important to ensure the accuracy of the placement of beacons, which allows you to control the evenness of the surface.
In order for gypsum plaster to adhere to the surface, the strength of the wall must be sufficient to hold the mixture. Inspect the wall and make sure there are no crumbling or peeling areas. Some workers prefer to give two layers of plaster, but this option is extremely risky, since the first layer may contain defects that can only be seen after the solution has dried. In addition, the consumption of gypsum plaster per 1m2 will increase significantly, which should be avoided, especially in times of crisis. And if you have to re-plaster the wall, the financial costs may increase.
Rotband Knauf is a popular and proven manufacturer of gypsum plaster
When preparing for work, you need to make sure that the technical characteristics of the solution are suitable for the wall material. If the surface is made of brick, it is best to use a cement-based mixture. It is quite cheap and can be applied in thick layers. However, when the layer thickness is more than 2 cm, reinforcement with plaster mesh should be used. Gypsum plaster of brick walls does not require a primer if there is no significant contamination on the surface.
In the case of facing bricks, it will inevitably be necessary to use a primer and reinforcement. The technical characteristics of the materials are important here, and the technology for applying the substance is very complex. This is due to the fact that the facing brick has a slight porosity, which prevents reliable adhesion of the plaster to the surface. Therefore, it is better to entrust the procedure to professionals who have experience and equipment, the technical characteristics of which are not available to the average consumer. They also use technologies thanks to which the consumption of plaster per 1 m2 can be significantly reduced.
Technical characteristics and consumption per 1 m2
For concrete and foam concrete, gypsum compounds and wall treatment with a deep penetration primer are used.
After choosing the material, you can begin installing the beacons.
DIY plastering technology
Surface preparation
Before starting work, you must first prepare the work surface. The surface on which the plaster is to be applied is cleaned of dust, dirt, and serious irregularities (potholes, protrusions). In some cases, walls need to be primed, for example, if the wall material absorbs water strongly. If you do not use ready-made mixtures, but make the mixture yourself, in many cases you cannot do without using a plastic or metal mesh.
Let's consider the option when you plan to use a ready-made mixture, since for all types of plaster different components are used in different proportions.
It is necessary to strictly observe the proportions of the mixture and water. You can ideally mix the solution using a construction mixer or a drill with an attachment.
Reinforcing mesh
To strengthen old weak walls or those made of low-quality material, they are reinforced with metal mesh before plastering.
This procedure allows you to prevent the appearance of cracks on the wall, protect them from deformation and mechanical stress.
Beacon device
In order for the walls to be perfectly smooth, it is necessary to install special beacons. The wall is moistened with water with the addition of a primer. The material is manually applied to the wall using a regular construction trowel. From the very beginning, make sure that the layer of plaster is uniform and align it with the beacons.
In the form of beacons, you can use steel corners and a plaster rule. The rule in which the level is built determines the deviation of the wall from the vertical. Only after this is it advisable to prepare a solution, which, first of all, is applied to the surface of the corner. The corner is pressed and leveled. In places where the corner does not fit tightly to the wall, you need to place a solution under it.
As a rule, plaster is applied in several layers, since each individual layer cannot be thicker than 3 cm, otherwise normal drying will not occur. One layer dries, then the next one is applied. When the last layer has set, it needs to be rubbed with a grater.
The plaster will not harden immediately. In order for the process to go perfectly, it is better to carry out work in good weather, without exposing the results to the risk of damage.
Finishing is done in a manner most suitable for the type of plaster. Finishing work can be carried out on cement plaster only after it has completely dried. If the plastering was carried out with lime mortar, finishing work is carried out while the plaster is in a plastic state. The surface texture can be created using a rubber brush, a flexible brush or using special stamps.
Splash
Spray is the first layer of plaster that is applied directly to the base. Thus, potholes, cracks and other wall defects are filled with plaster, after which the new layer of material lies more evenly and adheres better to the base.
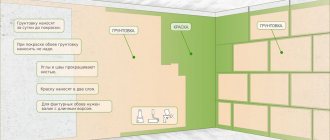
Primer
Primer is a very important stage of repair. The primer is applied to the walls before plastering or painting the walls to improve the adhesion of the material to the base.
Coating and sanding
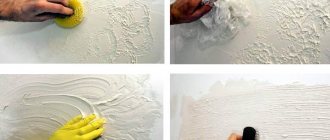
If the end result should not be just smooth walls, you need to take on their design. The simplest and most popular pattern for the garage is a fur coat. Work on this pattern can be divided into 3 stages:
- cover;
- grinding;
- calibration
If you plan to do the finishing yourself, you can use a spatter brush. For machine finishing, a pneumatic gun connected to a compressor is used.
Important: If you plan to use the ready-made mixture, you should cover it twice, taking short breaks so that the solution “sets.”
The “grated fur coat” coating is performed using a special grater that has a steel surface. Sand the surface with light movements, smoothing only the ends.
The pattern is calibrated when the surface has already dried a little, but is still quite plastic. When calibrating, the movements should be wave-like, with a little pressure.
The main stages of plastering walls
We display beacons
Beacons can be made of different materials, but the best option now is to buy special metal beacons sold in hardware stores.
The beacons are leveled over the entire area of the wall and secured with mortar. The optimal distance between beacons is 60-80cm. In the future, it will depend on the beacons how smooth the plastered wall will be.
After the fastening solution has dried, you can begin plastering the wall.
We begin the plastering process
First you need to apply the solution to the wall, this is done using a ladle. Scooping up the solution with a ladle, we throw it onto a section of the wall, between two beacons, starting from the bottom and moving up.
After the cast is made on a 40-50 centimeter area, using a trowel, leaning on 2 beacons, we pull the solution from the bottom up.
Important: the initial tightening of the mortar is done from the bottom up; if you pull it from top to bottom, the undried mortar will slide off the wall.
Thus, we move along the entire span between the beacons, and having closed it we move on to the next one.
Grout
After the entire wall is tightened, we once again check to see if there are any bumps along the entire length of the wall.
Then, when the plaster has dried a little, we begin grouting, using a grater we make circular movements over the area of the plaster without pressing too much. So we pass over the entire surface of the wall and leave until completely dry.
Prices of materials and their consumption
The amount of materials is affected by both the square footage of the garage walls and the defects of the walls. Manufacturers of plaster mixtures indicate on the back of the packaging the material consumption per 1 sq.m. As a rule, this is 10 kg per 1 sq.m. The bags usually contain 30 kg, in theory, this is enough for 3 sq.m. This is if you plaster with a layer of 10 mm. But taking into account the unevenness of the walls, it turns out to be more.
When using plaster containing cement and sand, the consumption is usually 17 kg per 1 sq.m. with a plaster layer of 10 mm. Gypsum plaster consumes an average of 30 kg per 1 sq.m.
You can calculate the amount of plaster, even if you are not a repair specialist, using the program on the Internet - Rodband plaster calculation.
The price of a regular cement-sand mixture is 50 hryvnia. Considering that it is enough for about 3 sq.m., the total amount of material can be calculated by simply dividing the area of the walls by 3. It is better to purchase mixtures with a small margin.
The consumption of facade paint is usually 150-200 grams per 1 sq.m. Accordingly, 1 liter is enough for 5 sq.m. 10 liter can of facade paint, which