A frame for a mirror made of mosaic for the bathroom is the best solution, firstly, it is very practical and hassle-free to maintain, and secondly, mosaic is an eternal classic, even in the kitchen fashion trends of 2020 it is used and often used.
In this article we give a step-by-step and detailed master class on how to make a mosaic mirror frame for your bathroom with your own hands.
Even more ideas on mirrors in the articles:
- How to make a frame for a mirror with your own hands, photos and step-by-step master classes
- Decorating a mirror in interesting ways - article.
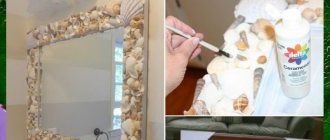
Mirror with mosaic frame
Manufacturing technology
In this master class, the mirror is installed directly on a painted wall. But, if you have tiles or other covering or you are afraid of ruining the wall, then it is better to initially do everything on a sheet of plywood, and then secure it to the wall.
TIP: Before starting with a large mirror, try on a small mirror on a sheet of plywood
First stage: laying tiles
- To begin with, the surface is degreased with alcohol .
- Then the mirror is glued to the surface using mounting adhesive.
- Markings are made with a pencil along the perimeter of the mirror, to the desired thickness of the future frame.
Glue the mirror to the surface
If you are attaching the mirror directly to the wall, then you need to fix it with bars and a screwdriver for 12 hours, until it dries completely.
When installing mosaics vertically, it is also necessary to secure the bottom beam so that the tiles do not “float”
- Then the pieces of the future mosaic should be laid on top of the tape so that the rough side is located at the top.
- You need to make 4 strips and cut them in half lengthwise. Each mosaic is coated with glue, then the strip is turned over and glued to the base.
Laying mosaics around the mirror
Remove the protective paper from the tiles
Broken ceramic mosaic
Another, no less impressive option for finishing a bathroom is using a mosaic made of broken ceramics. This option is not suitable for all styles. But such finishing can only be done directly on the wall. It is quite difficult to develop ready-made schemes for non-standard fragment sizes. Therefore, all hope is only for the good taste and artistic abilities of the master. Using this mosaic you can decorate the wall near the bathtub or in the sink area. A mirror framed by such drawings also looks unusual.
Design and marking
Photo 1: Lay the tiles dry on a flat surface
We used paper-based glass mosaic tiles. The front sides of the tiles are glued to the paper. They are a little more difficult to work with than mesh-backed tiles, but they are generally less expensive and the mesh backing won't show through the clear tiles. On a 19 mm thick MDF board, individual mosaic strips were combined with each other. This means that you need to cut the sheets of tiles into pieces and strips of the required size. Be sure to leave gaps between sections for mortar. The MDF board will later become the basis for the mirror.
Photo 2: Make sure the mirror is the right size
Place the mirror in the center of the tile frame and make sure it overlaps the elements by at least an inch. Then mark the outer edges of the tiles so you can cut the MDF base to the correct size. After cutting, prime both edges of the MDF.
Photo 3: Number the tile sections
This is an ingenious solution that will later save you from many unsuccessful attempts at laying the mosaic.
Photo 4: Make frame parts
We sawed the wooden planks for the frame (19mm thick) to a width of 65mm. The upper and lower parts of the frame cover the side strips - 19 mm on each side. Next, we rounded the edges of the parts with a 1.5 mm cutter for rounding the edges, but in general this is not necessary.
DIY mirror mosaic
You can easily make an ornament or design from a mirror mosaic with your own hands. To do this you will need an old, unnecessary mirror, a glass cutter, a little skill and patience. Next you should do the following :
- Using a glass cutter, cut the mirror into equal pieces.
- Wipe the surface prepared for mosaic application. It must be taken into account that it must be dry and even.
- Apply liquid nails glue to the surface.
- Carefully glue the fragments of the cut mirror, maintaining a gap of 0.25-0.5 cm between them . In this case, you can dilute the mirror fragments with any colors or fold them into a certain pattern. It all depends on your taste and desire.
- The mosaic must dry for three hours .
- After this, it is necessary to grout the joints with white color using a rubber spatula. You can choose any other grout color for this purpose, but white looks the most harmonious.
- Remove excess material with a damp cloth.
- After waiting five hours, polish the mirror mosaic with a dry cloth.
Now all that remains is to admire the creation of your hands and once again make sure that, if desired, even such a complex decorative element can be made by yourself.
Laying and grouting tiles
Photo 7: installing the backing under the tiles
If you are using a special backing, try to remove the paper from the tiles slowly and carefully so that it does not move or peel off from the surface.
Photo 8: place the mosaic in the right places
Installing the wooden frame first was another brilliant idea. This makes it easier to install the tiles because the mosaic sections automatically align with the frame slats.
Photo 9: Press the tile to the backing
Make sure all sections of the mosaic are positioned as needed. If necessary, align their position. Then use a piece of plywood to firmly press them onto the backing.
Photo 10: frame protection
Cover the frame with masking tape to prevent cement mortar from getting on it.
Photo 11: Remove paper
We wet the paper with water, then finally carefully peeled it off to reveal the gorgeous mosaic tiles. This step can be avoided if you buy mosaic tiles with a mesh backing.
Photo 12: grouting tile joints
Grouting of joints is carried out in the usual way, using cement mortar.
For this project, I used an adhesive backing for attaching the tiles - a sheet with a double-sided adhesive layer (sold in hardware stores and ceramic tile showrooms). One side of the substrate is attached to the frame, and then the tile elements are mounted to its other side. It is easy to use, you can immediately grout the seams, and there are far fewer problems with it than with mastic. However, mastic will undoubtedly cost you less and is also quite suitable for the task.
Small accents
It is not necessary to lay mosaics around the entire perimeter of the bathroom. To add uniqueness to the room, just use it in the form of accents. Stripes along the walls or in the sink area are suitable for this. You can also lay out only one wall of mosaic. The shower stall will look more interesting if the back wall is decorated with mosaics.
Also, the podium for the bath or the bath itself can be lined with this material. The main thing is to choose the right color. This technique can be used when choosing mosaics with gilding. Too much of this material will be unnecessary, but in the form of small accents or patterns it is quite appropriate.
Mirror installation
Photo 13: Apply glue
Cut strips of wood the same height as the tiles and glue them to the base. Then apply mirror glue to them. You will also need to apply glue along the inner edge of the mosaic frame - a thin strip so that it does not squeeze out beyond the edge of the mirror.
Photo 14: Install the mirror
We moved the mirror a little so that the glue spread across the base, and then pressed it tightly. After this, we left the entire structure alone for a whole day before attaching the metal parts.
Photo 15: Mark the outline of the mirror on the wall
Measure from the edge of the frame to the screws to determine where to place the two mirror hangers. This ensures that both gimbals fit perfectly into the mounts. However, it is better to use heavy-duty anchor bolts.
Photo 16: cut out recesses for hangers
This step is optional. It allows you to firmly attach the mirror to the wall. If you don't mind a little gap between the mirror and the wall, you can skip this step.
Photo 17: Attach the hangers
To avoid a trip to the hardware store, we made our own aluminum hangers with holes for countersunk screws. Then we screwed them to the mirror with 12mm self-tapping screws. The last step is to install the structure on the wall. To do this you will need two 50mm screws.
To glue the mirror to the MDF base, use special mirror glue (available in hardware stores or DIY supermarkets). Carefully place the mirror in place and then leave the entire structure overnight.
After the glue has dried, turn the mirror over and mark the position of the hangers on the back side in its upper part. If possible, match these marks to the position of the screws on the wall, but if the wall thickness is not suitable for you, use heavy-duty drywall anchor bolts.
Make slits to a depth equal to the thickness of the suspension strip. Screw the hangers to the MDF base and then hang the mirror on the wall.
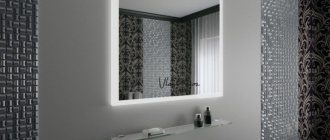
Mirror framed with glass mosaic
Mosaic panel
This option for decorating a bathroom cannot be called budget. But what aesthetic pleasure can you get while in such a bathroom? The panel is mainly made of glass mosaic. First, it is assembled onto a grid according to a special pattern. This is painstaking work that cannot be cheap. Then the panels are assembled from fragments on the wall. In terms of practicality, the surface is no different from standard mosaic installation, but the visual effect can be impressive.
Important! It is better to entrust such work to professionals. Incorrectly selected shades can ruin the entire perception.
Required Tools
Before you begin, make sure you have all the tools needed for the project to save time and stress. Below is a list:
- Miter saw;
- cordless drill/driver;
- a circular saw;
- syringe for sealing seams;
- screwdriver 4 in 1;
- level;
- respirator;
- carpenter's square;
- mortar trowel;
- rags;
- shaped cutter;
- protective glasses.
Step-by-step instruction
How to restore a mirror with large amalgam damage?
You need to carefully remove the mirror from the frame and place it on a table covered with a soft cloth. Thoroughly clean the damaged surface with a brush. Then wash with glass cleaner and dry. Now degrease the damaged area with gasoline or alcohol and dry again. Using scissors, cut a piece of foil slightly larger than the size of the damaged area. Apply glue to the treated area of the mirror, apply the foil with the shiny side down and press. Use a napkin to smooth the surface of the foil from the center to the edges. Carefully remove excess glue with a sponge and dry the mirror for several hours. Place the restored mirror back into the frame.
Repairing a mirror coating is labor-intensive and requires investment, so mirror restoration will probably not be cheap.
To restore the surface of a mirror that has minor damage, grinding and polishing are used.
Materials for this project
Try to prepare all the necessary materials in advance before starting work so as not to run to the store for them at the last minute. Here is the list:
- MDF board 19 mm thick;
- wooden planks 19 × 65 mm;
- clear varnish for wood;
- tile backing;
- cement mortar;
- wood glue;
- masking tape;
- glass tiles;
- mirror with facet;
- metal hanging strips;
- heavy-duty anchor bolts;
- screws 50 mm.
Materials and tools required for mirror restoration
For major damage:
- glue for metal and glass;
- brush;
- soft fabric;
- glass cleaner;
- gasoline or alcohol-containing product;
- foil;
- brush;
- scissors;
- sponge.
But you can repair minor damage with your own hands.
Polishing, as a separate method of mirror restoration, is also performed in case of clouding of the reflective surface.
In modern interiors, mirrors often play an important role.
For small scratches and chips:
- water;
- alcohol;
- sponge, soft napkins;
- silicone sealant.
But over time and improper care, the appearance loses its reflective ability.
If abrasion or a shallow scratch appears, the mirror can be ground, and the top layer is removed from the reflective plane using coarse abrasives.
Mirrors not only have a utilitarian meaning, but also serve to decorate the interior and visually enlarge the space.
From floor to ceiling
Original design of a mirror ceiling.
Thanks to the proper use of mirror panels in the ceiling design, you can visually increase the space of the room, make it lighter, and also bring a touch of sophistication and solemnity to the interior.
Narrow mirror in the bathroom interior.
We suggest you read: Which house flowers love shade in the apartment
A simple, narrow floor-to-ceiling mirror will help change the look of your bathroom.
Stencil painting on a mirror
In order to decorate a mirror, you do not need to be an artist or a hand-made master. All you need to do is buy stencils and apply them to the canvas. First things first.
We apply the finished stencil to the mirror surface, and then use a roller to carefully glue it, preventing air from getting under the film. Apply matting paste to the stencil (not on the coated surface), carefully distribute it over the entire film and leave for 15 minutes. After this, the paste should be removed and the mirror should be washed under running water. Finally, carefully remove the film from the stencil.