→ Fittings
What could be better than a beautiful, comfortable table? Maybe two of these tables? Or the same table, but much more compact? We know how to turn the most ordinary table into a narrow console table, with two legs, with our own hands. Or divide it into two and make a rack. Do you know?
You can create a real exclusive from a sawn table with your own hands. You've probably admired them in stores, where prices are often steep. But you can make such a “piece copy” yourself. And it will be much cheaper than the store-bought version.
The best part is that this table can be made from absolutely any high table. You can even take an old tabletop and screw beautiful legs to it (for example, from IKEA). And there are plenty of ways to decorate this item.
Another opportunity to save money is to buy a beautiful (high-quality, new) but heavily discounted table.
After all, as you know, stores reduce prices on furniture that has been on display or has even a tiny defect. master class No. 1. console table for a narrow hallway
Is there little free space in your hallway? Or do you like miniature things? Or maybe you're attracted to the idea of a classic console table, but you can't afford such a thing? In any case, you will certainly love this idea - a tiny console table made from... a very ordinary table.
Here's what you'll need:
- rectangular table (for example, ISALA from IKEA),
- a piece of fabric 30 cm with a width of 1.20 m (choose any one you like),
- aerosol glue for fabric, jigsaw, screwdriver, tape measure, pencil, scissors, sandpaper, 2 screws and 1 metal corner (for greater reliability, you can take 2 corners and 4 screws), masking tape.
How to make such a console for the hallway with your own hands.
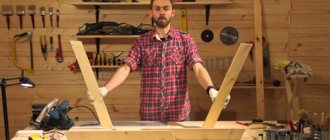
1. First, cut the table into two parts, lengthwise. A tape measure and a pencil will be useful for marking. Sand the edges with sandpaper to avoid splinters.
2. If you have a table with removable legs, secure two of them; if the legs cannot be removed, your console is almost ready.
3. Then fasten metal corners on the back side of the tabletop: one in the center or two at the edges (what to do with the corner further, see step 7).
4. Cover the edges of the table with masking tape - this is necessary so that glue does not get on them. And then prepare a piece of fabric of the desired size and spray glue over the surface.
5. Gently lay the fabric on the tabletop. Make sure that there are no bubbles left (if they appear, smooth the fabric). If there is excess fabric left on any of the edges, trim it with sharp scissors.
6. Once the glue has dried, the tape can be removed. And admire the work of your own hands - the original designer console.
7. Attach the free part of the mounting bracket to the wall, making sure that there are no gaps between the console and the wall.
What else can be added to such a table?
If it is a mirror, it will serve as a dressing table. Hang shelves or a writing board on top - useful for the kitchen or dining room.
If you made it for the hallway, hang a couple of hooks for bags and umbrellas.
Don't want to fuss with fabric and glue? Choose beautiful stickers.
And the table can be painted in advance in some interesting color, varnished, covered with patina... In general, there are many options. All you need is a tabletop and beautiful legs.
master class No. 2. a bedside table on two legs made from a sawn table
This compact piece can decorate your living room or bedroom. It is done according to a similar principle. However, there are some nuances.
You will need an old dining table, wood paint and 2 blocks.
Here are the differences from the previous master class
.
1. Shorten the legs, because a side table (or bedside table) is usually lower than a dining table.
2. The table should be cut not along the long part, but along the short part.
3. A product painted in a bright color (with a brush or spray gun) looks especially impressive.
4. A stable position is secured not with corners, but with a pair of bars (approximately 1/2 the width of the already sawn-off tabletop). They need to be connected to each other and screwed to the wall. The finished bedside table is placed on top.
master class No. 3. two consoles from one sawn round table
And this tutorial from Sarah Dorsey is a great example of using both sides of the table. One of them (yellow) became a console under the TV in the bedroom. The second one (painted blue) serves as a bedside table in the hallway.
How to make such semicircular console tables with your own hands.
1. Take an old round table, remove the old paint or varnish, and sand down any rough edges. Apply primer.
2. Cut the tabletop with a jigsaw into 2 equal parts.
3. Sand the edges and paint them in colors that you like and match the color palette of the room.
4. If you wish, you can also create an accent section of the wall, as Sarah did for the yellow model.
And below is another example of using two parts of one table
. One (only the tabletop is painted) is for the hall or dining room, the second (completely painted) is like a dressing table for the bedroom.
what other consoles can be made if you cut an old table?
Using the same technology you can make a narrow dining table on two legs
.
This compact model will be greeted with a bang by owners of small kitchens where there is no room even for a snack. To do this, again, you will need a square table - you can buy a modern one, but your grandfather’s inheritance will look especially chic. The technology is exactly the same. Just don’t forget to first remove all the “internals” - drawers, folding mechanism, etc.
But what to do with the second half of the table if you don’t need the second console?
If you want to use such a valuable resource with maximum benefit, make a two-tier console bar with a shelf
. The main difference is that the legs of the upper part are shortened by about half (they can be larger or smaller, depending on the tasks of the rack).
How can you use such a console? Whatever! It is ideal not only for the hallway, but also for the dining room or minibar. By the way, pay attention to how the author of the idea coped with the task of storing bottles: they are stored in tubes for stationery. And the glass holder can be hung from the bottom of the second tier.
In addition to the kitchen and dining room, such a compact table on two legs will be useful in other rooms.
If you strengthen a small rack on top, you will get a workplace
needlewomen or in a children's room.
And if you also have an old door leaf, a shelf and a couple of brackets, you will get an original design with vintage charm
(don't forget to paint everything the same color and create a patina effect).
And in this section there are several more examples of such narrow consoles, made with your own hands from sawn tables.
And another option for “waste-free production”. Do you recognize the good old LACK from IKEA in this turquoise table? Yes, that's him. How did they make him so tall, you ask? It’s very simple - connecting two legs into one. If you desperately need free space under the table, take this idea into account.
The first few days after the onset of the new year we relaxed, lay on the couch, went to the children's theater, watched movies and read books. In general, we had a rest. But before the new year, we decided that during these long New Year holidays we should do some kind of home project. They chose a console table behind the sofa in the living room.
The project was supposed to be economical, so don’t judge too harshly :) Again, this is the second piece of furniture that we make with our own hands.
Therefore, after the stores began to operate normally, we went to buy balusters that would be our legs for the table. We have the best selection of balusters in St. Petersburg for the most ordinary stairs in Metrica on the Vyborg highway. All the fun cost us 830 rubles for 6 balusters.
We bought the furniture panel in Maxidom, it is ordinary pine, 18 mm thick. Balusters 50 mm in diameter. We also bought 20mm (thickness) board for the project.
Well, another new acquisition of ours is a circular saw. Sorry neighbors and thank you for your patience. 
We shortened the legs a little, because... the height of the balusters is 900 mm, which is too much even for a console table.
For assembly we will again use our favorite Kreg. We saw how to attach legs to a table using Kreg in one of my favorite blogs - Anna White.
The table will be made of 6 balusters with a total length of 1800 mm (almost the entire length of the sofa). Therefore, we collected it in parts. Here's one of the halves:
We attach the bottom shelf to the table in the same way as the tabletop: We again saw a more detailed plan on how to do this on Anna White’s blog. Thank her very much. Her blog is simply a treasure trove of useful information. To strengthen the structure and level it, small jumpers were made.
And now our table is slowly acquiring a more or less finished look before painting it:
Here and there I simply smeared the cracks that had formed a little with wood putty:
Making furniture with your own hands is considered a creative and interesting process. Every person can create stylish and budget-friendly products. The master has the right to independently choose an interesting design for furniture, equipping it with interesting details and high-quality fittings. The easiest way is to make your own console that will fit perfectly into the interior of the living room.
DIY “portable” retro console
Hello Friday, Habr! This article will talk about how to experience the zen of self-assembling a gadget, that any experience is also knowledge, as well as some valuable advice for those who suddenly decide to repeat something similar.
As a result, we will plunge into the period when the words Dendy and Sega caused awe, and we will get this “pocket” console:
Below the cut there are many pictures and a short video for those who like to watch rather than read
Preface
A whole series of events pushed me to build this project.
The fact is that I spend a lot of time on the road on my way to work. As a rule, you have to while away the time listening to books or playing casual toys on your phone. Or, as it is now, make drafts for an article on Habr. And so, on the road, when all these casual games became very boring, I began to remember that before the grass was greener, and the games were more meaningful. I remembered how, as a child, I played dandy for days on end, and decided that Chinese playgrounds probably have pocket consoles that will brighten up a long journey. Well, I ordered myself one such console. The seller promised as many as 168 games from childhood. Days passed... Delivery of the order was delayed.
Time passed, and in anticipation, I decided to once again go through the list of games that were supposed to be on the console. While I was reading the list, I refreshed my memory of the games I spent whole days playing, and was disappointed to discover that many of them were not in the promised set. In addition, the Sega mega drive console, with its Comix zone, Rock'n'Roll Racing and Earthworm Jim, was a slab of memories... Time passed, but my “Nintendo” console did not. Having written to the seller, I received an answer that he simply forgot to send it, and the track he gave was invalid. I returned the money for it, but they did not return my childhood.
Having spat in my heart on the conscience of this bad man, I thought that you can play dandy on an emulator on your phone. But as it turned out, the sensations were not the same at all. There are no tactile buttons, and at the same time no comfort in the game. Moreover, old games are much more complex than modern ones, and missing the jump button can often mean starting the level from the beginning. And I decided - why not assemble my own console, with a Cannon fodder and buttons?.. And I assembled it. I made a bunch of mistakes, some due to inexperience, some due to crankiness. And I want to share with you my experience with mistakes, because a smart person learns from the mistakes of others, and only smart people gather on Habr
Video with assembly processes:
Platform selection
I have a raspberry pi 2 lying around, and an inexpensive 3.5 inch display for it.
I decided to start by looking for solutions for it. And as it turned out, it was not in vain. Raspberry already has the RetroPie operating system, which turns it into a full-fledged emulator for a wide variety of consoles. (more details at the link). In addition, the Internet is full of instructions on how to connect joysticks to it and put it into the case from an old console.
But this is not our way, we are assembling a “pocket” console. This means you need a built-in joystick.
Error 1: It is better to use raspberry pi 3 or 4 models due to the presence of wi-fi and bluetooth.
This will greatly simplify the setup of the already assembled console in the future. You can also use Orange pi, the solution will be no worse.
Designing a joystick
I decided to take a 6-button controller from Sega-mega-drive as the basis for the joystick.
Primarily due to the fact that 6 buttons allow you to play Segawa games and will not interfere with Dandev games. Further, Adafruit found a library that can emulate a keyboard by reading signals from the gpio pins of the raspberry itself. And it's very easy to use. You need to copy it to the already installed RetroPie and connect the buttons to the pins. The buttons, when pressed, must be shorted to ground (any GND pin).
To begin with, all the buttons were assembled on the breadboard and tested for functionality.
I used the following connection diagram:
Because the project was assembled for Sega's joystick - and the designations were appropriate. In general, in RetroPie it is common to use “TL” and “TR” instead of “C” and “Z”, apparently used in PlayStation joysticks. In fact, the buttons can always be reassigned, including for each specific game.
The buttons are assembled, now we need to think about the case for the pocket console. And here I had both positive and negative experiences:
Assembling the body
In one of my posts, I already mentioned that creating a case is a real headache for non-commercial gadget assembly if you don’t have a 3D printer.
You can either look for ready-made boxes and jump at their size, or assemble something yourself. I decided to try a new method for myself - gluing acrylic. Moreover, the Habravite millercutter offered his help in cutting acrylic in one of the previous posts. For which we are especially grateful to him! Having estimated the size of the filling, a drawing was made and sent for cutting. Initially, the idea was as follows: to round off the “sharp” edges in the assembled body with sandpaper and cover it with liquid rubber from a spray can. The soft-touch coating and Porsche design loomed in my imagination. It is recommended to glue acrylic with dichloroethanol. I couldn’t find it in the hardware store, so I took the first Bison plastic glue I could find. Please do not consider this an advertisement, but the case stuck together very well. Look how beautiful the transparent case turned out to be:
Acrylic glues easily and reliably, looks good and is generally a pleasant material.
The case is assembled, the buttons are soldered into breadboards, we are getting ready to paint...
After the glue had dried, I sanded the corners and the entire body so that the paint would adhere better. Since there is no place to paint at home, I went outside to paint. And here I got my second error:
You need to paint in a dry and warm room, and not in wet and cold St. Petersburg.
In general, either I violated the technological process, or the stars did not align, but the tires lay down disgustingly. With bubbles and smudges.
I had to tear off this coating and sand the body again. It was decided to postpone painting the hull for a while. Therefore, now hot-melt adhesive smudges are visible through the body, which does not look very good. And if you know what and how to carefully paint acrylic, I will definitely follow your advice, because the assembly cannot be left in its current form:
Console assembly
It was decided to attach the electronic elements to the body with bolts.
This should give the case a unique charm, but to be honest, I couldn’t think of any other way. I coated all joints and soldering points with hot glue. Yes, it’s ugly, but it’s a surefire way to secure a wall-mounted installation.
Mistake 3: mounted mounting is unreliable and unattractive in any case, so if you have the opportunity to order or obtain a printed circuit board, you will get something more reliable and compact
Collecting sound
Assembling the sound is one big mistake number 4:
I decided that the speaker from the phone would be ideal for playing sound. The one that plays the ringtone. But by mistake I purchased a voice speaker (the one that is applied to the ear). Well, after connecting it to the amplifier chip, the speaker simply could not cope with the volume. I had to remove the amplifier.
To be honest, I still don’t know what to do with the sound. I used the MC34119L amplifier chip. Maybe there was a connection problem. If anyone knows which speaker would be suitable and which simple amplifier would be suitable for it, please tell me. Preferably without additional body kits such as capacitors.
Collecting food
Everything is quite simple here.
We need to assemble a powerbank. I have a supply of 18650 batteries and various ready-made boards for charging them. Error 5: At first I used an unnamed 3 Amp from China with a round power socket.
She did not have a 5V stabilizer, so she additionally had to solder a DC-DC converter. A little later I converted it to a ready-made module with a stabilizer and a battery charge indicator, but due to the already prepared hole in the case, the round socket remained. Now I understand what should have been done for microUSB. A pair of 2300mAh batteries is enough for several days of unrestrained gaming. Also, the possibility of installing a button with a lock to turn on the device did not immediately occur to me. You can justify the large toggle switch, the only one at hand, but... There is no excuse for it, the button would be better. Also, 18650 batteries are quite bulky, you may want to consider using lithium coin cell batteries.
The finally assembled device
Conclusion
Overall the console turned out to be nice.
Immersing yourself in old toys is like experiencing a rebirth. The console still doesn’t fit in a pocket (except perhaps in a down jacket), but it’s easy to carry in a backpack. On the Internet you can find entire collections of games worth 30 GB. On this site you can legally download free games for this console.
For those who decide to repeat this project, I dare to give some advice:
- It's better not to use hot glue.
- If possible, order or make a printed circuit board, the console will turn out neater and more compact
- Before you start painting the body, you should practice on cats on a similar material
- Use Raspberry Pi with WiFi. This is better than constantly opening the case and taking out the raspberry to download games or reconfigure.
- Even better is to use a Raspberry Pi Zero or Orange Pi. They are more compact
- It's not a good idea to give a console to a child - it's difficult to pick it up later
Well, I would like to end the article with the words of Alexander Sergeevich: “Oh, how many wonderful discoveries are being prepared for us by the spirit of enlightenment And experience, the son of difficult mistakes, And genius, a friend of paradoxes, And chance, God the inventor.”
Product for a narrow room
If you have an old table that has lost its former appearance, then it can be used as the main raw material. This option attracts many craftsmen because the work requires a minimum of tools and financial investments:
- Pieces of beautiful fabric 130 cm wide.
- Rectangular table (IKEA or ISALA are ideal).
- Screwdriver, pencil, jigsaw, aerosol glue, sandpaper, sharp scissors, one metal corner, two self-tapping screws.
The prepared table must be cut lengthwise into two even parts. All edges should be cleaned with sandpaper. If the table has removable legs, then you need to securely fix two of them. On the back side of the console you need to secure a corner (in the center). The edges of the table are covered with regular masking tape to prevent glue from getting in. A piece of fabric prepared in advance is sprayed with an aerosol product. There should be no bubbles on the surface. Excess fabric on the sides of the tabletop is cut off with scissors. After the glue has dried, you can carefully remove the tape. The free part of the metal corner is screwed to the wall as firmly as possible so that there are no gaps.
How to make a console for a hallway with balusters with your own hands?
Now we will learn how to make a table with legs from balusters with our own hands. The most important thing is that you can use an old regular table for this. Or just take an old tabletop and buy beautiful baluster legs.
Important! This is a great opportunity to save money and get a new, high-quality, original decorative element. This furniture is ideal for narrow hallways. Do you have little space in your hallway, do you adore miniature things, or do you like classic style? Then you will definitely like this idea.
To work you will need:
- Rectangular table or countertop.
- Two baluster legs.
- A piece of fabric is 30 cm, width 1.2 m.
- Aerosol adhesive for fabrics.
- Jigsaw.
- Screwdriver.
- Scissors.
- Pencil.
- Roulette.
- Self-tapping screws.
- Sandpaper.
- Metal corner.
- Masking tape.
You can make such a console table with your own hands without legs or with them according to the following scheme:
- If you use a table for work, cut it lengthwise into two parts. Use a pencil and tape measure for marking. Sand the edges with sandpaper to avoid scratches.
- Attach baluster legs to the base on both sides.
- On the back side of our tabletop, attach metal corners so that one is located clearly in the center, the other two - at the edges.
- Cover the edges of the table with masking tape. Prepare a piece of fabric and spray glue over the surface of the table.
- Apply the cloth to the tabletop, being careful not to form bubbles. Trim the remaining fabric around the edges.
- After the glue has dried, remove the tape.
- Attach the free part of our mounting angle to the wall so that there are no gaps between the console and the wall.
Application of cinder block
From this material you can make your own console with an original design. To work, you need a minimum of materials: two strong wooden boards and four cinder blocks. This option is quite simple, since it only takes 30 minutes of free time to make it. A cinder block is placed on both sides, and varnished boards are placed on top. Then the actions are repeated again. You can lay out your favorite books on the middle board, but it’s better to put photo frames, candles and flower pots on the top shelf.
Consoles with forged commas, hot forging and welding
The review is devoted to the manufacture of consoles with forged commas for shelves. The master uses a basic set of tools: a forge, an anvil, a hammer, a fork and a hand fork, pliers, a grinder, and a welder.
After the video below, a detailed description of all the works with photographs is presented.
The contractor presents the result of the work, and only then proceeds to demonstrate the production process.
Strips are cut out of metal using a grinder.
Ready-made strips measuring 20x4 and round rods with a diameter of 10 mm. will be required for the production of consoles.
It is necessary to make curls at the ends of the rods. But first, the strips are heated in a homemade forge.
The tips of the plates are slightly processed with a hammer. Metal blanks are carefully tapped. These actions can be done with a grinder or sandpaper. But the performer prefers that the element have the appearance of a product after forging. The corners of the strips are knocked off and slightly flattened. The result is slightly rounded corners. The tips of all plates are processed in a similar way. The parts are placed in water to cool.
The plates are bent at right angles; to make it easier to hold in the hand, the parts are slightly cooled. Bending is done with a hammer on an anvil. This procedure can be performed differently - the workpiece is bent in a vice. But not all performers have a wide range of devices, and these instruments are either already available to the master, or they can be made from improvised means.
Using a square, the accuracy of the angle is checked. If necessary, lightly tap the hammer to make changes.
The second workpiece is given the desired shape; measurements are carried out “by eye”.
The accuracy of the second part is checked.
The final processing of the second workpiece is carried out.
The complete identity of the two processed plates in width is clearly demonstrated...
...and the general configuration. The finished consoles are placed in water.
The master begins making commas (curls, volutes). One of the ends of two rods placed on the anvil is processed with a hammer. Twisting actions are performed. It turns out to be a small ball, which should have a beautiful round shape.
Using a fork inserted into the anvil, the comma is bent.
A hand fork is a convenient tool for giving the workpiece the required shape.
The console and comma are ready, we are trying on how the finished element will look.
The processing of the second rod with a formed ball at the end is carried out, first by small taps with a hammer.
Bending is done using two available tools. For craftsmen who produce a large number of similar elements, it is advisable to purchase or assemble their own jig - a bending machine.
Using a special horn, you can also give the desired shape to the workpiece.
The identity of the bend of two commas is checked.
The unnecessary part is cut off with a grinder and processing of the part continues. The tip of the workpiece, on the opposite side of the curl, is pulled back. By tapping with a hammer, the end becomes sharp in one plane and flat in the other. As a result of manipulations, the part increases in length and decreases in cross-section. To work with elements heated to high temperatures, pliers are used.
Similar procedures are performed with the second workpiece.
Two commas are made.
Using a drill, holes for screws are drilled in the consoles, a five-piece drill.
The next stage is welding. In places where the performer clamps the parts with clamps, the chamfers are removed and the edges are cut.
Welding is carried out using ANO-21 electrodes, brand – TIGARBO, 2 mm. Rutile coating is well suited for pull-out welding.
The finished element is polished with a grinder.
Console after welding and grinding.
The console is screwed to the wall for ease of evaluation.
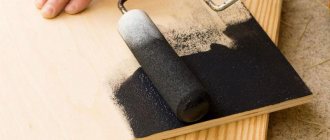
The console is being painted using spray paint.
The final result of the work.
Sections: How to make, Consoles
Previous article: Forged balcony: how professionals do it Next article: Commas with a tight eye and a pointed tip
Aristocratic model
This option is in greatest demand. Using a minimum of materials, you can make your own console, which will decorate not only the living room, but also the room of a young fashionista. The master will need:
- Roller and brush.
- An old console or chest of drawers.
- Plain gift paper with an interesting pattern.
- White paint.
- Sandpaper.
- Wallpaper glue.
- Scissors.
You need to sand the surface of the chest of drawers and remove all the fittings. The product is cleaned of dust. All surfaces need to be coated with two coats of paint. It is necessary to cut a blank from gift paper to the size of the table top with a small margin. The product is glued to the chest of drawers. It is necessary to remove all air bubbles by running a cloth from the center to the edges. Excess paper needs to be trimmed and the outline highlighted with white paint. All that remains is to screw on the fittings and the product is ready.
Compact and refined
From scrap materials you can make a console with your own hands, which will look harmonious in any interior. To work you will need an old dining table, two blocks and wood paint. All actions correspond to the standard scheme, but there are some differences:
- It is necessary to shorten the legs quite a bit, since the bedside console is not high.
- The table should be cut crosswise rather than lengthwise.
- Those products that are painted in a bright, solid color look more aesthetically pleasing.
- The console is attached to the wall not with corners, but with a pair of wooden blocks. They are fastened together in advance and screwed to the wall. The prepared bedside table is simply “put on” on top of the bars.
Types of console tables
Today, the range of consoles includes a variety of designs to suit any style and interior design. Products can be:
- Attached. Visually they look like half a table sawn lengthwise. These pieces of furniture are equipped with only one or two legs, so they are not stable enough. For this reason they are attached to the wall.
- Hanging. This console resembles a regular wall shelf, but differs in the presence of a decorative leg. The latter often does not reach the floor and creates the illusion of a “floating” table. Fixation of the product is ensured by fastening to the wall.
- Separately standing. This is a completely mobile type of console. Due to the presence of three or four legs, it stands stably on the floor, and its design in a rectangular, semicircular or triangular shape allows it to be placed against a wall, in a corner or any other place in the room. For example, a mirrored console with drawers can serve as a bedside table or flower stand.
- Transformers. When folded, this product is a narrow console. But if you unfold it, it becomes a full-fledged dining table or desk. The tabletop may include two or more parts. Models differ in transformation methods: the disguised parts recline, slide out, or appear if the tabletop is rotated.
Transforming old drawers
Long cracked and shabby chests of drawers are considered an excellent material from which you can make stylish furniture for your home. For a clear example, you should study numerous photos of consoles. You can build unique products with your own hands from standard wooden boxes. To make furniture you will need:
- Boards for the frame.
- Two plywood boxes.
- Screws.
- Primer.
- Screwdriver and drill.
- Sturdy board.
- Dye.
- Circular.
- Wood glue.
- Furniture clamps.
First of all, the craftsman needs to sand the drawers and coat them with paint. Using a circular saw, you need to make the necessary parts and frame. The blanks are fastened with screws and glue. All irregularities are carefully filled with putty. After complete drying, the product is coated with primer and paint. Boxes are placed on top of the frame and secured with glue and self-tapping screws.
Sarah Dorsey's proposal
You can make such a console table with your own hands in just a few hours. The technology is in great demand in different parts of the world, since it is possible to use both sawn parts at once. One blank can be used as a stylish TV stand, but the second can be installed as a bedside table in the living room.
Progress:
- You need to take an old round table and remove all the paint or varnish from it. Thoroughly sand all uneven surfaces to apply a thick layer of primer.
- A jigsaw is ideal for cutting tabletops.
- The edges need to be sanded and painted in the desired color, which will harmoniously match the interior of the room.
This is a great option for transforming an old table into two original consoles.
A budget option
Experienced craftsmen know many options for making a console with their own hands. You can make interesting products from PVC and old kitchen furniture. For beginners, it is best to make multifunctional products from suitable-sized cabinets, which must be connected into one, long structure. Be sure to put a strong board on top. A small bar is attached to the back of the table. The board itself may be rough and unpolished. If desired, it can be refined, thereby constructing a less weighty and bulky product. If the master has the necessary skills, then you can use all your imagination to create a truly original console.
Variety of materials
To furnish your personal home, you can use different types of furniture. A console for the living room allows you not only to emphasize the existing design, but also to create an additional corner for placing personal items, flower pots or cosmetics. In order for a handmade product to last as long as possible, you need to choose the right consumables. In factory conditions, pine, oak, ash, mahogany, and beech are most often used. Of course, such furniture is not cheap, which is why not all citizens can buy it.
To save your family budget and get high-quality furniture, it is best to choose veneer products. This material is absolutely safe for humans and is resistant to the negative effects of moisture and mechanical damage. The surface of the slabs can be decorated at your discretion: stick a laminate, fill it with high-quality polymer, use PVC film. Not only the amount of costs, but also the durability of the console depends on the choice of a specific material. Among ready-made furniture, stone models have become very popular: granite, marble, turquoise. These materials are durable and expensive. A forged product will fit perfectly into a classic interior. Thin rods make refined coils.
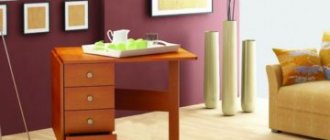
The concept of a console table appeared during the reign of Louis XIV. In those distant times, these interior items were very popular, and they are no less in demand today. Console tables come in a variety of designs, but they have one thing in common: console means narrow. This type of furniture is very convenient to use in small spaces; it does not take up much space and is not far from the wall.
Console is a narrow table with straight or curved legs, suitable for different interiors.
Decorative console decorated with carvings
We will not talk about variations of console table models, because there are countless of them. Let's talk about the scope of application of this piece of furniture. The furniture looks great in hallways and living rooms, acting as an alternative to a buffet.
The console table in the hallway has both decorative and practical significance.
In the living room, consoles replace tables attached to sofas.
You can turn this furniture into something like a mini bar, or place a framed photo on it. An original idea to use a console table in a boudoir or for storing cosmetics.
Modern console table in the bedroom
Store your keys on a table in the hallway and place a candlestick or picture on it. And in the bedroom space, you can install a DVD player or TV on the console.
Forged console table for figurines in a modern interior
If you have your own office, store cigars or beautiful figurines on the table. And in the children’s room, place toys on this piece of furniture, put markers or boxes with construction sets.
White console table with drawers for various small items
Console with drawers for children's room
We'll tell you about creating a console table with your own hands - it's a simple, fun activity that will help you save a lot of money. To do this, you will need to purchase some tools and be careful and patient.
How to make a DIY console table from an old table
We cut the table into two parts lengthwise
You can use an ordinary old table that has served its purpose to create your own masterpiece.
We fix the metal corners on the back side - in the center and edges
Glue the fabric to the tabletop in order to get an original console
We attach it to the wall and get an original console in the hallway
Saw off the required part from the table and process it. The photo shows examples of such creations. If you want to create a masterpiece from scratch, read on for a step-by-step guide to action.
A bedside table on two legs from a sawn table is made in a similar way
Console under the TV in the bedroom and a bedside table in the hallway from one table
DIY console table – nothing complicated! – Magazine – His.ua
They say that console tables came into fashion during the time of Louis XIV (1638-1715). But even today this piece of furniture is popular. Such tables can come in a variety of shapes and styles, but their main feature is their small width. Thanks to this, the console table becomes indispensable, for example, in a narrow corridor or a small bedroom.
Making a console table with your own hands is not difficult even for those who are far from carpentry. All that is needed for this is “straight” hands and a minimal set of tools.
The easiest way to make a console table is to use an old wooden table. The overall “condition” of this table does not matter at all, because we only need part of it, which should be carefully sawed off and then processed.
If the condition of the table allows, you can make two console tables out of it. In general terms the process looks like this:
You can use old narrow windows, doors and cabinet doors as a tabletop for a console table.
Here's how this transformation happens:
Any board can become a tabletop. All that remains is to attach the legs. For example, metal ones.
Or use wood as support
To create a console table, you can use carved legs for dining tables and even wooden balusters. They can be made to order or purchased ready-made – on the Internet or at a large building materials store.
Pipes will also work. This console table will fit perfectly into an industrial-style interior.
If you prefer to buy a ready-made table, then we recommend following the link
his.ua
Steps to creating a console table
Step 1. Make or buy legs. The console table has beautiful legs. Surely you do not have a suitable machine for turning curved baluster legs: this is not a problem. Visit a hardware store: you will find a variety of table leg models and choose the appropriate part.
Large and massive wooden legs for a console machine
Step 2: Cut the board. To create the top and bottom of the table, use a three-meter board, ten centimeters thick, 20 centimeters wide. Cut the board with a saw. You will need four boards with a length of 150 centimeters. Cut out the parts with a saw.
We cut the board to make the top and bottom of the table
The table will take four boards, ten centimeters thick and 145 long. You will place them in a vertical position, attaching them to the previously cut boards. Four squares will be placed at the edges, you will see this in the picture.
4 boards for the top and bottom of the console table, 150 cm long
Additional four boards 10 cm wide and 145 cm long for vertical installation and 4 squares of 10 cm on each side
Step 3. Connection work. Take square parts that are ten centimeters wide, and place a board one hundred and forty-five centimeters long on their end part. Tighten the structure using screws. In the same way, repeating your steps, make the lower and upper blanks for the future table.
We connect square elements and boards 145 cm long, make two blanks for the top and bottom of the table
Step 4. Don't forget about the legs. We take the legs purchased in advance and screw them to a board one hundred and fifty centimeters long. Before this work, do not forget to properly mark the places where you plan to install the legs. Use plugs to close the holes.
We screw the legs to their placement points
Step 5. Make the top of the table. Step back two and a half centimeters from the edge and place the blank structure created earlier. Coat both sides with wood glue. Place a board on the workpiece, you will get something like a rectangular pie.
We form the top of the table using our blanks
Place the board on top of the workpiece again and screw it in place
Step 6. Bottom of the table. Since our table will have the same top and bottom, we will need to repeat the fifth step in relation to making the bottom of the future table. When you have completed all the work, you will have a real masterpiece that should be cleaned with sandpaper.
We repeat the same procedure with the lower part and get a finished console table
Console table: how to make it yourself?
The concept of a console table appeared during the reign of Louis XIV. In those distant times, these interior items were very popular, and they are no less in demand today. Console tables come in a variety of designs, but they have one thing in common: console means narrow. This type of furniture is very convenient to use in small spaces; it does not take up much space and is not far from the wall.
Console is a narrow table with straight or curved legs, suitable for different interiors.
Such different tables
Decorative console decorated with carvings
We will not talk about variations of console table models, because there are countless of them. Let's talk about the scope of application of this piece of furniture. The furniture looks great in hallways and living rooms, acting as an alternative to a buffet.
The console table in the hallway has both decorative and practical significance.
In the living room, consoles replace tables attached to sofas.
You can turn this furniture into something like a mini bar, or place a framed photo on it. An original idea to use a console table in a boudoir or for storing cosmetics.
Modern console table in the bedroom
Store your keys on a table in the hallway and place a candlestick or picture on it. And in the bedroom space, you can install a DVD player or TV on the console.
Forged console table for figurines in a modern interior
If you have your own office, store cigars or beautiful figurines on the table. And in the children’s room, place toys on this piece of furniture, put markers or boxes with construction sets.
White console table with drawers for various small items
Console with drawers for children's room
We'll tell you about creating a console table with your own hands - it's a simple, fun activity that will help you save a lot of money. To do this, you will need to purchase some tools and be careful and patient.
How to make a DIY console table from an old table
We cut the table into two parts lengthwise
You can use an ordinary old table that has served its purpose to create your own masterpiece.
| Old table | Main part |
| Saw | Saw off the required part |
| Sandpaper | Clean up |
| Dye | Paint |
We fix the metal corners on the back side - in the center and edges
Glue the fabric to the tabletop in order to get an original console
We attach it to the wall and get an original console in the hallway
Saw off the required part from the table and process it. The photo shows examples of such creations. If you want to create a masterpiece from scratch, read on for a step-by-step guide to action.
A bedside table on two legs from a sawn table is made in a similar way
Console under the TV in the bedroom and a bedside table in the hallway from one table
Steps to creating a console table
Step 1. Make or buy legs. The console table has beautiful legs. Surely you do not have a suitable machine for turning curved baluster legs: this is not a problem. Visit a hardware store: you will find a variety of table leg models and choose the appropriate part.
Large and massive wooden legs for a console machine
Step 2: Cut the board. To create the top and bottom of the table, use a three-meter board, ten centimeters thick, 20 centimeters wide. Cut the board with a saw. You will need four boards with a length of 150 centimeters. Cut out the parts with a saw.
We cut the board to make the top and bottom of the table
The table will take four boards, ten centimeters thick and 145 long. You will place them in a vertical position, attaching them to the previously cut boards. Four squares will be placed at the edges, you will see this in the picture.
4 boards for the top and bottom of the console table, 150 cm long
Additional four boards 10 cm wide and 145 cm long for vertical installation and 4 squares of 10 cm on each side
Step 3. Connection work. Take square parts that are ten centimeters wide, and place a board one hundred and forty-five centimeters long on their end part. Tighten the structure using screws. In the same way, repeating your steps, make the lower and upper blanks for the future table.
We connect square elements and boards 145 cm long, make two blanks for the top and bottom of the table
Step 4. Don't forget about the legs. We take the legs purchased in advance and screw them to a board one hundred and fifty centimeters long. Before this work, do not forget to properly mark the places where you plan to install the legs. Use plugs to close the holes.
We screw the legs to their placement points
Step 5. Make the top of the table. Step back two and a half centimeters from the edge and place the blank structure created earlier. Coat both sides with wood glue. Place a board on the workpiece, you will get something like a rectangular pie.
We form the top of the table using our blanks
Place the board on top of the workpiece again and screw it in place
Step 6. Bottom of the table. Since our table will have the same top and bottom, we will need to repeat the fifth step in relation to making the bottom of the future table. When you have completed all the work, you will have a real masterpiece that should be cleaned with sandpaper.
We repeat the same procedure with the lower part and get a finished console table
Decorating
Finished painted table in the living room interior
We recommend simply painting the resulting table. Nowadays a wide range of different wood varnishes are sold. For example, paint a walnut-colored finish on the table and use Vaseline to lubricate the structure after the paint has dried. Apply the last layer of gray paint (when this coating dries, sand the end elements). As a result, you will get a shabby table with beautiful legs. This piece of art is perfect for any living room or hallway. As you understand, making a table is very simple.
Long console table with decorative elements in the interior
Video: Making a console table with your own hands / DIY Making a Console Table
Photo gallery of console tables in various rooms and styles:
';
blockSettingArray[8][“setting_type”] = 1; blockSettingArray[8]["element"] = "h3"; blockSettingArray[8][“elementPosition”] = 1; blockSettingArray[8][“elementPlace”] = 7; blockSettingArray[9] = []; blockSettingArray[9]["minSymbols"] = 0; blockSettingArray[9]["minHeaders"] = 0; blockSettingArray[9]["text"] = "; blockSettingArray[9][“setting_type”] = 1; blockSettingArray[9]["element"] = "h3"; blockSettingArray[9][“elementPosition”] = 1; blockSettingArray[9][“elementPlace”] = 8; blockSettingArray[10] = []; blockSettingArray[10]["minSymbols"] = 0; blockSettingArray[10]["minHeaders"] = 0; blockSettingArray[10]["text"] = "; blockSettingArray[10][“setting_type”] = 1; blockSettingArray[10]["element"] = "h3"; blockSettingArray[10][“elementPosition”] = 1; blockSettingArray[10][“elementPlace”] = 9; blockSettingArray[11] = []; blockSettingArray[11]["minSymbols"] = 0; blockSettingArray[11]["minHeaders"] = 0; blockSettingArray[11]["text"] = "; blockSettingArray[11]["setting_type"] = 1; blockSettingArray[11]["element"] = "h3"; blockSettingArray[11][“elementPosition”] = 1; blockSettingArray[11]["elementPlace"] = 10; blockSettingArray[12] = []; blockSettingArray[12]["minSymbols"] = 0; blockSettingArray[12]["minHeaders"] = 0; blockSettingArray[12]["text"] = "; blockSettingArray[12]["setting_type"] = 1; blockSettingArray[12]["element"] = "h3"; blockSettingArray[12][“elementPosition”] = 1; blockSettingArray[12]["elementPlace"] = 11; blockSettingArray[13] = []; blockSettingArray[13]["minSymbols"] = 0; blockSettingArray[13]["minHeaders"] = 0; blockSettingArray[13]["text"] = "; blockSettingArray[13]["setting_type"] = 1; blockSettingArray[13]["element"] = "h3"; blockSettingArray[13][“elementPosition”] = 1; blockSettingArray[13]["elementPlace"] = 12; blockSettingArray[14] = []; blockSettingArray[14]["minSymbols"] = 0; blockSettingArray[14]["minHeaders"] = 0; blockSettingArray[14]["text"] = "; blockSettingArray[14]["setting_type"] = 1; blockSettingArray[14]["element"] = "h4"; blockSettingArray[14][“elementPosition”] = 1; blockSettingArray[14][“elementPlace”] = 1; blockSettingArray[15] = []; blockSettingArray[15]["minSymbols"] = 0; blockSettingArray[15]["minHeaders"] = 0; blockSettingArray[15]["text"] = "; blockSettingArray[15]["setting_type"] = 1; blockSettingArray[15]["element"] = "h4"; blockSettingArray[15][“elementPosition”] = 1; blockSettingArray[15]["elementPlace"] = 2; blockSettingArray[16] = []; blockSettingArray[16]["minSymbols"] = 0; blockSettingArray[16]["minHeaders"] = 0; blockSettingArray[16]["text"] = "; blockSettingArray[16]["setting_type"] = 1; blockSettingArray[16]["element"] = "h4"; blockSettingArray[16][“elementPosition”] = 1; blockSettingArray[16]["elementPlace"] = 3; blockSettingArray[17] = []; blockSettingArray[17]["minSymbols"] = 0; blockSettingArray[17]["minHeaders"] = 0; blockSettingArray[17]["text"] = "; blockSettingArray[17][“setting_type”] = 1; blockSettingArray[17]["element"] = "h4"; blockSettingArray[17][“elementPosition”] = 1; blockSettingArray[17]["elementPlace"] = 4; blockSettingArray[18] = []; blockSettingArray[18]["minSymbols"] = 0; blockSettingArray[18]["minHeaders"] = 0; blockSettingArray[18]["text"] = "; blockSettingArray[18]["setting_type"] = 1; blockSettingArray[18]["element"] = "h4"; blockSettingArray[18][“elementPosition”] = 1; blockSettingArray[18]["elementPlace"] = 5; blockSettingArray[19] = []; blockSettingArray[19]["minSymbols"] = 0; blockSettingArray[19]["minHeaders"] = 0; blockSettingArray[19]["text"] = "; blockSettingArray[19]["setting_type"] = 1; blockSettingArray[19]["element"] = "h4"; blockSettingArray[19][“elementPosition”] = 1; blockSettingArray[19]["elementPlace"] = 6; blockSettingArray[20] = []; blockSettingArray[20]["minSymbols"] = 0; blockSettingArray[20]["minHeaders"] = 0; blockSettingArray[20]["text"] = "; blockSettingArray[20]["setting_type"] = 1; blockSettingArray[20]["element"] = "h2"; blockSettingArray[20][“elementPosition”] = 1; blockSettingArray[20][“elementPlace”] = 1; blockSettingArray[21] = []; blockSettingArray[21]["minSymbols"] = 0; blockSettingArray[21]["minHeaders"] = 0; blockSettingArray[21]["text"] = "; blockSettingArray[21]["setting_type"] = 3; blockSettingArray[21]["element"] = "p"; blockSettingArray[21]["directElement"] = "#toc_container"; blockSettingArray[21][“elementPosition”] = 0; blockSettingArray[21][“elementPlace”] = 1; blockSettingArray[22] = []; blockSettingArray[22]["minSymbols"] = 0; blockSettingArray[22]["minHeaders"] = 0; blockSettingArray[22]["text"] = "; blockSettingArray[22]["setting_type"] = 3; blockSettingArray[22]["element"] = "p"; blockSettingArray[22]["directElement"] = "social"; blockSettingArray[22][“elementPosition”] = 0; blockSettingArray[22][“elementPlace”] = 1; blockSettingArray[23] = []; blockSettingArray[23]["minSymbols"] = 0; blockSettingArray[23]["minHeaders"] = 0; blockSettingArray[23]["text"] = "; blockSettingArray[23]["setting_type"] = 3; blockSettingArray[23]["element"] = "p"; blockSettingArray[23]["directElement"] = "social"; blockSettingArray[23][“elementPosition”] = 0; blockSettingArray[23][“elementPlace”] = 2; blockSettingArray[25] = []; blockSettingArray[25]["minSymbols"] = 0; blockSettingArray[25]["minHeaders"] = 0; blockSettingArray[25]["text"] = "; blockSettingArray[25]["setting_type"] = 3; blockSettingArray[25]["element"] = "p"; blockSettingArray[25]["directElement"] = "#nav_menu-2"; blockSettingArray[25][“elementPosition”] = 1; blockSettingArray[25][“elementPlace”] = 1; blockSettingArray[26] = []; blockSettingArray[26]["minSymbols"] = 0; blockSettingArray[26]["minHeaders"] = 0; blockSettingArray[26]["text"] = "; blockSettingArray[26]["setting_type"] = 3; blockSettingArray[26]["element"] = "p"; blockSettingArray[26]["directElement"] = "widget_construct"; blockSettingArray[26][“elementPosition”] = 1; blockSettingArray[26][“elementPlace”] = 1; blockSettingArray[27] = []; blockSettingArray[27]["minSymbols"] = 0; blockSettingArray[27]["minHeaders"] = 0; blockSettingArray[27]["text"] = "; blockSettingArray[27][“setting_type”] = 1; blockSettingArray[27]["element"] = "h2"; blockSettingArray[27][“elementPosition”] = 1; blockSettingArray[27][“elementPlace”] = 1; var jsInputerLaunch = 15; Making a massage table with your own hands The benefits of massage have been known since ancient times. It is used to heal and relax the body. For a high-quality massage, you must use a special device. If you are young... How to make a table from epoxy resin: design and manufacturing features A table made from epoxy resin looks unusual. Thanks to the use of this material, it is possible to create unique designs that look good in any interior. Using resin you can…
Making a table for a sewing machine with your own hands
Nowadays, sewing can be considered not only as the art of creating clothes, interior items and accessories, but also a way to turn a hobby into a business project. Custom-made items are appreciated...
Making your own table decor
The purchase of furniture in every family is always an important event: it is associated with a change in the design of the apartment and significant financial investments. And I want the comfort that has been created over the years to be preserved in the new...
We do the restoration of the table with our own hands
Sooner or later there comes a time when a wooden table loses its former attractiveness. Sending it to gather dust in the attic or throwing it out completely is not the right solution. The best way out of the current situation...
Dining table style in a small living room
The living room plays an important role in every home. This is a place where the whole family and friends gather, and holidays are organized. It can also be a room in which you can have a good rest and watch after…
berkem.ru
Decorating
Finished painted table in the living room interior
We recommend simply painting the resulting table. Nowadays a wide range of different wood varnishes are sold. For example, paint a walnut-colored finish on the table and use Vaseline to lubricate the structure after the paint has dried. Apply the last layer of gray paint (when this coating dries, sand the end elements). As a result, you will get a shabby table with beautiful legs. This piece of art is perfect for any living room or hallway. As you understand, making a table is very simple.
Long console table with decorative elements in the interior
Wooden reflection
But let's return to mirrors. Just as an image on a computer screen is made up of many pixels, Daniel’s mirrors are real models of pixel art. Another thing is that Rozin looks at the issue much more broadly: the elements of his works can be of different colors, different shapes, different sizes. Danni also uses a variety of materials in the manufacture of mirrors - wood, metal, plastic, etc.
Detail of a mirror made of shiny balls (Shiny Balls Mirror, 2003), in which the picture is formed by balls that are buried in grooves or protruding from them.
The principle of operation of a pixel mirror is quite simple. The viewer approaches, the camera captures the image and transfers it to the computer’s memory, the picture is processed, and the output “pixels” depict some semblance of the viewer - either quite accurate or schematic (depending on the material). The principles of image formation in all works are different - Daniel constantly experiments with this. For example, Brushed Metal Mirror (2011) consists of 721 motorized steel disks, each of which can take a different position relative to the viewer. Depending on the angle of inclination, the disks reflect more or less light - and the viewer's image is formed by shadows and highlights; Some of Danni’s other works are arranged in a similar way. And in Circles Mirror (2005), the picture is made up of disks overlapping each other. Depending on which half of the disk is dark or light on the outside, the part of the picture it forms takes on one shade or another.
Wooden Mirror (1999)
In total, it turns out something like this: you approach some kind of abstract mosaic, with a slight rustling, some of the elements deviate from the main axis, and - boom! - you see your reflection. Congratulations, you have become a work of art created by American artist Daniel Rosin.