August 1, 2020 Specialization: facade finishing, interior finishing, construction of dachas, garages. Experience of an amateur gardener and gardener. We also have experience in repairing cars and motorcycles. Hobbies: playing the guitar and many other things that I don’t have enough time for :) Plastic pipes are an excellent material from which you can assemble not only pipelines, but also all kinds of crafts. Moreover, working with them is quite easy and simple, not to mention that this procedure is very exciting. As an example, in this article I will give 10 of the most interesting ideas for using plastic pipes.
Features of making crafts from plastic pipes
In the hands of a master, plastic pipes and fittings (angles and tees) turn into a real construction set from which you can assemble any frame structures. The only thing you need to pay some attention to is the choice of pipes. For example, metal-plastic is not suitable for these purposes, as its bending strength is very low.
Therefore, it is best to use the following types of pipes:
Before gluing the PVC pipe to the fitting, you need to chamfer it to get rid of burrs that could scrape off the glue during the process of joining the parts.
Office desk with plastic frame
Buying even the cheapest office desk can be a big hassle for some people, so we'll show you how to make a desk out of plastic pipes. This project differs from the previous one in its complexity, so you will have to think through some parts yourself, but we will try to explain everything to you as clearly as possible.
READ ALSO: How to fix a leak in a plastic pipe with your own hands
First of all, you need to decide on the size of the table. In our case, we take a ready-made tabletop (915×2030 mm), under which we will assemble the frame. When choosing a tabletop for your own table, pay attention to its weight and follow the rule: the lower the weight, the better for your table. The best solution for a countertop would be a hollow door leaf. You can also assemble the tabletop yourself using flat boards, fasteners, a saw and a drill.
First of all, prepare 12 meters of plastic pipe and cut it into the following parts:
- 5 parts of 7.5 cm;
- 10 pieces of 30 cm;
- 4 parts of 50 cm;
- And 4 pieces of 75 cm.
Among the other parts for the frame you will need the following:
- 4 T-fittings;
- 4 four-way fittings;
- 2 cross fittings;
- 10 plugs for pipes and fittings.
Having prepared all the necessary parts, you can begin to assemble a table from polypropylene pipes. It is better to perform the first assembly without using glue, and after assembly, glue all the connections one by one. Begin assembly by constructing the sides of the frame on which the tabletop will rest.
Next, assemble the back part, which will connect the two already assembled. To give the table additional stability, we recommend adding a third leg to the back wall. When assembling the table, carefully monitor the parallelism of all elements in order to ultimately obtain an even structure.
READ ALSO: Do-it-yourself welding of polypropylene pipes: how to properly weld polypropylene pipes
At the final stage, it is necessary to connect all the parts into a single structure, obtaining a table frame. Check it for strength, correct any unevenness, and then glue all connections.
Having made the frame, you can begin installing the tabletop. This can be done in many different ways, but we will consider the most reliable and aesthetically correct of them.
Homemade options
Option 1: Laptop stand
Let's start with the simplest, but nevertheless very useful product - a laptop stand. In the photo below we see how to make a stand from PVC pipes.
So, the instructions for making it are quite simple:
- First of all, measure your laptop so that the stand fits it perfectly;
- then cut the tubes according to the obtained dimensions:
- The 2 tubes should be approximately 5cm longer than the depth of the laptop;
- 1 tube should be 2-3 cm shorter than the width of the laptop;
- 2 short tubes – the height of the stand depends on their length;
- now glue the corners to the two long tubes and connect them with the short tubes, resulting in 2 L-shaped parts;
- after that, glue the corners to the short tubes and connect the parts with the longest tube, which should be perpendicular;
- then glue the corners to the two ends of the L-shaped parts, which will serve as limiters so that the laptop does not move off the stand;
- At the end of the work, the product can be painted in any color you like with spray paint.
Now it will be more convenient for you to work with your laptop, and you can also place it on the bed or sofa and it will not overheat.
Option 2: sled for children
Sleds made of plastic pipes are a more complex design, however, they are made in almost the same way as a laptop stand. Therefore, every skilled person can cope with the task.
.
To make a sled you will need the following materials:
- two pipes with a diameter of 40 mm;
- tips for pipes 40 mm;
- pipes with a diameter of 25 mm;
- tees and angles at 90 and 45 degrees for pipes with a diameter of 25 mm.
The sled is made as follows:
- start work by preparing a drawing. Use any sled in the photo above as the basis for the design. The main task of the drawing is to indicate the dimensions of all parts, which will simplify and speed up further work
; - Next, make runners from magpie pipes. To do this, mark the places where they bend with a pencil and heat them over an open fire, rotating the pipe along its axis. When the plastic softens, the ends should be bent so that the runners slide easily through the snow and do not bury themselves. It is advisable to bend the runners not only in front, but also in the back. After this, you need to put plugs on the finished runners;
- Now you need to assemble the upper part of the sleigh, i.e. frame to which the seat will be attached. The frame must have racks for connection to the runners. This design is a rectangle with stiffeners in the form of jumpers. To install jumpers and racks, use tees;
- if a small child will ride the sled, be sure to also make a backrest. To do this, use short pieces of tubes and 45-degree angles;
- when the frame is ready, you need to connect it with the runners. To do this, install it on the skids and make markings, indicating the holes into which the racks will be inserted;
- now drill holes of the required diameter so that the racks can fit into them;
- after that, connect the runners to the posts by inserting them into the holes until they stop. To fix the racks in the runners, use self-tapping screws;
- To complete the work you need to make a seat. To do this, you can use wooden slats that are screwed to the frame with self-tapping screws or planks.
This completes the sled making process.
Option 3: rack
Another simple and quite useful design for household use is a rack. It can be useful in the garage, for storing all kinds of small items, in the country house, or even in the apartment to conveniently arrange canned food in the pantry.
The process of making a rack is extremely simple:
- start work by making a drawing, indicating the dimensions of all parts;
- then, according to the drawing, assemble the racks and connect them with jumpers using tees;
- now install the rack and place boards on the lintels that will serve as shelves;
- If the rack turns out to be high, you need to provide brackets for attaching the structure to the wall.
Option 4: Snowshoes
We figured out how sleds for children are made, now we’ll look at how to make snowshoes with your own hands from plastic pipes for adults. To do this you will need the following materials:
- 2 pipes with a diameter of 20-30 mm, one and a half meters long;
- nylon cord 4-5 mm thick – 40-50 meters;
- elastic band for fixing the foot.
The process for making snowshoes is as follows:
- cut a piece 200 mm long from each tube;
- on long workpieces, apply a mark in the middle and heat them in this place over an open fire, for example, over a gas burner;
- when the plastic softens, you should bend the pipes around a cylindrical object, for example, you can use a kettle for this purpose. At the same time , do not apply a lot of force during the bending process; it is better to heat the workpiece again so that it does not crack
; - Heat the resulting sock again and give it an angle of approximately 120-130 degrees. Do the same with the ends of the pipes;
- Now both ends of the pipe should be connected. To connect pipes, you can use self-tapping screws;
- after this, sand the frame of the snowshoes so that the surface is rough;
- Now you need to weave a mesh of nylon cord on the frame. You can connect the nodes according to the diagram above.
While making the net, you need to tie a jumper to the snowshoes. When the product is ready, tie the elastic bands to secure the snowshoes to the leg.
The size of snowshoes depends on the size of your feet. With a foot size of 42, a snowshoe with a length of about 60 cm and a width of about 25 cm is sufficient.
Option 5: catamaran
For lovers of outdoor activities, we can recommend making a homemade catamaran from plastic pipes. This design is based on large-diameter external sewer pipes. Their length should be about two meters.
The manufacturing process for this product looks like this:
- place the three pipes at the same distance from each other and connect them with pipes of smaller diameter, using clamps or other fasteners. The distance between the two outer sewer pipes should be about one and a half meters;
- then glue plugs on both sides of the pipes. To reduce the resistance of the floats, “bend” them at the front using 45-degree corners;
- on the base of the tubes connecting the floats, lay a wooden shield that will serve as a deck;
- A seat, which can be made from boards, should be secured to the shield.
At this point the catamaran is ready. This floating device is perfect for fishermen, as well as just lovers of walking on the water.
To steer the catamaran, use the oars from the kayak. Of course, if you wish, you can develop and implement a more complex design with pedal-driven blades.
Option 6: tent
The tent is made according to the same principle as all other structures - it is based on pipes and fittings. The only thing is that the parts do not need to be glued or soldered to make the product collapsible. Another feature is that you will have to sew an awning, for example, from tarpaulin or other suitable fabric.
The design manufacturing process looks like this:
- To make it easier to work, draw a drawing indicating the dimensions of all parts and the location of fittings. The design of the tent is quite simple - the base is a rectangle, to which four posts are attached at the corners. The roof is attached to the posts on top. If the roof is gable, then to assemble it you will need 45 degree fittings;
- after that, cut the tubes into parts of the required length;
- Now, from the received parts and fittings, assemble the frame according to the drawing;
- Next you need to make an awning. To do this, cut the material into sheets for each side of the tent, as well as the roof, and then sew them;
- Now put the resulting awning on the tent to make sure that the job is done correctly.
For the tent, use high-quality fittings so that they hold the pipes firmly and do not crack.
Option 7: making a velomobile
For those who like to design and invent, we can recommend making a velomobile. However, keep in mind that for its manufacture you will need more durable pipes than for the products described above
.
An excellent solution is PVC pipes with metal reinforcement with a diameter of 1/4 inch. However, it is almost impossible to find such material on the domestic market. It can be replaced with 40 mm uPVC pipes intended for swimming pools, although their disadvantage is the high price of the fittings.
In addition, you can use ordinary polypropylene reinforced pipes, into which metal tubes of suitable diameter are inserted. Another option to increase the strength of pipes is to fill them with foam.
The process of making a velomobile frame is not complicated. The structure is assembled according to the same principle as all other products - the tubes are connected using fittings and thus the frame is assembled.
The most difficult thing when performing this task is to securely fasten the metal parts - the wheel axles and the drive. To do this, use metal plates that can be secured to the frame with bolts. To screw the bolt into the pipe, use bushings that are glued into place.
As for the mechanical part, all parts are used from the bicycle. The only thing is that you can use the electric motor, as shown in the photo above. In this case, an electric drive is installed on one rear wheel, and a mechanical drive on the second.
To implement a mechanical drive, an axle with bends in the form of pedals should be placed in front, as in the photo below. This axis, in turn, transmits torque to the sprocket, and then everything is like a regular bicycle.
Here, in fact, are all the main nuances of making a velomobile. You will probably find solutions to other design problems yourself.
Option 8: zherlitsa
If you love fishing and experiment with different gear, then you will probably be interested in this idea of using a plastic pipe, which is to make a summer girder. To do this, you will need a piece of sewer pipe with a diameter of 32 mm and a length of 10 cm, as well as a fishing line, hook and sinker.
The vent is made from a plastic pipe as follows:
- remove the edges from both ends of the workpiece;
- then drill a hole with a diameter of about 5 mm, stepping back from the edge of about 1.5 cm. This hole will be used as a line stopper;
- Now drill a through hole on the opposite side of the workpiece, i.e. there should be two holes in the tube opposite each other;
- Now you need to equip the workpiece. To do this, tie a suspension of fishing line to two opposite holes (for hanging the girder). The suspension should end with a noose loop;
- Now tie the fishing line to one hole and wrap it around the tube. 10 meters will be enough;
- You need to put a sliding sinker on the end of the fishing line, and also attach a tee hook;
- To fix the fishing line in the working position, put a tight rubber ring on the workpiece.
Now the gear is ready, all that remains is to prepare the bait and go to the nearest suitable body of water to test it in action.
Option 9: folding chair
If you liked the previous option of using a plastic pipe, then a folding one will probably come in handy too. Moreover, it is produced extremely simply and quickly:
- from tubes and corners, assemble a rectangle with dimensions of approximately 40x30 cm; if desired, you can make the chair even more compact;
- now assemble a second similar rectangle. Its height should be the same, and its width a few centimeters smaller so that it can fit tightly into the first rectangle;
- now drill holes opposite each other in the center of the long sides of each rectangle;
- then connect both parts using bolts;
- To finish the job, sew on a rag seat, as in the photo above.
As a result, you have a light and compact chair that can even be put in a backpack.
Option 10: waterfall for children
As you know, children love to splash in the water on hot summer days. Therefore, if you have a summer house, do not deny them this pleasure and make a waterfall.
The design of this device is extremely simple. It is a U-shaped frame. In the crossbar of this frame from below you need to drill small holes through which streams of water will fall down.
To ensure that the crossbar stands firmly on the ground, attach the legs from below, perpendicular to the frame, as shown in the photo above. Attach a hose connection or threaded fitting to one of the legs. Install plugs on the remaining ends of the legs.
Now the waterfall is ready, all that remains is to connect the water to it. For these purposes, you can use a tank from a summer shower or install a special container where the water will be heated under the rays of the sun.
Original designs
The previous chapter talked about crafts that should not be constructed, or simply assembled. Now we will talk about more capacious subjects.
Let's start with the flower stand. It can be made for any number of flowerpots. You should think about where it will be located in order to correctly calculate how much space it can take up. Based on this, a plan is drawn, pipes are cut and connected with adapters. If you get tired of this stand, you can easily disassemble it. And the big advantage is the ability to install it outside in your dacha, and nothing will happen to it.
And if you have large sewer pipes lying around, they can be used as temporary flower pots.
Technical lamps. The idea of transforming a pipe structure into a lively lamp is a very original idea. A minimum of details and interesting execution.
The hallway hanger can also boast of its practicality. It is assembled from several long pipes and small sections. In appearance it resembles a store hanger.
If you have a baby or several babies, and they are growing up and starting to move actively, and a purchased playpen is very expensive, then build your own. The design is very easy to assemble, just measure the space you are ready to allocate for a children's space. And buy pipes and adapters, which, when connected, form a wonderful playpen.
Related article: DIY floss organizer made of cardboard: master class with video
And for older children or adults who love to have fun, small football goals are suitable. This would be a fun build to make with kids.
From furniture structures, you can build chairs, tables, children's double bunk beds and shelving. And this is only part of the idea that can be realized by making friends with plastic pipes. Try making products for your summer cottage, greenhouses, firewood stands, animal feeders. The list of products is limited only by your needs and imagination.
Conclusion
From plastic pipes, as we found out, you can make many interesting and useful crafts. We have considered only 10 options for their use as an example. However, if you stretch your imagination a little, you will probably discover a lot of other, no less interesting ideas.
From the video in this article you can get more information about how sleds are made from plastic pipes. If some points are not entirely clear to you, ask questions in the comments, and I will be happy to answer you.
August 1, 2020
If you want to express gratitude, add a clarification or objection, or ask the author something, add a comment or say thank you!
Using PVC pipes. But greenhouses and sheds are not all that can be made from PVC and aluminum pipes of different diameters. Furniture, decorative items for the home, organizers, shelving, even weapons are beautiful bows of different shapes. People's imagination is constantly being embodied in new PVC forms, and we have made a selection of the most interesting DIY projects for you.
Let's start with homemade furniture made from aluminum and PVC pipes connected with fittings. There is both children's furniture and options for adults, cute designs that will fit into any interior, and shelving with many shelves.
DIY furniture made from pipes
Low table made of pipes and wood
A table made of pipes and wood.
Here is a detailed video instruction on how to make it.
Dinner table
Dining table
This table made of three planks and metal pipes can be used as a dining table. A note of industrial style in the design of the room. You can see the manufacturing technology.
Large rack made of pipes and wood
Pantry rack
A rack for a spacious pantry or garage is an excellent solution for storing all sorts of things. It's durable and looks cool. Read the assembly manual.
Shelving for the room
Rack for the hall
TV, audio system, souvenirs and books - everything will fit on this homemade rack. Let's see how to make it.
Another rack
Rack made of metal and wood
The shape of this rack is somewhat unusual, as if it was planned for specific items. Looks cool with paintings, figurines and other contents. There is a list of building materials and a story about production.
Coffee table with glass top
Coffee Table
The legs of this table are made from bent and painted PVC pipes. As for the tabletop, it doesn’t have to be made of glass, but it certainly looks cooler. you will find manufacturing instructions.
Aluminum tube bed
Bed with aluminum tube frame
Large bed frame with canopy made of aluminum tubes and fittings. Manufacturing Guide.
A simpler bed made of pipes and wood
Bed made of pipes and wood
This bed looks simpler and is easier to make. You will need pipes, fittings, wooden "ribs" and a manufacturing manual.
Canopy over the crib
Canopy over the crib
Anyone can make this simple canopy from PVC pipes. It turns out a children's bed with a tulle canopy.
Simple towel rack
Towel Dryer
A few PVC pipes and fittings and your towel dryer is ready.
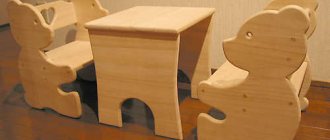
Cute chairs for children
Chairs for Kids
These cute chairs are easy to make yourself. Frame made of PVC pipes and seat woven from threads. You can see how to braid chairs.
Simple Camping Chairs
Outdoor Camping Chairs
Small, comfortable chairs for the patio or outdoor camping. Children will definitely like bright furniture. See how to make such chairs.
Place to play
Place to play
For kids, you can organize a place to play with a PVC frame.
Beach style bar counter
Bar counter
PVC pipes painted to resemble bamboo, various attributes such as exotic masks and a thatched roof - this bar counter will be an excellent reminder of exotic hot countries and beach holidays. Read detailed manufacturing instructions.
A simple and convenient drawing tablet
PVC Tablet
This lightweight drawing tablet is perfect for home practice. There is no need to attach paper to it - the album is placed on a special stand along the bottom edge of the tablet. Read how to make it.
Shelving for the garden
After renovation, not only polypropylene pipes may remain in the house, but also a metal profile, from which you can try to make a shelving for your summer house without using welding. To work, we only need a tape measure, a pencil, a screwdriver and a hacksaw.
First of all, it is necessary to design the future rack. Draw a diagram on paper, observing all dimensions. Next, you can purchase an additional profile to the existing one, and also find several sheets of plywood 15 mm thick. You can also make a rack from PVC pipes with your own hands, using the diagram for the profile.
READ ALSO: Everything about installing a well pump with your own hands
Let's look at the manufacturing process using a specific example:
- Take the profile and cut it into pieces: 4 vertical posts, 8 front and 8 rear crossbars;
- Assemble 4 frames that should become shelves in the future;
- Using self-tapping screws, secure the resulting frames to the vertical posts;
- If you wish, you can screw the rack to the wall and paint it, after which you can lay plywood on the frames to make shelves.
Interior decorative items and gifts
Curtain rod
Curtain rod
Nice cornice made of painted PVC pipes and decorative elements. Read more about production.
Dresser decoration
Decorating a chest of drawers
PVC pipes, cut into thin rings, can serve as decoration for furniture.
Creative mirror frame
Frame for the mirror
And again PVC pipes, cut into thin rings. Cut it out, put it in the right order, glue it together and admire the new frame.
Piggy bank
Piggy Bank Pig
This funny piggy with a base made from a scrap of PVC pipe can be given to someone or placed at home as a souvenir. Here
At the moment, many people have PVC pipes in their households. If you have already become tired of them, then under no circumstances should you even think about throwing them away and replacing them with others. They have a whole host of advantages.
First of all, one cannot fail to note the pleasant white color. It is perfect for creating interesting products. In addition, you can use the most common glue to hold the elements together. If you don’t glue everything, then it’s even worse. You will receive a kind of LEGO constructor. Let's look at some interesting ideas that might appeal to you. You can think for yourself what you will do, just show your imagination.
Just look at the high chair pictured below. Surely you will want to build it. The temptation is very great.
You can easily make a folding chair from one pipe. It is ideal for a picnic.
Do you want everything to look organic? Then simply create a set of several chairs and a table from the same pipes.
A children's bunk bed would also be great. But you need to choose pipes of optimal diameter so that the load is distributed.
If you have a dog at home, then you can create a bed for it too. You just need to take into account the weight and size of the dog.
From 1/3 or 1/2 pipes you can make a very good stand for your laptop.
Want to get a good laundry basket? Then just make it out of pipes. You just need to make calculations according to your needs. Just look how stylish it looks.
You can do bigger things. In particular, a hanging swing, on which you can have a great time in the country.
Are there only leftovers from PVC pipes? Then you can simply add a bottom to them and store pens, pencils and much more. It all looks very creative.
Very often situations arise in which it is necessary to solve the problem of drying clothes. Today we’ll talk about the problem in small summer cottages or during outdoor recreation. In these cases, very often you have to face the fact that it is impossible to place a stationary dryer due to lack of free space.
In such cases, portable dryers come to the rescue. You can buy them ready-made, or you can make them yourself, which will be much cheaper and more interesting. One option for making a portable clothes dryer is using PVC plastic pipes. This is a unique material that can be used not only for assembling plumbing systems, but also for arranging various furniture items.
Functional crafts
We will conduct a review describing the production of pleasant little things for the home; without spending a lot of effort and time, you can make all the following items yourself. The big advantage is the low cost of such products.
Making an organizer from cut pipes is as easy as shelling pears. It is suitable for small items in a workshop or garage, or even for a desk, convenient and practical to use. To create it, you just need to cut the pipes to the required height and, if desired, connect them together with quick-drying glue or a hot-melt gun.
It’s convenient that for such an organizer you may not need to buy pipes specially, but just find the sections left over from the repair.
You can create original bookshelves. This invention belongs to the modern style - high-tech. Here you simply think through and draw on a piece of paper the selected number of turns for the books, after which the pipes are cut and connected with purchased adapters. Even a teenager can make such a shelf for books.
Article on the topic: Weaving from paracord: patterns for weaving bracelets with your own hands with photos
A frame for a mirror or for photographs will not even look homemade, and you will spend a very small piece of pipe on it. The pipe is simply cut into several centimeter circles, which are glued together according to the invented shape. The frame can be round, square, star-shaped or any other.
Shoe shelf. Shoe lovers and those with limited storage space will definitely love the idea of creating such a shelf. A plus is the reasonable distribution of hallway space, since a regular shelf is limited in height, and these individual pipes for each pair can rise even to the ceiling.
You can also make funny shapes from pipes, example in the photo:
Let's talk about pipes
On the Internet you can find quite a lot of products that can be made from plastic material. If we talk about a summer cottage, then such design options as all kinds of shelves, folding chairs, dryers and even greenhouse frames are possible. This is not the entire list for the manufacture of which PVC pipes can be used.
Even a children's highchair can be made from plastic pipes
The question often arises: is it possible to make similar products from polypropylene pipes? Of course yes. But there are some nuances. Firstly, the products will be gray in color, and secondly, a soldering iron will be required to connect them.
But still I would like to note the advantages of PVC pipes:
- products made from them have a beautiful aesthetic color;
- simple and convenient to connect, like a Lego set;
- If you do not use glue for joining, you will get a collapsible structure, which is very convenient for transportation.
Propylene material does not have such features.
If the goal is to make a strong single structure, then glue is used to connect the elements.
Tools and materials required for work
Since modern plastic is not toxic, pipes can be used to make children's hangers. In addition, this design is quite compact, so you won’t have to spend a lot of time creating it, and it won’t take up extra space in the nursery.
To make a children's clothes hanger you will need the following:
- pipe with a diameter of 2 centimeters and a length of 125 centimeters;
- pipe with a diameter of 2.5 centimeters and a length of 260 centimeters;
- tees - 15 pieces (according to pipe diameters);
- plugs – 13 pieces;
- adapters – 2 pieces;
- turning corners – 2 pieces.
Depending on the type of furniture that you plan to make, the set of materials and tools may vary. But basically the following tools will be required for the job:
- perforator;
- screwdriver;
- hacksaw;
- scissors or knife.
Materials required for work:
- pipe cutting;
- glue;
- connecting elements of different shapes;
- stubs.
To make furniture look more beautiful, paint is useful. Beds, tables, shelves can be painted in the color you like. For beds in the children's room, choose delicate pink, blue, bright orange, yellow shades.
PVC materials
Soldering iron for welding plastic pipes
Variety of types of plastic pipes
Types of plastic pipe connections
Stages of the plastic pipe welding process
Models made from water pipes turn out to be unusual and original. They decorate the room, garden plot. Handmade plastic furniture will add zest to the interior and attract the attention of guests.
Furniture is made from plastic pipes. Two types of materials are used in production: polypropylene (PP) and polyvinyl chloride (PVC). Each of them has its own characteristics and is suitable for the production of different products. Polyvinyl chloride is a cheaper material. It is more often used for sewer pipes.
- strength and durability;
- ease of installation;
- low cost.
We suggest you read How to use iodinol for chickens
The disadvantage of PVC is that when exposed to high temperature water, the pipes begin to deform. In contrast, products made from polypropylene are not subject to change in shape at high water temperatures. They are able to withstand liquid heating up to 60 degrees, and even more if the pipe is reinforced.
Both materials are equally suitable for making furniture. In addition, there are a huge variety of items that are made from scraps. These are shelves, stands, mirror frames and more. The furniture is easy to assemble. The structure consists of pipes and fittings, the elements are also glued together.
Classic polymer heating pipes can be used to create furniture that will fit perfectly into the interior of the garden.
Children's sleds that can be made from lightweight polyvinyl chloride pipes.
Children's chair made from scraps of PVC pipes.
Features of working with PVC pipes
Adhesive for PVC pipes
In the manufacture of any product, accurate measurements and correct cutting of the plastic are required. Otherwise, we can only talk about a pitiful semblance of furniture.
Thus, in order for the result of the work to please you and last a long time, you must adhere to some rules when working with pipes:
- measure the required length of pipe using a tape measure and mark it with a marker;
- make a small incision in the marked place using a knife;
- Next, carefully fixing the pipe in a vice, we cut the pipe using a hacksaw.
A pipe cutter for plastic pipes is also used for this operation.
Pipe cutter for plastic pipes
In order for connections to be made easily, the cut should be made at a right angle.
Then sand the cut to prevent chips or nicks.
If a curved part is required, the smoothness of the lines is achieved by heating the material with a gas burner, then giving it the desired shape by hand and leaving it to harden for a while.
If the household does not have a gas burner, then heating can be done over a regular gas stove.
Clothes dryer - step by step instructions
You can choose the shape of the dryer at will
Let's look at how to make a portable clothes dryer from plastic pipes with your own hands. The appearance of the manufactured dryer resembles an easel. To make it you will need:
- pieces of plastic pipe of different lengths;
- two connecting corners;
- several tees (their number is exactly twice the number of drying jumpers);
- two clamps for fastening pipes.
The dryer consists of two rectangular parts of the same length but different widths. The width of the second rectangle should be 10 cm smaller. The width of the product itself should be determined to your taste based on conditions such as the amount of laundry and the stability of the dryer. For an example of a simple clothes dryer on a radiator, see this video:
The clothes dryer is ready. When drying clothes, it is installed in the shape of the letter “l”, and clothes are hung on the crossbars. It is very convenient in the household. When it rains, it can be quickly moved under a canopy. For the secrets of quick and smooth fitting of tubes, watch this video:
As you can see, making a dryer from plastic pipes is very easy, quick and interesting. Thanks to the positive characteristics of this material, such a product will last quite a long time, since the plastic is not susceptible to corrosion and does not require periodic repairs.
From plastic pipes with your own hands.
Rules for assembling shelves from plastic products
You can assemble a rack from pipes with your own hands in just a few hours if you have all the tools and materials, and it doesn’t matter what products will be used - PVC or metal-plastic. The main task is to make the correct drawing, calculate and indicate all dimensions, and prepare the material without errors.
It is difficult to make complex bends for a shelf made of PVC pipes, so the entire structure will be rectangular. Products made of metal-plastic are bent by hand, and such a furniture structure can be made shaped, with curved transitions between tiers. For example, the supporting legs can be bent into shapes, and to fasten the shelves in the right places, cut the leg and insert a tee into the cut.
The difficulty is in the space between the shelves - there you need not a tee, but a transition with four outlets. But, since there are no such transitions in metal-plastic, you will have to dodge and add an extra segment onto which another tee will be screwed. Or make pipe jumpers for shelves not on four sides, but only on two - the shelf will lie on two pipes just as securely.
PVC sections are connected at all intersection points to fittings using soldering. These can be tees and crosses, couplings and turns. The presence of PVC crosspieces makes the work of assembling a shelf or rack especially easier - this design allows you to do without unnecessary parts and connections on the shelf fastenings. It is better to strengthen legs made of propylene sections by soldering couplings or plugs onto them.
To prevent the legs of a rack or shelf from moving apart under heavy loads, they can be fastened with segments in the same way as the shelves, and then there will be no need to solder plugs.
Organizers - convenient devices for storing small items
Even without special skills, you can easily make such useful crafts from plastic pipes with your own hands. Even very short cuttings of different diameters will be used. To work you will need a sharp knife and glue.
The drawing shows how to cut off one edge of a piece of pipe in order to then make a convenient organizer for writing things or bathroom accessories. It is only important to try to ensure that the angles are the same everywhere.
Then the workpieces are cut into a flat surface: a stand or a wall. If desired, you can paint the organizers or put a design or ornament on them. Or you can even paste photographs of the most pleasant moments of life.
Using this algorithm, you can make other crafts from plastic pipes with your own hands: a creative shoe rack, a sock holder, a wine rack. And if the cuts are made strictly horizontally, you will get beautiful flowerpots or flower vases.
Advantages of plastic over wood or metal
- Propylene and metal-plastic pipes are cheaper than metal products or processed (planed and sanded) wooden slats, they are easier to cut, they can be used to bend complex, curved or shaped elements of a shelf or shelf, which cannot be done with wood or metal,
- Galvanized steel products can only be fastened by threading or welding - it is more difficult to bend them, and the welding seams will have to be cleaned or masked with overlays. The same applies to copper and brass structures,
- Due to the metal reinforcement inside, metal-plastic can withstand quite large weight loads, which is often necessary for a garage, and PVC pipes will make a beautiful rack that you can assemble with your own hands and place in the house,
- Since metal-plastic sections can be firmly connected only with the help of fittings, such a stand or shelves made of pipes can be placed in the garage - fitting connections are not very beautiful. The propylene sections are connected to each other by soldering, and the joints look neat, which allows you to use shelves made of plastic pipes in residential areas.
It’s not difficult to make a rack from plastic elements: to do this you need to stock up on material and the following tools:
- Metal-plastic pieces or a coil of the required length (before assembly, calculate the total length of the structure and the length of each piece),
- Carpenter's cutter or regular knife,
- Tape measure, marker, two wrenches - 19 x 22 and 22 x 24, for tightening fittings,
- The fittings themselves are straight connections (couplings), turns (corners) and tees. The quantity depends on the configuration of the shelf or rack,
- Plugs for fittings on the lower sections of the structure, which will serve as the legs of a shelf, shelf or rack.
Tools and materials for shelves made of polypropylene or metal-plastic:
- Soldering iron for soldering shelves,
- Pipes in coils or scraps,
- Hacksaw or grinder,
- Couplings and other fittings for connecting and turning when assembling PVC shelves with your own hands,
- Roulette, marker.
Designer find - a chair made from scraps of propylene pipes
A good owner will never lose anything. With a reasonable approach, every little thing will go into action, and through the efforts of a patient craftsman, amazing crafts from plastic pipes can be obtained. You can easily make a luxurious chair with your own hands using the same knife and glue.
In this case, pipe sections are cut to arbitrary lengths in large quantities. It is only important to maintain the same dimensions of the longest supporting pieces.
Then the segments are glued along their length. The longest supporting pieces should be located at the same distance from each other. For the armrests, the sections are prepared higher than those that make up the seat. And for the back you will need even longer ones.
All that remains is to sew beautiful pillows and stuff them with padding polyester or cover the foam parts of upholstered furniture with fabric.
DIY children's chair made from plastic pipes
Polypropylene is a hypoallergenic and non-toxic material, so you can make various children's furniture from it without worrying about the health and well-being of the child. By implementing ideas from plastic pipes with your own hands, you can easily assemble a table, playpen, chair, etc.
One of these simple projects could be a comfortable children's high chair, which is assembled from pipes and fittings like a construction set. The size of each part will depend on the size of the desired result, but below we will provide instructions in which we will tell you how to make a chair for a five-year-old child.
To make a high chair you will need the following materials and tools:
- PVC glue;
- Approximately 3 meters of polymer pipe;
- 6 T-fittings;
- 8 corner fittings (90°);
- Durable fabric;
- Fine tooth saw;
- Sewing machine;
- Scissors.
- First of all, you need to cut the pipe into pieces: 7 pieces. 33 cm each (A), 4 pcs. 20 cm each (B), 4 pcs. 13 cm each (C) and 2 pcs. 18 cm each (D);
- Take two parts A and secure them at each end with an angle fitting;
- Insert all elements B into each of the fittings;
- Place T-shaped connectors on each element B, turning their perpendicular part perpendicular to element A;
- Connect the T-fittings in pairs with elements A. As a result, you should have parallel chair legs;
- Insert all elements C into the free ends of the fittings;
- Next, you need to place the structure so that the ends of the legs “look” at you;
- Take the two corner fittings and slide them onto the C parts closest to you;
- Slide the two T-pieces onto the C pieces further away from you, rotating them so that the center joints are facing you;
- Next, you need to connect the inserted fittings with parts A parallel to the chair legs;
- We insert parts D into the free ends of the T-shaped fittings and put corner fittings on them, turning them “facing” each other;
- We connect them with element A, ending with the back of the chair;
- Make a seat out of fabric by stretching it between parallel bars;
- Glue all connections, then let the chair dry.
Having completed the children's chair, you will acquire the necessary skills, after which you will be able to design and assemble other children's furniture from PVC pipes with your own hands, for example, a table or a tent. Read also: “What furniture can be made from plastic pipes with your own hands.”
Stool made from scraps of polypropylene pipes
They say that the goal is cunning in invention. This is the absolute truth! Only a thrifty person can invent something similar - create amazing crafts from polypropylene pipes left over after repairs or construction, that is, practically from garbage. This means that, with his wise approach to life, he will never be naked.
For a stylish stool you will need thin pieces of pipe of different lengths. Before work, you should make paper patterns according to the drawings. Pipes with asymmetrical bevels on both sides are cut along them and glued together along their length. The last trim is the support one, it will serve as a leg. Therefore, it is the longest and has a horizontal lower cut.
When all four side parts are assembled, they are held together with corner trims. The bottom is assembled from short pieces with a horizontal cut at the top. The stool can be painted any color, or it can be left white - it all depends on the preferences of the master.
Advantages of using plastic pipes
Below are the diagrams and drawings necessary for making furniture from pipes. With their help you can make armchairs, chairs, beds, shelves, tables, and a huge number of decorative elements. The products are interesting, durable and safe.
Armchair
An original way to use plastic pipes is to make a chair out of them. There are many options for making it. It all depends on the desire, capabilities and imagination of the master. Plastic pipelines can become a material for making a chair. You can make it using PVC pipes, a knife and glue.
To get an unusual chair, you need to do the following:
- First, cut pieces of different lengths. The main thing is that the longest segments should be the same length. They will act as supports;
- long ones will be needed for the backrest and armrests;
- Then the segments are glued together so that the surface of the armrests and backrest is at the same level. Towards the bottom, the length of the segments changes.
Thus, we get an interesting chair that will decorate any room in the house. To make it even more comfortable, pillows are placed on it or covered with foam fabric. You can have a good time in such a chair, read a book, watch TV.
The parts under the letter "A" determine the width and depth of the seat. The length of the pipes “B” determines the height of the seat from the ground. Details under the number “C” are the height of the armrests, and under the number “D” the height of the backrest.
Bed
Using the method described above, a table and a bed are made. The different sections are glued together to create the base of the bed. On top of it you need to put a comfortable mattress, pillows, and blanket. This is quite a suitable place to sleep and relax.
In addition, cribs are made from this material. To do this, you need to study diagrams and drawings. Then prepare the required size pieces. They are connected using fittings. If you fasten the parts together with glue, they will be very strong and durable. Without the use of glue, the structure will be collapsible and can be removed at any time. A crib for a baby will be unusual, reliable and durable. If there is more than one child in a family, you can make several beds.
You can make such furniture from polypropylene pipes with your own hands, like a table. Its frame will be made of pipes, and the tabletop will be made of any other material. At the same time, it must be remembered that PVC pipes are not suitable for heavy loads. The lighter the countertop, the better.
The size of the tabletop in this case will be 91.5 x 203 cm. The following materials and tools will be needed:
- door leaf as a tabletop;
- fasteners for connecting parts;
- drill;
- saw.
You will also need pieces of size:
- 30 cm – 10 pcs;
- 7.5 cm – 5 pcs;
- 50 cm – 4 pcs;
- 75 cm – 4 pcs.
To assemble the frame, prepare:
- t-shaped fittings – 4 pcs;
- plugs for pipes, fittings – 10 pcs;
- 4-sided fitting – 4 pcs;
- cross fitting – 2 pcs.
According to the diagram, assemble the side elements first. Then move on to the back of the table. Pay attention to the stability of the structure. All details must be the same.
The last thing is to assemble all the elements into one structure. Inspect the product for any unevenness or sharp parts. Process everything carefully, glue the connections. This is a simple way to make a table.
Tool
Materials
Preparing parts of the required size
Connecting fragments
Fastening the table top
Rack
Armchairs, beds, tables - this is not the entire list of products that can be made from this material. Another useful interior item is a shelving unit. Design parameters can be very different. It all depends on the size of the room where it will be installed and the wishes of the master.
First of all, it is recommended to make a drawing, a diagram of the future product. Next, use them to prepare the required quantity of a certain size of parts. Connect everything together. The base of the shelves can be plywood or other material. The only thing we must not forget is that the materials are not suitable for heavy loads.
We invite you to familiarize yourself with Santalia plant shrub
Such racks are used for flowers and toys in a children's room. Shelving can be installed in the garage. There, the products will be a great place to store tools and other things. You can place garden tools on the shelves: pots, tools. PVC products look unusual, neat, and do not require additional decoration. Plastic shelves and racks do not harm the health of others, they are durable and environmentally friendly.
In order to assemble such a simple structure from plastic pipes, you will need to prepare the following:
- Plastic pipe 2.5 meters long. The base of the entire structure will be made from it. The diameter of the pipes should be 2-2.5 centimeters. You can buy 200 centimeters of thick pipe and 50 centimeters of thinner pipe, which will give the finished structure an interesting look. Such pipes can be connected using adapters of suitable size.
- Bends with an even angle, the size of which must match the pipes.
- Connecting crosses needed to secure additional branches.
- Plastic pipe ends that are installed at the end, upon completion of the frame assembly.
- The cap needed for the top of the product.
- Soft fabric. If desired, it can be installed on the legs of the hanger so as not to damage the floor covering.
- Spray paint (any color). Of course, the product can be left snow-white, but some craftsmen prefer to paint the finished hanger structure.
- Scotch tape or glue. If you choose the first option, the structure will be less durable, but collapsible.
You can purchase colored pipes to skip the dyeing process
Plastic pipes
Table 3. Instructions for making a hanger from plastic pipes
| Illustration, step | Description |
| First you need to prepare a convenient place for cutting pipes, and then make the following markings of the parts: |
- 800 millimeters (for rack);
- 100 millimeters – 1 fragment;
- 200 millimeters – 2 fragments;
- 150 millimeters – 3 fragments;
- 120 millimeters – 6 fragments.
Then, according to the marks, you should cut the pipes into fragments using a hacksaw. The cut areas will need to be immediately treated with sandpaper, after which it is necessary to distribute all the parts by size for ease of further assembly. - plastic pipes with a diameter of 2.5 centimeters and length: 100 centimeters - 4 pieces, 65 centimeters - 2 pieces, 48 centimeters - 4 pieces, 20 centimeters - 6 pieces, 5 centimeters - 8 pieces;
- connecting crosspieces – 10 pieces;
- corners for tapping - 6 pieces;
- plastic panel for shelf;
- spray paint.
Step two: collecting the crosspiece parts
Step Three: Connecting the Base
Step four: collecting the legs
Step Five: Adjusting the Base
Step Six: Installing the Center Piece
Step seven: connecting the hanger
Step eight: connecting the branch
Step Nine: Adjusting the Hanger
Step ten: installing plugs
Step Eleven: Painting
The only disadvantage of this design is poor stability, so if the hanger is not supposed to be disassembled, then you can pour sand into the pipes at the assembly stage, so that it will not fall under the load of clothes.
In addition to simple options for creating hangers, there are also larger models. In this case, we are talking about a product that will accommodate the entire wardrobe of the average person.
During the manufacturing process you will need the following:
Step one: you need to mark the length of the pipes and cut them with a pipe cutter or saw. Next, all the parts should be sorted to make it easier to assemble the structure.
For convenience, you can place sheets with written dimensions next to the pipes.
Step two: assembly should start from the bottom, similar to the previous options. It is necessary to attach crosspieces to the pipes, and rotating angles on them, until the base of the frame is formed.
Hanger with compartments for shoes
Fencing a flower bed or sandbox
Using the same algorithm as chairs and stools are made, you can build other necessary things. It will be practically
Plastic pipes make excellent original fences on a summer cottage or in the courtyard of a country house. Moreover, you can use even the shortest cuttings of various lengths and thicknesses. They are fastened together along the length in the form of a miniature fence and dug around a flower bed or sandbox
You can use glue to make such a creative fence. It will be even more interesting if the scraps are tied with wire, imitating a wattle fence.
Greenhouse for a summer cottage
It is difficult to list all the DIY plastic crafts created by visionary craftsmen. But not mentioning such a necessary and useful structure as a greenhouse is the height of imprudence.
To build, you need to fence off the designated area with boards or bricks and dig pins around the perimeter. Their diameter should be slightly smaller than the pipes used.
Now you can start designing. Therefore, the next step will be to secure the pipe sections on pins in the form of arches. To do this, first the ends of the pipes are put on the racks on both sides. Then you can additionally attach the pipe from below with a strip of tin to the perimeter of the fence.
You can add rigidity to the structure using several pipes, which should be placed perpendicular to the arches. The intersections are tied crosswise with wire or strong twine.
Now all that remains is to stretch the film over the structure - and the greenhouse is almost ready.