You can purchase such a product either ready-made in a store or make it yourself.
Sand painting has many benefits. In addition to developing fine motor skills, people get a lot of positive emotions from such an activity.
Materials
Before you start building a sand painting light table, you need to make a preliminary drawing. This drawing indicates the dimensions of the future product. The materials and necessary tools are selected.
Particular attention should be paid to the choice of manufacturing materials. For the countertop, you need to choose milky (white) acrylic , 5 mm thick. The light will be evenly scattered on it. The advantages of acrylic include:
- resistance to mechanical damage;
- safety in operation;
- durability.
Help : this material does not crack or break even under significant loads. Therefore, you don’t have to worry about your child getting hurt.
Many people believe that wooden furniture is the most stylish. But, unfortunately, structures made from MDF or solid wood are not suitable for all rooms. For example, such furniture should not be installed in the kitchen, since it will quickly become unusable and begin to collapse. In such conditions, it is better to use glass decoration.
Why are glass structures so good? 1. Taking care of glass tables is quite easy. It is enough to regularly wash the surface with a damp cloth. 2. Glass decoration can be used in any room. It goes well with the design of furniture made from other materials. 3. The range of glass tables is huge. To create them, various technologies and additional accessories are used. By the way, glass models can be made to order. In this case, they will fit perfectly into your interior. 4. Fungi and other pathogenic microorganisms never form on a glass countertop. 5. Thanks to glass objects, you can radically change the look of the room, as well as expand the space in visual perception. 6. Due to the fact that the glass used in the production of tables is treated with special compounds, the furniture is strong, durable and completely safe.
Some skeptics claim that glass products are dangerous due to the fragility of the material, and are not very convenient to use, since they require constant cleaning to maintain the surface order. However, this can be disputed based on certain facts:
— glass tables are easy to use. Such a surface is not scratched, retains color, stains and damage from chemicals and moisture are excluded;
- easy care. Cleaning with a damp cloth is sufficient. Only in certain cases is thorough cleaning required, for example, when something is spilled on the table, but this procedure is very easy to carry out due to the pliability of the material;
— glass tables prevent the formation of bacteria and harmful fungi. Compared to wood, glass is an unfavorable surface for microorganisms;
— high-precision professional equipment used by our specialists allows us to carry out any processing. It is thanks to different types of processing that very durable glass is obtained, which is not inferior even to wood. Therefore, you can be sure that the product will withstand heavy loads, delighting its owners for many years.
Our workshop produces tables based on new technologies, using high-precision equipment, modern materials and high-quality fittings. Glass must undergo a tempering procedure to ensure high strength of the final products. Glass tables purchased from us are able to withstand high pressure and last for many years.
Dimensions
There are no specific standards for what size a children's sand painting table should be. Here it is worth starting from personal wishes and the characteristics of the room . If the size of the children's room allows, you can make a fairly spacious and large table. It can be installed in the corner of the playing area. If the room is small, then it is worth saving free space and making a mini table for sand painting.
In any case, the child will be interested in creating his favorite cartoon characters, dogs, cats, both on a large table and on a small one.
TABLE WITH LIGHTING: STEP-BY-STEP DESCRIPTION OF THE WORK
1. I took a glass shelf and a mirror from an old disassembled sideboard. I took measurements from them and drew a sketch.
2. Sanded the boards with a sanding machine.
EVERYTHING YOU NEED FOR THIS ARTICLE IS HERE >>>
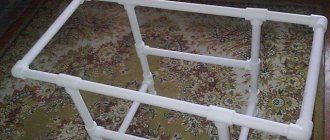
3. I sawed the boards and got 4 blanks. I fixed them on a frame made of 50×100 timber. I made the table legs from 40×50 timber and fixed them to the frame with furniture screws.
4. Marked the seats for the glass inserts. To do this, I attached the glass from above to the tabletop, and the mirror from below to the frame. I selected the grooves with a router (or a chisel) (photo 1)
5. I brushed the wooden surface of the product: I thoroughly burned the tabletop, frame and legs with a gas burner. Then I removed the scorched wood with a stiff clothes brush that does not leave scratches. Wipe off the soot with a wet rag. Dried it. I covered it with several layers of yacht varnish with intermediate drying (three on the tabletop, one each on the frame and legs).
6. The glass was tinted with film according to the instructions on the package.
7. Next, I sawed off the strip cooling parts from the aluminum profile to size (photo 2) and secured them exactly in the center of the niche (photo 3). And according to the internal size of the latter, I cut off the LED strip and glued it along the profile (photo 4). I placed the LED control elements in the far corner of the niche and brought the power socket to the table leg (photo 5).
8. I secured the mirror to the bottom of the table with slats (photo 6) and placed the tinted glass in the seat of the tabletop. For reliability, you can fix it with sealant.
9. I turn on the backlight and the illusion of a tunnel is created. The wife was delighted with this effect. What makes me especially happy is that I made this unusual beauty with my own hands!
We also recommend reading: Stunning DIY COFFEE table - photos and drawings
Tools
Tools for making a table you will need :
jigsaw;- drill;
- screwdriver;
- self-tapping screws;
- ruler;
- assembly knife and new blades for it;
- building level.
From the materials you need to prepare:
- a plywood box with high sides (you can buy it in a store or make it yourself);
- acrylic glass;
- whatman;
- Double-sided tape;
- special glue;
- 4 bars for legs;
- lamp or LED lamp.
Help : with a competent approach to making a drawing table, it will take you several days. You can assemble the product in a day, but for it to completely dry and stick together properly, you will need to wait a couple more days.
Inspection tables with lighting
Table with lighting and water supply for inspection of caviar and other offal.
Price: 37500 rub.
Options:
Power supply:
220V, 54W, IP54
Water supply: 1/2″ connection, max. pressure up to 4 atm.
Luminous power: 6500Lm
Dimensions:
W1320*H900*D720 mm.
Weight: ≈ 15 kg.
Table top and all working parts:
made of food-grade polypropylene in light gray color (light colors of the material are recommended by the SES and make it easy to control the degree of contamination of the equipment surface).
The surfaces of the product are absolutely smooth, easy to clean and do not absorb dirt. The material from which the table is made, due to its structure, has antibacterial properties that inhibit the growth of a number of bacteria, including salmonella, Escherichia coli (e.Coli), staphylococcus and bacteria that cause pneumonia. All equipment has appropriate certificates!
More information about certificates>>>
This inspection table is equipped with powerful lamps that provide sufficient luminous flux to detect all possible product defects . The electrical equipment of the inspection table is waterproof IP54. Thanks to the unique properties of LED lamps, you will never have to be distracted from work to replace or repair them!
The caviar inspection table is also equipped with a water supply system with special pistols for washing the product. The water supply system allows you to regulate the volume of water supplied to the caviar inspection .
Additional equipment options:
1. Height adjustment. Adjustment limits 0-300mm + 4300 rub. Adjustment limits 0-40mm + 1100r.
(allows you to conveniently adjust the position of the table on an uneven surface or determine the slope for liquid drainage from the tabletop)
2. Boning knife
3. Additional replaceable tabletop for the entire surface of the table + 3400 rub. (allows you to protect the working surfaces of the table from knife cuts and scratches, which in turn significantly extends the service life and hygienic condition of all equipment)
Illuminated table for inspection of caviar and other offal.
Price: 43999 rub.
Purpose - inspection of various agricultural products: berries, fruits, fruits and vegetables, mushrooms, dried fruits, etc. Can be used as part of a line for preparing preserves, marmalade, confiture, pureed berries with sugar, canned fruits and vegetables, toppings, etc. The material is food grade polypropylene, light gray in color. The side is edged with a tube to prevent injury to personnel. The countertop has a built-in pipe with a diameter of 150 mm, under which a container can be installed for high-quality raw materials or for dumping garbage and substandard materials.
Power supply:
220V, 54W, IP54
Luminous power: 6500Lm
Thickness of the translucent product: up to 30mm
Dimensions:
W1320*H900*D720 mm.
Weight: ≈ 15 kg.
The set includes a function for adjusting the height of the legs.
Table top and all working parts:
made of food-grade polypropylene in light gray color (light colors of the material are recommended by the SES and make it easy to control the degree of contamination of the equipment surface).
The surfaces of the product are absolutely smooth, easy to clean and do not absorb dirt. The material from which the table is made, due to its structure, has antibacterial properties that inhibit the growth of a number of bacteria, including salmonella, Escherichia coli (e.Coli), staphylococcus and bacteria that cause pneumonia. All equipment has appropriate certificates!
More information about certificates>>>
Tables can be manufactured in various variations with one-sided or two-sided unloading, in various sizes.
Along with this product you can buy:
| Illuminated fish inspection table | Tables for filleting and fish cutting | Centrifugal machine for removing scales |
| Scaler | Fish stringing table | Salting baths |
| SANITARY ENGINEERING | Centrifuge for caviar | Plastic food boxes |
Sending equipment across Russia by transport company. More information about equipment delivery>>>
Send your request by e-mail and we will do the rest!
How to do it?
Before we start making the table, we carefully check the drawing again, measure the length and width of the drawer, and check the dimensions of the acrylic.
Box
The workflow itself consists of the following stages:
The manufacture of the table begins with the assembly of a plywood box . If possible, it is better to purchase it ready-made at a hardware store. The box should have high sides. The depth of the finished product should be about 7 cm.- Using a jigsaw, cut a hole in the bottom through which the light will pass. It is recommended to make preliminary markings by attaching a sheet of acrylic. It should be taken into account that a 3-5 cm frame is left around the perimeter of the product for gluing the glass.
- Cut out a piece of whatman paper to the required size. Its dimensions must correspond to the dimensions of the glass.
- Glue whatman paper to the glass using double-sided tape. Whatman paper is used to ensure that the light is evenly scattered over the surface and so that the backlight is not visible.
- We put the glass in the prepared box and glue it to the frame with double-sided tape.
- Now we screw the legs to the assembled structure . For stability of the product, additional fastenings can be made between the legs.
Backlight
Most people use a night light or LED lamp as lighting.
Attention : the greater the distance from the lamp to the glass, the more scattered the light will be.
But it’s best to backlight using an LED strip:
We take 5 meters of self-adhesive LED strip, which is powered by 12 volts. You need to purchase a power supply for it. The ribbon comes in different colors, but it is better to give preference to white.- A hole for the plug is drilled at the bottom of the table .
- At the opposite end of the plug, several clamps are tightened so that the wire does not fall into the hole made.
- Lay out the tape on the table . We check how conveniently the material is laid out and how well it fits.
- Next, glue the selected installation pattern. It is better to do this from the end where the connection cable is located.
- Despite the fact that the self-adhesive LED strip sticks quite firmly to surfaces, it is better to strengthen it with double-sided tape in several places. Especially on bends and corners.
- We connect the tape to the power source.
- Let's check how the backlight works.
Onyx Bathroom Countertops
The hygroscopicity of the material is extremely low, it is not afraid of water, so it can also be used to make sinks and wall decoration. The bathroom is a place of relaxation and peace, which is why stone backlit is so often used to decorate this room. Without backlight it shines like a mirror, and in a dimly lit room it acquires a magical glow, its multi-layered texture appears more clearly. The bathroom countertop is made not only from honey onyx, but also from black or white mineral. In its physical characteristics it is similar to marble, but in its hygroscopicity it surpasses it, absorbs water much less, and is itself harder. All this is its advantage. Granite is also used for interior decoration, but it is not as beautiful.
Finishing
After manufacturing and assembling the drawing table, it needs to be given an attractive appearance. Before painting the product, it should be sanded . Once you are sure that there are no nicks, chips or other defects on the table, you can begin painting.
Attention : finishing will not only improve the aesthetic qualities of the drawing table, but will also extend its service life.
The table can be painted any color . The legs of the product can be made colorful and multi-colored. In other words, use your imagination and create exclusive and unique sand painting tables with your own hands.
Tip : a coffee table, a children's table, or even a glass table can also become a bright decoration for your home.
Materials and tools
You can make an exclusive piece of furniture with your own hands. To do this, prepare the necessary materials, tools and follow the step-by-step instructions.
To make a table you will need:
- boards for the frame (wood or particle board);
- mirror according to tabletop parameters;
- translucent mirror. The dimensions should be 10 cm larger than the bottom mirror;
- self-adhesive diode tape, length depending on the size of the table, but not less than 1.5 m;
- materials for connecting the tape: controller, programmer, wires, power supply with USB;
- consumables: sandpaper, glue, screws, metal corners.
Instead of a translucent mirror for the top cover, you can take regular glass and cover it with tinting film yourself.
Idea: to reduce work, you can purchase the simplest table in any furniture store and use it as a ready-made base.
Why choose LEDs:
- They give a rich, beautiful, deep shade.
- Longer service life without burnout (the number of on/off switches does not affect the service life).
- No heating.
- High efficiency.
- Various colors.
- Reasonable price.
- Light bulb safety.