Almost every person who likes to repair or build something with their own hands sometimes needs to rack their brains over how to properly connect two objects or materials. Linoleum and tile are the two most popular types of flooring. After renovation, every person wants the house to be comfortable, beautiful and safe, so many people design a corridor or a passage between rooms without a threshold at the junction of linoleum and tiles.
We combine different materials
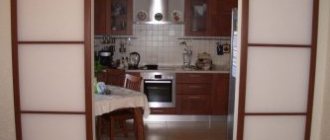
Many people separate tile and linoleum because they are tired of dirt and dust. Most often, the place where the two materials meet is the kitchen. Linoleum and tiles allow you to highlight functional areas - dining and cooking areas.
Tiles are usually laid on the dining area, and linoleum on the hob. It is much more pleasant to move on it, since it is much softer and does not slide as much. The line dividing these two coatings is too large, therefore, to make a high-quality and safe transition, overlays are used. Also, tiles are laid in the corridor, because most of the dirt from the entrance gets there. Due to the fact that the joint line between the rooms is shorter, the two canvases can be joined with profiles.
Tips from a pro
In the kitchen, it is important that the tiles are at the same level as the linoleum, so it will be convenient to remove debris that falls on the floor during cooking. In the corridor the situation is completely different. In order to retain heat, the entrance is lined with linoleum, and immediately after it, the so-called “sanitary” part is laid out. This part is covered with tiles, and most of the dirt accumulates on it.
You can make the transition from tiled flooring to linoleum in the following ways.
- Metal thresholds . This design can be used in the corridor or on the floor, under the door, since its width is no more than 50 mm, the difference in height will be no more than 16 mm.
- Phishing corners . This option is suitable if the tile level needs to be made higher than the linoleum level.
- Folk method . If the previous options do not work, then you can seal the seam using a wooden bead. To do this, you need to screw the plank to the linoleum using thin self-tapping screws, without glue. And glue the bead itself to the end of the tile, but the lower edge, which is adjacent to the linoleum, must be filled with silicone. To close the gap, you can take an aluminum profile and attach it to a sliding fastener. If the apartment has a floor heating system, then this becomes most important, since this connection scheme is more flexible and easily adapts to height fluctuations.
Types of damage
There are several types of damage that owners of PVC-coated floors have to deal with. Below are the most common ones.
Types of linoleum
Table. Typical damage to linoleum.
| Damage, photo | Description |
| Attrition | Appears against the background of long-term use of the floor covering. The abrasion often appears locally, for example, under chairs. |
| A cut | Cuts may be the result of careless manipulation of sharp objects. Cuts occur relatively rarely. |
| Breakdown | When using furniture with sharp legs, pinpoint damage to the linoleum is possible. To avoid breakdowns, special gaskets are used. |
| Through gap | Dragging heavy objects across linoleum with a drag can cause through tears in the flooring material. |
| Spot | Occurs when the surface comes into contact with chemicals or fats. As a rule, such stains appear in the kitchen. |
READ MORE: What glue to use to glue linoleum - types of glue
Despite the variety of damages and ways of their occurrence, it is possible to restore the original appearance of linoleum without the help of specialists. To do this, you need to choose one of the effective methods and follow the instructions.
How to eliminate bubbles on linoleum
Threshold and profile: we make the connection
To close the seam line, you need to lay the edge of the linoleum with a flexible and durable adhesive. Rubber, epoxy and other adhesives will not work. In this situation, sealant, which can be purchased at any plumbing store, will help out.
The sealant is a very durable material, and after hardening it will hold the linoleum no worse than “liquid” nails, it also does not shrink, and at the same time, there will be no cracks. This material easily withstands the effects of detergents, dust and hot water.
However, if you need to glue two flexible materials, you can use any glue. But, if one of the materials is glass, ceramics or tiles, then only sealant should be used.
First you need to trim the linoleum a little, and after that, apply silicone along the joint and lay the canvas on it. Next, in increments of 100-200 mm, drill holes for the dowels and hammer plastic bushings into them.
To install the profile, you need to align the fasteners so that all the dowels are above their place. Now all that remains is to place the threshold on the dowels and use a mallet to drive it into place. The final stage is to load the pad with additional weight, so all the excess silicone will come out from under the threshold, sealing the seam between the tile and linoleum well.
Repair of a broken joint
Most problems associated with damage to the polymer coating can be eliminated yourself using available tools. You just need to prepare the necessary tools and material, as well as allocate some free time. Below are detailed instructions for repairing linoleum.
Stages of linoleum repair
A special adhesive mixture will help restore small pinpoint areas, but provided that the damaged area is no more than 1 square meter. see. In construction stores you can purchase a ready-made repair kit, which includes a spatula, colorant and solvent. Stores also sell PVC adhesive mixtures.
Pencil for linoleum
The procedure for restoring linoleum looks something like this:
- cleaning the damaged area;
- selection of the appropriate color scheme;
- adding color to a special composition for repair;
- thoroughly mixing the components until the desired shade is obtained;
- filling the hole in the linoleum with the prepared product;
- surface leveling;
- removing the remaining repair compound using a spatula.
Preparation of repair composition
Now you need to wait for the adhesive mixture to dry completely. Exact information about drying time is indicated by the manufacturer on the packaging.
Dent Removal
Step 1. Clean the surface and wash the linoleum at the damaged area with warm water.
The area should be washed with warm water
Step 2. Cover the dent with a wet cloth folded several times.
The dent is covered with a wet cloth
Step 3. Press the rag with a hot iron for a few seconds (no more than 5).
The scarf is pressed down with a hot iron
Step 4: Take the iron and dampened rag to assess the condition of the dent.
Assessing the condition of the dent
https://www.youtube.com/watch?v=
Step 5. Repeat the procedure with the iron. For the best effect, you need to press it firmly to the floor.
Repeating the procedure with an iron
Step 6. Roll out the damaged area with a wallpaper roller. You need to roll out from different sides. Be sure to apply force when rolling.
The area is rolled out with a roller
Step 7: Re-wet the cloth and do the ironing procedure again.
The wet rag is placed again on the damaged area.
Step 8. Continue rolling out the linoleum with a roller until the defect is completely eliminated.
Linoleum is rolled out until the defect is eliminated
Step 9. This is what the coating looks like after repair. The mark of the dent will certainly remain, but it will not be very noticeable.
Coverage after repair
Repairing punctures
Through the resulting puncture, moisture will get under the linoleum, which can ultimately cause the material to swell. Therefore, in order to prevent swelling, punctures that appear must be eliminated immediately. PVC glue is used for this purpose.
How to fix a puncture in linoleum
Elimination of small punctures (up to 1.5 mm) is carried out with A-type glue. The process itself looks like this:
- tape is glued to the hole;
- A small hole is made above the puncture itself (smaller than the puncture itself);
- then you need to pour a little liquid glue into the resulting hole;
- after some time the glue will begin to crystallize;
- after crystallization, the masking tape is removed;
- Cured glue may remain on the surface of the linoleum, which must be carefully cut off.
Quick Step Repair Kit
Bonding burns
Step 1. Clean the linoleum surface before repair work. The burn is small, so it can be patched.
Such a burn can be eliminated
Step 2. Cut out a piece of whole linoleum of the same size. You need to cut with a small margin. To do this, use a stationery knife.
A piece of linoleum is cut out
Step 3. Evaluate the alignment of the patterns on the cut piece of linoleum and the damaged area.
The picture needs to match
Step 4. Having aligned the pattern, glue the cut piece of linoleum with double-sided tape.
A piece of linoleum is glued with tape
Step 5: Carefully cut out the burnt portion of the flooring using a pre-cut piece of material. To do this, use a stationery knife.
The burned part is cut out
Step 6: Apply a small amount of adhesive to the subfloor and wait a few minutes for it to dry slightly.
Glue is applied to the base
Step 7. Place the cut out triangle with the inside of it against the base and press it tightly. The material should be held in this position for 1-2 minutes.
The triangle is pressed tightly
Step 8. Apply some sealant to the joint of the linoleum. Then remove excess sealant with a clean rag or cotton wool.
Sealant is applied to the joints
Step 9. Done! Now the linoleum looks like new. You just need to choose the right drawing, since the final result will depend on this.
Damaged area after repair
C-type glue, which is also popularly called cold welding, will help eliminate a break or cut on linoleum. The glue has a thick consistency, due to which it is effective in combating various defects in PVC coatings.
Breakthrough on linoleum
The technology for repairing breakthroughs is as follows:
- cleaning the linoleum surface in the damaged area;
- removing burrs from the edges of the cut using fine-grained sandpaper;
- trimming the resulting fringe on the cliffs. For this purpose you need a stationery knife;
- filling the space under the linoleum at the break point with special glue. The product is quite thick, so it will not spread when filled;
- After tight tension, the edges of the damaged material are connected. The screed must be done carefully;
- Now you need to wait for the glue to dry completely;
- You can use masking tape to secure the edges of the linoleum. If the floor is wooden, then it is better to take small nails;
- After about 1-2 days, the nails need to be removed and the remaining glue carefully cut off.
It is important to carefully repair the defect, without leaving even the slightest gap
The final touch is to mask the repaired area of linoleum using mastic. But it must be selected in accordance with the shade of the floor covering.
Seam gluing
If the linoleum seams are split and raised, this can be easily fixed. There is no need to buy new material and re-install it. The joints can be restored using special adhesives. Cold welding has already been mentioned earlier. This is the most effective remedy for repairing linoleum floors. But you can also repair “raised” edges using polyvinyl acetate.
Joining linoleum - features
Sealing linoleum joints
cold welding for linoleum
Hot welding of linoleum
To connect joints whose size exceeds the 4 mm mark, you can use thresholds made of PVC or metal. The range of materials is quite large, so when choosing, you need to consult a specialist.
It is important to know how to properly care for linoleum so that you can spend less time repairing it later. First of all, for washing you need to use warm, not hot water. Along with changing the water, it is necessary to change the floor cloth, throwing the old one in the trash. You can enhance the cleaning effect by adding a small amount of water to the water.
Washing linoleum with cleaning solutions
If plain water does not remove stains, then you can clean the PVC coating with turpentine or damp chalk powder. Mastic will help remove dull spots. It needs to be applied to the surface of the linoleum and rubbed. You can buy this mastic in a store or make it yourself. If the choice fell on store-bought products, then the specialist recommends buying turpentine mastic (it is intended for cleaning parquet floors).
There are several ways to clean linoleum
Another secret to restoring the appearance of linoleum is linseed oil. You just need to lubricate the floor with it and leave it for several hours. As a result, the material will return to its former shine. If you follow at least half of the recommendations listed above, the flooring will retain its original appearance for many years.
READ MORE: How to repair a hole in linoleum at home
To glue the loose linoleum, it and the floor surface underneath it are cleaned of dust and degreased.
- The frayed edges are cut off and masking tape is glued along the edge.
- If the joint width is up to 3-3.5 mm, gluing is done by type C welding. For wider distances between joints, a threshold is used or a patch is applied.
- The free space is filled with glue.
- The surface is leveled and left until the glue dries completely.
- After complete hardening, the protective tape is torn off from the linoleum.
Method with metal edges
In this scheme, it is not necessary to use metal pads, as they are needed to simplify cleaning. It prevents water and dust from getting under the tiles.
The method involves the use of two metal edges. The execution process is as follows:
- Trim the linoleum so that the overlap on the surface of the tile is 4-10mm.
- Glue the linoleum so that its edge fits as tightly as possible to the end of the tile.
- Place a piping on the seam and a weight weighing up to 7 kg on it.
- After the glue hardens, using scissors or a saw, the crown is trimmed, and the seam that remains after this is filled with hot glue.
Visually, it does not look as good as with a threshold, therefore, most people lay a decorative strip on top, which, as practice has shown, very quickly falls off and is thrown away.
Basically, when making joints, a situation arises when cracks appear or poor adhesion of the material to the base or peeling of the plank. It all depends on the installation of the trim.
How to glue linoleum together with double-sided tape
If the base is flat, the linoleum is rigid, and a large shear load (in the form of large dogs or playing children) is not expected, the linoleum joint can be fixed using double-sided tape.
Quick gluing of linoleum joints with double-sided tape
As you understand, everything here is elementary. We cut the connection to fit the ruler (described above), and glue wide double-sided tape to the base. Remove the protective film and fix the edges of two sheets of linoleum. If the pruning is done well, then there will be no problems. Unless a roll that has not rested is laid down and it may decrease in size. That's when the edges can come off the tape. But in this case, the glue seam will not hold up.
Joining at different heights
Well-known seam design options include a multi-level joint. The difficulty of its execution lies in the fact that it is difficult to find high-quality fasteners, and without it, if physical stress is applied to the lining, then over time it will become loose and can be easily pulled out with one hand.
To avoid this, you need to choose the right threshold with a vertical difference between linoleum and tiles of no more than 1.6 cm. In this situation, you will need to purchase a special step with two supports, which can be placed on both surfaces without any problems. Such models are mainly mounted on polyurethane foam.