Prices for laminated chipboard desks and tables:
Single growing laminated chipboard desk and chair - from 4100rub
Double growing laminated chipboard desk and 2 chairs - from 9000rub
*we also make desks according to your sizes, the price for them is calculated individually.
Why is it so important that a student’s home, especially if he is in elementary school, has a specially equipped place for lessons? Firstly, it disciplines. The child is just getting used to the need to study every day, and a workplace similar to a school one will psychologically facilitate this process. Buying a transforming desk is relevant already in the preparatory group of a kindergarten. It will not be intended for games - only for activities. And thanks to its “growing” design, this children's furniture will serve him all through elementary school and part of middle school. This way, you don't have to constantly spend money on furniture.
Master class No. 3
How about a simple sofa and chair? Such furniture is suitable for busy parents, because it requires a minimum of time and effort to assemble. Moreover, the implementation of these interior elements is accessible to any child. Look at the photo: have you already understood how to make a sofa and an armchair? If not, then here is a mini-instruction: Decide on the size of the sofa. The length of the sofa should match the length of the back, and the length of the bed with its side. The height of the sofa is ? from the height of the backrest. Cut the cardboard into rectangles according to the intended length. Use two rectangles as a backrest, the rest as seating areas. double to the sides . The sofa is ready. The chair is made by analogy. After the furniture is assembled and glued, cover it with fabric. Use glue or a staple gun to secure
What is a transforming desk for a schoolchild made of?
Transformable desk for schoolchildren from the manufacturer
Sawing Podolsk is made from high-quality laminated chipboard. These are environmentally friendly raw materials based on thermoactive polymers. Its advantage is its high resistance to mechanical damage, as well as the effects of chemicals, so cleaning a child’s workplace will not be difficult. The laminated chipboard desk serves for a long time without losing its appearance even under the influence of children's pranks. The high performance qualities of the material and its safety are confirmed by the fact that they are produced not only for home furnishings, but also furniture for children's and medical institutions.
Transformable school desk for schoolchildren at home
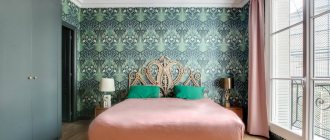
, developed by our company, is available in various colors. Therefore, you will harmoniously fit it into the interior of a children's room or living room. They are collapsible, full-length, a single design together with a chair, and various additional options. For the little ones, growing transforming desks are decorated in cartoon style. Thus, the child will not only have his own favorite workplace, but also the opportunity to get distracted. Children under 6 years old can concentrate on one process for 15-20 minutes, and then they need to take a breath.
Requirements for a growing desk for a schoolchild
Growing desk for schoolchildren
must be safe first and foremost. This applies to both the material of manufacture and design features. Everything must be stable, because the child does not always sit straight at the table. All additional elements, if any, must be securely fastened, and the shelves must support the weight of a stack of textbooks.
At the RaspilPodolsk production site, the children's transforming desk can be tested multiple times. It itself, its connections and additional structural elements repeatedly withstand loads to which it is unlikely to be subjected during everyday use.
The basic requirements for a growing desk for the home are:
- The width of the tabletop is at least 60 centimeters
- Height adjustment from 52 to 76 centimeters (often these are two different groups of products)
- Comfortable ergonomics ensuring correct posture
- Functional and beautiful - the child should enjoy working with it
The ideal pair is a growing desk and chair. Firstly, they are from the same collection, and therefore will create a single ensemble. Secondly, they were initially adjusted according to the difference in height, which is also important. It should be at least 20 centimeters, and the older the child gets, the greater the difference. This ensures the correct posture for reading and writing.
It is necessary to check how comfortable the height of the workplace is at least 2 times a year. And every 4 centimeters of a child’s growth, transforming desks for the home must be adjusted. As a rule, they are produced in two height groups - 2-4 (115-160 centimeters) and 5-6 (from 160 centimeters and above). This means that around 6th grade you will have to change your desk.
Our designers and planners have developed non-standard solutions. Firstly, we produce chipboard desks for the little ones. They are relevant for preschoolers and students in grades 1-2. Next, you can buy a set of growing furniture in the height group 2-6 to avoid unnecessary expenses. High quality workmanship will allow it to be used until high school.
Let's move on to the dimensions of the parts and the drawing
First, you need to sketch out a drawing on paper; do not forget that the dimensions can be changed if desired.
— Sidewalls 2 pcs. (300 mm x 790 mm), angle can be 90 - 60 degrees; — Shelves 3 pcs. (520 mm x 300 mm), shelf length taking into account the thickness of the side walls; — Doors 2 pcs. (280 mm x 120 mm); — Roof 2 pcs. (295mm x 600mm), you can make one half of the roof from fiberboard; — Back wall 1 pc. (520 mm x 560 mm), it can also be lightened and cut from fiberboard.
Cut out the details of the table - house
So let's get to work. On the surface of the prepared material, draw parts according to size with a pencil and cut them out with an electric jigsaw.
Attention!
The width of the roof parts must be two centimeters wider than the main structure on each side
The ends where chipboard parts are cut must be glued with adhesive-based end tape. Attach the tape to the end and carefully iron it with a hot iron, placing a sheet of paper between the tape and the iron. Trim the excess edges of the tape with a sharp knife.
We connect the prepared parts
Making the base
Screw three shelves to one side panel. On the other side of the shelves, attach the second side panel in the same way. In order to hide the screws, they must be recessed into the body of the material. To do this, drill holes in the desired location with a drill larger than the diameter of the screw head. On the front side, the caps can be puttyed if you plan to decorate the end later. Otherwise, use furniture screws with plastic plugs or stickers. The result is the frame of the future desk
Installing the roof
We take a piano loop and measure the required size, cut off the excess with a hacksaw. We screw the loop to the top shelf and side of the roof at the level of the thickness of the chipboard. To ensure that when laying out the table, the loop does not separate the working area of the desk. We simply screw the second part of the roof to the base.
Installing doors
Table doors can be attached either to a piano hinge or to furniture hinges.
It must be remembered that when using a piano hinge to secure the door, you need to install stops. Let's consider the second method of fastening - with a furniture hinge. Important!
The doors must be the correct size, as they serve as the legs of the folding table.
To fasten the door using a furniture hinge, a milling machine was used (or use a special drill). Handles can be made either in the form of holes (decorate them in a child’s style), or they can be screwed onto any furniture handles. We simply nail the back wall made of fiberboard.
Decoration
All visible parts (if desired, internal parts) can be painted or covered with decorative self-adhesive film. In order for the film to last a long time and stick as tightly as possible to the product, you need to use a soft cloth and a hair dryer.
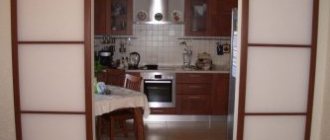
The children's table and desk is ready, this is how it looks when assembled and looks more like a house:
And this is how it looks disassembled and looks more like a desk or table:
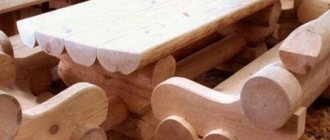
Like a desk, which is the main part of the interior of any educational institution. Also, a desk can be put to good use at home, which is why it was decided to make a desk with your own hands for children. In this article I will tell you how the author made an age-appropriate small desk with his own hands and a comfortable chair, which will allow you to conveniently look through picture books, draw, sculpt from plasticine or lay out toys. Before manufacturing, we need to decide on the materials needed for this.
In order to assemble this homemade product, we will need:
*Piano hinges 50 cm long. *Con-firmats. *Screws. *Sandpaper. *Metal corners. *Cutting a furniture panel from pine, for a desk according to scheme 1, and for a chair according to scheme number 2.
Now all the materials are ready.
You will also need tools:
*Jigsaw. *Screwdriver. *Sanding machine to facilitate sanding work. And this is what the drawing of our future desk looks like, since making parts with dimensions taken from your head will not only be incorrect, but also inaccurate.
Step one.
First of all, you need to assemble the desk, and only then the chair, so we gradually begin the exciting assembly process.
As usual, all wooden parts should have the least roughness, which in other words simply be encrypted. It is best to grind on a grinding machine or using a sander, but if you don’t have one, you can use regular sandpaper. It should be processed with sandpaper of first coarse grit P40, then medium P120 and finer P220. We correct sharp corners using a jigsaw, thereby rounding them. After sanding, you need to cut out semicircular grooves in the legs, this is done so that the child who will sit at the desk does not experience discomfort, and also so that when turning to the sides, the knees do not rest. Step two.
Now you need to attach the legs to the bottom of the box, we do this using confirmation mats, it is better to screw them with a screwdriver into the holes that need to be made in advance, the diameter of which is slightly smaller. We lower the bottom 8 cm lower than the edge of each of the legs, as shown in the figure according to diagram 3. Then we fix the front wall of the box, taking into account that its upper edge should be level with the legs, so that the box is almost perfect and smooth. Armed with a screwdriver, we attach the back wall of the desk to them with screws; the resulting protrusion should be several centimeters higher than the edges of the legs themselves.
Step three.
A desk without a tabletop is not a desk, so we will now attach it, but for this we will need a piano hinge, it must be attached so that its free movement can allow the tabletop to be raised and lowered without any difficulties or sticking, and also so that it the surface had a flat surface when closing for better contact and evenness. The result is a medium-sized drawer under the tabletop, where you can store things such as albums, coloring books, accessories and many different little things.
It is also worth considering that the protruding edge of the back wall of the desk prevents the pen and the like from rolling and falling on the floor, which can be left on the tabletop without fear that the pen will roll somewhere when the lid is lifted, as in photo 2.
Step four.
This is how we got to the point of creating a chair, we also make it from wood, after which we fix its legs at an angle to the seat, which we fasten with the help of a trapezoidal support board, which in due course needs to be inserted in the middle between them, as shown in diagram 4. In order to to strengthen the structure, knowing that children love to swing on a chair, all its parts at the joints must be secured using metal corners that can be borrowed from furniture, see photo 3. We also attach the backrest, as shown in photo 4. You can increase stability by cutting There are semicircular recesses on the legs in the supporting part.
We prematurely cut out a groove for the backrest in the seat, which is shown in photo 5. The last part was rounded off in the upper part and a heart-shaped hole was cut so the chair is easier to carry; this shape is easiest to cut using a jigsaw according to a pre-drawn pattern. Finally, we coat the homemade furniture with two layers of varnish, protecting it from moisture and other influences.
Thank you all and good luck with your homemade projects.
Hello friends! Our cardboard workshop received an order to design and manufacture comfortable and durable school furniture for dolls from cardboard. It was necessary to make a school board, a desk and a teacher's table with a chair. Moreover, the furniture was intended for playing with dolls 30-40 cm tall.
The play furniture turned out to be quite large (for a doll size). For a more visual understanding, here are the general sizes of items from our set:
— school board: width — 31.8 cm
, height -
35 cm
, width of racks -
16 cm
;
– table (length×width×height): 30×17×20 cm
;
– chair: seat – 10×10 cm
, height -
21 cm
;
— desk: length — 31 cm
, width -
30 cm
, height - about
20 cm
, bench -
10x30 cm
.
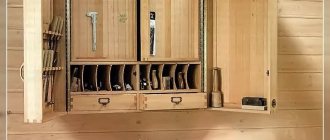
This is what a school desk looks like:
And here you can take a closer look at the chair.
Our model doll is very comfortable both at the table and at the desk. 
Thanks to the use of several layers of cardboard, the furniture is actually durable enough for long-term use. No worse than plywood. And the undoubted advantage is that it is much easier to make furniture from cardboard with your own hands. I will now show you exactly how and tell you in detail.
How to choose the right transforming desks for children
Transformable desks
for children they are adjustable in height, so it is almost impossible to make a mistake in choosing based on height. If you were unable to choose a chair so that the child’s feet were on the floor with the entire foot resting, provide a stand for it. Otherwise, posture will be impaired and the feeling of comfort will decrease. Accordingly, the child will get tired and distracted faster, because he is not comfortable.
How a growing desk for a schoolchild looks stylistically at home is an important point, but not the main one. The safety of both the manufacturing materials and the structure itself is of paramount importance. The next aspect is the functionality of the furniture. You can choose either the simplest growing table and chair, or with additional options. Laminated chipboard desks in Moscow produced by RaspilPodolsk are manufactured with additional modules, shelves, and drawers. This allows you to properly organize your workspace so that everything is in its place. Pay attention to the adjustments you need.
- Absolutely all products of this type are height adjustable. If a children's growing desk is needed for a preschooler, then choose it with the expectation that the child will be able to study with it until the second grade at most. Next, it is better to buy new furniture that will better suit him in terms of ergonomics.
- The angle of inclination of the tabletop. Desks come with a straight tabletop, with a slope and with an adjustable angle. The third option is preferable, but keep in mind that any additional option affects the cost of the product. Why is it better to buy a growing desk with an adjustable angle? Firstly, the anatomy of each child is individual. For example, if he has long arms, then it will be uncomfortable for him to sit at a level desk. Secondly, from the point of view of doctors, the angle of inclination when reading should be 30 degrees, when writing - 15 degrees, and when drawing - 5 degrees. This is ideal for vision and posture. In order not to control how the child sits and whether he is hunched over, it is better to adjust the desk, ensuring maximum comfort.
- Desk reach adjustment. It is relevant in the case when a growing desk and chair for a schoolchild are a single structure. Due to the height and length of the arms, even with the correct height adjustment, the child may feel uncomfortable. Then you need to move them away from each other on skids. This problem does not exist in furniture consisting of individual items.
The one-piece design is as convenient as possible for children of preschool and primary school age (grades 1-2). Despite the fact that it takes up more space, this is offset by its functionality. As a rule, it already has additional shelves and drawers, so such a laminated chipboard desk allows you to buy the required minimum of school furniture. You won't need additional bedside tables.
Please note that all adjustments must be made smoothly. If the height settings require adult intervention, then the child should be able to set the desired angle of inclination independently. Therefore, the quality of fittings and fasteners is important.
Making furniture from paper
If it is not possible to buy ready-made doll furniture, you can make it from paper. How to make a chair out of paper so that it is strong and does not immediately wrinkle? Roll the paper into tubes! Craftsmen have long been weaving anything from newspaper tubes. Sets for dolls will be no exception. Weaving patterns can be found on the Internet
. Such items will decorate the house and look very cozy. In addition, they will be quite durable if painted or coated with several layers of varnish.
To make paper furniture you will need:
You need to roll thin tubes out of paper. This can be done using a knitting needle. They should dry well. Then the tubes need to be glued lengthwise using glue. It is better to use a hot gun, so the connection will be stronger and the paper will not get wet.
In this way, small blocks (walls) are glued together, which are then connected to each other. They are easy to cut into the desired pieces. For better fastening, you can use wire or thread.
Then shelves and doors are made in the same way.
. The doors need to be secured with tape or wire.
The legs and arms are made from the same tubes, rolled into a roll. The edge needs to be glued with hot glue.
Why choose growing desks in Moscow from RaspilPodolsk
Growing desks in Moscow
We manufacture in accordance with GOST standards applicable to furniture for schools and preschool institutions. As a direct manufacturer, we are responsible and provide a guarantee for furniture. You can buy one desk from us, or to equip an entire classroom. We work with all forms of payment and participate in public procurement tenders.
- All furniture is made from environmentally friendly materials
- The transformable table-desk undergoes repeated testing for safety and wear resistance
- Products are certified
- We offer the best prices in the market for high quality children's furniture
In our catalog of ready-made solutions you can choose the option that suits you perfectly. In our production, you can make a custom-made laminated chipboard desk according to your sketches or individual developments by our designers in accordance with your wishes. This is relevant, for example, if you need to design a workspace for two children at once. Or you want to choose a desk in the same style with your existing furniture. Such tables and chairs can be made in absolutely any color, configuration you need and with all additional elements.