Materials and tools
To assemble the cabinet you will need:
- Boards. The best option is pine. As for quantity, you should focus on the desired sizes. An important point is the thickness of the material. The fact is that a closet usually uses not only shelves, but also the walls themselves. Accordingly, if you plan to place heavy metal tools on the walls, then the board should be selected with maximum thickness.
- Plywood. This material is used to create partitions. You can also use it to make the back wall of a cabinet if you do not plan to store heavy tools or use the wall as a “shelf.” But such sheets are not suitable for the bottom, since they cannot withstand heavy loads. Again, the amount of plywood is determined by the dimensions of the box and the partitions.
- Beam. It is best if it is made from the same type of wood that was used in the boards. It will be needed to equip the cabinet with legs or runners. The optimal size is 50x50.
- Metal corners. Here you only need those elements that are used in the construction of furniture, as they are characterized by increased strength. If you want to make a closet with opening doors, then you should immediately take care of the hinges.
- Screwdriver. The tool will need appropriate drills and bits.
- Electric saw or hacksaw.
- Furniture screws. But when purchasing them, you immediately need to take care of special nuts for them. It is advisable to opt for brass products, since this material is highly resistant to moisture. This is especially important for those who plan to place their closet on the balcony.
- Self-tapping screws. These fasteners will be needed to secure the auxiliary fasteners. Here you can get by with galvanized elements. But in addition, it is worth keeping nails on hand, although some recommend discarding them, since wood tends to dry out, which means that the fastening will weaken over time.
Once all the materials and tools are on hand, you can start working.
Wardrobe space. Dimensions. Blueprints
The first step is to independently measure the space in which our wooden cabinet will be located. Whether it is a built-in wardrobe or a free-standing one is up to you to decide according to the location. It’s more difficult to make a free-standing one, but you can’t move a built-in one anywhere.
We decide on a location, take measurements of height, width, depth. If the cabinet is built-in and will be located in any niche, then we take the exact dimensions of the niche with a tolerance of 1-2 mm (the tolerance is what can be wrong). We take paper (a notebook to a cage, for example) and draw a niche and/or cabinet from 3, or better yet 4 sides, if there are legs or a base (this applies to built-in cabinets and free-standing ones): front, top, side and bottom .
A small drawing and dimensions are required when making a cabinet with your own hands
There is no need for special precision in the drawings; it is enough to outline the contours of the cabinet and put down the correct and necessary dimensions. In the drawing you can also draw decorative elements that you can try to cut out of wood or in wood - these are drawings on the fronts of doors and/or decorative strips on doors (doors) and above the doors. You can see beautiful elements on the Internet, but keep in mind that you need to cut them out yourself, because we are making a cabinet out of wood with our own hands, so count on your strength and skills, and besides, you will need a tool for cutting - a router. Or purchase decor separately.
Wooden decorative elements for the cabinet can be purchased separately
So, the location was determined, the cabinet was drawn, and the exact dimensions were noted. Next, we calculate the material and purchase it.
I recommend: Choosing a sofa - easy or simple? What is the right sofa?
Assembly steps
Tool cabinet yourself
To assemble a tool cabinet with your own hands, you need design drawings.
You can create them yourself, or you can simply find an interesting option on the Internet.
In the first case, a simple sketch will do.
The main thing is to determine for yourself the dimensions of the back and side walls, and also pay attention to the parameters of the lid and tray.
The main thing here is not to forget that when planning shelves, it is worth remembering the thickness of the boards, which will “eat up” a certain part of the space.
To create a tool box, you must perform the following steps:
- To make the legs, the timber is sawn into 4 identical cubes (50x50x50). It is recommended to fix them on runners made of the same material. The runners themselves are attached perpendicular to the sides of the cabinet, which indicate the length.
- Next, all wooden elements are processed. For such purposes, an antifungal solution is used. It will help protect the wood from rot and mold. As soon as the coating has dried, all parts are coated with wood primer, and when this layer is dry, Aquastop is used. BUT! Such work is carried out only with planed boards, and it is advisable that all materials are pre-cut into the required size parts.
- The first thing that is assembled in the closet is the frame. According to the drawing, the boards are adjusted according to the parameters, after which the side walls, bottom and lid are assembled. In the case of narrow elements, it is allowed to use two combined boards, but the main thing is to ensure that there are no gaps at the joints. Fixation is carried out using self-tapping screws. Thus, an external frame on temporary fasteners should be obtained.
- Now proceed to the main fixation. For these purposes, all connecting points are secured using furniture corners. Here, too, self-tapping screws or nails are used first. Next, furniture screws and nuts are screwed in, after drilling the corresponding holes in the right places. The most difficult part is drilling the holes at the end of the stroke in the shelves, lid and bottom. As a result, it turns out that their ends will have drilled holes. IMPORTANT! The length of the drill is selected to match the length of the screw.
- Now let's move on to the legs. A beam is attached to the bottom of the box, on the reverse side, like runners. There is no need for heavy-duty fasteners, so you can get by with simple self-tapping screws. Next, pre-prepared legs are mounted to them in the corners.
- As for the boxes, this work is carried out by knocking down a frame of the desired shape and size, where the bottom is nailed down. If shelves are needed, cuts are made on the inside where the partitions will be installed. They can be made from plywood.
If desired, doors can be attached to such a box, after which the entire product is varnished.
Assembly
Before you start work, you need to make a drawing. To do this, we determine the dimensions of the future cabinet, what and where will be located so that it is convenient for use. You can make the circuit yourself if you have the skills. If there are none, seek help from this article, select the drawing you like the most and print it. If you like the finished version, but it doesn’t fit the dimensions, make your own edits. Do not forget that the thickness of the material will eat up a little space; take this point into account when deciding on the dimensions of the overall product.
1
2
3
4
If you are interested in how to make a metal locker for a garage with your own hands, you can use these instructions, but then you will need tools for metal and at the end you will need to be coated with special products to avoid corrosion.
Arranging the tools
It was described above how to create a simple box, but in order to use it conveniently, its internal space must be ergonomic. For such purposes, shelves, drawers and hanging hooks are organized. This issue can be resolved this way:
- Upper compartment. To create shelves, you can use the same boards that are fixed inside the frame. It is permissible to fix them on ready-made hooks or by drilling holes in the ends (on the outside of the box) and place them on self-tapping screws. Such shelves can easily withstand the weight of small tools or boxes of nails and screws.
- Bottom part. For convenient use, it is best to make only one shelf in the lower compartment. More massive instruments can be placed on it. If you wish, you can install a folding table here.
Read also: DIY buckets drawings
There is also an option for mounting tools on the walls. It’s worth saying right away that all heavy elements should be located in the central part, but lighter tools are hung on the doors (if there are any).
Cabinet assembly diagram
Usually loops, nails or other elements are used for this, but boxes can also be placed. To ensure that they always remain in their places, they are placed on glue or screws.
The quantity and shape of the internal filling of the box directly depends on the needs. The more building material there is, the more shelves and compartments need to be created.
Assembling a wooden cabinet with your own hands
Well, having discussed the details, drawn a drawing, put down dimensions and purchased materials, you can begin assembling the cabinet. To work, we will need a cutting device, at least a hacksaw, and at most a wood cutting machine. The ideal option is a hand-held circular saw, but a jigsaw can also work if you match it with a hacksaw for thick wood, although the cut may be rough and there may be chips. A hand saw with fine teeth will produce a more accurate cut.
I recommend: How to make a bench with your own hands
Another option is a “grinder” with a wood disc. BUT only with a wood disc
!
You cannot
cut with a circular saw blade using a grinder ; you will not only be cutting wood!
There are special discs specifically for grinders and specifically for wood
! It may look like the photo below.
Wood saw blade for grinder
We measure and cut out the parts according to the assembly diagram, first of all we assemble the panels: walls, lid, bottom, doors.
We collect furniture panels
There are two ways to assemble our walls, lid and bottom into shields:
- using glue, having previously glued the shield,
- and fastening parts together during cabinet assembly.
Gluing boards into panels is not an easy task. Clamps are needed to hold the boards tightly during the gluing process.
If you want to study this issue, start with the video below.
As you can see, this is not a simple matter, but it is interesting. You can also buy furniture panels instead of making them yourself. It is much easier to assemble a furniture panel perpendicularly by screwing 3 boards that will be located on the inside of the cabinet, but this method is not entirely aesthetic.
A simpler option for assembling furniture panels is to use boards with grooves using the tongue-and-groove method. The groove is filled with glue and a tenon is inserted into it and secured, preferably with clamps. This is the easiest way to make a furniture panel and there is no need for perpendicular veins.
Assembling a cabinet using planks
You can use another method when the cabinet is assembled one board at a time, that is, having assembled the bottom and fastened it perpendicularly with boards where they will not be visible (from below), we begin to assemble the outer walls, fastening them with shelves and a lid. This method will avoid perpendicular fastening boards inside the cabinet. You can also use these boards as holders for shelves, disguising them in this way. In this case, it is better to use bars of a small cross-section - 20*20 mm, for example.
First the bottom, then two boards along the edges, between them there are shelves and a lid (shelves can be added later if the cabinet consists of two sections and there is a partition in the middle). It is impossible to make doors without perpendicular veins and they are required there.
The shelves and the lid are screwed into the end of the second part using self-tapping screws; the fastening is quite simple, but first it is better to carefully drill a hole with a drill of a smaller diameter than the self-tapping screw so that the self-tapping screw does not tear the board. For these purposes, you cannot do without a screwdriver and/or drill.
To align parts strictly perpendicularly, vertically and parallelly, you cannot do without an assistant and measuring devices.
A carpenter's square and bubble level are must-have tools for building a good, FLIGHT DIY wood cabinet.
Well, then it’s better to watch than read, a few videos for clarity.
Improving the tool box
Depending on where the tool cabinet will be located, on the balcony or in the storage room, you can make its lighting with your own hands. This will significantly improve ease of use. There are several options for resolving this issue.
For those who understand electricity, we can offer automatic backlighting. Future lighting fixtures are marked in the box and holes are cut for them so that it is possible to install a base.
It is advisable that the product is already in place, since the next step will be choosing the length of the electrical cable. It is fixed to the wall or ceiling using screws, after which it is placed in the lid and closed. Next comes the sequential connection of the backlight to the cable - first phase, then “zero”.
IMPORTANT! Any work with wires and other elements is carried out only with the electricity turned off. Now the lamps are screwed into the base and the work is checked.
Halogen lamps. This option is suitable for a large box to illuminate its shelves. Typically, such kits are sold as ready-made kits consisting of:
- switch
- transformer
- halogen lamps
- connector
- wires
Initially, lighting is marked, after which holes (0.5 cm) are made with an electric drill and cutter. After this, the cutter is turned over and the points are completed.
If this is not done, there is a risk that the tool may seriously damage the wood, which will require you to redo the shelf or door.
According to the diagram, all the elements on the floor are connected into a single chain, after which the lamps are connected to a transformer and the operation is checked. For parallel connection, blocks and terminals are used.
In order for such lighting to work fully, it is worth remembering the following important points:
- transformer power ratings should be 5% higher than the total power of the lamps themselves
- minimum power output from the transformer is 12 volts
- pay attention to the operating voltage indicators of the lamps themselves
- For the backlight to work well, the maximum cable length should not exceed 2-3 m
- the transformer is mounted in a place so that it does not heat up from other sources (battery, heater, etc.)
Mini workshop with lighting
Perhaps the easiest way to outfit your toolbox with light.
But this does not mean that such light will be ineffective.
LED strips are sold in reels, and you can buy a specific meter or take one reel, in which 5 meters are measured at once.
Additionally, you will also need a plug and wire to connect the entire system to the mains, as well as a power supply and controller.
The work has the following stages:
- first connect the unit with the cable, and then connect the controller to the power supply
- 4 multi-colored controller wires are connected to similar colors on the tape using a soldering iron or terminal blocks
- to check, connect the plug to the socket and see if all the lights are on
- Each tape on the reverse side has an adhesive backing, which is covered with a protective film - gradually removing it, the tape is pasted in the necessary places for illuminating the box
If desired, you can purchase multi-colored ribbon. As for the intensity of lighting, it all depends on the density of light bulbs per 1 square meter. m. - the more there are, the brighter the light.
Making tool box lighting is actually not that difficult.
At the second stage we make the frame.
Wooden blocks of 20*40 mm are mounted around the perimeter of the future cabinet.
When installing, it is worth considering the material of the walls. If the walls are concrete, then it is better to use a 6*60mm dowel-nail, having previously drilled a hole with a hammer drill; if the walls are plasterboard, the bars are attached to 40mm wood screws.
Next, wooden blocks of 50*50mm are mounted strictly according to the level. They, in fact, are the main frame; the cabinet doors will be attached to them. They must be smooth and planed.
A very important point is that the bars should be installed 1-2 centimeters larger than the width of the doors, depending on the number of doors. And 2-3 centimeters from the height of the door. In our case, these bars were attached to 55mm wood screws.
It is also worth making an additional frame for attaching the lining and shelves, from a 20*40mm bar. The number and distance between shelves is decided individually.
In our case, a shelf was made along the entire length of the cabinet in the upper part. Two shelves on the right side of the closet and a wardrobe rail (photo No. 2).
Before sewing up the cabinet with clapboard and installing the shelves, you need to check that the frame is manufactured correctly. To do this, you need to try the door into the opening and make sure that there is space on all sides so that the door opens and closes without problems.
Cabinet frame
A few final tips
The design of a homemade box is so simple that even a novice craftsman can handle it. The main advantage is that there is no need to use expensive tools. But there are a number of recommendations that will greatly facilitate the operation of such a product:
- You shouldn’t immediately equip the entire space with shelves, as over time there may be a need to expand it
- when there are a lot of heavy tools in the house for which a cabinet is being built, then it needs to be additionally reinforced with aluminum corners
- a portable box is always convenient, since it is possible not only to change its location, but also to take it with you to the dacha
- If you make it yourself, you can easily add some functional compartment even at the drawing stage
A DIY toolbox is not only an organized storage place for tools, but also a reason to be proud of yourself.
You can watch the video to see how to make a tool cabinet yourself:
Noticed a mistake? Select it and press Ctrl+Enter to let us know.
Tools are available in every home. Especially if there is a man in it who loves and knows how to make something with his own hands. Then there is simply an incredible amount of tools. After all, in a good economy everything will come in handy.
Diagram of installation of fasteners and fastening of shelves.
A hammer, screwdriver and pliers, which are often used for basic work, can be placed anywhere.
But a large number of tools requires a good and convenient cabinet. It should accommodate the entire tool and also not take up too much space.
Cabinets, bedside tables, and chests are used for these purposes. Hang the instrument on the wall in the hallway or glassed-in balcony.
Assembly diagram of a wall cabinet for tools.
You can, of course, use all of this. But making a tool cabinet with your own hands is not at all difficult. And this is the optimal solution. Indeed, in this case it will be ideally suited for the needs of the home craftsman.
Read also: What does a power outlet mean?
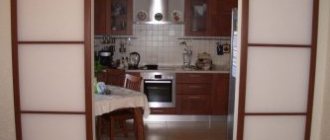
There is a wonderful option for such furniture, which is a cabinet with two doors. The doors swing open, and in the middle part of the cabinet there is a folding table. It is convenient to use for work. You can install separate lighting in the closet, which will further increase comfort. When closed, it takes up very little space, so it can be installed in a small city apartment. For example, on the loggia. Such furniture will satisfy the needs of the most picky craftsman.
DIY wardrobe for the balcony. Scheme
Before you begin to outline the instructions for making a cabinet, you should figure out what options you can implement with your own hands. Taking into account that the home master is not a professional in this matter, and the tool is only a household one. And based on the chosen model, focusing on the size of the balcony, it is easy to decide on the dimensions of the “furniture”.
Sectional composite model. How many compartments there will be depends on their desired capacity and the dimensions of the future cabinet. This option makes it possible to combine with the size of the cells in each pencil case.
For example, if you don’t fill the long one with anything at all (leave it empty), then for the summer you can put children’s sleds, clubs and other sports equipment in it. And for the winter - a bicycle. Not a bad solution, and you won’t have to constantly trip over all this in the narrow hallway of the apartment.
Built-in model of several sections. It is advisable to install such a cabinet while finishing the balcony. Many of its structural elements are common to the supporting frame for the paneling.
For example, the same racks, which at the same time serve as sheathing slats. Well, it’s not difficult to decide how to divide it into compartments. Either as stated above, or choose your own, more original option.
Pencil case. As a rule, this design is most often chosen for typical balconies that are not large in size. The easiest cabinet option to make, and from a practical point of view, no less convenient.
You can experiment here too. For example, divide the cabinet into levels, and install shelves in each compartment so that you get “cells” of different capacities - for bulky items, jars of pickles/jams, some household items, and so on. A specific solution will be suggested by your own imagination.
Corner cabinet. This pantry option has its advantages. The main one is that its back walls, by definition, already exist. It is only necessary to properly finish the masonry (or slab) and the fence between adjacent balconies.
As an option - a modification of the wardrobe, corner, in which the door leaves can be easily moved apart. But doing it is much more difficult.
There are enough models of cabinets on the balcony, and besides, these are just tips. The main thing is that there is something to focus on, and coming up with your own scheme and determining the required dimensions of all structural elements is not so difficult. In principle, for storing property that is not constantly needed in the apartment, shelves, racks, and so on are suitable. There is no doubt that it will turn out cheap, but whether it is beautiful is where opinions differ.
Examples of drawings and sketches of cabinets that can be placed on a typical balcony will help you design them yourself.
It is worth dwelling on the nuance of what the cabinet should be - stationary or mobile (mobile). The first option is much easier to do with your own hands. And there is not enough free space on the balcony to regularly rearrange the furniture on it. Therefore, it is advisable to install a rigidly fixed structure.
List of materials
For this you need:
- pine boards;
- plywood;
- wooden blocks;
- hacksaw, hammer, nails, screws;
- metal corners;
- hinges and other fittings.
Before you start making a cabinet, you need to decide on its location in the house and, accordingly, its size. For example, there is free space - two meters along the wall. If the central part of the cabinet is 100 cm wide, then the doors should be 50 cm each. When opened, they will take up these 2 meters of free space. The height, for example, will also be 2 meters. That's it, the sizes are determined.
Now you need to take the prepared lumber and cut it to size. The back of the cabinet, as well as the back (and at the same time the front) of its swinging doors, can be made of thick plywood. The side walls are made of boards. The boards can be connected to each other with metal corners.
Rack arrangement diagram.
As a result of this work, you get three identical rectangular boxes. Now the task is to attach the sashes on hinges or hinges to the central part so that they open and close easily. But before you do this, you need to secure the central part of the product to the wall. High-quality fasteners are important here, since, given that the table will recline in the cabinet, it will bear a large load. The cabinet must be attached directly to the wall using metal corners. The corners are attached to the boards. Holes are pre-drilled in the wall into which the choppers are driven.
After the central part of the product is secured, you can mount the table. It consists of a wooden board that hinges down into the bottom of the cabinet. From below, on the tabletop, 1 or 2 folding legs are fixed. The same on the hinges. Door hinges can be used. But they must be quite massive and firmly fixed. The tabletop should not be too large so as not to increase the load on the cabinet. When folded, there should still be free space underneath it.
The next stage of work will be fastening the opening sashes. They need to be adjusted so that the movement is smooth and they fit perfectly. To fix the shutters in the open state on the wall, you can provide special fasteners.
How to make a wardrobe with your own hands. Popular models
There are many models of cabinets, which, as a rule, can be made of the same materials, but serve different purposes.
- For clothes. Designs of this type are distinguished by the presence of special components. A closet for storing clothes must have a hanger bar (transverse or longitudinal), shelves and hooks. You can also add a mirror, drawers for underwear and a shoe cabinet to this list. Very often, such a piece of furniture is built-in or wall-mounted - installed along the wall using an artificial niche made of plasterboard. A frame is assembled from wood or metal profiles and attached to the floor. Then it is covered with plasterboard, the structure is puttied and sanded. After this stage, the installation of shelves and doors (hinged or “compartment”) occurs.
- Shoe. There are two types of shoe storage structures. The first is as an integral part of a wardrobe for storing clothes. The second is like a separate chest of drawers, on the lid of which keys, gloves, hats and other small items can be stored. The shelves do not have to be wooden - it is possible to choose the type of dish dryer. Lattice shelves made of metal combine functionality and attractive appearance. Be sure to leave the bottom of the cabinet open, otherwise excess water will accumulate inside. The depth of the shelves should match the length of the box from the largest pair of shoes in your apartment.
- Book. Models of bookcases are divided into open and closed. The latter protect books from dust, moisture and light, but the former look better in the interior. Also distinguished are cabinet cabinets (the most common), modular (giving the opportunity to combine elements and change the appearance), built-in (with a sliding door system), and corner. Most often, these pieces of furniture are assembled from chipboard or MDF. The classic depth of a bookcase is 400 millimeters, height is 2 meters, and width is 800 millimeters. Most books and magazines fit comfortably inside at these figures. The shelves can be mounted not on the corners, but cut into the sides of the cabinet. To make the furniture aesthetically pleasing, use decorative moldings - overhead convex strips.
- Swing. This type is one of the simplest and most familiar for Russian apartments. The design can be very different, and the content can include shelves, drawers, bedside tables or hanging rods. These cabinets are used to store some personal items, clothing, dishes, hobby or handicraft items - in general, for anything.
- Built-in. In addition, you can assemble a cabinet placed in a niche or under the stairs, if possible. These models allow you to save space and refresh your interior design.
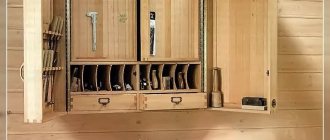
Tool holder
Drawings of tool cabinet parts.
The next important point in the manufacture of such a cabinet is the mounting of various tools in it. After all, this is exactly what it was created for.
Of course, all heavy tools should be located in the central part, which is securely mounted on the wall.
Lighter things are located in the doors, as moving parts. You can make full use of your imagination to ensure that everything is at hand and the tool is convenient to use.
For example, you can attach metal or plastic boxes with various small things to the doors: nails, screws, bolts, etc.
At the very bottom of the central part, you can provide mounts for heavy tools, such as a hammer drill or grinder.
Lighting installation
Of course, you can also install a portable table lamp with a clothespin mount. But it is much better to provide separate lighting for such a cabinet. In addition to the lamp, you can also provide an outlet located so that you can conveniently plug in a power tool there. If desired, you can even run a separate line from the electrical distribution panel. The line must be connected through an emergency shutdown circuit breaker.
Well, the tool cabinet is ready. It remains only to pay attention to the external decoration, so that when closed it fits well into the interior of the room. Don't forget about door handles. If there are small children in the house, you can provide a latch or lock.
This closet is very convenient. Not only does it allow you to store a large number of tools and everything that can be useful for a home craftsman, but it also represents a mini-workshop with electricity and a small table.
After reading this material, the question of how to make a cabinet to place home tools in it disappears by itself. After all, the description is quite detailed.
Peculiarities
Wooden cabinets fit perfectly into any interior. This allows them to be used both in city apartments and in the country. It is enough to correctly calculate the dimensions and determine a suitable design that will be an ideal complement to the appearance of the room.
Wooden cabinets have many advantages:
- environmental friendliness - only natural material is used that is not subject to chemical treatment;
- heat and water resistance - when heated or wet, the cabinet will not lose its properties and will not be damaged;
- variability - you can create your own unique closet with maximum convenience and ideal design;
- decorations – wooden furniture can be decorated with carvings, paintings or various inserts;
- placement methods - the cabinet can be built in to save space or placed in a classic way;
- possibility of disassembly - wood allows you to disassemble the furniture many times if necessary;
- elimination of damage - if scratches or chips appear, it is enough to sand the damaged area and treat it with paint, mastic or putty.
Creating a wooden cabinet yourself is not difficult and does not require large financial costs. In some cases, the process of preparing parts and assembling evokes such pleasant emotions that it turns this work into a hobby.
Important! In order for the cabinet to have all the properties inherent in wood, you should purchase materials from trusted stores where they were stored properly.
How to do something yourself, with your own hands - home craftsman website
AN EXCELLENT TOOL FOR CRAFTERS AND HANDCRAFTS AND EVERYTHING FOR THE GARDEN, HOME AND Cottage LITERALLY FOR FREE - SEE FOR YOURSELF. THERE ARE REVIEWS.
Nothing can replace a mobile chest of drawers that helps organize storage and tidy up your workshop. It'll hold the tools you use frequently so you'll always have them within reach, but you can easily tuck it out of the way or roll it to your workbench. Does it have any disadvantages?
Most of the hefty, rugged commercial models sell for exorbitant prices. But you can make such a chest of drawers yourself by taking several sheets of birch plywood and available fittings. Customize it exactly to suit your needs and enjoy admiring your work every time you pull out the drawer.
TOOLS FOR HOME AND GARDEN, HANDCRAFTS, ETC. PRICES VERY LOW
Construction of the tool cabinet body
1. Start by cutting out the parts of the upper body: side walls A, top and bottom panels B and back wall C according to the dimensions indicated in the “List of Materials.” Sand all parts with 220-grit sandpaper.
Attach the side walls with screws to the top and bottom panels (Fig. 2, photo A). After checking the squareness of the assembly, add the back wall and secure with screws.
Read also: Copper ore largest basins
2. Cut out frame D of the upper body. Apply glue to one edge of the piece and glue it to the bottom panel B, aligning with the front (Fig. 1).
3. Cut out the side walls E, the top and bottom panels F, the back wall G and the frame H for the lower body. Assemble the lower body in the same order as the upper one.
4. Cut out four corner bosses from 25 mm thick material and glue them from below to the corners of the bottom panel F (Fig. 1).
While pressing the box wall blank against the wooden pad, adjust the position of the longitudinal stop to align the face of the blank with the outside of the disk. Since the cuts are not through, it is safe to use the longitudinal stop as a limiter when forming grooves in the side walls J, K. By moving the longitudinal stop close to the disk, but without interfering with free rotation, cut the folds along the ends of the front and rear walls.
Make drawer parts
1. Cut out the side walls J, K and the front/back walls L, M for large and small drawers. Also prepare a 12mm thick scrap for tuning and set it aside.
Quick tip! Want to add partitions? Make grooves 6 mm wide and 3 mm deep on the inside of the front and rear walls L, M. Once the boxes are assembled, insert strips of 6mm plywood into them.
2. Install a 6 mm thick mortise disc and an anti-splinter insert into the saw machine. Attach a wooden plate to the longitudinal (parallel) stop. Raise the disc to a height of 6 mm and fix the longitudinal stop at a distance of 6 mm from the disc. Cut grooves on the side walls J, K (photos B and C, Fig. 2).
3. Push the rip fence close to the disc, leaving a minimum gap so that the disc can be rotated by hand. Take the previously prepared test cut, cut a fold along the edge and check how the formed ridge fits into the grooves of the side walls (Fig. 2a). If necessary, adjust the position of the longitudinal stop, then cut out folds on the front and rear walls L, M (Fig. 2, photo D).
4. Saw the bottoms N, O to the specified dimensions. Sand them and the insides of all walls J, K, L, M with sandpaper No. 220. Apply glue to the end ridges of the front and rear walls, as well as into the tongues for the bottom, then assemble the boxes .
Quick tip! Once the boxes are glued and secured, measure their diagonals to ensure they are square. To eliminate the skew, adjust the pressure of the clamps until the diagonals are equal.
Door installation.
Even at the measurement stage, it is necessary to take into account an important nuance. You need to have a rough idea of the size of the as yet non-existent frame. This will allow you to determine the correct size of the doors so that they are neither wide nor narrow, and also to match the height, this is necessary so that everything looks beautiful and aesthetically pleasing.
Louvered doors can be purchased ready-made at a hardware store or ordered according to your size.
But you need to keep in mind that there are size limits: the height is a multiple of 20 cm, and the width is a multiple of 10 cm.
Next, we make holes in the doors for the hinges using a Forstner drill.
All that remains is to screw the doors to the frame with self-tapping screws. (Photo No. 3).
Wardrobe with installed doors
Installation of boxes
1. Place the large K/M/O box on its side. Position one drawer rail on side K flush with the bottom and front edges and secure the narrow drawer section with screws (photo E). Quick tip! When attaching the guides to the drawers, screw the screws into the same oblong slot holes to simplify further adjustment. Having done this operation with all the drawers, separate the body parts of the drawers.
2. Plane the strip to a thickness of 8 mm and saw off a spacer 380 mm long from it. Then cut two additional spacers of the same length from 6mm plywood, 160mm and 59mm wide.
Using an 8-mm strip, secure the lower pairs of guides to the side walls of both cases A, E (Fig. 3, photo F). Install the remaining guide housing parts into the lower housing (photo G). Then do the same with the upper body, but now insert a 59mm wide spacer between them to align the guides.
H. Cut false panels P, Q from 19 mm birch plywood. Saw a 2 mm thick strip from the edge of the board and divide it into short sections to use as spacers.
Insert small drawers J/L/N into the upper body. After gluing strips of double-sided tape to the back, attach the false panels P to the front walls of the drawers, starting with the bottom (photo H). Then repeat the same steps with the lower cabinet drawers.
4. Secure the handle-brackets, aligning them with the center of the folder and panels P, Q (pnc. 2). Place the lower body on the back wall and attach the 100mm wheel supports to the bosses I (Fig. 5). Secure the back walls C, G with screws.
The box parts of the guides are attached to the side walls with 12 mm cylindrical head screws. To correctly install the second guide, remember the opening direction.
Place an 8mm strip underneath, align the body part of the guide and attach it to the body with screws, leaving 19mm at the front.
Place a 160mm wide strip of plywood on the bottom guide fixed to side wall E and use it to determine the position of the other two guides. Do the same on the opposite wall.
Attach the false panels P, Q to the drawers with double-sided tape, inserting 2 mm spacers to even out the gaps. Mark and drill mounting holes to install the handle brackets.
1. Cut out the brackets R, the base S and the tray panel T. Attach the brackets to the edges of the base with screws (Fig. 4). Cut out the U sides and make bevels at their ends, adjusting the length to the dimensions of the panel.
Glue the edges in place flush with the underside of the panel. Once the glue is dry, attach the T/U tray with screws to the R/S base assembly, aligned with the back. Finish the assembly with 220-grit sandpaper and attach it with screws to the side wall K of the lower housing (Fig. 5).
2. After removing the slide rails and handles, apply a finish coat. We used polyurethane, applying three coats with a pad, sanding in between with 800-grit sandpaper. Once dry, reinstall the hardware. Next, tidy up your workshop and put your tools in drawers.
Do-it-yourself cabinet-chest of drawers for tools in the workshop - drawings
© Materials from the wonderful magazine WoodMaster were used in preparing this article