What is not at all difficult to make are rugs made from pompoms. In some models you don’t even need to knit anything. Make yourself balls and put them together into a rug. Under the model of a rug with a sheep, you must first knit a lining in the shape of this very sheep, and only then sew pompoms onto it. Same with the bear. I liked the bear the most. My daughter loves to sit on the floor, so I’m thinking of knitting one for her.
The pompons themselves are made in the simplest way. Cut out two circles from cardboard, cut holes inside each in the form of small circles. And then take the yarn and wrap it around these very circles. The pictures show the main steps.
By the way, you can avoid fussing with cardboard and use a special device for pompoms. One of the options is shown in the photo. I myself have never resorted to these devices. But to make a rug from pompoms, I think you’ll have to fork out the cash, because you’ll have to make a lot of pompoms, and the cardboard will constantly fray and you’ll need to cut out new ones. It's not expensive. Around 50-60 rubles.
In general, sometimes I do it much more simply - I wrap the threads around my palm, cut it, cut it again, tie it with thread, shake the pompom, straighten it with scissors, and the next. The pompom is attached to any dense fabric (mesh, carpet - who has what at home) at a distance from each other and retreating from the edge of the fabric. Before starting work, it is advisable to mark where and in what order they will be attached.
By the way, you can make anything from pompoms! A scarf can become such a thing - and it will only take 1 day!
With the help of a pompom rug you can decorate any room in your apartment, making it incredibly cozy, warm and comfortable. This product is a fluffy rug, which is made from threads, yarn or special braid. You can make it yourself at home.
Design options
A pompom rug can come in a variety of designs. The shape of the product can be in the form of a circle, square, rectangle or in the form of other geometric shapes. Often, a pom-pom carpet is made in the form of an animal skin (usually a bear, hare, sheep or fox). These varieties differ in their colors and sizes, which can be absolutely any. You need to choose the appearance of the product based on the interior design of the room in which you plan to use it.
For example, if you want to place such a soft and fluffy rug in a children's room, you can make it bright and colorful, if in an adult bedroom or living room - in delicate light colors.
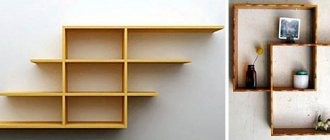
Decorative curtain made of beads
You will need:
- beads;
- fishing line;
- metal crimps for jewelry;
- pliers;
- cross stitch pattern;
- wooden plank;
- L-shaped bracket – 2 pcs.
In order to make a decorative curtain from beads, you will have to work hard. The first thing you need to do is purchase a wooden slat; it must be smooth and durable, since such curtains have a decent weight. After purchasing, leave the bar in the room for 7-10 days.
To create curtains from beads, you will need beads of different sizes and colors and strong threads.
This is necessary to acclimatize the material, otherwise the tree may pull and warp. After this, drill holes for the fishing line along the lower edge of the future cornice. The distance between the holes will depend on the diameter of the beads. It is important not to place the threads closely, otherwise the product will be overloaded; the ideal distance is 1.7-3 cm.
The cornice can be painted with acrylic paint of a suitable color, decorated using the decoupage technique, tinted using stain or colored varnish; the L-shaped brackets are screwed on after the curtain is ready. If you are making a curtain for a doorway, then you will not need brackets; in this case, it is better to drill holes on the back side of the strip, and then attach the curtain rod to the dowels. Instead of a wooden beam, you can use a beautifully shaped branch. To design an arched opening you will need a flexible plastic profile.
In order to determine how many beads you will need, you need to make 1 thread, count all the elements, multiply by the total number of threads. If you want to make a curtain with a specific motif, then you need to take an embroidery pattern and count the number of cells of each color. Buy beads with a large supply, as some of them may be defective or lost.
Tools and materials for making curtains from beads.
After the cornice is made and everything necessary is purchased, you can begin to work. The fishing line is threaded through the hole in the cornice, tied in a knot, the ends are burned with a lighter, and then decorated with a metal crimp, which is secured with pliers. Crimp is a metal piece for jewelry that serves to secure beads at a certain distance from each other. The first bead is strung at a distance of 3-5 mm from the cornice; if you do this closely, the thread will bristle, which will ruin the appearance of the product.
Then everything is simple: the beads are strung in a certain order and secured with crimps. If you make a curtain according to an embroidery pattern, then be extremely careful, first count the number of beads of a certain color (for each thread), write down the data on paper, then it will be easier for you to work. The bottom of the curtain can be decorated with teardrop-shaped glass beads, the fishing line is threaded through the hole in the pendant, tied in a knot, then cauterized and hidden under the crimp. Decorative curtains are ready!
How to install a window sill? Instructions for installing plastic windows according to GOST. Installation of PVC windows. Read more>>
Features and Benefits
A pompom carpet performs a number of important functions and has many advantages:
- decorative function
- products of this type look original and stylish, while they make the interior as cozy and special as possible; - versatility and functionality
- pom-pom rugs fit perfectly into any interior style, they can be used in any room (bedroom, living room, hallway, nursery, bathroom, terrace, including as soft covers for stools); - reasonable cost
- products are made from materials and yarns whose cost is low; - the opportunity to make a carpet with your own hands
- anyone can cope with this task.
Materials
Various raw materials are used to make a pompom carpet.
The most popular types of materials are:
- Yarn. The thread should not be thin. You can choose synthetics, wool, acrylic or cotton. In order to save money, they often use not purchased yarn, but threads obtained from unraveling old knitted items. A good manufacturing option is a mixture of natural and synthetic fibers.
- Original products can be made from garbage bags. The main advantages of such products are their low weight, low cost and the simplest possible care - such rugs can be washed by hand using soap or detergents.
What can you use to make pompoms for a rug?
Fluffy balls can be made from various materials that can be found in every home, for example, it is a great idea to recycle leftover yarn. In addition, the work uses:
- old knitted things. They must first be unraveled and the threads wound into a ball so that they straighten;
- you can buy skeins of yarn of different colors at sales;
- garbage bags - they need to be cut into strips and made into a pompom using a cardboard template;
- knitted clothing cut into strips across the product.
The number of pompoms per rug depends on the thickness of the yarn and the size of the finished product.
Manufacturing stages
The first step is to decide what size the future rug will be and, depending on this, calculate the required amount of materials. It is important that you have scissors, cardboard, a pencil, a crochet hook, and a needle on hand. Next, you need to select the base of the product. This could be a special textile or mosquito net, or a piece of tapestry.
Before you start, you need to prepare a template for making pompoms. It can be made from cardboard (you need to cut out circles with a hole in the center). If you want all the pompoms to be the same size, we make circles of identical diameters; if you want to get pompoms of different sizes, we prepare different templates.
Making a pompom
We take prepared templates (two identical cardboard circles with holes in the center). Then we begin to wind the thread evenly around the template around the entire circle, passing the thread through the central hole. After this, take scissors and carefully cut the threads along the outer edge of the circles, then move the templates a little to the sides and tighten the middle with another thread. The result is a pompom that just needs to be fluffed.
Another method for making pom poms is to wind the thread around your fingers. Depending on the desired size of the pompom, wind the thread around two, three or four fingers (make about fifty turns). Pull the resulting winding in the center with another thread and remove it from your fingers. After this, all that remains is to cut the ends of the winding and straighten the finished pompom. The thread used to tighten the pompom in both methods should not be cut. With its help, the fragments will be attached to the base.
When decorating your home with handmade elements, remember - it is always fashionable, inexpensive and sincere! Creative individuals constantly invent and create original things using only available means. Today, rugs made from pompoms have become very popular. A rug made of pompoms will undoubtedly decorate any home; it is very warm and soft, and kids like it, since the long pile resembles grass, which can be pulled cheerfully. To make a pompom rug you don't need any knitting, weaving or sewing skills. Everything is done easily and quickly!
For the rug we will need simple materials:
- Woolen threads, so that the rug does not prick, choose soft threads for knitting children's clothes. Such threads are hypoallergenic and there is little chance that “uninvited guests” will settle in them.
- Two toilet paper rolls
- Scissors
- Mesh base for the rug
If you don’t find a mesh for the base of the rug, then this is not a reason to abandon the idea. Take as a basis a foamed PVC mat, which are sold on every corner. They also have holes, plus they are non-slip, you can ask them to cut them to any size. At least make a path out of pompoms!
So, let's start making an amazing rug! Prepare all materials. Wrap your two fingers around the two bushings and secure the end of the thread between them. Start wrapping the thread around the two bushings.
Continue winding the thread. Then pass the end of the thread between the bushings and carefully remove the wool from the bushings.
Make a tight and strong knot. Leave the threads from the knot long.
Holding the skein of thread by the middle, cut the side threads in half. Fluff the resulting pompom and cut off the protruding threads, giving it a more rounded shape. Don't forget to leave the threads from the knot long.
Make a lot of pompoms using this pattern. It’s okay if they turn out to be different sizes, the rug will look even more interesting.
Once the required number of pompoms are ready, tie them to the base by passing long threads through the holes. Attach them closer to each other.
The mat is ready, you can use it. If desired, cover the back of the rug with fabric, sewing it to the base.
Unleash your imagination, experiment with different yarns and make your own original rug of an unusual shape or color. Look at what fun rugs you can make from ordinary pompoms.
A hand-made pom-pom rug creates home comfort in any interior: from a baby’s room to a living room. It is not only soft and fluffy, but also a stylish item that contains a piece of the soul of the craftswoman. A practical and necessary thing is to protect your feet from the cold floor.
Products are made in different forms: from geometric to animal figures. Children love rugs that resemble their favorite characters from fairy tales. Whatever the shape of the rug, the manufacturing technique is the same - pompoms of different sizes are attached to a common canvas.
A homemade rug is not only a fashionable element in a bedroom, nursery or bathroom, but also an original present for any occasion.
Crazy hands
In two weeks we will celebrate the New Year. But it’s not too late to make more New Year’s souvenirs and room decor from pompoms, because it’s very simple and quick. Moreover, for pompoms you can use the threads that are left over from knitting various blouses and which will not be enough for anything else.
This New Year's decor is perfect not only for personal use, but also for gifts to anyone.
You will need: threads for pompoms (for snowmen - white and cream), for other crafts - multi-colored or also white, lace, a little glue, various buttons or beads.
Snowman made from pompoms:
To make such a snowman from pompoms, just make two pompoms, one smaller and the other larger, glue them with hot glue, tie a scarf-ribbon around your neck (or knit or crochet a scarf). We glue small eye beads, a nose bead, and rhinestones to where the buttons should be and make “headphones” from fluffy wire.
Instead of headphones, you can tie a scarf for the snowman, glue a bow or knit a hat for him.
Garland of pompoms:
This craft makes it even easier. We make multi-colored pompoms and complement them with other pendants (in the photo - Christmas trees made of ordinary cardboard with buttons and pieces of braid glued to them).
We string all the elements onto a thin rope (it’s probably better to glue loops to the cardboard Christmas trees from the same braid that was used to decorate them). The pompom garland is ready!
Decorative pompom curtain:
Well, after the New Year, you can make a decorative curtain from pompoms. We simply string pompoms onto thin ropes or cotton threads, which we fasten to a wide braid or thick ribbon.
Read also on our website: how to make a pompom or many, many pompoms quickly. See also in earlier articles - puppet toys made from pompoms, flowers made from pompoms for a unique interior. Let me also remind you of the ideas for necklaces with tassels and pom-poms - they are beautiful and original. Well, you can also sew pompoms from fur.
How to connect pompoms? Pompoms can be joined using a long needle, which is used when sewing soft toys, by simply sewing the pompoms together at the middle. You also need to attach eyes, handles and other parts to the toys that you collect from pompoms. They can be glued - spread the threads of the pompom, drip glue and insert the desired part deeper. Eyes with a flat base are glued to the surface of the pompom. Parts can also be sewn on. Also, the toy, which is supposed to stand on a stand, can be assembled onto a thin rod, such as a toothpick.
Similar articles
- Crochet: three simple but very beautiful triangular openwork shawls. — 05/13/2020 00:01
- Interior: how to simply make an unusual flowerpot from leftover fabric. — 04/18/2020 17:46
- Interior: how to make small colorful wooden trays. — 04/07/2020 00:14
- Sew: a quick way to sew an elegant skirt for the Christmas tree. — 12/28/2019 19:54
- Interior: an easy way to decorate a bolster pillow with ribbons. — 06/24/2019 12:18
New articles
- Knitting: two cozy blankets is simple and very beautiful. — 12/30/2014 09:42
- About hand knitting. — 12/25/2014 04:32
- Knitting: warm and very simple slippers. — 12/22/2014 07:55
- Getting ready for the New Year: Two elegant garlands made from scrap materials. — 12/17/2014 23:54
- Interior: fluffy rug made from old T-shirts. — 12/14/2014 18:18
Early articles
- Getting ready for the New Year: ballerinas and snow. — 12/11/2014 15:33
- New Year's decor made of cotton wool - a snowman and snow quickly and easily. — 07.12.2014 13:08
- Crochet: New Year's garland with snowflakes. — 03.12.2014 18:04
- We sew: a panel calendar made of buttons and fabric. — 24.11.2014 20:06
- Christmas tree ball in 5 minutes from beads and buttons. — 11/13/2014 16:16
What materials are rugs made from?
The basis of the product is a construction mesh for plastering work. Convenient and practical, does not crumble when cut. Retains its shape for a long time. You can buy a special plastic canvas at hobby and craft stores or weave it from durable twine.
Rug pompoms are made from various materials:
- remnants of multi-colored skeins of yarn;
- old knitted items;
- knitted fabric strips;
- plastic bags.
If a knitted product is used as a material, it must be unraveled by wetting it with water. When the yarn dries, it will straighten out - the strings in the boombos will not be curly.
Creation
So, how to make a pom pom rug? Decide what shape you want your rug to be. What drawing are you going to post?
Cut out the required shape from the plastic canvas. Having estimated the approximate location of the pompoms, start creating them. Take your time to cut the thread that held your pompom together. Pull the thread through the canvas and tie tightly. Fill your canvas with pompoms in a certain sequence or randomly, depending on your desire.
How to make pom poms
Buboes for a rug are made using several methods. Any needlewoman will choose the best option for making them. It’s worth trying to make one ball to evaluate the simplicity and speed of the action.
The classic way - pompom on rings
Required tools and materials:
- sheet of cardboard,
- compass,
- needle with a large eye,
- yarn,
- scissors.
First you need to decide on the size of the pompom. Using a compass, draw two circles of different radii with the same center on the cardboard. Cut two blank rings. Connect the rings. Wind the threads evenly, passing them through the hole.
When the middle is filled, cut the yarn along the edge of the circle with scissors. You should hold the middle so that the future pompom does not fall apart. Leave a thread between the rings to attach to the base (25–30 cm long), tie a knot tightly. Remove cardboards. Trim the pompom with scissors for aesthetics.
Method for making a pompom on a “rectangle”
What you will need:
- cardboard,
- scissors,
- threads
Cut a rectangle out of cardboard or fold it several times to the desired size. Wind the threads tightly to the desired thickness. Pull out the rectangular cardboard. Using a thread folded in half, tie the turns in the middle. Leave the tip for attaching to the canvas. Fluff the pompom.
If cardboard is not at hand, then the threads can be wound around the fingers folded together. You can make pompoms of different sizes. The more turns, the more magnificent the pompom.
Small pompoms on a fork
The method for making a pompom is similar to the first two options. Wrap the thread across the fork across the teeth, leaving a long end to connect the pompoms to the base.
Tie the middle of the skein with a string. Remove the workpiece from the fork. Cut with sharp scissors on both sides. Distribute the threads for pomp.
Linear method for making pompom balls
You can make many pompoms using a chair. Wind the yarn onto the back of the chair to the desired volume. Use a ruler to measure equal distances and tie with thread. Cut in the centers. Shake the pompoms.
The end result is that all methods are good - you get a high-quality, elastic element. Quality check: crush the pompom in your hand and release it - it should instantly return to its original shape.
- To make a multi-colored ball, you need to intertwine threads of different colors.
- If you don’t have cardboard on hand, then useless CDs will do.
- The larger the circumference, the larger the product will be.
- Pompoms can be used to make fun toys for kids.
Basic techniques and features of making pompoms
There are several techniques for making pompoms with your own hands; we will tell you about the most popular and simple ones.
Using cardboard templates
Pompoms using this technique are as fluffy and neat as possible. First you need to prepare two round blanks of thick cardboard, inside of which holes of small diameter are cut. The width of the segment will be the size of the thread in the finished product.
- First you need to combine the two templates and wrap them with threads. The more turns are made, the more magnificent the ball will turn out.
- Cut the thread, cut the yarn between the cardboards with nail scissors.
- Slightly push the edges apart and tie the workpiece as tightly as possible in the middle with a thread of the same color.
- Remove the cardboard and trim the edges of the pompom.
Making a fluffy ball on your fingers
A fluffy ball can be made very easily and quickly using your hands; to do this, you need to wrap the thread around your fingers, tie it in the middle and cut it on the sides. Fluff the pompom and trim any protruding yarn.
Stages of making a pompom on your fingers
Pompom on the back of a chair
You can make a large number of fluffy balls in one go. To do this, you need to wind the yarn between the back or legs of a chair or table, then tie the “sausage” at the required distance and cut it as shown in the figure.
Pompom made of fine yarn on a fork
If you need to make many small pompoms from thin yarn, it is best to use a fork. To do this, wrap threads around the cloves, tie them in the middle and cut along the edges.
The finished pompom needs to be fluffed by hand.
Advice! A pompom can be made from threads of different colors; to do this, you need to alternate shades during its manufacture.
How to make a rug from pompoms
Any work should begin with the development of a project for the future product. A diagram of the pattern is drawn, how many pom-poms are needed and what size is calculated. Make enough boomboons - in practice there may not be enough balls.
In the process of making a rug from pompoms, improvise with the sizes of the balls: for originality you need all types. Before starting work, assess the quality of how large and small pompoms hold the volume together.
If you use a variety of colored pompoms to assemble the rug, then the pattern is transferred to the base with colored markers. Distribute the blanks on the grid according to the pattern, tie them in a checkerboard pattern. There should be no gaps between the elements of the rug. Volume and splendor depend on the density of arrangement.
Cover the reverse side of the product with thick fabric. The rug is beautiful on both sides. The edging will add completeness to the finished rug.
The rug, pleasant to the touch, is made from knitted children's clothing. It is hypoallergenic - there will be no insects in the finished product.
Weaving pompoms
STEP 6 Next comes perhaps the most painstaking and time-consuming stage.
It is necessary to bandage all intersections of threads. It is necessary to bandage tightly so that the future product does not fall apart during use.
It is necessary to cut carefully so as not to cut the warp threads. When cutting, it is necessary to straighten the pompoms so that they acquire a beautiful appearance.
Often such products are made for small children and newborns. In this case, reduce the length of the frame base.
Discharge envelopes are made from such blankets: blue for boys and pink for girls. But the color depends entirely on your imagination.
Thus, you and I were able to learn how to make a blanket from pompoms step by step.
I wish you good luck in weaving and, of course, patience. Let your blanket give you a sea of warmth.
Today we are doing some handicrafts