To eliminate chips and scratches on cabinet furniture made of chipboard and MDF, the following materials and components are used:
Designed for:
for sealing chips, scratches, cracks, and dents on wooden and laminated surfaces that bear light physical and chemical loads (cabinet furniture, doors, MDF panels, etc.), to ensure moisture resistance of the damaged area.
Application of soft furniture wax.
| Damaged areas: hole from a self-tapping screw, chip at the end. | |
| Application with a spatula or edge knife. | |
| We cut off the excess with a knife or a piece of plastic, for example a plug for a furniture corner, which is more preferable because plastic eliminates accidental scratching of already damaged material. | |
| And carefully polish with a clean cloth, preferably felt. | |
| If the material being restored has a distinct wood texture or some other texture, then you can finish painting it on the putty area with alcohol-soluble felt-tip pens or markers. | |
| The more colors you have, the more accurately you will be able to seal the surface. They can also be used to sketch not deep scratches. | |
Designed for:
for sealing chips, scratches, cracks, and dents on wooden and laminated surfaces bearing medium and heavy loads (cabinet furniture, doors, MDF panels, etc.), to ensure moisture resistance of the damaged area.
The only difference from soft wax is that it is more resistant to mechanical stress and is applied in a molten form and, accordingly, costs much more, is more difficult to obtain and the color range is not as wide as that of soft wax.
Furniture touch.
Unlike alcohol felt-tip pens and markers, it has the word “furniture” in the name, is more expensive, rare and limited in color range.
| Designed for: For quick repair of small chips, scratches and cracks on wooden and laminated surfaces (furniture, doors, floors, windows, etc.), as well as for wide household use. |
Furniture made from laminated chipboard has been and remains the priority purchase option for the vast majority of our population. Perhaps its main advantage is its affordable price, which can be obtained by using chipboard that is inexpensive relative to other materials (for example, wood). Thanks to the lamination of the surface of the board, the furniture acquires a quite decent appearance and fits well into almost any room.
However, like any other product, such furniture is prone to damage during use or transportation. Now we will look at what damage is typical for this type of furniture, how restoration and repair can be carried out.
Products to help!
Nuts
Strange as it may seem, walnut is very often used to cover up scratches on wood. We cover the scratch with a walnut without the use of physical force and immediately remove all excess with a soft, dry cloth so that the wood does not absorb too much juice and there is no stain left on the furniture.
Mayonnaise
Cracks in wood flooring can be treated with mayonnaise. The most popular sauce is also useful in home furniture restoration.
Fill small cracks with mayonnaise, wiping off excess sauce and leave in this state for several days. The excess protein and oil contained in mayonnaise will be absorbed into the wood, it will swell and close small cracks on its own. After 2 - 3 days, remove the mayonnaise that has not been absorbed and polish the surface with a soft cloth.
Lemon
With a solution of lemon and vegetable oil, first applied to a clean, lint-free cloth, you can polish small scratches on a wooden surface.
Tea
Steeply brewed tea can also be used to paint over scratches; the longer you brew it, the darker the final color will be. You need to apply it very carefully so as not to overdose the scratch, otherwise the wood will absorb too much of the painted liquid and a stain may form.
Instant coffee
From one tablespoon of coffee, adding warm water, make a thick paste. We fill the scratch with this mixture, avoiding contact with entire areas of the coating. Remove excess with a dry cloth.
Whatever type of home restoration of wooden furniture you choose for yourself, upon completion of the work, be sure to polish the treated areas, this will help give the surface a shine. And if, despite all your efforts, for some reason your restoration work at home was unsuccessful, do not be discouraged, you can always turn to professionals who will help return your favorite furniture to its former appearance. Watch a video on how to extend the life of old furniture:
Operation "Liquidation"
Repairing chips
To repair chips on chipboard you will need:
- retouching felt-tip pen (or a regular one of a suitable color);
- hard tint wax;
- wax melter or lighter for melting wax;
- chisel or spatula;
- felt fabric;
- fixing varnish spray.
Chips usually appear at the corners and are small, light-colored indentations (chipboard color).
The elimination process consists of several stages:
- Preparatory treatment of the chip
. In this case, it is necessary to process the chip with a chisel so that its edges become straight. - Repairing the chip
. To do this, hard wax of a suitable color is melted with a wax melter or lighter and applied to the chip with a small margin. - Leveling the surface
. After the wax has dried, using a chisel, having worked through each plane, carefully cut off the excess wax, forming a clear right angle to the surface, and lightly sand it with a felt cloth. - Texture restoration
. Using a thin retouching felt-tip pen, apply lines along the chip in accordance with the overall texture, wiping each time with a paper napkin to easily blur the clear boundaries of the lines and make them more believable. - Opening with varnish
. To fix the seal and to give the restored surface a characteristic shine, it is treated with a spray varnish.
Removing scratches
Such damage is detected especially often. To remove scratches, you will need the same tools for repairing furniture as for repairing chips, only instead of hard wax it will be more convenient to use soft wax.
How to remove scratches: sequence of work
- Using a spatula, apply wax transversely to the scratch, simultaneously compacting and leveling it.
- Use a thin retouching felt-tip pen to fill in the missing texture.
- To fix the place of sealing and level the surface gloss, apply a fixing varnish.
Scratches on chipboard
Advice! To seal cracks when wax is unavailable, you can use a special furniture touch.
Restoring a worn surface
Scuffs, like scratches, often occur on laminated chipboard due to constant contact with the surface of foreign objects. For example, you can find them in the kitchen.
As a result, the top protective layer and partially or completely the paint layer are worn away.
In order to eliminate the abrasion that has already appeared, you need to do a few simple manipulations:
- Stretch a microfiber cloth over your finger and dampen it with a matching colored marker.
- Use a napkin to touch up the abrasion, rubbing along the surface structure.
- Apply several thin layers of fixing varnish.
Repairing cracks
Cracks in chipboard furniture often appear under the influence of moisture, heat or improper use at the attachment point of the cabinet doors.
To repair cabinet furniture with your own hands you will need:
- clamps (adjustable clamps);
- syringe with needle;
- PVA glue.
Repair process:
- PVA glue is filled into a syringe without a needle (for easier and faster penetration) and the needle is put on.
- Using a syringe, fill the entire internal volume of the crack with glue.
- Place a clamp on the slab on either side of the crack and tighten it.
- Remove excess glue with a napkin and leave in this position for at least a day.
After the glue has dried, the element will be ready for use again.
Special means
Furniture wax
Furniture wax can be used to remove small chips, scratches and cracks, as well as dents on laminated and other wooden furniture. Melted wax must be applied to damaged areas of furniture with a spatula; after it has hardened, the excess must be cut off and the treated area polished.
Due to the application technology, this method is usually used by professionals or people who have some skills in working with hot wax. The wax is selected according to the color of the furniture, and if there is no suitable one, the chipped area can be slightly tinted. Watch a video on how to properly repair scratches on a wooden surface with soft wax:
stain
This special material, which comes in liquid form, is applied to the prepared wood to give it a certain color. Stain differs from paint and enamel in that when applied it does not form a film, leaving the structure of the wood clearly visible; the color itself seems to penetrate into the top layer of wood.
Regular liquid paint
If the furniture is no longer new and is so badly cracked that it has acquired an unesthetic appearance, it is better to paint it entirely. We buy the paint we like, sand what we are going to paint and move on. And if you also cover it with varnish, you will get an almost new item in .
Oil polish
Very often, manufacturers coat wooden furniture with urethane or polyurethane, in which case it will be more difficult to polish out scratches. For this purpose, Old English companies produced a special oil polish. You need to stock up on 600 grit sandpaper (wet and dry). Dip sandpaper into lemon oil and sand the scratches until smooth. Then we polish the surface with steel wool No. “0000” and cover it with oil polish to restore the former shine to the restoration site.
How to remove a scratch on a product that is covered with varnish or shellac: first you need to remove the top layer of varnish or shellac using alcohol or a special nail polish remover, you can use a product intended for nails. We apply the thinner to the cracked varnish until it gets wet and fills the cracks, then we leave it until it dries completely.
Briefly about materials
Edge gluing
The most commonly used materials are hard and soft wax, special retouching and shading felt-tip pens or markers, furniture touches, PVA glue, and laminating edge.
Soft wax differs from hard wax in that in its original form it is immediately ready for use (it does not need to be melted), but it is applicable only on those surfaces that are not subject to mechanical stress.
Soft wax is more convenient to use, while hard wax is more reliable.
The stroke is used to cover minor damage (scratches, small chips, abrasions). It must be applied to the surface, allowed to dry slightly, and then sanded with a felt cloth.
Laminating edges are glued to the worn end surface of the board, having previously removed and sanded the old edge.
The edge is placed on the end and a heated iron is passed over it, causing it to stick.
Summing up
We hope our article was useful to you. In order to more accurately understand the technological and practical issue, our website provides detailed photo and video instructions in which you will find useful information on this issue.
Well, who among us would refuse to have entirely wooden furniture at home? It is elegant, reliable, but expensive, and it is because of this that we are forced to purchase furniture made from chipboard, which is more susceptible to damage. But even these defects can be eliminated, even if repairing chipboard furniture with your own hands seems like a complicated process. Now we will prove to you that you can cope with such work on your own.
How can you restore furniture made from laminated chipboard?
Furniture made from laminated chipboard is found in every home and office. This is the most budget-friendly and quite decent-looking furnishing option. In more expensive versions of furniture, only the body is made from chipboard, while the facade part is made from MDF with various types of cladding (PVC film, veneer, enamel) and solid wood. MDF and solid surfaces may also require restoration, but we will not talk about them. This article provides information on how to restore chipboard with a laminated surface with your own hands.
.
Do-it-yourself chipboard restoration can be of several types:
- Restoring the color of a worn (worn) surface.
- Masking chips and scratches on the surface.
- Restoration of chipped ends of chipboard furniture.
- Restoration of places with torn fasteners and hinges.
Each of the defects requires its own approach to restoration and a different set of available tools.
A little about materials
The most commonly used are soft and hard wax, special retouching and tint markers or markers, PVA glue, furniture touches, laminating edge:
- Soft wax differs from hard wax in that in its original form it is immediately ready for use, that is, it does not need to be melted. But at the same time, it can only be used on surfaces that have not been subject to mechanical stress.
- Using soft wax is much more convenient, but hard wax is more reliable.
- The touch-up is used to cover minor damage, such as scratches, small chips, and abrasions. It must be applied to the surface, wait until it dries slightly, and then sand it with a felt cloth.
- Laminating edges must be glued to an already worn end surface, after removing and sanding the old edge.
- The edge is placed on the end and a preheated iron is passed over it, due to which it sticks.
Restoration of chipboard facades
The front part of furniture made of chipboard can rarely be restored. Similar procedures for filling scratches, cracks and dents with furniture wax turn out to be ineffective. Because light hits the surface differently, it is impossible to make defects less noticeable. Usually they resort not to the restoration of damaged chipboard facades, but to the actual renovation of the entire facade part of the furniture:
- They are covered with wallpaper or covered with artificial leather. To do this, it is recommended to remove the facades and twist the handles - this will make it neater.
- They use photo printing, hand painting and decoupage techniques. The pattern can be applied exactly to the location of the defect, and not over the entire surface of the chipboard facade.
- The facade is decorated with self-adhesive moldings and various overlays. You can find out more about furniture decor.
- Glue strips of melamine tape of a similar or contrasting shade. If you think through the concept, this disguise of damage can look like a design technique.
No kitchen can do without a countertop, as this detail of the kitchen interior performs a number of important functions:
- is a work surface for cutting food and preparing it;
- is an area for placing the necessary equipment and tools;
- sometimes a tabletop can be used instead of a table.
Restoration of a veneered kitchen table top
The kitchen countertop tends to wear out over time; various chips may appear, since it is subjected to numerous mechanical influences and loads for a long time.
Partial restoration of a burn on a kitchen countertop before and after
Therefore, it is restored, updated and repaired more often than other furniture components of the kitchen in order to restore its attractive appearance.
A chipboard tabletop has a low price, as well as a large selection of a wide variety of colors and textures
These elements of kitchen furniture are made from various materials: wood, chipboard, stone, plastic, glass.
hpl panels for chipboard cladding have a huge number of color options and attract buyers at an affordable price
The most common type are those made from chipboard, as they are inexpensive and can withstand high temperatures. As an option, there are separate matte and glossy ones, coated with plastic. For their production, laminated, melamine and laminated chipboard is used.
Laminated chipboard - the sheet is covered with paper impregnated with resin
For laminated chipboard, the same paper is used, but of greater thickness, impregnated with melamine resin and fixed under pressure
The tabletop can be damaged due to exposure to moisture and heat, excessive looseness and other damage appear on it. Many people wonder how to repair a kitchen countertop.
Chipboard covered with film is afraid of moisture; the ends and edges of the tabletop suffer from water ingress
Ceramic tiles or mosaics are often used to restore the worn surface of a kitchen table.
Very often, countertop repairs can be done independently without the use of special tools.
Restoration of a table top made of chipboard before and after
Construction of a countertop laminated with hpl plastic
In such models, after prolonged loads, cracks and chips form on the surface. Here you need to use a special fastening glue for plastic applied with a gun.
Special glue for plastic Moment
If the surfaces are not severely damaged, then inexpensive regular superglue or “Moment” will do. If the chip is significant, then you cannot do without Titan glue.
Professional Titanium glue in a bottle for a mounting gun
To seal cracks, plastic is ground to a powder and mixed with glue, then empty spaces are filled.
Repairing chips
Chips, as a rule, appear in the corners and are small, light-colored depressions. Therefore, it is necessary to repair chips on furniture made of chipboard with your own hands.
In order to repair such defects, you will need:
- a retouching felt-tip pen or an ordinary one of a suitable color;
- hard wax;
- lighter or wax melter;
- spatula or chisel;
- fixing varnish spray;
- felt fabric.
The liquidation process consists of several successive stages.
Preparatory treatment of the chip
Process the chip with a chisel so that its edges are straight.
Repairing a chip
Melt hard wax of a suitable color with a wax melter or lighter and apply it directly to the chip with a certain reserve.
Leveling the surface
When the wax is dry, use a chisel to work through each surface, carefully cutting off any excess wax. Form a clear right angle to the chipboard surface and lightly sand it using a felt cloth.
Texture restoration
It is enough to use a thin retouching felt-tip pen to apply lines along the chip, in accordance with the overall texture, wiping each time with a paper napkin in order to slightly blur the clear boundaries of the lines and for greater believability.
Opening with varnish
In order to fix the seal and give the restored surface a characteristic shine, it is necessary to treat it with spray varnish.
Removing scratches from a surface
Especially often, such damage is discovered during the renovation of children's rooms. In order to eliminate scratches, you will need all the same tools for repairing chipboard furniture as for repairing chips. Only now, instead of hard wax, it will be more convenient to use soft wax.
How to eliminate scratches - sequence of work:
- Using a spatula, apply wax crosswise to the scratch, simultaneously leveling and compacting it.
- Using a thin retouching marker, add the missing texture.
- In order to fix the sealing areas and level the surface gloss, apply a fixing varnish.
Important! To seal cracks if wax is unavailable, you can use special furniture touches.
Restoring a worn surface
Scuffs, like scratches, quite often occur on laminated chipboards due to frequent contact of foreign objects with the surface. For example, you may find them during renovations in the hallway or kitchen.
As a result, the top layer of protection and part or all of the paint layer are erased. In order to eliminate the abrasion that has already appeared, you must perform several simple and uncomplicated manipulations:
- Stretch a microfiber cloth over your finger and moisten it with a felt-tip pen of a suitable color.
- Touch up the abrasion with a napkin, rubbing along the surface structure.
- Apply several small layers of fixing varnish.
Removing cracks
Cracks in furniture made from chipboard often form under the influence of moisture, heat, or improper use in the place where the cabinet doors are attached.
To repair cabinet furniture, you will need:
- clamps, also known as adjustable clamps;
- PVA glue;
- syringe with needle.
The procedure for repairing chipboard furniture with your own hands in this case will be as follows:
- For the easiest and fastest penetration, put PVA glue into a syringe without a needle and put on the needle.
- Using a syringe, fill the entire interior of the crack with glue.
- Place a clamp on the slab on both sides of the crack, and then tighten it.
- Remove excess glue with a napkin and leave in this position for about a day.
- After the glue has dried, the part will be ready for use again.
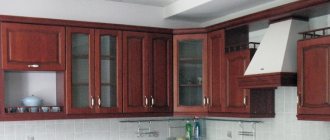
Lately, the presence of cabinet furniture in the house is almost mandatory. Cabinet furniture is interior elements made up of massive rigid vertical and horizontal elements. Connections are made using angles, self-tapping screws, bolted connections and other fasteners. One of the advantages of prefabricated furniture sets is the ease of their transportation and installation. Cabinet furniture is found in many rooms of ordinary apartments, is subject to stress and, of course, breaks during use. But this doesn’t mean it’s time to go shopping for a new cabinet. Each person can perform simple repairs to cabinet furniture on their own.
Before carrying out repair work, you must prepare a set of tools:
- If the surface is damaged, you will have to restore it using improvised means. A wax pencil, an ordinary walnut, vinegar, glue and many other repair items can help in this matter;
- Screwdrivers of suitable size;
- If required, you will have to find the missing elements of the mechanisms;
- Furniture varnish.
Repairing cabinet furniture with your own hands is a creative process; no one can accurately list the entire set of tools, because all breakdowns are unique and require a special approach.
Available means
Cigarette ash
A simple way to repair chips on damaged furniture. It won't work on all types of wood, so it's best to try it on a small area of wood that sits on furniture in discreet furniture. Make a thick paste from the ashes and water, then rub it into the damaged areas.
The toothpaste method is similar to the “cigarette ash” method. Apply a thick paste diluted with water to the chips and rub in, you can use an old toothbrush. If the furniture is not white, then it is better not to use toothpaste, except for the effect of giving an antique look.
Colour pencils
There are special pencils for repairing chips and scratches on wooden furniture. But these wonderful pencils have one significant drawback - they are very difficult to find on sale, especially those that match the color.
Iodine
Iodine is used to repair scratches on furniture made of dark wood (walnut, oak,). To treat scratches, you will need a small brush (you can use an old toothbrush) and a weak iodine solution. Using a brush, treat the scratch with a solution.
Eyebrow pencil
Another unusual solution in the fight against small wooden scratches. If your eyebrow pencil matches the color of the furniture that needs a mini-repair, fill in any chips with it.
Shoe polish
Since shoe polish can be easily purchased in both liquid and creamy form, it is very convenient for filling any cracks in furniture, and there should be no problems with the color scheme. Creamy shoe paint can be applied to scratches using cotton swabs.
Colored crayons
Children's colored crayons, matching them to the color of the furniture, can also be used to repair and paint over small scratches, as they contain wax. The advantage of working with them is that they can be easily removed if necessary.
Markers
MinWax is a company that produces special paint for furniture in the form of markers. They are very convenient and easy to use. Complete drying after application occurs in just 1 minute. After painting, use wax or polish to restore shine.
Laminated chipboard is difficult to restore. Defects that arise during transportation or intensive use can often only be masked and not completely removed.
Since this is an inexpensive material, in some cases it is easier to replace a part with noticeable scratches and chips with a new one. Restoring chipboard is only appropriate in some cases - let's look at them using examples.
Surface restoration
The most common damage is surface defects. This is not surprising, because cabinet furniture is often used in not the best conditions and the surface is often subjected to heavy loads. You can fix minor damage yourself. To do this you will need your skill and some tools depending on the damage.
Minor scratches
The appearance of small scratches is a natural process during the use of furniture. The cause of such a defect can be pets or careless handling of furniture. Usually scratches appear as if by themselves, the owners simply notice them and begin to choose a repair method:
- Walnut. With its help you can make small scratches on the surface less noticeable. The material covers up scratches. To carry out repairs, it is necessary to divide the whole nut into two halves and lightly rub the damaged area with the inside;
- To correct damage, you can use a pencil of a suitable color. With its help, you just need to paint over the scratch;
- MDF and chipboard panels can be repaired using furniture wax. To do this, the wax pencil is melted using a thin knife heated over an open flame, and the mixture is applied to the scratch. After drying, the remaining wax should be removed with a blade and wiped with a cloth. Under no circumstances should wax be melted over an open fire; the beeswax contained in it is highly flammable.
After completing the work to eliminate scratches, the surface can be varnished; this will not only improve the appearance, but will also help protect the furniture from further damage for a while.
Anti-scratch pencil
Scratches are removed with walnut
Major damage
Major damage cannot always be repaired with your own hands; they often require the involvement of specialists. Many companies carry out repairs of cabinet furniture at home, this saves the energy and nerves of the owners. In this case, the technician will professionally assess the amount of damage and carry out repairs. If the damage is unusual or non-specific parts need to be replaced, you will have to wait until the specialist returns with a set of everything necessary.
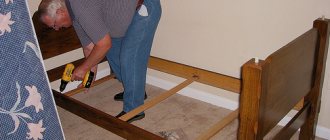
Some major damage can be repaired on your own. A common defect in furniture is cracking of legs or other parts due to use in unfavorable conditions, with constantly changing humidity. To repair this defect you will need the following tools:
- PVA glue;
- Syringe with needle;
- Rag;
- Clamp.
The work is carried out in several stages, at which time the operation of the furniture becomes impossible
. To ensure that all work is carried out efficiently, the objects being repaired are advised to be freed from cargo.
- First you need to remove dust and other contaminants from the crack. Do not allow moisture to get on the surface; all work must be carried out with dry parts;
- Carefully draw glue into a syringe without a needle. At this stage, air bubbles should not be allowed to get inside;
- To work, put a needle on the syringe. Through it, the crack is carefully filled with glue. It should protrude somewhat above the surface of the furniture;
- The part is compressed with a clamp and excess glue protruding from the crack is removed;
- After 24 hours, the clamp is removed, the surface is sanded and coated with varnish to protect it from scratches and other damage.
After performing these simple steps, the furniture completely restores its functions. Crack repairs should be carried out as early as possible, immediately after damage appears. This is due to the ability of cracks to expand as time passes.
Cleaning the surface
Filling the crack with glue
Sanding the coating
Chips
Cabinet furniture is made from chipboard or MDF - these are sheets of tightly glued sawdust, wrapped in a decorative coating. They are often varnished or laminated. The top layer of furniture parts is susceptible to chipping. This unpleasant incident can result in the appearance of noticeable defects, because the unprotected surface is subject to significant damage.
Chips in the paint layer can be easily repaired using furniture repair wax. It is simply applied to the surface, wait until it dries completely and cover with an additional layer of varnish.
The situation is somewhat more complicated with chipped edges of structures. These are noticeable light indentations on the edges and corners of chipboard panels. Such damage causes further destruction, so they must be “treated” immediately. To complete the work you will need:
- A felt-tip pen for giving the repaired area an inconspicuous color. The most difficult thing in repairing chips is choosing the required shade;
- Repair wax of a suitable tone;
- Thin knife and lighter;
- Putty knife;
- Felt;
- Fixing varnish spray.
The repair process includes several stages:
- The edges of the chip are given a straight shape. The damage is treated with a knife and sandpaper;
- The chip is sealed with wax. The pencil should not be melted over an open fire, so it is applied using a hot thin knife. It is necessary to leave some wax reserve;
- After the wax has completely cooled and hardened, it needs to be processed with a chisel and the frozen mixture must be given the required shape;
- When the shape of the part is restored, the wax is lightly polished with a felt cloth;
- A pencil is used to repair surfaces with a clear structure. It helps restore texture;
- If the chipped area looks invisible, it means the work was done well and you can coat the repaired part with varnish.
If you cannot find wax of a suitable color in the store, then this problem can be solved by mixing different shades. Purchase two tones that are close to the color of the furniture being repaired. The shavings of these wax crayons are placed in a waste tablespoon and melted. You should get a substance of the required shade. By adding shavings from one of the two pencils you can achieve the perfect color.
Making straight edges at the chip
Cover the surface with wax
Processing with a chisel
Updated appearance
When furniture doesn't look as new as it used to or the owners are tired of its appearance, updating the furniture can help make cabinets attractive again. It includes several types of work:
- Painting;
- Pasting;
- Replacement of accessories.
All these steps can be performed independently, even without the skills to repair cabinet furniture. For painting, it is recommended to choose an acrylic paint mixture. It dries quickly and does not require multiple layers. But it has a number of disadvantages:
- Each piece of furniture will have to be painted separately from the rest;
- Painting work cannot be carried out indoors;
- Use personal protective equipment.
Before painting, the surface must be treated with sandpaper and the old paintwork must be removed. In this case, cracks and scratches should be treated with putty. After this, a primer is applied. The paint is applied with a brush or spray. It is not necessary to apply several layers, but you must ensure that the paint layer is even on all elements. Pasting is carried out only on smooth surfaces. In stores you can buy self-adhesive film of any color. It is glued to a clean, dust-free surface. When carrying out work, remove all fittings. By the way, it can be replaced with a new one. This is easy and does not require any tools other than a screwdriver.
Scratches on your favorite furniture, especially if it is new, can very easily ruin our mood. And when rearranging or moving, your favorite furniture very often gets scratched in the most visible place.
You may have never even thought about it, but masking or removing scratches on wooden furniture is very easy and simple; you can do it yourself at home using the simplest means at hand.
So let’s look at all the options for home treatment for scratches on your loved one: