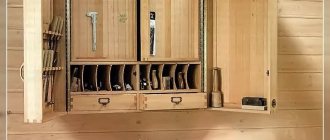
Possible ways to repair the floor
The floor on the balcony can be made of ceramic tiles. It meets almost all modern consumer requirements. Ceramics do not cause problems during operation. It looks aesthetically pleasing and is offered for sale in a wide range of colors and textures. Another important factor when choosing for housewives is the ease of care of the coating. The tiles can withstand any impact of the most aggressive detergent. This finishing material can decorate the floor on an open balcony or glazed loggia. The material copes well with the effects of heat and cold, as well as changes in temperature and humidity.
The floor on the balcony can be made using porcelain stoneware. This finishing material is durable and strong, it does not wear out as intensively and has low susceptibility to mechanical stress. It is almost impossible to leave a scratch on porcelain stoneware using household items. This building material is moisture resistant and able to withstand frequent temperature changes. All these qualities are complemented by the ability to implement any design solutions. This coating is easy to care for and can be used on a balcony of any degree of security.
The floor on the balcony is often covered with solid boards. It can act as an additional heat insulator. The massive board looks quite attractive. If you install it according to all the rules, then it will be ready to serve for a long period of time, and you will be faced with the need for replacement if you get tired of the design of the coating. The only requirement when laying solid boards is the need for a glazed space.
Choosing flooring depending on the type of balcony
Before making a choice of material for finishing the floor on the balcony, you need to understand the existing immediate arrangement. There are such types of balcony premises as:
Depending on these parameters, floor insulation and subsequent finishing should be carried out. It must be taken into account that the selected coating must withstand low temperatures, precipitation and sunlight.
Open balcony
Open type balconies, without glazing, are most exposed to atmospheric phenomena. That is why serious requirements are put forward for its arrangement. One of the main problems is the selection of suitable cladding. Indeed, in addition to durability and weather resistance, the appearance of the material plays an important role.
The flooring on an open balcony must withstand winter frosts, autumn rains and scorching sun and at the same time maintain its functionality and aesthetics. In addition, anti-slip properties are desirable if the floor gets exposed to rain. All these requirements are met by ceramic tiles, porcelain stoneware, stone, and special paints.
Glazed balcony
A glazed balcony is less demanding when it comes to choosing flooring. It is not affected by atmospheric phenomena, the wind does not blow dust and dirt. For example, temperature changes and minor raindrops are not so dangerous for a tree. The only thing you should choose with caution is carpet and laminate. The first, due to possible condensation, can absorb moisture, and the second, due to high temperatures, is deformed.
Carpet - covering for a glazed balcony
Reviews about laminate and linoleum
You can cover the floor on the balcony with laminate. This material is usually installed in a warm space, because it does not tolerate sudden changes in humidity. The surface must be prepared and leveled before installation work. Laminate panels are easily adjusted to each other, which is one of the positive qualities.
Another advantage, according to consumers, is the presence of a latching mechanism on the products. Thanks to this, the joints between the panels are practically invisible. According to home craftsmen, linoleum is one of the affordable floor coverings offered by the modern construction market. The coating can imitate natural materials such as wood and stone. If you consider that installation is a simple procedure, then the choice becomes clear. Buyers also like the fact that the material is inexpensive compared to other solutions described above.
Video instructions and expert advice on the topic
How to make a subfloor for any floor covering
The floor on the balcony is an important detail. It must be strong enough to withstand the weight of things stored on the balcony, beautiful, functional and warm.
The task is not only to choose a decorative finishing coating, but also to lay the most functional floor. It can be laminate, tile, linoleum, carpet, board. Let's figure out which option is suitable for your balcony.
For some, a strong and even floor is enough, while others definitely need decorative details. Modern coatings are quite original with imitation of different surfaces and even 3D designs.
Reviews about carpet
The floors on the glazed balcony can be improved with carpet. If your plans include renovating the loggia, then it can be turned into a relaxation and recreation area. Currently, carpet can have any quality of pile. Consumers, in their words, like that the basis can be yarn from different materials, namely:
- artificial;
- natural;
- combined.
This affects the cost, but also expands the possibilities of choice. Natural materials include animal wool. Among the artificial ones we can distinguish:
- polyester;
- nylon;
- polyacrylic;
- olefin
Combined materials in the basis of carpet include those to which natural wool is added in a volume of 10 to 30%.
Technology of constructing a frame floor with insulation
To manufacture such a structure, it is necessary to perform the following type of work:
- we knock down the entire screed on the balcony so that it becomes possible to get to the base of the slab;
- we use wooden beams 50*50 mm, 50*70 mm or 50*100 mm, depending on the required height of the future floor;
- from this timber we make a frame that will serve as the foundation of the future floor;
- This frame is set to a horizontal level. This is done using plastic wedges.
When the base of the future floor is ready, you can proceed to the next stage of insulation. To do this you need:
- Place mineral wool tightly between the beams in 2 layers. It will provide additional heat and sound insulation of the floor;
- Lay a moisture-resistant OSB board on this frame, the thickness of which should be at least 15mm. It will provide an absolutely flat surface for laying finishing material. The thickness of the slab will make the base strong, which will not allow the floor to sag under the weight of a person;
- To prevent mineral wool from getting into the apartment, the joints between the OSB board and the walls of the balcony should be filled with polyurethane foam.
Preparation of tools and materials
Quite often, novice home craftsmen wonder what is best to lay on the floor on the balcony. Regardless of what decision you make, you must prepare the following materials and tools:
- insulation;
- waterproofing;
- sealant;
- metal corners;
- beam;
- level;
- chisel;
- putty knife;
- a rag;
- cement;
- floor levelers;
- lighthouses;
- hardboard;
- roulette;
- hammer;
- Master OK.
To paint you will need a primer, brushes and a roller. If you decide to lay linoleum, you should ensure that you have:
- glue;
- baseboards;
- fasteners;
- knitted roller;
- metal scissors;
- linoleum;
- accessories for connecting skirting boards;
- glue brushes;
- knife for cutting linoleum;
- square
We make the floor on the balcony from ceramic tiles. To do this you should prepare:
- glue;
- primer;
- tiles;
- wooden block;
- tile cutter;
- tile drill;
- glass cutter;
- trowel for laying tiles;
- tile tongs;
- porous sponge;
- grout composition;
- distance crosses;
- metal corners;
- grinder;
- electric drill;
- dowels;
- hammer or mallet;
- putty knife; comb;
- scraper.
If you are deciding what to make the floor from on the balcony, you can choose a self-leveling coating. It will require a special mixture, pigments and fillers.
But to lay wood flooring, you should make sure you have a wider list of tools and materials:
- polyurethane foam;
- baseboards;
- electric drill;
- self-tapping screws;
- flooring;
- varnish;
- fire retardant composition;
- sheets of plywood;
- Bulgarians;
- dowel-nails;
- screwdriver or screwdriver;
- glue.
Plywood sheets can be replaced with one of the following materials:
- MDF;
- OSB.
What material is better for the floor on an open balcony?
The finishing coating is fully exposed to a bunch of adverse weather conditions. Therefore, the material must be resistant to temperature changes, tolerate frost and heat well, not be destroyed by moisture, and resist ultraviolet radiation.
The foundation is also properly prepared. All potholes, chips and cracks are well sealed with a repair compound. Waterproofing is laid on the base prepared in this way. It prevents moisture from entering the concrete slab and protects it from destruction. Choose any suitable insulation: coated, rolled, etc. Next, one of the finishing options is installed.
Ceramic tile
Many types of cladding are available. For an open area, choose low-porosity ceramics: clinker, metlakh, porcelain stoneware, cotto, etc. Porous plates, even covered with glaze, absorb moisture too actively. When it freezes, it will destroy the tile. For the floor, choose only rough models that prevent slipping.
A balcony is an integral part of almost every apartment. This additional space is used in different ways: as an extension of the living area, as an office, or as a place to store unnecessary junk. In any case, you need to think about what is best to make the floor on the balcony from to make it warm and comfortable.
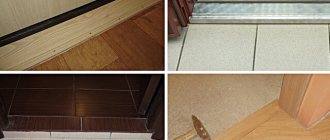
Surface preparation
Repairing a balcony floor always begins with preparing the base. The complex of works for all types of coating will include cleaning the rough surface from dirt and objects. If necessary, existing coatings can be removed. If there is a screed, it is removed from the supporting slab. The next step is to clear the floor of debris. The slab should be leveled.
The operation is carried out during the installation of the screed. To do this, you will need beacons, which are strips of metal. Alignment of the position of the beacons is carried out by placing pieces of hardboard. On an open balcony, the floor is sloped towards the street, which will ensure water drainage from melting snow and rain. The lighthouses are fixed. To do this, cement mortar is applied with a trowel in the area where the hardboard is laid. After 2 hours, the horizontal position of the beacons must be checked and they must be completely fixed with a solution.
The next day you can start making the formwork. It will consist of bars that are fixed on the outside of the railing. Before pouring the screed, the gaps between the beams and the base are filled with sealant. The solution is prepared from a dry mixture for leveling the floor, which is mixed according to the instructions. The consistency of the mixture should resemble semolina porridge. Add 3 kg of cement per bag of mixture.
Before pouring, the base is primed with a deep penetration compound to increase adhesion. The finished mixture is poured over the entire volume of the formwork. The surface is leveled with a trowel and then smoothed with a rule. He is pressed against the ribs of the beacons. Typically, special mixtures do not require additional leveling work. After pouring, the screed is left for two days or more until it dries. The formwork can be carefully removed after this and the blemishes on the edges can be corrected with a solution. After drying, metal corners are fixed along the entire length of the screed.
Details
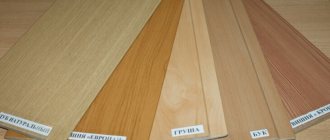
Varieties
Standard tiles for a loggia (that is, a balcony) are divided into main types, and each type has certain advantages:
Quartz vinyl tiles.- Porcelain tiles.
- Cotto slabs.
- Clinker tiles.
- Tile.
In order to make ceramic products, sand, clay and related finishing materials are used under the influence of high temperatures. After preliminary shaping, the tiles are fired in a kiln and then covered with a glazed mass (the last component determines the future texture and color). Conventional clinker tiles are highly resistant to low temperatures and have increased resistance to wear, which makes them far superior to other types of cladding material. The cost is cheaper than porcelain stoneware. The unusual tiles on the balcony, the photo of which is just below, are called Cotto tiles. At first it was made exclusively without glaze and has a brown or yellow tint.
Now glaze is used in its production, which affects the range of materials. Porcelain tiles for cladding are made in this way:
- It is given its original shape in special containers.
- Next will be processing of the mold under pressure.
- After pressure there will be firing at high temperature.
After completing all the procedures, the finished material not only looks like natural stone, but also has similar qualities, or rather an increased degree of strength, resistance to frost, sudden temperature changes and excellent resistance to a humid environment. The product is made both without admixtures of the glazed mass and together with it. The latter type of porcelain tile has a huge selection of colors and textures, which is preferable from an artistic design point of view. The only drawback of porcelain tiles is their price. A tiled floor made from quartz vinyl has very high performance that competes with other building materials.
The tiled floor on the balcony is practically not subject to wear and tear, and also has excellent strength. This is due to the specific creation process, including components made from 80% quartz sand. But resistance to wear will be provided not by decorative material, as is commonly believed, but by a special protective film on top of the product.
How to choose a tile
The most important factor when choosing any floor covering is to take into account the weight of the overall balcony structure, because the larger it is, the greater the pressure on the supporting slab. For this reason, you definitely shouldn’t overload it. For finishing, lighter options are quite suitable, for example, PEI 3 tiles. In order not to reduce the already small balcony space, it is better not to lay a product with a size larger than 0.4 * 0.4 meters for the floor. It is also better to choose light shades for a balcony or loggia (a dark color helps to visually reduce the area).
Please note that a one-time purchase of material (ideally with a small supply) helps ensure an ideal floor covering.
It is recommended to cover an unglazed balcony with relief tiles (rough) to avoid possible injuries. Don’t forget to prepare in advance the tools you will need for quality installation:
- Excellent glass cutter.
- Tape measure, pliers and hammer.
- Putty spatula (spatula).
- Building level.
Additional items you will need are a regular pencil, a sponge and a clean cloth.
Preparatory stage of the surface
Before broaching the issue of laying tiles on the balcony, you should understand the preparatory stage of the floor:
- If you are not going to lay tiles on the old surface, then you will need to dismantle the balcony floor.
- If dismantling was not part of the plans, then you can increase the pressure on the load-bearing slab (taking into account not the heaviest glazing and other things) up to 400 kg per m2 (for new buildings) or exactly 2 times less for older buildings.
For uneven surfaces of the balcony floor, it is better to use a “wet” screed or joists.
Wet screed is a simple building mixture of concrete or sand.- Logs are wooden blocks with a cross section of 5*5 cm, or 5*7 cm, which will be fixed to the load-bearing slabs using dowels.
In the spaces between the joists, lay construction insulation, namely polystyrene foam, extruded polystyrene foam or penoplex, on top of which I attach sheets of moisture-resistant plywood (fixed to the sheathing using simple self-tapping screws). Finish the process with gypsum fiber boards that can be easily laid on the balcony floor.
Laying tiles
It is advisable to finish the balcony floor at a temperature level of at least +10 degrees. Certain types of floor tiles can be soaked in water before cutting, and after a few hours they can be cut with a regular knife. The facing process itself looks like this:
- A moisture-resistant polyethylene mat is mounted on the construction screed, which is primed with a special mixture or PVA solution.
- To lay tiles on the balcony floor, certain markings are applied to maintain accuracy of installation.
- Correct installation of tiles on a balcony begins from the middle of the floor, because it is better to hide the halved pieces closer to the baseboard.
- A special adhesive composition is applied with a spatula (treat a square meter of floor in one pass).
- To ensure uniform seams between adjacent tiles, it is better to use cross-shaped spacers.
- Porcelain tiles can be laid without seams, which will create the effect of a monolithic floor covering.
The balcony tiling looks just like in the photo. When laying the tiles, proceed to the final stage. After a day, remove the gaskets and grout the seams with a scraper, and the dirt that appears after grouting must be removed with a damp cloth, and then the tiles must be wiped with a dry, clean cloth. At the end of the sequence of work, you have made a high-quality floor on your loggia or balcony.
The sequence of work on painting or laying linoleum
The floor screed on an open-type balcony can be painted with concrete paint. It must be designed for outdoor use, which indicates that it is weather resistant. The dyeing process is standard. The base must be primed and then paint applied in several layers. You can choose acrylic.
The coating will not withstand loads from furniture and heavy interior items, but the layer will remain intact for 5 years, despite sudden fluctuations in humidity and temperature. Linoleum can be used on an open or glazed balcony. Its modern types can withstand any atmospheric conditions.
The material is fire resistant, highly durable and environmentally friendly. But it wears out quickly and can look quite cheap. To lay it on a primed screed, lay a sheet of linoleum and leave it for a couple of days for the material to stretch and level out. When this happens, the canvas is cut around the perimeter. After this, it is wrapped to the middle, and glue is applied to the reverse side. The cloth is rolled out and pressed to the floor. It should be rolled with a roller. The operation is also carried out on the second half.
It is most convenient to lay linoleum on plywood, which is laid when installing a wooden floor. It makes sense to stick sheets only if you plan to turn the balcony into a full-fledged living space. Installation of linoleum-based tiles is carried out using glue. It is necessary to proceed according to the same principle as for seamless laying of porcelain stoneware. A plinth is fixed between the edges of the covering and the wall.
Types of coatings
Choosing a floor covering is not as simple as it seems at first glance. The floor must meet certain standards and requirements. In addition, the topcoat will become the visible part, so its appearance should be attractive. What is better to put on the floor of the balcony? Below are some suitable options.
Ceramic tile
Ceramic tiles will look very beautiful on the balcony floor. There are many color and texture solutions on sale, so choosing cladding for a specific interior will not cause difficulties.
Ceramic tiles are one of the floor coverings on the balcony
The tiles are quite durable and retain their appearance for more than 10 years. It is easy to care for, but it is a rather cold material, so you will need to lay carpet on top or make a “warm floor” system.
Linoleum
There are several types of linoleum, which are produced on the basis of different materials. Rubber-based linoleum has the most durable characteristics. The coating is not afraid of moisture, is not flammable, and can withstand mechanical stress and stress. If the balcony will be used as a living space, it is better to choose natural-based linoleum. It looks beautiful and is environmentally friendly.
Laying ceramic tiles
If you decide to lay tiles on the floor on the balcony, you can use this coating in an open or closed loggia. If the balcony is planned to be used as a living space, then it is advisable to organize a warm floor in its space. It is extremely risky to do it with a water-heated system. Therefore, it is recommended to use electric underfloor heating.
Before laying tiles on the floor on the balcony, you should make sure that they meet safety requirements. The finishing surface should be rough or have a textured pattern. Glossy coating is dangerous, because due to the entry of a minimal amount of water, the products become slippery.
The tiles are glued onto a primed screed, which is pre-cleaned. The composition is applied to the reverse side of the products. Installation is carried out starting from the far corner. The first product is cut at an angle of 45˚. The layer is leveled using a spatula comb. This will remove any excess. A small amount of glue must also be applied to the screed. The tiles are laid and pressed.
Spacer crosses should be installed to maintain a constant seam width. Constantly monitoring the horizontal position of the products using a level, you must place all rows according to the described principle. If necessary, the tiles are trimmed using a wooden block and a mallet. The edge tiles are cut with a tile cutter. Once the glue has dried, you can attach the metal corners using dowels. The fasteners are inserted into holes drilled with a tile drill.
Laying laminate
What to make the loggia floor from? Made from laminate. This material is suitable for completely enclosed (glazed) and well-insulated rooms. Under the laminate, you need to make a floor on the loggia with decking. For work, plywood, particle board or chipboard can be used. The thickness is selected depending on the expected load, because the finished surface should not sag.
You may be interested in: Formwork for the foundation: choice of material, design, assembly features, advice from builders
The most commonly used options are 16 mm or more. How to make a loggia floor from plywood under laminate? The flooring is secured with self-tapping screws (at least twice as long as the thickness of the material). A backing is placed on top to compensate for some unevenness. The substrate has good heat-insulating properties. Hard and soft options are available for sale.
The first row of laminate is laid along the wall. It is better to leave a gap (5-7 mm will be enough) to compensate for the deformation. The second row starts from half the panel. Under no circumstances should the joints coincide, so the joints must be offset by at least 30 cm in adjacent rows. The rows are combined by assembling and snapping. The exact steps depend on the design of the laminate locks. Afterwards all that remains is to attach the plinth, which will close the gaps and give the room a finished look.
Water heated floor installation
Water floors on the balcony can be installed on a concrete screed. It is first cleared of debris and large potholes are filled with solution. In those places where the screed will be adjacent to the walls, damper tape should be placed. It will prevent damage to the material due to thermal expansion. The surface is spread or filled with waterproofing, then you can start insulating it. For this purpose, foamed polymer boards are used. It could be polystyrene foam.
There is a reinforcing mesh on the insulation layer, which will prevent the pipes from moving during the pouring of the leveling layer. The heated floor on the balcony at the next stage involves laying a pipeline system. You can use a double snail as a circuit. Flexible pipes are placed on the reinforcing mesh, which should be strengthened with clamps. There is no need to tighten them tightly. A distance of 1 m should be maintained between the clamps. The pipes should not be allowed to be close to each other near the wall. A distance of 10 cm should be maintained between them.
The outlet sections of pipelines that approach the collector should be protected from a corrugated hose. If you are thinking about the question of how to make a warm floor on the balcony, then the next step is to connect the pipeline to the water collector. Next, you should start the coolant, setting the pressure 1.5 times higher than normal. The system is left in working condition for a day. After testing is completed, you can start filling. In this case, normal operating pressure must be applied to the pipes. Then the final floor covering is formed.
Working with foam plastic and penoplex
If you know how to deal with mineral wool (and now you do), then dealing with other insulation materials will not be difficult for you. Because the installation technology has no fundamental differences. Only in the case of foam plastic and penoplex, we no longer need waterproofing, since these materials are not afraid of moisture. As already mentioned, in the case of penoplex, 20 mm of insulation will be sufficient due to the fact that this material is denser than ordinary foam plastic and mineral wool. But just ordinary foam plastic should be taken 5 cm thick for reliable protection from the cold.
All other procedures are the same as when working with mineral wool. There is no point in repeating ourselves. Let’s just briefly list the main stages of the work:
- preparation of the base,
- level determination,
- assembly of the frame (lathing),
- laying insulation in the sheathing,
- filling the cracks with remnants of insulation and/or polyurethane foam,
- laying penofol (optional),
- installation of plywood or OSB,
- laying flooring.
As we can see, there are no fundamental differences from what was described in the previous section. The only thing I would like to add is a small clarification about penofol. It should be laid with a continuous sheet, with an overlap of ≈20 cm on the walls.
That's all for leveling the floor on balconies and loggias using a frame made of wooden beams. Now let's talk about another method of surface reconstruction. This option involves pouring a new screed.
Installation of electric heated floors and insulation
The electric floor on the balcony can be based on a heating cable. This system is complemented by a concrete screed, due to which the height of the room is reduced by approximately 12 cm. You must follow the following instructions: first, the old coating is dismantled, and then the surface is leveled. If you want to know how to insulate the floor on a balcony, you can use polyethylene foam. It may have a foil coating. The joints between the canvases are taped with metal tape. In this case, a damper tape is laid along the perimeter, which eliminates deformation.
A mesh or mounting tape is fixed to the insulation layer for further installation of the electric heated floor. The heating cable is attached with the same pitch. It is calculated based on the area of the room and the recommended heating power. It reaches 250 W per square meter. If you are wondering how to make a heated floor on a balcony, then you should read the instructions. At the next stage, you need to install the temperature sensor and thermostat, placing them in a place suitable for use.
The circuit needs to be tested to make sure everything is connected and working. The finished system is photographed so that if repairs are needed, you know where everything is. Next, the cement-sand mortar is mixed and a 5-cm screed is poured. As soon as it hardens, you can proceed to laying tiles or linoleum flooring.
Subfloor options
In order for the balcony to look beautiful and provide the necessary comfort, preparing the base should not be limited to leveling it with a screed. It is necessary to further insulate it by installing a wooden frame with insulation. And for maximum comfort in the cold season, you can install a “warm floor” electrical system.
Wooden frame with insulation
The most popular subfloor design, due to its simplicity and relatively low costs, consists of:
- wooden frame;
- insulation (mineral wool, expanded polystyrene);
- flooring (chipboard, plywood).
Wooden logs are used as lathing, which are attached to the base of the balcony with anchors and form cells for laying insulation. Both mineral wool and expanded polystyrene (foam plastic) can serve as insulation material, since their thermal insulation properties are comparable.
Note! If you will insulate the floor on the balcony with mineral wool, take care of reliable waterproofing. Unlike expanded polystyrene, mineral wool completely loses its thermal insulation properties when wet.
When choosing between chipboard and plywood, keep in mind that the first option has a lower coefficient of linear expansion. Chipboard retains its shape much better and deforms only if it stays in water for a long time.
Combination “wooden logs + mineral wool + chipboard”
Warm floor system
Insulating materials reduce heat loss indoors, but do not emit heat themselves. To maintain a comfortable temperature in any weather, it is better to install an electric heated floor on the balcony. Such a system costs an order of magnitude more than a conventional wooden frame with insulation. But thanks to it, you will get additional living space where you can arrange a relaxation area or a study.
To install the system, use an electrical cable or infrared film. The choice of a specific option primarily depends on the geometry of the base. If the room is of irregular shape, it is better to use a cable, which can also be easily laid on an uneven surface, so leveling the base is not required. For infrared film, it is critical to install it on a perfectly flat surface, and the geometry of the balcony or loggia must be rectangular. The advantage of the film is that the floor covering can be laid directly on it, whereas the use of cable requires a finishing screed.
The smaller the cable laying step, the greater the power of the “warm floor”
The cable and film in the “warm floor” system must be laid on a heat insulator, which will prevent heat from escaping downwards.
You will have to pay for the comfort provided. It's not just about expensive materials. The system operates from the electrical network, which means it is an additional consumer of electricity. The consumption of “warm floor” depends on the external air temperature, on average it ranges from 100-200 W per 1 m².
Wooden floor installation
Before laying a wooden floor on the balcony, you must dismantle the old covering and remove debris. The work will require logs, which are beams made of hard wood. Flooring is easier to make from floorboards. The coating elements have the necessary impregnation, they are equalized in thickness and have embossed ends for connection using the tongue-and-groove principle. An edged board requires sanding; a sanded board has a leveled surface on all sides. Thanks to this, the boards adhere well to each other.
If you are faced with the task of how to insulate the floor on the balcony, then for this you can use waterproof plaster. It will also serve as a waterproofing agent. If the hole is large, then foam can be used to fill it. You will also need a waterproof film. For the heat-insulating layer, mineral wool, polystyrene foam, penoplex or other solutions with a low thermal conductivity coefficient are additionally used.
To make a wooden floor you should prepare:
- screwdriver;
- electric jigsaw;
- hammer;
- knife for cutting insulation;
- drill;
- construction stapler;
- level.
The sequence of work is as follows: to protect the material from moisture, it should be sealed. Film is used for this. At the next stage, it is necessary to install longitudinal logs along the balcony. The structure will become more reliable if it is formed from longitudinal and transverse elements. The distance between the latter will be 50 cm.
The insulation is placed in the space between the joists. Then you can proceed to installation of the coating. Boards are used for this. They are checked with a level or square. Having retreated some distance from the wall, it is necessary to lay the first element. With the help of end fastening, all boards will be attached to each other. In order to ensure tighter pressing, several wedges should be installed between the second board and the batten. When they are hammered in, the gap should decrease.
Flooring options
We must inform you right away that there is no single type of flooring that will satisfy all the customer’s needs and requirements. However, most of them have good characteristics and meet the requirements specified above, so they are perfect for installation. So, for the floor on the loggia you can use the following materials:
- tree,
- linoleum,
- self-leveling floor,
- carpet,
- ceramic tiles,
- laminate.
Let's study the properties of each flooring material and decide which type is best to choose for your balcony.
Wooden floor
On the balcony, very often they try to make the floor from wood, although experts believe that this particular material is not always suitable for use, because there is a threat of overloading the floor slabs.
Important: if you have already chosen wooden floors, then you must follow the installation technology for the work, then this coating will serve you for a very long time.
- First you need to level the base surface well; to do this, perform a light screed. Even a small unevenness can cause gradual destruction of the entire structure.
- After the screed, a waterproofing film is laid. Logs are installed on top and secured with anchors or dowels, between which thermal insulation is laid.
- Then a rough layer is installed - a sheathing made of bars.
- Wooden flooring is laid on a rough surface; it is also possible to lay parquet by slightly changing the proposed technology.
Important: please note that all wooden elements must be treated with special protective compounds, this will further increase the service life of the structure.
Source: megadizajn.ru
Step-by-step technology for constructing a wooden floor can be studied in the video recommendations of many construction bloggers, which display all the nuances of the work.
Tile
This option for flooring on the balcony can serve you for a long time, because ceramic tiles are quite durable and do not lose their properties over time. In addition, cleaning the floor of a loggia or balcony with such a coating will not be at all difficult. The disadvantage of such a floor is that the tile surface is quite cool to the touch. Installing a “warm floor” will eliminate this problem.
Source: megadizajn.ru
It is also necessary to take into account that the front surface must be rough to avoid slipping and injury. Among other things, the tiles perfectly withstand the effects of low and high temperatures and moisture, without losing their properties. The main thing is that the tiles, glue, and grout are intended for outdoor use.
Installation of tiles is carried out in the following sequence.
- First, the base surface is cleaned of various contaminants, then a waterproofing film and thermal insulation material are laid.
- After this, it is necessary to perform a cement screed.
- We wait for the layer to dry.
- The tiles are mounted using glue; for proper installation, a regulating cross is used. The adhesive is applied both to the floor and to the back of the tile.
- When the glue dries, the seams are treated with a special grout.
Laying tiles on a balcony that is actively used by all family members is considered an ideal option!
Porcelain tiles
With such material you will definitely not be afraid of any vagaries of the weather, because porcelain tiles have good strength, are resistant to wear, durable and do not lose their appearance over time. The structure of this material is such that it has no pores, this does not allow liquid to penetrate inside the slabs and does not destroy the material at low temperatures. Such tiles are made in a wide variety of external design options: leather, wood, stone, etc.
Source: megadizajn.ru
Decking
Decking is parquet for outdoor use, which is usually used for installation on open verandas, platforms and garden paths. For its manufacture, hardwood is used, sometimes with the addition of polymers. The material is resistant to temperature changes, durable, so it is perfect for an unglazed open balcony.
This covering is installed in two ways: the plates are connected to each other, like a construction set for children, or they are laid on wooden logs, which are mounted on a base concrete floor. The mass of this material is small, so you are not in danger of overloading the floor. There are usually gaps between the decking slabs through which water drains.
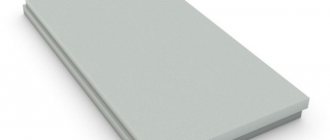
Self-leveling floor
This coating will also look great on the balcony. Carrying out the work of making such a floor is not at all difficult: first, a cement screed is made, and after drying, the surface is primed.
Source: balkonyi.ru
For work we will need the following tools: a container, a spatula, a mixer and a roller. It would also be useful to “help a friend” - the composition quickly sets, so all work must be carried out promptly and, preferably, according to a previously developed plan.
The thickness of the self-leveling floor on a cement base should be 20 mm, on a polymer base - 4 mm. Work must be carried out at a temperature not lower than +5 °C. If the temperature is lower, you may have problems with the composition spreading and drying out.
Important: before starting work, be sure to study the manufacturer’s recommendations, which are indicated on the packaging. In the future, carpet, linoleum or laminate can be laid on this covering.
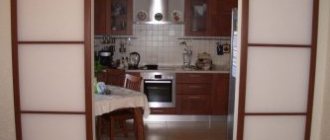
Laminate
This type of flooring should only be used on closed, well-insulated balconies or loggias. The coating must be of good quality to withstand changes in temperature and humidity. A well-chosen design of walls, ceilings and furniture will result in creating a very cozy room where you can admire the beautiful view from the window, relax and unwind. A good option may be to create a work office.
Which heated floor to choose for laminate
If you decide to lay a heated floor on the balcony under laminate, then you should seriously consider the issue of choosing a system. In this case, its power is taken into account. It should be approximately 190 W per square meter. Infrared film has a maximum power level of 160 W per square meter. There will be no benefit from such a design on the balcony.
If you want to lay laminate flooring on a heated floor on a balcony, it is better to use a cable system, which will effectively heat the surface. The main thing is to comply with the recommended power. According to experts, the choice of system comes down to the electric cable floor. It should cover approximately 70% of the total area. The heated floor on the balcony under the laminate should be provided with an electrical cable system. It is inexpensive, and you can install it yourself.
Summing up: which floor is better for a balcony
Calculate the renovation budget, think about the purpose and design of the object. If the economic component is at the forefront, choose linoleum. The material is universal and can be used on all types of balconies and loggias. If your budget allows you to choose any option, make a decision based on functional criteria.
Take care of the environmental friendliness of your flooring. Do not use cheap linoleum, it smells unpleasant and emits harmful substances. Natural linoleum, laminate or parquet are suitable.
The main criteria for flooring for a work area are quality and environmental friendliness
- Recreation area or gym
For relaxation or sports, it is better to lay carpet. This floor will allow you to completely relax your feet after a hard day at work, freeing them from uncomfortable shoes.
Imitation of grass allows you to relax not only physically, but also psychologically
- Winter Garden
Plants need to be watered regularly. Ceramic tiles can cope with high humidity. In addition, due to its high thermal conductivity, such a floor covering will allow you to use the “warm floor” system as efficiently as possible.
For your information. The effectiveness of “warm floor” directly depends on the thermal conductivity of the floor covering. The higher it is, the less heat loss will be. The most suitable in this regard is tile, followed in descending order by laminate, linoleum, parquet, and carpet.
The winter garden places demands not only on the quality and reliability of the floor, but also on the room temperature
If the balcony or loggia is well insulated and has reliable waterproofing, then you can use almost any coating; the choice is limited only by the financial component and personal preferences. If there is no hydro- and thermal insulation, it is better to make the balcony floor from unpretentious, weather-resistant materials.
Which heated floor for ceramic tiles to choose
Warm floors on the balcony can also be laid under tiles. Heating mats are great for this. They have the form of a fiberglass mesh onto which shielded heating sections are fixed. They are manufactured by connecting the hot and cold parts using the couplingless method. Thanks to this, the system has high reliability.
It makes sense to lay a warm floor on a balcony under tiles if the space is well insulated. Floor installation is carried out in a certain sequence. First, you need to draw up a diagram of the location of the heating mats, then you need to prepare the floor surface and lay thermal insulation. The next step is to create a cement screed and lay heating mats. Electrical wires are connected to the network, and then you can proceed to laying ceramic tiles with special glue. The layer thickness should not exceed 7 mm.
Is it permissible to screed the floor on the balcony?
A screed on a balcony is not the most beneficial solution in terms of safety, because... it will greatly increase the load on the slab. The minimum thickness of the screed should be 2-2.5 cm, plus a layer of waterproofing is laid on top and reinforcement is performed. If you plan to heat the floor by pouring mortar, you will also have to add a thermal insulation layer underneath it. In this case, the thickness of the screed increases to 4-5 cm.
If the surface of the balcony floor has unevenness in the form of a deviation from the horizontal, then the thickness of the screed will increase significantly and, as a result, the load on the base of the balcony will increase. There is only one conclusion here: it is preferable to find another way to level the floor surface and not risk your safety.
What are the obvious advantages over self-leveling floors?
As mentioned earlier, a frame floor with insulation has many advantages over cement floors. Let's look at the advantages of this design:
- Speed of work. Such a frame is made by specialists in just a few hours;
- Light weight structure. The entire area of the balcony will require no more than 18 linear meters of timber, which in total does not exceed a weight of more than 60 kg;
- The cost of the work will be 2-3 times cheaper than the cost of a self-leveling floor;
- The floor is already insulated from the beginning. Two layers of mineral wool and dense OSB board are enough to provide warmth. On 90% of balconies there was no need for an additional heating system. In winter, you can safely go out on such a balcony in socks, and not be afraid of the cold.