—banner in article 2—-
In standard apartments, bathrooms are usually of modest size. Apart from a few plumbing fixtures - a bathtub and a sink - practically nothing can be placed in them. Installing a sink above the washing machine will help solve the problem in a small area. We will tell you in detail how to do this with your own hands in this article.
Requirements for installing a sink
The bathroom is a room with high humidity, and under the sink, where the drain pipe and siphon are located, there is also a high risk of leaks. All electrical equipment must be grounded and protected from water.
When installing a washbasin above a washing machine, you must fulfill the following requirements:
- the height of the sink bowl is no more than 20 cm;
- width and depth - 2-5 cm larger than the dimensions of the machine;
- washbasin drain - is not located above the device, but only on the side or back.
Drawing of a sink for installation above the washing machine
If these conditions are met, the electrical equipment is not in danger of being flooded with water even if the siphon leaks. It is recommended to use specially designed washbasin models for combination with washing units.
What materials are they made from?
Sinks for installation above a washing machine, like any plumbing fixtures, are made of porcelain and earthenware. Earthenware is cheaper, but has a more porous structure and is itself hygroscopic. To overcome these shortcomings, the surface is covered with glaze. When applied properly, the product has a good appearance and does not get wet. But after a while the glaze may crack. The cracks are microscopic, but dirt gets stuck in them, the surface becomes grayish, and nothing can be done about it. Therefore, earthenware has to be changed often.
Related article: Curtains for turquoise wallpaper: choose to taste
Porcelain car wash
Porcelain sinks cost more and weigh more, but they are more durable. The surface is smoother, dirt does not settle on it, and it is easier to keep clean.
Sinks made of artificial stone are often found. This is a mixture of polymer with stone dust and chips. The high plasticity of the mass allows you to obtain any shape, achieve any colors and shades.
Sinks are made from artificial stone according to customer sizes
There are companies that are ready to make sinks strictly according to your dimensions. Naturally, individual production is more expensive, but the available space is used rationally.
Another custom option
Advantages and disadvantages of sinks over a washing machine
The main advantage of this arrangement is space saving. For small apartments, it is sometimes very difficult to choose another option. The kitchen or hallway are not the most convenient places to connect a washing machine.
The design of the washing machines is neutral and fully matches the modern style of the bathroom. In addition, you can connect to the water supply from the riser in one place, just like cutting into the sewer, which reduces the amount of work and materials. Usually the siphon that comes with the kit has an additional pipe for connecting the drain from the washing machine.
And finally, the third advantage is the ease of washing, which all housewives will appreciate. Sometimes pre-washing of clothes or other manipulations are required, which requires at least a small sink. And in this case, everything is nearby - both the machine and the bowl of cold and hot water.
There is only one drawback to the close proximity of a washbasin and washing machine - the danger of water getting on the electrical parts of the machine. Therefore, when installing equipment, you need to do everything possible to eliminate such a situation.
Installation of a washbasin above a washing machine: procedure and rules of work
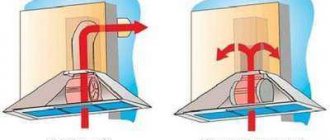
The width of the washbasin bowl should be 580 mm in diameter if the sewerage outlet is located on the wall behind the appliance. In the absence of such a conclusion, the permissible size of the sink is 500 mm. The drain pipes rise above the body of the machine. This arrangement will prevent water from entering the washing equipment due to vibration. And the sink should cover the top of the machine. With its housing it will protect the equipment from water ingress. For reliability, make sure that the bowl protrudes forward by 3-5 cm.
Photo 4. Rules for installing a washbasin over a washing machine.
Attention! The drainage system is located behind the equipment, as shown in the figure, and the bowl completely covers the washing machine.
Installation stages
- Mounting the “Water Lily” washbasin on the wall. Installation of a sink above a washing machine begins with marking the fasteners. Then he does a fitting. Lean the bowl against the wall. The gap between the machine and the sink should be no more than 30 cm. If you plan to use a common faucet for the washbasin and bathtubs, then check whether the tap spout rotates freely enough between the plumbing fixtures. It is best if the side edge of the bowl hangs over the bathtub. In the final marking areas, drill a hole for the anchor bolts. We install the brackets (they are included in the kit), do not tighten the bolts completely, leave a gap of 5 mm.
- Apply a layer of sealant to the back wall of the sink. The silicone sealant should be 0.5-1 cm from the top edge of the edge. It is also necessary to seal the protrusions of the brackets at the points of their contact with the surface of the sink.
We place the washbasin bowl on the brackets. We insert the metal hook into the technological hole on the back wall (it is included in the kit). We fix the sink with a hook to the wall and secure it with a self-tapping screw for reliability. We check the horizontal installation by level. Next, you need to tighten the bolts until they stop.
Photo 5. Installation of a wall-mounted sink above the washing machine.
Siphon installation. Before installing the siphon, it must be assembled taking into account the manufacturer's recommendations. Connect the drain hose from the washing machine to the siphon pipe.
In order to avoid tearing and flooding while using plumbing fixtures, secure the connection with an additional clamp. Next, connect the corrugation to the hole in the sewer pipe. Before completing work, be sure to check the tightness of the connections under water pressure. Also, do not forget to make sure that the gaskets are tight. Make sure that the siphon and hoses do not touch the surface of the washing machine.
- Mixer installation. We put it in a special hole on the bowl. For connection we use flexible hoses and special fittings. Use gaskets and fum tape as a seal at the joints. Lubricate the rubber seals with silicone grease. We seal the threaded connections with plumbing tow or fum tape.
- We test the operation of the installed washbasin. We check all connections for leaks and repair them if necessary. Once again we tighten the connections well.
Choosing a washing machine
For installing household appliances together with a washbasin, only fairly compact washing machines are suitable, whose dimensions must correspond to the dimensions of the bowl:
- maximum height - 70 cm;
- width - 60 cm;
- depth 45-50 cm.
The capacity of such devices does not exceed 3.5 kg of laundry. Sometimes “babies” are immediately equipped with a “water lily” sink with a special siphon. The price of the set is more expensive than the standard one, but there will be no problems with installation.
Not every family can limit itself to a small amount of washing, so they buy a machine with a load of up to 4-5 kg, and then select a sink. But with the standard height of the machine, another 20-25 cm will be required for the washbasin, that is, the total height will be at least 105-110 cm. For ergonomic reasons, it is optimal if the sink does not rise more than 85 cm, so it will be inconvenient to use.
An example of choosing a washing machine by height
The depth of the machine should not be more than 45-50 cm, since utilities and a siphon will be located at the rear. You need to step back at least 8 cm from the back wall. A prerequisite for a washing machine under the sink is front loading and control using the functionality on the front panel. Models with a loading hatch on top will not work.
Which washing machine to choose
If the advantages of such an installation are more significant for you than the disadvantages, you should first choose an automatic machine. It is much easier to match a sink to the purchased appliances than vice versa.
When choosing a washing machine, you need to consider several criteria. It is best to purchase a narrow model up to 43 cm wide. The corners of a small-sized machine will not protrude, which also contributes to its comfortable operation.
To make the sink convenient to use, the height of the machine should not exceed 70 cm. In this case, the washbasin will be located at a distance of 80 cm from the floor. You need to pay special attention to this criterion if your height is below average. Tall people are recommended to install the sink at a distance of 90–100 cm from the floor. Then the height of the machine can be 80 cm.
When purchasing, you also need to consider the method of loading laundry into the unit. A top-loading machine cannot be installed under a sink. Therefore, only the horizontal loading method needs to be considered.
Rectangular
These washbasins follow the contours of the car. Small overhangs, like the edges of an umbrella, perfectly protect its surface from splashes.
The bowls are made of durable waterproof materials. Their height does not exceed 20 cm. The siphon is usually moved back so as not to interfere with the installation of the washing machine. The drain hole is located closer to the back or side surface of the “water lily”. The mixer can have 2 installation options - in the center or along the edges.
Semicircular
Differ from rectangular ones with a rounded bowl. There are no sharp corners, which makes them safer, and the bathroom environment softer and more comfortable.
Non-standard
Originally shaped sinks are an accent in the bathroom interior. The whimsical shape of the bowl attracts the eye and gives this utilitarian device an unusual look. Plumbing fixture designers compete to see who can come up with the brightest and most interesting idea. Of course, the price of such sinks cannot be low.
Optimal sizes
The width of the purchased plumbing fixtures must correspond to the dimensions of the washing machine.
If the household already has a washing machine, then the choice is quite limited and you will have to work with what you have. If you are just about to purchase this household appliance, then you should opt for compact models. The optimal dimensions of a machine for washing clothes are as follows: height no more than 60 centimeters, depth within 35 -45. Width does not play a special role here, so be guided by your taste.
In both cases, the following nuance must be taken into account. The height of the finished structure (sink + washing machine) should not exceed 75-80 centimeters. This is considered the best option. Using a “water lily” that is installed above or below the recommended level will be very problematic. At the same time, there should be a small gap between the plumbing and household appliances. You can calculate at what height the bowl will be using the following formula: height of household appliances + depth of the bowl + 10-15 centimeters of reserve.
USEFUL INFORMATION: Where and how to use moisture-resistant putty
There is also a third option: purchase a ready-made bathroom set. It includes a washing machine and a sink made specifically for it. The only drawback of such designs is that these products are mainly produced abroad, and therefore their price is appropriate. Not every family can afford to spend almost the entire monthly budget on purchasing this pleasure.
Design features of “water lilies”
Unlike conventional washbasins, the sink above the washing machine should be flatter so as not to add additional height. Another important condition is that the siphon should be located as close to the wall as possible. The gap between the surface of the machine and the bottom of the sink should be minimal. All these conditions are met by “water lily” models from different manufacturers.
For the production of shells they use:
- Earthenware is an inexpensive white material with a finely porous structure. To increase water resistance, it is coated with transparent or colored glaze.
- Porcelain is a denser and more durable type of ceramic. It has a slightly transparent surface and rings when struck lightly. Plumbing fixtures are decorated with glaze or gloss.
- Cast marble - the base is polymer concrete, to which marble chips are added. This is an artificial stone, invented not so long ago, but has already proven itself well.
Sinks made of earthenware or porcelain are easy to clean, last up to 25 years, but are susceptible to impacts. Care must be taken during installation. Cast marble is stronger and more resistant to abrasion than ceramics. In addition, the damaged surface can be quickly restored by simply polishing it with a special tool.
Features of equipment selection
The name of the washbasin for placement above the washing machine is “water lily”. It comes in various shapes , most often in the form of a rectangle. The depth is quite sufficient for washing - 20 cm. Many foreign manufacturers of household and sanitary appliances produce such kits for purchase together and installation without lengthy selection.
If none of these options suit your taste, you can choose to install two items separately, since the modern market is flooded with various models.
Before purchasing a washbasin, you need to make sure that there is a drainage system located outside the center of the sink. Do not place the drain hole above the surface of the machine due to the possibility of leakage and electric shock. For the “water lily” in this case, only a system of horizontal drainage and a sink with a side drain is used.
- They differ in the material from which they are made. There are ceramic options, earthenware, copper, stainless steel and artificial and natural stone.
- The shape of “water lilies” is very diverse. They produce simple models of square or rectangular, oval or semicircular shape. But sometimes very complex original outlines appear. The washbasin can be extended from one or two sides in the form of a countertop.
- Some have a hole for installing a water faucet, while others are designed to be mounted under a faucet that extends from the wall. This option is for very small bathrooms.
- Some water lilies have a vertical drain rather than a horizontal one. This option is possible with a partial shift of the machine and the sink, when the washbasin is partially located above the machine.
A brief overview of the most popular washbasins for installation on a washing machine
Plumbing manufacturers offer many options to meet demand. Among the “water lilies” you can find both very small models for narrow washing machines, and quite comfortable luxury ones that can be installed above machines up to 51 cm deep.
How to place water lily shells
“Water Lily” Compact 53.5 cm
The sink is almost square in size, measuring 53.5 x 56 cm with rounded corners. The height of the bowl is only 14 cm. It is made of porcelain with a white coating.
The compact, elegant “water lily” can be installed on a washing machine with a depth of up to 46 cm and a width of up to 54 cm. There is a hole in the left corner for the mixer, and a drain hole in the right side of the sink. Supplied with mounting bracket and siphon.
"Water Lily" Bolero 64 cm
The spectacular bowl of non-standard shape is quite large - 64x60 cm. It can be installed above any washing machine, provided that the depth of the machine does not exceed 46 cm. It is made from high-quality ceramics, equipped with a siphon and fasteners.
A distinctive feature of the Bolero water lily is its straight vertical drainage. The water drains quickly and there is virtually no risk of blockages. By closing the drain with a plug, you can do a mini-wash in the large bowl, or bathe a small child or pet.
"Water Lily" Quadro
Cast marble is used to make this washbasin. A square bowl measuring 60x60 cm is installed on washing machines with a depth of up to 46 cm of any height.
The strict geometry and modern design are emphasized by an original detail - a cover for a hidden drain hole made of stainless steel. The hole for the mixer is located in the middle.
"Water Lily" Long
An elongated model with a comfortable tabletop and towel holder. The dimensions of the sink are 50x80 cm, which dictates the need for free side space. The bowl is round, with a central drain hole.
A washing machine with a depth of up to 46 mm can be installed under this washbasin. Unlike other models, it is placed under the countertop, and directly under the sink you can place a laundry basket, a small cabinet or a cabinet.
Waterlily Lux-Light
Manufacturers created this model for lovers of rounded “soft” lines in the interior. Thanks to the thoughtful design, it seems that the sink is much smaller than its size, although its dimensions are 600x570 mm with a height of only 180 mm.
The Lux-Light water lily is made of cast marble with holes for a mixer and overflow. To improve drainage, there are 3 holes of increased diameter, so there is no risk of water stagnation or blockages in the washbasin. The model is designed for installation above a washing machine with a depth of up to 51 cm.
Pros and cons of placing a washbasin above the washing machine
Let's consider the main advantages of placing a washbasin above a washing device.
To install a small cabinet, it is enough to move the sink 30cm above the washing machine. At the same time, the freed up space is used to install the box.
Disadvantages of this solution.
- The use of a siphon of a non-standard shape due to the location of the electrical appliance under the sink. As a rule, a glass is included in the package of purchased plumbing equipment.
Remember, mistakes made during the installation of a sink above a washing device can lead to tragic consequences, since the electrical safety of every apartment resident depends on the correct installation of the product. That is why a siphon of a special shape should be installed only in extreme cases when there are no other options.
- Making it difficult to drain water from the bowl, increasing the risk of blockages.
Remember, improper placement of equipment contributes to inconvenience during operation of the devices.
Thus, before proceeding with the installation of a sink above the washing machine, you should purchase a special class of plumbing fixtures, as well as a washing device, the height of which does not exceed 700mm. Otherwise, installing a “water lily” on a standard-sized device will cause inconvenience during its operation.
Pros and cons of installing a sink above a washing machine
Drains in sinks: features and types
To prevent water from the washbasin from getting onto the body of the machine, even in the event of a leak, the drain is located in the back or side of the bowl. Depending on the location, we can distinguish:
- Vertical drain. The siphon is located below the drain hole, so the water drains quickly, with minimal risk of blockage and leakage.
- Horizontal drain. The drain is located at a slight angle to the wall, which can cause clogging of the pipe lumen. But the siphon is located outside the washing machine, so water will not get into its body during leaks.
Many models have an overflow to drain water in case of obstruction of the main hole, removable soap dishes, plugs and other accessories.
Rules for installing washing machines under the washbasin
For safe operation of electrical equipment, you must follow the installation rules:
- the top of the washing machine must be completely covered by the sink from splashes;
- if a sewer pipe runs along the wall, the minimum width of the bowl is 580 mm, if there are no communications, then 500 mm;
- the drain pipes should not touch the machine, as they can be damaged by vibration;
- The machine must be installed strictly horizontally; if there is a slope, use rubber mats;
- Installation and connection must be carried out by a qualified specialist.
The washing machine must not be allowed to protrude from the front of the washbasin. It's inconvenient and unsafe.
How to install a sink above a washing machine: installation instructions
Manufacturers usually complete their products with brackets, but before starting work you need to make sure that the fasteners are available. Some models provide for mounting on standard Soviet hooks, since the weight of the plumbing fixture itself is small. This allows you not to use old brackets and not to unnecessarily weaken the walls.
Preparation
First you need to dismantle the old washbasin, turn off the water supply, and check the horizontalness of the base for the washing machine. Prepare the hot and cold water outlets - wind the sealing tape, screw on the fittings. Install a tee with a tap to connect the machine to the cold water supply.
Connect a tee with an angle of 45° to the sewer pipe. One socket will be used for drainage from the sink, the other from the washing machine.
Fittings for connecting hoses are mounted on the outlets from the main pipeline.
Marking for fastenings
You need to mark the points on the wall where the brackets will be mounted. First, install the washing machine, put a sink on top and draw a horizontal line. To avoid drawing on the tiles and damaging its surface, it is recommended to use masking tape. Once the points for the brackets are marked, it can be removed.
Then the unit is removed, a washbasin is placed on the marked line and markings are made from below for the brackets.
Installation of brackets
Holes are drilled according to the markings and plastic dowels are driven in.
Sink assembly
Insert the water supply hoses into the holes provided for this purpose and secure with nuts. Screw the brackets to the sink.
Securing the washbasin
Place the assembled sink against the wall so that the holes on the brackets and the mounting points match. Screw in the anchors.
Connection to water supply and sewerage
Install the mixer, connect flexible hoses to the corresponding terminals, and tighten the nuts. A siphon and a flexible corrugated tube are connected to the drain hole. The second end is inserted into the sewer drain. Carry out a trial run.
Washing machine installation
The unit is placed under the sink. Using a flexible tube connected to the cold water supply tap, connect the washing machine to the water supply. The drain is inserted into the sewer pipe.
The installation of the sink above the washing machine is complete. All that remains is to fill the joint between the wall and the washbasin with silicone sealant so that drops of water do not flow down. To do this, glue masking tape along the edge of the bowl onto the decorative tiles, carefully place the sealant into the joint, and compact it using your fingers. The tape is removed.
Installation procedure
How to install a sink above a washing machine with your own hands?
- The socket should be located in such a place that the likelihood of splashing on it is minimal.
- Grounding is mandatory. And in no case on steel pipes of cold or hot water: a single-core copper grounding wire is thrown from the panel body.
- The minimum wiring cross-section for all devices with a two-kilowatt heater is 1.5 mm copper. With a smaller cross-section, the wiring will overheat.
- To connect to the water supply, a special three-way tap is used. The easiest way is to install it on the cold water supply to the sink, directly in front of the flexible faucet hose.
The tap is placed in the gap of any threaded connection on a half-inch pipe.
- To seal threaded connections, a special polymer thread-sealant or ordinary plumbing flax moistened with varnish or paint is used. Impregnation will protect it from rotting.
- To drain drains after washing, a standard hose with a hook guide is often used to fix it on the edge of the bathtub. Disposing of hot drains with a washing powder solution will not harm the bathtub; Moreover, it will flush the sewer. However, it will, of course, be impossible to swim in it while washing. If such a scheme is unacceptable, then to drain wastewater in the horizontal section of the sewer, a separate tee with a branch pipe is installed, the edge of which should not be lower than 50 cm from the floor.
- The sink itself is installed exclusively on brackets. The scheme with a pedestal is eliminated due to the presence of a washing machine; anchoring to the wall will not be reliable due to the small height of the sink itself. The combination of the height of the stop and the mass of the washbasin will bring the load on the earthenware dangerously close to its strength limit.
- If the sink does not overlap the front of the washing machine by at least five centimeters, it can be moved forward from the wall. The free space will be occupied by a wall cabinet.
- The connection between the sink and the wall or cabinet must be sealed with silicone plumbing sealant. This measure will help prevent water from getting into places where it doesn’t belong.
Don't forget to protect surfaces with masking tape.
Installing a sink over a large washing machine
Now let’s look at how you can still install a washbasin if the washing machine is not compact, but standard, with a load of 4-5 kg. The dimensions of the sink are 60x60 cm, the washing machine is 60x45x85 cm.
Assembling the kit
The mixer, brackets and drain with siphon are immediately installed on the sink. For fastening the brackets, embedded parts are provided.
Marking
The old washbasin is dismantled, new attachment points are marked 15 cm higher than the old ones. A gap of 2 cm is left between the surface of the machine and the bottom of the sink so that vibration is not transmitted during operation.
Installing supply fittings
New fittings are installed on the cold and hot water inlets. On the cold side there is another connection for connecting the washing machine.
Sink installation
Secure the washbasin brackets by installing anchors in pre-drilled and doweled holes. The shell holds firmly and does not play.
Connecting a washbasin and washing machine
The water supply and sewer drain hoses are connected to the appropriate terminals. Communications are fixed with clamps to the wall so that there is no movement.
Installing the machine under the sink
Push the device under the washbasin, being careful not to bend the hoses anywhere. There should be access at the back to turn off the water supply for washing or to clean the siphon. The machine must first be positioned strictly horizontally.
The joint is filled with polyurethane sealant. After hardening, you can turn on the tap and carry out tests.
Types of shells
A special water lily sink is designed for installation above the washing machine. Its distinctive characteristics are its wide shape and flat bottom. The depth of such a washbasin can be from 18 to 20 cm. When purchasing, you need to pay attention to the drain, which can be vertical or horizontal. It is located in the middle or on the side, most often on the right.
In the first case, the drain hole is located in the center of the sink. The outlet pipe to which the siphon is connected requires space. Because of this, there is free space between the sink and the washing machine. Such a gap looks unaesthetic. In addition, this sink model does not ensure compliance with all safety rules. For example, if the siphon leaks, water will flow onto live parts of the machine, which can lead to a short circuit or breakdown of the unit. When purchasing such a model, special attention should be paid to sealing.
The depth of a sink for installation above a washing machine usually does not exceed 18–20 cm.
When the drain is located on the side, the pipe is moved back and to the side, which is why these components are located behind the body of the washing machine. This allows you to install the washbasin so that its flat bottom practically lies on the lid of the machine. There is almost no gap left. The back of the sink is slightly deeper and is about 20 cm, the front is 10–15 cm. If possible, it is better to purchase a model with a horizontal drain. Some manufacturers make a drain system that can be connected to the washing machine. This will save space and provide more comfortable use of the washbasin.
If you have free space in your bathroom, you can complement the design of the room with a sink with a countertop. This option is as safe as possible, since the risk of leakage onto the machine is reduced several times. The machine is installed under the countertop, the second part of which can be supplemented with drawers for storing hygiene products.
How to install a drop-in sink in a bathroom
A built-in washbasin with a countertop is a practical and convenient option for medium-sized and large-sized bathrooms. The space under the countertop is used to install a washing machine and a cabinet or cabinet where you can store household chemicals and various small items.
The shape of mortise bowls can be round, oval, rectangular or fancy. For production, ceramics, artificial stone, metal, glass and even wood treated with water-repellent impregnations are used.
Installation Features
The sink is mounted in a pre-prepared hole so that its sides rise above the countertop by 1-2 cm or are flush with its surface. Communications are hidden inside and do not spoil the interior with their appearance.
Installation can be carried out in 2 ways - from above or from below. You will need a tape measure and a pencil for marking, a jigsaw for cutting a hole, an installation tool and fasteners, and FUM tape.
How to choose
First of all, you need to choose a sink according to the width of the countertop. When cutting a hole, at least 50 mm must remain to the edge of the supporting surface, otherwise an edge that is too thin may not withstand, crack or break under load. Measure the tabletop and, knowing its width, choose the appropriate option.
For a large family, you can buy a double sink, then you can avoid queuing at the washbasin. They can be round, square or oval. During installation, additional reinforcing elements (brackets) are provided.
When choosing a sink, you need to consider the location of the faucet. It can be mounted on a bowl or countertop, so in the latter case, additional space will be required to install it.
Top mounting
In this way, you can install a sink with sides located above the surface of the countertop. To draw the hole, turn the washbasin upside down and trace the outline with a pencil. But this is only suitable for symmetrical shapes. If the sink is non-standard, a template is made.
The hole should be 10-15 cm narrower than the contours of the bowl, so draw an additional line parallel to the one already drawn.
Carefully cut a hole in the tabletop with a jigsaw. Sealing tape is glued to the edges of the sink, installed in the selected niche, and the faucet, supply hoses and siphon are connected.
Bottom mounting
With this method, the sink can be installed flush with the work surface. It is held in place by gluing it into a small groove selected with a cutter in the countertop. The tabletop should not be completely secured because it will need to be turned over.
Installation from below is more labor-intensive than from above. Use a template made of plywood or a sheet of plastic, with which a hole is cut. Then the edges are ground and processed with a milling cutter. The shell is inserted and glued upside down. After the glue has hardened, the tabletop is put in place and secured. Water and sewer are connected.