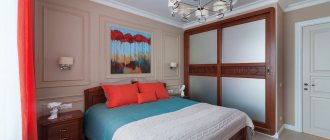
How to connect a wardrobe with a suspended ceiling
I already touched on the topic once on our website - Sliding wardrobe and suspended ceiling: what to do first?
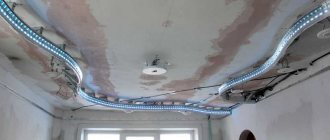
Briefly, I tried to tell you where to start. Now it’s time to touch on the technical side of joining a stretch ceiling and a wardrobe. Let's look at the various options, supported by the pictures that I drew for you in the PRO100 program. OPTIONS 1. You decided to install a built-in wardrobe in front of the suspended ceiling. Let's assume the total depth of the cabinet is 600mm. We make a box for a stretch ceiling from laminated chipboard. Usually a height of 100mm is sufficient, the depth should be at least 100mm. Picture 1. Using dowels, we attach the resulting base to the ceiling. You don’t have to worry about the strength of the structure; it can easily withstand the tension of the canvas and the weight of the upper track. For those who don’t know, I’ll add that the upper track acts as a guide; the compartment doors do not weigh on it, but ride along the lower track. The box is secured, then we begin assembling the wardrobe and inserting the doors. Pictures 2, 3.
After the cabinet is ready, other craftsmen stretch the ceiling. Usually it takes up 4-6 centimeters from the total frame height of 10cm. Picture 4. This is what the suspended ceiling looks like adjacent to the closet. Picture 5. 2. You decided to make a suspended ceiling, and then a wardrobe. Installation of a wooden block 100 by 100 mm. This option is essentially similar to the first option. The difference is that you yourself will attach a block of wood to the ceiling, and a stretch ceiling will be attached to it. Picture 6. You can order a sliding wardrobe later, at any time. Don't forget to correctly calculate the depth of your closet! I told you earlier how deep it should be, you can read -. The top track occupies 100mm. You can treat the block with putty and paint it. When you get a suspended ceiling, call us, we will assemble a wardrobe. Picture 7. There is another option for attaching the top track for doors. We can attach the aluminum guide to the beam itself and hide it. The main thing is that the timber should not be more than 100mm high. otherwise we won't be able to fit the coupe doors into the track. Look how it might look in the pictures: 8, 9, 10, 11. A similar option may be suitable if the ceiling is multi-level made of plasterboard. Look at picture 11. Sometimes we are asked to cover up an unsightly ceiling that is visible inside a closet. Then we make the ceiling from chipboard. In my opinion, it is better to improve this area yourself, paint it, whitewash it. You will simply lose useful height area. Picture 12. 3. First of all, you decided to make a suspended ceiling, but under the canvas, you installed a beam for the upper track. Once we attached an aluminum track to a block that was hidden under a suspended ceiling. The owner successfully calculated its height, thanks to which the ceiling panel did not push upward and everything looked natural. Using self-tapping screws, we secured the aluminum guide to the block through the suspended ceiling. Picture 13. 4. You have already made a stretch ceiling. Now you need to install a built-in wardrobe. In this case, there are two options for installing the cabinet. You can make a frame for the top aluminum guide from laminated chipboard. Pictures: 14, 15, 16. Watch the video of how we make the frame for the top track.
It is possible to make a ceiling from laminated chipboard inside the wardrobe and attach the top track to it. Picture 17. In the first case, you will have a ceiling inside the same color as in the room, it’s beautiful. But remember that a suspended ceiling can be easily broken through by things that you will place on the upper shelves. For example, these are cardboard boxes with shoes or skis. In the second case, the suspended ceiling inside the cabinet will be protected from possible breakthroughs. Decide for yourself which option suits you best. In both options we do not pierce the ceiling, it remains intact. I have listed the options we have tested for combining a wardrobe with a suspended ceiling. You must decide for yourself whether you leave space for a wardrobe of a certain depth and install a mortgage on the ceiling, or make a suspended ceiling around the entire perimeter, and we build a frame for the upper track. Or maybe it’s worth making a built-in wardrobe first, and attaching the ceiling to it. I wish you to find your artist and get the furniture you dreamed of! Designer: Eduard Sukhanov
How to install a wardrobe with a suspended ceiling
Repair is a complex process that can take months, and sometimes even years. The reason for this is, first of all, incorrect planning of the work sequence and, as a consequence, a huge number of shortcomings and problem situations, the resolution of which requires a lot of time and money. To get rid of unnecessary hassle and make repairs as quickly as possible, you need to clearly understand how and when to do this or that work.
One of the most common problems is installing a wardrobe in a room with a suspended ceiling. Many people make mistakes at this stage of repair, and to avoid them you need to think about the following things:
- Which wardrobe should you choose?
- What are the features of installing the selected cabinet?
- What's next, a wardrobe or a suspended ceiling?
- How to install a closet with a suspended ceiling?
- How to combine a wardrobe and a suspended ceiling?
You will find out the answers to all these questions below.
Sliding wardrobe after suspended ceiling. Installation methods
Let's look at the basics of installing a wardrobe and ceiling in each of the methods proposed above.
- Sliding wardrobe with suspended ceiling. In the place where the wardrobe doors are supposed to be placed, a strong wooden beam is fixed to the ceiling. It will serve simultaneously both for fixing the stretch ceiling and for the sliding wardrobe guides. It is very important to install the beam strictly parallel to the wall - the correct installation of the furniture will depend on this. After installing the beam, the cabinet guides are attached to it, on which the doors will then be installed.
At the same stage, electrical work is carried out: wiring, installation of mortgages, including in the space of the future wardrobe. If your plans include installing an air conditioner or other ceiling-mounted electrical appliance, this should also be taken into account.
The next step is installation and stretching of the ceiling fabric. After installing it and gluing the ceiling plinth, you can install the doors and internal shelves of the wardrobe.
- Installation of suspended ceilings with an existing wardrobe. Here the work, as in the previous case, begins with installing a wooden beam on the ceiling. The difference is that it is attached in front of the sliding wardrobe guides. The beam will secure one side of the ceiling frame, onto which the canvas will be stretched.
Electrical wiring is also done before the ceiling is installed. In addition to the main lighting of the room, it would be useful to make a row of lamps in front of the cabinet doors. It is better if they are LED or halogen.
- Mounting on a decorative panel. In this case, you first need to install a wardrobe. Guides for the future cabinet are fixed in a wooden beam attached to the concrete ceiling. A false panel is subsequently attached to the same beam - the front strip of furniture. It will act as a fastener for the stretch ceiling. The result will be the effect of integrity of the wardrobe and ceiling. Also, this installation scheme is distinguished by the independence of the elements - you can dismantle the wardrobe or ceiling without damage.
What difficulties may arise when installing a wardrobe in a room with a suspended ceiling?
There may be many problems, but all of them can be easily solved with careful planning at the beginning. Here are the main problems that may occur:
Installer mistakes
No matter how confident you are in the company that is doing your repairs, workers are different. Installing a wardrobe in a room with a suspended ceiling will not be the easiest task even for an experienced craftsman, let alone inexperienced installers. Careless handling can easily damage the ceiling. All this will lead to the waste of not only nerves, but also money, and a lot of it.
Limitation when choosing a cabinet
It is not always possible to install a wardrobe and a suspended ceiling together. It is quite possible that the option that you really like will turn out to be unsuitable for installation. This condition significantly narrows the number of cabinets from which you will have to choose.
Gap between ceiling and cabinet
Since nothing can be attached to the film, there will be a gap of several centimeters between the cabinet and the ceiling. This gap will quickly become the site of a huge amount of dust. It will be almost impossible to wipe it off, since the gap is very narrow. In addition, this gap will take up extra space, which means there can be no talk of rational use of the space in the room.
Overpayment for hidden ceiling meters
A stretch ceiling is, in principle, an expensive pleasure. For every square meter of high-quality stretch ceiling you will have to pay a considerable amount. In such circumstances, it will be very irrational and wasteful to hide several square meters of the ceiling with a wardrobe. It turns out that you paid for these hidden meters, but they are of absolutely no use.
Installing a wardrobe in a room with suspended ceilings is often very irrational. But sometimes that is the only possible way. Therefore, in order to avoid such problems, everything needs to be planned in advance.
Scheme of installing the cabinet before installing the ceiling
Options for installing suspended ceilings and sliding wardrobes
There can be many options, and below we will talk in detail about each of them. But before examining the features of each option, you need to understand what types of sliding wardrobes there are.
Despite all the external diversity, there are only two types of sliding wardrobes:
To the ceiling
These are cabinets whose guide rails are attached directly to the ceiling.
Independent cabinets
These cabinets do not require ceiling mounting. They are a complete structure that can be assembled regardless of the ceiling height.
These are the two main types into which all sliding wardrobes are divided. When choosing an option to combine a built-in wardrobe and a suspended ceiling, choosing the type of cabinet is a very important point.
Now let's take a concrete look at what options for installing a sliding wardrobe and ceiling there may in principle be, and what is more profitable to install first.
What to do first: suspended ceiling or closet
When making renovations, we most often first deal with finishing the walls, floors and ceilings, and only then proceed to choosing furniture. However, this approach is not entirely correct; if you immediately draw up a room design project, thinking about what material to use for its decoration and what furniture will fit there, then the interior will look much more harmonious. Also, you will avoid many problems that may arise when installing built-in furniture.
When choosing built-in cabinets for your home, you must first think carefully about what kind of ceilings it will have. If you decide to decorate a room with stretch fabric, you must initially decide whether to install the ceiling or the cabinet first. It depends on where the furniture will be installed and how it should fit into the ceiling space.
Installing a cabinet with an installed ceiling
A sliding wardrobe under a suspended ceiling is often sought by people who did not bother to plan the renovation in advance and are now forced to look for a way out of the current situation. Nevertheless, the situation is not critical and it is quite possible to find a good way out of it, which will not only suit you, but may even be better than other options. To better understand the essence of installing a cabinet under a suspended ceiling, let's look at its pros and cons.
Pros:
- Allows you to install a ready-made wardrobe without touching the ceiling
- Installing an independent sliding wardrobe is often cheaper
- When moving, an independent sliding wardrobe can be disassembled and assembled at a new place of residence
There are not many advantages, and most people may not even agree with them. But, nevertheless, in a hopeless situation this is far from the worst option. For the sake of objectivity, let's now turn our attention to the disadvantages.
The video clearly shows the process of installing a cabinet with a suspended ceiling installed:
Minuses:
- The gap between the closet and the ceiling, which will be the main dust storage in the apartment
- Wasteful use of space
- Overpayment for unused meters of stretch ceiling
- Limited selection of cabinets
The disadvantages turned out to be more convincing, and this is not surprising, because the work will be of the highest quality and rational only when it is thought out and planned in advance.
Sequencing
In the case when the project is carried out “from scratch”, everything must be done at the same time, that is, decide on the type of furniture and hanging fabric, their relative position, and think through lighting options. Then call specialists from these areas at the same time and agree on all the nuances so that there are no misunderstandings during installation.
It is necessary to do everything strictly according to the level, since the difference in height between the floor and ceiling tiles at different ends of the room will be different. If this is done carelessly, such errors are very noticeable and enhance visual perception. As a result, you will end up contemplating the picture of a “crooked closet under a sloping ceiling.”
READ MORE: How and with what to clean an elastic band from dirt in an automatic washing machine
If all operations (measurements, manufacturing of cabinet parts and suspended ceiling elements, installation of both) are carried out with high quality, and the external design, including the color scheme of the room and lighting fixtures, is chosen with taste, you will enjoy being in a cozy apartment, and you will be able to do not hesitate to invite the greatest aesthetes to visit.
For clarity, we present a video of one of the options.
In this article, we did not focus on installing the tension fabric directly, since everything is done according to the standard scheme and the difference lies in the presence and absence of a mortgage, as well as the methods of attaching baguettes to it.
We hope you found this article helpful and would be grateful if you would share it on social media.
Happy renovation! NICOMAX – Your suspended ceilings.
Installation of the cabinet, followed by installation of the ceiling
This option is the most rational. That is why experienced builders, when planning work on site, most often prefer to first install a cabinet, and then a suspended ceiling. As you know, everything is learned by comparison, so we will also consider this option, both from the positive and negative sides.
The ceiling mount is attached to the false panel of the cabinet
Pros:
- A full range of all kinds of sliding wardrobes is at your disposal. With timely planning, you will be able to choose exactly the cabinet that you like best and which you find most convenient. Now you don’t need to think about what type it will be, any type will be installed.
- Rational use of space. Cabinets up to the ceiling are the best option as they are strong enough and don't leave any gaps. But even if you choose an independent cabinet, its location will also be chosen specifically so as not to leave gaps. To solve this problem, use a box for a suspended ceiling for a cabinet made of chipboard.
- Installers are less likely to make mistakes during installation, since now the assembly will be much easier and more convenient. Now even inexperienced craftsmen are unlikely to be able to damage anything.
All these advantages are quite significant arguments in favor of choosing this installation option. However, things are not always so wonderful. To have the most complete and objective picture possible, let's look at the disadvantages.
Minuses:
- Difficulties with decorative strips.
Often people choose a wardrobe not for practicality, but for appearance. According to this criterion, cabinets with decorative strips above the rails usually win. The point is that you cannot attach a suspended ceiling to such a plank, which means you will have to put a timber overlay on it. Because of this, beauty often disappears.
There was only one minus, and this is quite objective, because this method is the most common and most rational.
Fastening the cabinet to a suspended ceiling
This method is rarely used, but it also has a right to life. The essence of it is that before installing the ceiling, a beam or a cabinet insert is attached between the concrete and suspended ceiling. The sliding wardrobe rails will subsequently be attached to this beam. Many people believe that this way the ceiling can be damaged, but in fact this is not the case. The surface of the stretch ceiling is quite strong and, with the right approach, several screw holes will not cause any damage to it.
This option is not very common, since it wastes extra meters of the stretch ceiling, despite the fact that everything is planned in advance. This is irrational, and when planning this option is most often rejected.
How exactly are the different types of cabinets installed?
So, we’ve sorted out the options for the sequence of work, now let’s talk in more detail about the process of installing certain types of sliding wardrobes.
Each type has its own installation features. Now we will look at the main types.
Cabinets with top to ceiling
The peculiarity of such cabinets is that they are ordered and installed most often after finishing work on the ceiling. There are several reasons for this. Firstly, the height of such cabinets varies depending on the wishes of the client. Therefore, before ordering a cabinet, you need to know exactly the height of the room, but you won’t be able to find out this before installing the stretch ceiling. Secondly, it will be extremely inconvenient for installers to install the ceiling if there is this cabinet in the room.
The process of assembling such a cabinet is quite standard, and the end result is a structure that rests evenly on the suspended ceiling and does not create any gaps.
Cabinets with a guide rail designed for mounting
The peculiarity of these cabinets is that the guide rail must be fixed to something. Naturally, it won’t be possible to attach it to a suspended ceiling, because you need something solid and immovable.
Most often they prefer to attach such cabinets directly to the concrete ceiling and only after that install a suspended ceiling. This is the most effective and rational option, as it saves square meters of stretch ceiling and leaves no space for gaps.
The stretch ceiling is attached to the strip in front of the cabinets, so the cabinet stands in a niche
There is another option, in which a beam or mortgage is installed under the wardrobe in the suspended ceiling to fasten the rails. The rails are attached to this beam with a regular screwdriver through the suspended ceiling. There is no need to worry about the ceiling tearing or being damaged in any other way. An experienced master will be able to do everything correctly and cleanly. However, if after the completion of the repair you have problems with the ceiling, you will not be able to contact the company that provides the guarantee. Warranties are provided that the surface has not been damaged and you already have holes in it. Accordingly, there can be no talk of any return.
Cabinets with decorative strips above the rails
Decorative strips look very beautiful and can be found both on cabinets up to the ceiling and on independent cabinets. However, their peculiarity is that a suspended ceiling cannot be attached to them. Practicality suffers greatly from this.
To solve this problem, installers usually place an additional beam along the plank. Often this beam spoils all the beauty, so if you decide to install a cabinet with a decorative strip, try to install the ceiling across the entire width of the room before installing the cabinet. In this case, with correct calculation, the bar will just reach the ceiling. Then it will look quite beautiful, and at the same time will not leave an unnecessary gap.
Installation of an extension or a mortgage under a cabinet:
Assembling the wardrobe after installing the ceiling, the structure is attached to the mortgage nailed in the previous video:
Options for joining a stretch ceiling and a sliding wardrobe
| Sliding wardrobes, dressing rooms, kitchens to order in Kaliningrad. And also a lot of useful information about furniture. |
Helpful information |
| Ordering a sliding wardrobe |
| Order a kitchen |
| Drawer guides |
| Wardrobe doors |
| Photos of sliding wardrobes and cabinet furniture |
| Wardrobe design |
| Storage of sliding wardrobes |
| Glass and mirrors in wardrobe design |
| Wardrobe lighting |
| Filling the wardrobe |
| Types, design, location of the sliding wardrobe |
| All about dressing rooms |
| DIY furniture |
| Home storage ideas |
| DIY kitchen |
| Photos of kitchens |
| Styles and kitchens |
| A collection of ideas for the kitchen |
| Kitchen ergonomics |
| Color in kitchen design |
| Rainbow colored kitchens |
| Achromatic kitchens |
| Railings for the kitchen |
| Interesting things in the world of furniture |
| DIY interior items |
Well, if you didn’t plan it, or you already have a wardrobe and you decide to make a stretch ceiling, what to do? We will consider solutions for pairing a sliding wardrobe with a suspended ceiling below in the article.
First, a little theory about the profiles (baguettes) that are used for installing a stretch ceiling and the general design of a stretch ceiling. This will help you analyze and understand the options for joining a stretch ceiling and a wardrobe, and you will decide for yourself whether to make a wardrobe or a suspended ceiling first.
The ceiling is attached to the cabinet; there is no ceiling inside the cabinet.
This option is considered the most acceptable and common. Ideally it looks like a single canvas without gaps, the cabinet may not be the entire wall, ceiling specialists will work around any obstacle. The suspended ceiling and the wardrobe will have one common element - the top panel of the cabinet. Two elements in this system exist independently of each other and can, if necessary, be replaced without damaging the other element. This option for connecting the ceiling and the cabinet involves the initial installation of a wardrobe, so the design of the stretch ceiling must be coordinated with the design of the cabinet. The top panel of the cabinet must be installed perfectly level, exactly level, because... The entire ceiling will be aligned along this line. If this line turns out to be crooked, then the ceiling will have to be made crooked so as not to disturb the external balance. Wardrobe installers should know how much the ceiling level will drop, discuss the cabinet design with you and take measurements. Stretch ceiling installers must know in advance all the additional equipment that you will place on the ceiling in order to know exactly how much the ceiling will drop (for example, built-in lighting, air conditioning, hatch). Attaching the panel to the cabinet frame is carried out by ceiling installers. The closet will be surrounded, as it were, by linen, but there will be no linen inside, which will help avoid the risk of mechanical damage to the linen by things in the closet.
Elements of a stretch ceiling system
Wall molding for stretch ceiling
An aluminum wall profile or molding is necessary for attaching a stretch ceiling sheet to a wall or a vertical false panel of a sliding wardrobe. They are fixed in increments of 15-20 cm. The minimum loss in ceiling height is 3.5 cm. The gap that forms between the wall and the stretch ceiling is closed with decorative tape.
| Rice. 3. Wall molding for installing a stretch ceiling |
Universal and ceiling moldings for stretch ceilings
A baguette or aluminum ceiling profile is used to attach the stretch ceiling sheet to the ceiling and any horizontal surfaces. Minimum loss of ceiling height 2 cm.
The universal molding can be used both as a wall and as a ceiling molding.
| Rice. 4. Ceiling molding for installing a stretch ceiling |
Decorative tape or edging, plinth for stretch ceiling
Decorative tape is used to close the gap between the ceiling and the wall. An L-shaped decorative tape closes the gap between the wall and the ceiling flush, and a T-shaped decorative edging runs along the wall.
| Rice. 5. T-shaped decorative edging for a stretch ceiling |
| Rice. 6. L-shaped decorative edging for a stretch ceiling |
Options for pairing a sliding wardrobe with a suspended ceiling
Option to pair a stretch ceiling with a built-in wardrobe; there is no stretch ceiling inside the wardrobe
In this option, we will consider an example of pairing a stretch ceiling and a built-in wardrobe, with the wardrobe running along the entire wall.
Unlike the usual installation of a built-in wardrobe, when installing with a suspended ceiling, it is necessary to attach a wooden beam to the ceiling in the place of future fastening of the upper rail of the wardrobe. The level of the lower edge of the beam will correspond to the level of the future stretch ceiling.
If it is a problem to obtain timber of the required thickness, then you can twist 100 mm wide chipboard panels together in series.
| Rice. 7. Embedded chipboard beam for mounting the top guide |
| Rice. 8. Embedded timber made from chipboard strips |
The question arises, how to attach the embedment beam itself or the mortgage to the ceiling. For these purposes, you can use metal mounting angles.
| Rice. 9. Metal mounting bracket |
| Rice. 10. The embedment beam or embedment is secured to the ceiling using metal mounting angles |
There are two possible approaches to attaching a stretch ceiling, but in both cases there will be no stretch ceiling inside the wardrobe.
The first approach is to attach the top rail of the sliding wardrobe to a beam, and also attach a false chipboard panel to the beam.
The height of the false panel is based on the level of lowering of the stretch ceiling relative to the base concrete ceiling. We attach a wall molding to the false panel.
| Rice. 11-12. Stretch ceiling and built-in wardrobe, fixing the baguette to the false panel |
Second trip - we attach the wall molding directly to a wooden beam; after installing the stretch ceiling it will be hidden
| Rice. 13-14. Stretch ceiling and built-in wardrobe, attaching a baguette to a wooden beam |
At the same time, another method of attaching the baguette is possible. In this case, we use a universal or ceiling molding, which we attach to the bottom of the embedded wooden beam, in front of the guide for the compartment doors.
| Rice. 15-16. Attaching a stretch ceiling to a sliding wardrobe using a universal or ceiling profile |
In our opinion, in all cases of installing a sliding wardrobe and a suspended ceiling, it would be better to make not only the side false panels 100 mm wide from chipboard, but also to make a false panel on the top. As a result, you will not attach the sliding door guide directly to the wooden beam. First, we attach the false panel to the beam, and then the guide for the compartment doors to the false panel. This scheme is described in the article on making a built-in wardrobe with your own hands.
DIY built-in wardrobeBuilt-in wardrobe: from the name itself it follows that the wardrobe is built in somewhere. This can be a separate niche or part of the room is fenced off, read the full article. |
Decide for yourself which method to choose, the main thing is to provide for all this right away, because in these cases the depth of the future sliding wardrobe and the height of the sliding doors will depend on the location of the wooden beam.
And one more thing, if you are a fan of sliding wardrobes with lighting, then immediately plan when ordering a tension flow where the lamps will be. Unlike a cabinet sliding wardrobe, the lamps will not be in the visor of the sliding wardrobe, because there is none in the built-in sliding wardrobe, but in the suspended ceiling, in front of the sliding wardrobe doors. All this must be calculated correctly and when ordering a stretch ceiling, indicate in the design where the holes for the lamps will be cut.
| Rice. 17. Stretch ceiling with lamps in front of the wardrobe doors |
Option for pairing a built-in wardrobe with a suspended ceiling, suspended ceiling inside a wardrobe
If we want to make a suspended ceiling inside a wardrobe, then we also need a wooden beam. Similarly, we attach the upper false panel made of chipboard to the beam, and to it the upper guide for the sliding wardrobe doors. This option is rarely used, because the suspended ceiling inside the wardrobe can be damaged.
| Rice. 18-19. Stretch ceiling inside a wardrobe |
Option for pairing a sliding wardrobe with a suspended ceiling, stretch ceiling around a sliding wardrobe
You have a ready-made sliding wardrobe, and it is about 10 cm below the height to the ceiling. The wardrobe cannot be moved and prevents the installation of a suspended ceiling for the entire room.
Again, a wooden block comes to the rescue, which we fasten in front of the front and side edges of the sliding wardrobe, and then we attach the wall molding from the inside to the wooden block.
| Rice. 20-21. Sliding wardrobe and suspended ceiling |
Watch the video on how to bypass a wardrobe with a suspended ceiling
| Video.1. How to get around a wardrobe with a suspended ceiling |
Connections between a stretch ceiling and a sliding wardrobe without embedded wooden beams
The suspended ceiling is made, there is no timber and it was not planned in advance, and you wanted to make a wardrobe. In this case, a sliding wardrobe is made, the height is 2-3 mm lower than the level of the stretch ceiling.
We install the cabinet carefully so as not to tear the ceiling. Here, special accuracy is required in preliminary measurements so that the wardrobe does not support the suspended ceiling.
| Rice. 22-23. Pairing of a sliding wardrobe and a suspended ceiling without an embedded beam |
Read further:
|
How to properly combine a suspended ceiling and a built-in wardrobe?
You can combine the ceiling covering with the body based on the device or method of furniture assembly:
- The built-in one is mounted in a niche, delimiting the area of the room. The mount is stationary, the installation is permanent - it will not be possible to move the furniture to another place. Since the coupe is assembled according to exact dimensions, the height is selected according to the level of the tension membrane.
- Modular models are manufactured according to standard factory dimensions. The structure can be rearranged without disturbing the interior. Due to the fixed height, it is difficult to fit the body closely to the suspended ceiling.
When the ceiling membrane is already stretched, there is a risk of damaging the film when installing dismountable furniture. Therefore, it is necessary to foresee in advance how to install it close to the ceiling.
It is best to combine stretch film with furniture
The situation is not insoluble. Both compartment furniture and the tension structure can be combined in one room without any problems. This is achieved in three ways:
- the first method is to install the covering and then adjust the furniture to the height of the covering;
- the second method is to remodel the furniture and subsequently install a film covering;
- the third is creating a composition when both the furniture and the ceiling complement each other.
For the first option, the following algorithm applies: first, the ceiling covering is installed, and then the furniture is ordered. The advantage of this scenario is the relative cheapness of the project, since both the film and the coupe are ordered with the smallest deviations from standard sizes and do not require adjustment to each other. The mounting rail is installed around the perimeter and does not require additional manipulations, even if the room has a complex configuration, this is not a problem, because the rails are attached strictly according to the size of the walls.
An example of a compartment with a tension system.
There are also disadvantages. Sooner or later you will have to admit that the design will not look like the advertising photo. It is difficult to clean; over time, stains appear on the ceiling from touching.
READ MORE: Description of Asiatic lily varieties, planting and care in open ground
The option of working with finished furniture, when you first need to disassemble it and then assemble it, but of a smaller size taking into account the height of the ceiling, raises even more questions. Here it is necessary not only to correctly disassemble the structure, but also to subsequently make its height smaller. You will have to be smart with mirrors and doors. This is where the big problems start:
- unaesthetic or incorrect cut of the material;
- errors in re-installation;
- replacement of mirror elements;
- replacement of the sliding system and internal mechanisms.
The most acceptable and most correct option is the simultaneous installation of a built-in compartment and a suspended ceiling structure. The essence of this solution is simple and reliable - the cabinet itself acts as one of the sides for attaching the mounting rail.
Installed ceiling with finished cabinet
Initially, the installation level of the stretch ceiling is determined. The coupe is ordered taking into account the fact that a rail will be attached to its lid or a specially applied additional strip. Since the rail is made of aluminum alloy, there are no particular problems in giving it the necessary bend. Considering that many walls have a shaped cover with built-in lamps, this decision is entirely justified, because as a result the ceiling covering will have an additional light source. Now you know what is installed first and under what circumstances.
How to connect a suspended ceiling and a built-in wardrobe
STRETCH CEILINGS SPB Details NEVA CEILING Views: 1946
Stretch ceilings have long ceased to be considered a novelty. To order, call Tel.+7. Many people choose this option when renovating. But sometimes difficulties arise if it is planned in advance that the interior will have a built-in wardrobe. How to connect a suspended ceiling to it in this case. What to do first: mount and install a wardrobe or stretch the ceiling?
Options for joining a suspended ceiling and a cabinet
This option is available for full-wall cabinets. Before installing both the ceiling and the cabinet, you need to think through everything down to the smallest detail, so that there is no annoyance later for making the wrong choice and having to redo it. It is important to take into account everything: what the suspended ceiling will be like, with its parameters, lamps, locations and dimensions. It is important that the lamps do not end up directly above the cabinet where the door track, etc. will be attached.
To resolve the issue of installation primacy, it is necessary to analyze docking options. Because the ceiling kit includes: canvas, decorative edging and a wall molding for attaching the canvas. But the baguette can be either wall-mounted, ceiling-mounted or universally mounted. To close the gap between the ceiling and the wall, a decorative tape (L- or T-shaped) is provided.
Option 1. There is no ceiling inside the closet
In this case, a wooden beam is fixed to the ceiling at the location where the future cabinet guide will be installed. The thickness of the beam must exactly correspond to the lower boundary of the future ceiling. For this purpose, you can use direct suspensions from suspended ceiling structures. In this option, we attach a false panel to the fixed beam on the side, and cabinet guides from below. We mount a wall profile-ceiling molding to the false panel. You can also attach the wall molding directly to the beam, if after installing the ceiling the beam will be completely hidden. You can also use a ceiling molding to attach it to the beam, but it should be fastened close to the guide for the wardrobe door. The mounting option should be planned in advance, since the depth of the future cabinet and the height of its doors depend on the location of the beam.
The installation location of the lamps also needs to be planned in advance to determine whether they will illuminate the contents of the cabinet or whether this is not necessary.
Option 2. Ceiling inside the closet
In this case, it is also necessary to secure a wooden beam to the ceiling at the place where the cabinet door guides are attached. The ceiling is stretched, and only then guide false panels with door guides are fixed to the beam through the ceiling sheet. This method is rarely used due to the high probability of damage to the ceiling fabric when assembling the cabinet.
Option 3. Ceiling around the closet
This is an option for those who already have a ready-made wardrobe installed and cannot move it during renovation. It interferes with the installation of the ceiling. In this case, the same wooden beam is attached around the cabinet along the edges of its upper part. The ceiling wall molding is attached from the inside to this block.
Option 4. Pairing without the use of an embedded wooden block
In this case, the ceiling is first installed and only then the manufacture of a cabinet is ordered. The height of the cabinet should be a couple of millimeters below the ceiling. When assembling and installing the cabinet, you should be extremely careful not to damage the fabric of the mounted ceiling. In this option, the main thing is to avoid mistakes in measurements and act with extreme caution.
How we are working:
Options for installing a ceiling with a cabinet
There are several installation methods:
- The split design is presented in the form of fastening two independent fastening systems. This allows you to tension the coating at any stage of the work. The first step is to secure the door guides to the ceiling. Moreover, you need to immediately know exactly the dimensions of the cabinet. Along the surface of the ceiling there is a beam that serves as a profile holder. Whereas on the side of the cabinet, fasteners are already made for the tension structure.
Separate design
After stretching the film, the beam will hide, the compartment can be installed at any time
- Film inside. They immediately install the ceiling, and then install the furniture. A beam is attached to the ceiling surface and the film is stretched. In this case, the beam will be between the main covering and the tension structure. The canvas contains special inserts and guides for doors.
Fastening with film inside
The film covers the entire perimeter of the room, so difficulties may arise when subsequently replacing the ceiling covering with a new one.
- Built-in compartment that surrounds the furniture. This is a rather complicated process. But if it only takes up part of the room, the result will be amazing. First of all, a box is assembled from beams and a harpoon baguette. Holes for fastening are made along the perimeter of the beam. At the same time, the cabinet is being assembled. The ceiling covering is stretched and the frame is attached.
Built-in wardrobe
When taking measurements and installing the ceiling covering, including combining the wardrobe and the ceiling, not a single centimeter should be neglected. Otherwise, it will ruin the appearance of the room in the future.
- Attaching to a stretched ceiling covering occurs using a beam. In this case, it is necessary to coordinate both elements. Although in practice this installation option is extremely rare. The technique is typical for a built-in structure, which serves as a large storage room.
Fastening with timber
This method allows you to install the ceiling covering before installing the cabinet without the risk of damaging the material.