Each of us wants to create an unusual interior in our home, pleasing to the eye and arousing the admiration of others. Today there are many means for these purposes - original finishing materials, decorative elements, etc. One of the options for the original design of a home is molding. What it is? These are overlay panels (plinths) of various shapes, used to decorate walls, ceilings, and furniture. This element allows you to add original features to any room. In this article we will tell you how to use moldings to finish the ceiling.
Types of decorative panels
Nowadays, you can choose decorative skirting boards in a variety of configurations and sizes. They can be smooth and patterned, with relief patterns or imitation stucco. This type of finishing is also produced in different materials, it can be:
- wood;
- plaster;
- foam;
- polyurethane.
The last type is the most widespread. Polyurethane, compared to other materials, has many advantages:
- moisture resistant (can be used in the bathroom, swimming pool, etc.);
- tolerates both low and high temperatures;
- retains its original color for many years;
- not deformed.
Polyurethane panels are the best choice for sealing joints between the wall and the ceiling.
Insert for stretch ceiling: tips for selection and installation
Installation of PVC sheeting begins with its attachment to a special profile - the design of which provides for an unsightly technological gap of 3-5 mm between the ceiling and the wall. An insert for a stretch ceiling is a decorative element designed to disguise this joint, giving the room a finished look.
Advantages of using molding
The main advantage of installing moldings on the ceiling is the ability to add originality to any interior. But this is far from the only advantage of this decorative element. For example, ceiling molding will help hide surface unevenness. Also, with the right color of this element, you can visually expand the room. This effect can be achieved if the baseboard is the same color as the finishing of the walls and ceiling. Another important plus is affordability. Ceiling moldings made of polystyrene foam and polyurethane are available to absolutely everyone. Wooden and plaster models are much more expensive, but also not exorbitantly expensive.
What is molding?
What is molding? This is a hellishly broad and collective concept that externally represents any overhead, protruding decorative detail. Moldings can be found on walls, ceilings, pieces of furniture, doors, fireplaces, arches, niches or columns. In fact, you can use them to decorate any vertical and horizontal plane, and even a radial structure. Moldings can be embossed or smooth, made from various materials, and besides, you can always paint them in any color you need.
Painted wooden fillets and decorative moldings for the ceiling, Minacciolo
The simplest and most common type of molding that can be found pragmatically in any room is the ceiling fillet (fillet), designed to hide the border of the wallpaper and the ceiling and correct the incorrect geometry of the room. Even if you want to create the shortest possible interior, you will hardly be able to do without this detail, especially if the room does not have perfectly 90-degree angles, which, unfortunately, is found everywhere in our apartment buildings.
Modern interior
In such an interior, discreet, smooth skirting boards look best. They can be used to zone a space in a very interesting way - laying out all sorts of geometric shapes on the ceiling. It is very popular from the center of the ceiling, where the chandelier is located, to place several rectangles or circles of decorative panels, increasing in size. In terms of color, you can use any shades - to match the tone of the room’s decoration or, on the contrary, play in contrast. The last option is suitable only for rooms with high ceilings.
Constructivism implies restraint. In such an interior there is almost no decor in the form of additional small elements. Therefore, the decor in this case should be smooth, without any relief ornaments or stucco molding. For example, you can zone the space into equal squares using thin, smooth skirting boards. In this case, the chandelier in the center does not look good; it is much more effective to place spots in the center of each square.
Bright, contrasting figures will look great in pop art
complement the high-tech with decor in shades of gray, metallic, and chrome.
In short, any style can be emphasized favorably with a properly selected decorative element. A flat, smooth ceiling without any decoration looks boring, so it’s worth diversifying the interior of your home. Fortunately, the variety of decorative elements today can satisfy people with very different tastes.
Take note: the more spacious the room and the higher the room, the larger the baseboard can be and the more elaborate the relief pattern on them.
Is it possible to glue wallpaper before or after a stretch ceiling?
In both cases, wallpapering does not have any difficulties. However, a number of points should be taken into account:
- Some types of suspended ceiling fastenings require a fixing decorative glazing bead, which actually replaces the plinth; in this case, in order to capture the area of the wall under the plinth, you will actually have to dismantle the stretch ceiling.
- If the wallpaper has already been glued before installing the suspended ceilings, then when they are re-glued (replaced, dismantled), part of the surface under the suspended ceiling will not be freed from the old wallpaper. Or it will need dismantling again.
- If the decorative fastenings and the baseboard are spaced apart, this is the best option. Wallpaper can be changed and re-pasted without any problems. True, with each re-gluing, the skirting boards will need to be replaced with new ones, without gluing them to the stretch ceiling material.
Features of stickers for decorative skirting boards
There are different options for finishing the ceiling with molding. The installation method directly depends on the material with which the ceiling surface is lined. First, let's look at options for gluing decor to a regular and plasterboard ceiling.
Start gluing this decor from the corner.
Polyurethane materials are usually glued using liquid nails or special assembly adhesive. The work includes several stages:
- removing debris and dust from work surfaces;
- treating the future locations of elements with a primer;
- applying glue and installing the panel;
- removing any glue that has come out;
- sealing the resulting gaps with sealant.
When it is impossible to restore damaged stretch ceiling film
It also happens that PVC sheeting cannot be repaired. Such cases include damage that occurs at the places where the seams pass. This will require a complete replacement of the stretch ceiling, since other methods are impractical.
If the fabric has come apart in the area of the built-in ceiling light, use a special ring that masks the defect and prevents the damage from spreading in the future.
As you can see, restoring a stretch ceiling is not such a simple task in some cases. Sometimes you have to make a lot of effort to achieve the effect without spending a lot of time and money on it - avoiding a complete replacement of the structure.
Localizing the defect will help to spot repair the canvas using glue for a stretch ceiling, the quality of which depends on the choice of glue. With the right composition, you will quickly get rid of the problem literally hanging over your head.
How to glue plinths on suspended ceilings
For ceilings with stretch fabric, you can only use foam or polyurethane plinths, due to the light weight of these materials. Installation begins in the same way - with surface preparation. Only in this case, only the wall to which it will be glued is treated with a primer.
The plinth cannot be glued to the tension fabric, as it may become deformed.
Now let's move on to preparing the panel itself. Since in this case the surface will not be painted, if you want to paint the baseboard, this must be done before installation. When the paint is completely dry, it is glued to the wall. After the glue has dried, carefully seal the seams.
How and with what to glue plinths and other elements to a suspended ceiling
Clients of the Mos Siling company have questions regarding the process of installing suspended ceilings, their maintenance and repair, among which the following is popular: how to glue skirting boards onto a suspended ceiling?
Stretch ceiling and plinth
You will probably be surprised, but it is impossible to answer how to glue the ceiling plinth to the stretch ceiling. The answer is nothing. It is impossible to glue anything of any significant weight to a thin vinyl sheet. Why?
There are several good reasons for this:
- if you try to glue the baseboard to the vinyl sheet, the glue will cause it to sag, may become wrinkled and even dissolve;
- the film is not firmly fixed in the frame, so the plinth would come off due to air movement;
- with the harpoon installation method, the canvas is dismantled to drain water in case of flooding and dry the ceiling or to replace wiring, heating pipes, etc. Naturally, a glued baseboard would interfere with this process.
According to the technology, the hole between the ceiling and walls is closed with a special masking tape, white or painted to match the shade of the ceiling/walls. Questions about how and with what to glue the baguettes arise if the stretch ceiling is decorated in a historical style and an imitation of stucco molding is required.
In this case, the solution is very simple: the skirting boards are glued not to the tension film, but to the walls. Moreover, you can choose any material and type of finishing: polystyrene foam, natural wood and polystyrene foam.
How to glue foam baseboard
The Mos Siling company's craftsmen install suspended ceilings and masking tapes, but you can install ceiling skirting boards yourself. They can be glued directly to painted or wallpapered walls.
Another reason for using skirting boards is uneven walls. Therefore, when gluing the plinth, you should not use a level, just measure the same distance from the tension fabric.
For fastening, you can use any acrylic glue, which is applied only to the lower part of the plinth (when choosing a decor, pay attention not only to its appearance, but also to the width of the vertical part, due to which it will be glued).
To aesthetically join any type of ceiling plinths, you will need a miter box. With its help, a sharp construction knife can easily cut the foam. Don't worry about small irregularities - they are hidden thanks to acrylic putty.
Features of gluing polystyrene foam
The difference between polystyrene foam is that it is thinner, but much denser and heavier than polystyrene foam, so gluing it is much more difficult. That is why in this case the baguettes are attached directly to the wall, and not wallpaper.
The walls are first coated with a primer on top to strengthen the plaster. To ensure reliable gluing of the baseboard, you can use adhesive putty in residential areas and liquid neopropylene nails in bathrooms and other wet rooms.
Fastening a wooden baseboard
Wooden moldings with suspended ceilings are rarely used. They can be fixed with glue-putty or screwed with self-tapping screws to the walls every half meter. The heads of the screws are puttied and painted the same color as the baseboard.
How to glue a suspended ceiling
Mos Siling specialists are also interested in how and with what vinyl films are glued. When installing suspended ceilings, adhesives are not used. Glue and vinyl are connected only in three cases:
- when installing lighting devices;
- when gas pipes, heating pipes, hoods and other elements enter the ceiling;
- for repairing cuts and punctures.
Lamps. As you already understand, nothing can or cannot be hung on a suspended ceiling. Spotlights and chandeliers are attached to the base ceiling. To do this, before installing the canvas, embedded parts are installed - racks or platforms.
After stretching the film, you need to make holes in it to install the lamps. However, any holes in the vinyl from tension will stretch and tear further, so all technical holes are reinforced with special plastic rings.
This is where glue comes in handy. Typically, Mos Siling specialists use CosmofenCA12. Cosmofen is a one-component product based on cyanoacrylate, characterized by instant hardening.
Opposite the embedded part, an armored ring is glued to the canvas, and then a film is cut along its inner diameter and the lamp is fixed and connected through the resulting hole.
Pipes and hoods. When installing suspended ceilings in many rooms, pipe bypass is required. The principle here is similar, only reinforcement parts often need to be made manually by Mos Siling company craftsmen from special thin plastic and glued to the film with Cosmofen from the outside or from the inside, depending on the situation.
Repair. If you accidentally get cuts or punctures in the canvas, this is the moment when you need to decide how and with what to glue the stretch ceiling in order to repair it. By the way, gluing is far from the only way to repair.
The easiest repair method is a patch. Although at first glance it seems that you can handle this work yourself, Mos Siling specialists do not recommend experimenting, but trusting professionals.
Firstly, instantly hardening glue requires a lot of skill and experience working with it. Secondly, it contains a toxic substance. Thirdly, the task is not just to glue a patch, but to return the ceiling to its ideal appearance, and you need to be able to do this.
Mos Siling specialists can decorate the hole by applying an inconspicuous patch or insert a new lamp, glue a false exhaust grille, mount a mirror or a polyurethane rosette around the chandelier.
Conclusion
Now you know how and with what to glue a suspended ceiling when repairing it, you have received information about the intricacies of installing lamps and installing ceiling plinths, but theoretical knowledge does not replace experience and practice. Therefore, it is better to entrust all this work to the professionals of the Mos Siling company.
We recommend reading:
Rules for installing suspended ceilings
Proper care of suspended ceilings
Stretch ceilings made in Russia
Stretch ceiling China - modern technology and low price
Ceiling plinth for suspended ceilings: types and features
Useful tips
- Carefully select the adhesive for the material. Some adhesives contain quite aggressive substances that can damage the decor being glued.
- To help the panel stick better, you can use masking tape. Once the glue has completely dried, the tape can be easily removed.
- You can also use self-tapping screws to press the panel more tightly to the surface. After drying, they can be removed or simply painted over to match.
- When choosing the type of decor, first of all, focus on its compliance with the style of your home.
- Before purchasing, it is good to first look at the types of decorative panels on the Internet. This will help you quickly understand what will suit your interior best.
Drywall drywall
Photo of the design of a suspended ceiling made of plasterboard.
This type of two-level suspended ceiling has become widespread and is often found in apartments with European-quality renovation.
Photo of the design of a two-level suspended ceiling made of plasterboard
Whichever type of ceiling is chosen, to install it you will need a whole list of materials and tools, which include:
- Level (an indispensable tool for correct ceiling installation). Thanks to it, you will be able to install the structure and drywall sheets without distortions. There are several varieties of this instrument. Laser or inexpensive water-based ones are often used;
- Hammer (a construction tool used to adjust the ceiling surface for installing profiles);
- Screwdriver (device for tightening screws);
- an ordinary square (a simple tool used for marking and drawing straight lines);
- Screws and self-tapping screws (fasteners for securing profiles);
- suspensions and profiles (frame of the future ceiling);
- Drywall (sheets of material from which the ceiling surface is formed). When installing stretch fabrics in rooms with high humidity, such as a kitchen, you will need moisture-resistant plasterboard sheets. This material is unique because it is easy to install and give any desired shape.
- Hacksaw (tool for shortening profiles). An electric jigsaw is also used, with which the work is faster.
If desired, construction work can be entrusted to professionals, but in this case the cost of European-quality repairs will increase significantly. On the other hand, only masters of their craft will protect you from unintentional errors during installation and guarantee high-quality completion of the assigned tasks.
The process of installing the ceiling itself is complex and requires skill. First of all, using a pencil, the selected design sketch is drawn on paper, after which it is carefully displayed on the surface itself. If difficulties arise at this stage due to the complexity of the sketch, you can use various construction tricks:
- the use of curved blanks cut from plasterboard, on which it is much easier to draw the selected sketch.
- using coordinate centers. Usually these centers mean the corners of the room, however, if the sketch has a lot of curved lines and circles, it is more advisable to fix the fasteners on the ceiling and use it as a coordinate center. In this case, a thread with a pencil is tied to the fastener, with the help of which further marking is carried out.
After marking work is completed along the perimeter of the ceiling, a frame is mounted from a rigid guide profile, into which CD partitions are subsequently installed. This is shown in the photo:
Installation of a drywall guide
After the installation of the frame is completed and the component parts are fixed using fasteners, it is covered with plasterboard, which is subsequently, after installing point light sources, repeatedly puttied and painted.
During installation, the main thing is to provide for the location of electrical wiring, point sources of lighting and ventilation, since dismantling the installed frame is not an easy task and will require the intervention of professionals, thereby causing associated costs for correcting repair errors.
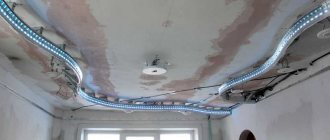
Connecting LED strip
Of course, it is better to carry out European-quality repairs not according to training instructions, but under the supervision of professionals or with their direct participation. And you can monitor their work personally, making, if necessary, suggestions for improving the design of the room.
What glue is used for suspended ceilings?
Stretch ceilings have recently become an indispensable attribute of a presentable apartment. It is attractive, durable, and easy to maintain. Tensile coverings have only one drawback - the low strength of the canvas, which results in damage to the surface. It is very easy to damage the canvas; this can be caused by children’s games of throwing objects up or by a carelessly opened bottle of champagne “shooting at the ceiling.” However, this is not a reason to despair and refuse to install such a coating. Glue for suspended ceilings will help correct the situation.
When carrying out repairs, it is important to take into account all the details. The choice of glue plays an important role in this case. It is also worth knowing how to remove glue from the surface. You will learn about all the nuances by reading this article.
Molding configuration
Most often, decorating walls with moldings is used in the reconstruction of ancient interiors.
Below is an example of the use of moldings in a Victorian interior.
Wall moldings for Victorian interiors
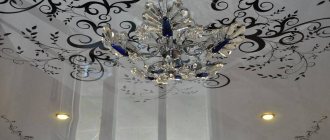
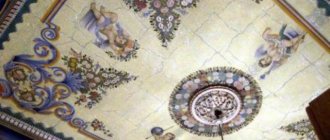
The multifaceted use of moldings (for ceiling medallions, in wall bas-reliefs) is typical for classical designs and neoclassicism. Figured bas-reliefs and complex configurations are perfectly highlighted by the built-in ceiling lighting.
In modern interior styles, complex forms of moldings are used more restrainedly. The shapes of the frieze are simplified, acquiring simple geometric shapes.
This photo shows that a simple form of molding is used to separate the walls and ceiling, made in the same color.
The neutral color of the walls harmonizes with the wicker furniture.
The color division of surfaces can organically blend into the color scheme chosen by the designer.
The pastel pinkish color of the ceiling molding with a simple profile matches the tones of the headboard, floor lamp, and soft pouf.
A more complex form of molding extending onto the kitchen ceiling is needed to visually reduce a large area of the room.
The high height of this hall forces architects to use all techniques to visually reduce it.
Ceiling, middle moldings in the interior of the living room with a sharp white color divide the high painted walls into unequal parts. The monotony of large walls is broken by the absence of molding on the pediment of the fireplace and the stepped structure of the ceiling frieze.
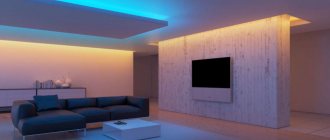
The opposite effect of using contrasting moldings is also possible.
In this interior, light molding expands the ceiling area, and the visual contrast with dark walls enlarges the small living room.