What to do first: closet or suspended ceiling
The design of a stretch ceiling involves the use of wall molding, canvas and decorative edging. Depending on what the suspended ceiling will be attached to and whether it will be visible inside the cabinet, the order of the work depends. The choice remains with the owner of the premises. Today there are no restrictions on the order of work. You can install the ceilings first, and then place the built-in wardrobe from the floor, or you can do the work in the reverse order. The most important thing is to warn the furniture company and the tensile structure installer that you plan to combine these elements in the room. Then it will be possible to perfectly coordinate both designs.
Option two: start by installing the cabinet
Attaching to a bar
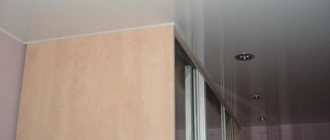
If you decide to first assemble the wardrobe, then the door guide tracks should be attached to the concrete ceiling. And the suspended ceiling must be mounted to the block (it is placed in front of the guide). This option is good because, if necessary, you can replace suspended ceilings without touching the cabinet. But you should understand that in this case the guide track will be hidden, and not everyone likes this.
Following this layout diagram of the wardrobe and suspended ceiling, you need to calculate in detail the location of the beam attachment: the depth of the cabinet and the height of its doors depend on this. It is also important to accurately determine the lighting. If you want to place spotlights in front of the cabinet doors in a suspended ceiling, you need to calculate in advance the location of their attachment and take this into account when ordering a suspended ceiling structure. The option when the suspended ceiling is located around the wardrobe is ideal if the wardrobe is already installed and you decide to install suspended ceilings. Moreover, the cabinet should be approximately 10 cm below the main ceiling; this will allow you to calmly lower the ceiling level by installing a tension structure.
Using a false panel
As an option, you can install a special false panel (decorative horizontal strip). It is to this that the suspended ceilings will be attached. And the cabinet guide will be attached to the beam, which is located behind the panel. The height of the false panel depends on how much the suspended ceiling will be lowered.
When choosing one of the methods for assembling a built-in wardrobe and suspended ceiling, focus on the ease of work and the ability to replace the ceiling panel without affecting the cabinet. Of course, if you already have one of the designs, you just have to follow the scheme that is available in this case.
Preparing to install a stretch ceiling
You can install a stretch ceiling in a few hours. But preparation, as well as connecting lighting, sometimes require even more time. So let's begin.
First, we clear everything that might fall from the ceiling. This is very important for aesthetics. Everything after the ceiling is stretched can be seen through.
Ceiling prepared for installation: everything has been cleaned, lighting fixtures have been installed
If the film is white or light, dark spots, if any, may be visible through it. The same problem exists in a log house: the dark ceiling will be visible. In this case, you can pre-sheath it with some material (plywood, plasterboard, etc.) and cover it with white paint. As an option, shoot some white material (at least a vapor barrier).
At what stage of repair should a suspended ceiling be installed?
Installation of suspended ceilings is carried out after the main “dirty” stages of repair have passed, and the walls are leveled. You can do it before wallpapering, or you can do it after. Both options are imperfect. And that's why:
- If the walls are already covered with wallpaper, they will get dirty when installing the baguette. To avoid contamination, you have to close the walls, and this is extra time.
- If you glue wallpaper after installation, you need to work very carefully: the films (if they are stretched) tear very easily. And during such work it is very easy to tear it.
What is the lesser evil for you - choose. In other periods this is not possible.
Mount the ceilings after all the dusty work is done, on flat walls
Where and at what height is it mounted?
There are two types of profiles - for the ceiling and for the wall. Ceiling ones are used in cases where for some reason it is impossible to screw a supporting structure onto the walls (wiring running in the required place, very unstable material). In other cases, a baguette is mounted on the walls.
At what height is the baguette attached? If there are no distortions, at a level of 4-5 cm below the junction with the ceiling. Why not at the very top? Because the higher the strength of the wall is reduced, it can crumble. Loads when using PVC films are created decently, so load-bearing capacity is important. In addition, wiring is often laid in this place and it can be damaged. So be careful with the wiring, designate the area where it is located. This height reserve also allows the use of a wider range of lamps. As you can see, there are enough reasons.
You need to attach the baguette to flat walls, retreating 4-5 cm from the main ceiling
If the walls in the room have not been leveled, but you want to install a suspended ceiling, level the area in which the molding will be attached. If this is not done, it will bend, which will be clearly visible from below.
On walls made of foam concrete, a beam is mounted to the wall, and a baguette is attached to it. The tension created in this way is transferred predominantly to the beam, and the wall experiences less stress.
For normal ceiling tension, it must be stretched in a strictly horizontal plane. Therefore, they find the lowest point of the ceiling, set aside those same 4-5 cm from it, and then beat off the horizontal along all the walls. So relative to the existing ceiling, the height difference may be different.
The drop relative to the main ceiling may be uneven...
It is most convenient to apply a line using a painting cord (a thin cord “stained” in loose dye such as blue).
If you decide to make a two-level stretch ceiling, it is attached to a plasterboard structure. If the fastening is on one of the horizontal guides, everything is fine and there are no problems. If lower or higher you need to add gain. This can be a profile fixed in the right place or a strip of plywood 5-6 mm thick. Both methods have been tried and work well.
When installing in a room whose walls are tiled, attach the baguette 2 cm below the edge of the tile. It is important that there are no voids underneath.
Electrical wiring and fittings for suspended ceiling lamps
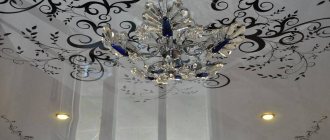
Since lower-power lamps are used in suspended ceilings (no more than 40 W for incandescent lamps and 35 W for halogen lamps), a larger number of lamps is required. In addition to the main chandelier, peripheral lighting is also provided in the center. In this case, built-in lamps are usually used.
It turns out that there are a lot of wires running along the ceiling. They must be well and correctly secured. If a suspended ceiling is made in a wooden house, all electrical wires are laid in fireproof pipes, a special corrugated hose or mounting box. In other cases, it is enough to secure them to the ceiling with mounting tapes or using clips.
Reliable way to secure wiring
For the installation of lamps in a suspended ceiling, embedded elements are made. Their design depends on the type of lamp and is selected separately each time. It is only desirable that the lampshades be either directed downward or located no closer than 40 cm from the ceiling. Otherwise, after a while, yellowish spots from overheating will appear on it.
Perhaps the best solution when choosing lamps for a suspended ceiling would be LED ones. They produce a powerful stream of light, last a very long time, draw very little electricity and practically do not heat up. The downside is the high price. But it is justified quickly - by saving on electricity.
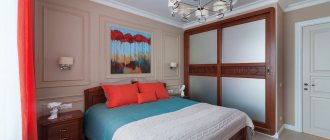
Is it possible to combine a wardrobe and a suspended ceiling?
We are used to the fact that during a renovation, the floor, walls and ceiling are immediately done, and then they start choosing furniture and decor. But if you don’t initially design the interior of the room, you can forget about harmony and comfort in the room forever.
Even if all cosmetic work is done efficiently. Moreover, difficulties can arise even during installation. And if in the future a suspended ceiling is also proposed, everything will only get worse.
And to make the room look immaculate, you need to figure out what to do first, installing the ceiling covering or installing a compartment.
When planning a renovation, immediately consider where the suspended ceiling will be so that you can combine it with the wardrobe
Types of suspended ceilings and their characteristics
There are two types of stretch ceilings: PVC film and fabric. They differ in properties and appearance. The film does not allow water to pass through, which in an apartment can serve as insurance against flooding from above. But there is no guarantee that it will bear the weight. In addition, the film has holes for lamps. This fact is only a “side effect” that the material gives, like the fact that it does not allow vapors and air to pass through.
The advantage of fabric ceilings is their ability to allow air and water vapor to pass through. This is important, for example, for a wooden house, where this quality is in demand. You can also make ceilings from PVC film in a timber or log house, but folds and wrinkles may appear on it due to differences in temperature or pressure. There is a solution - more carefully seal the cracks that always exist in such buildings, and install a ventilation grill (or several) that will unite the space below and above, eliminating the unpleasant phenomenon.
Example of an assortment of film colors
The second advantage of fabric ceilings is their large width. Canvases can be up to 4-5 meters. You can also find 6 meter ones, but on special order and at a corresponding special price. However, for most rooms this width is enough. That’s why this type is often called seamless: there is no need to sew the fabrics together.
The disadvantage of fabric stretch ceilings is their higher cost, as well as a more limited selection of colors. But there are many more textures: there is leather, velvet, imitation frosted glass and others. Also, any type of photo printing looks great on this base. But if you want a bright gloss, it can only be in PVC film. The woven surface has either a matte or slightly shiny surface.
Stretch ceiling made of textured fabric (the walls are also finished using the same technology)
By the way, you need to be careful with bright gloss. It, of course, visually makes the room taller. Due to the reflection of light and objects. But it is the reflection that can play a trick on you. Everything is reflected in the ceiling. And what lies on the cabinets too. And garbage and dust. Literally everything. So take that into account too.
Another comparison parameter is operating temperature. PVC stretch ceilings can only be used at positive temperatures. At 0°C it becomes brittle, after -40°C it collapses. If you install such a ceiling in an unheated room, it may survive a winter or two (if the doors are not opened abruptly in a cold house). But then it will inevitably break. Fabric stretch ceilings are undemanding to temperatures, so they can be frozen.
What to design first
If you stretch the ceiling and then proceed with installation, the following problems may arise:
- workers will damage the ceiling surface;
- The cost of installing a tension structure depends on the area of the ceiling. Then the question arises, why pay more?
the space formed between the cabinet and the ceiling will accumulate dust. Since it is not recommended to attach anything to the film and the distance between the surfaces will be around 70 mm;
Before installing the ceiling, warn the installers about the subsequent installation of the cabinet
Options for installing a ceiling with a cabinet
There are several installation methods:
- The split design is presented in the form of fastening two independent fastening systems. This allows you to tension the coating at any stage of the work. The first step is to secure the door guides to the ceiling. Moreover, you need to immediately know exactly the dimensions of the cabinet. Along the surface of the ceiling there is a beam that serves as a profile holder. Whereas on the side of the cabinet, fasteners are already made for the tension structure.
Split design
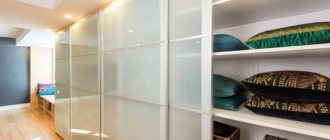
- Film inside. They immediately install the ceiling, and then install the furniture. A beam is attached to the ceiling surface and the film is stretched. In this case, the beam will be between the main covering and the tension structure. The canvas contains special inserts and guides for doors.
Mount with film inside
- Built-in compartment that surrounds the furniture. This is a rather complicated process. But if it only takes up part of the room, the result will be amazing. First of all, a box is assembled from beams and a harpoon baguette. Holes for fastening are made along the perimeter of the beam. At the same time, the cabinet is being assembled. The ceiling covering is stretched and the frame is attached.
Built-in wardrobe
- Attaching to a stretched ceiling covering occurs using a beam. In this case, it is necessary to coordinate both elements. Although in practice this installation option is extremely rare. The technique is typical for a built-in structure, which serves as a large storage room.
Fastening with timber
Second option: attaching the wardrobe to a ready-made tension fabric
The suspended ceiling has already been created, therefore, the cabinet must be placed in the gap between the upper border and the floor. After measurements and selection of optimal dimensions, they proceed to attaching the cabinet rail. We attach it to the mortgage. In this case, the beam must already be installed inside the tension structure and calculated according to the depth of the built-in structure.
This combination option is not used as often as the first, and only when the furniture requires an attractive ceiling.
The peculiarity of this situation is that it is used more often when creating dressing rooms. The stretch ceiling also extends into the area inside the closet, which makes the design suitable for creating a beautiful mini-wardrobe.
Another advantage of this method is that the installation of the ceiling structure can be done before installing the cabinet with sliding doors.
However, it is worth considering that when installing a cabinet with a ready-made stretch ceiling, there may be difficulties in opening the doors, additional costs and difficulties during repairs. Here, special attention should be paid to hiring qualified specialists, since this installation method is rare, and few people are able to implement it; as well as strong fastening of the mortgage. The beam can come loose and damage both the tensioned fabric and the cabinet.
Some advice from experts
To correctly combine the ceiling and wardrobe, it is better to follow the recommendations:
- thanks to the presence of a ceiling plinth, you can achieve the effect of the integrity of the ceiling structure;
- if work is carried out in a niche where installation is planned in the future, it is better to immediately provide a built-in model of furniture;
- When hiring workers for installation, it is better to discuss upcoming plans with them, even if subsequent manipulations will be performed by other people. This will allow specialists to think step by step how to act and will only improve the result;
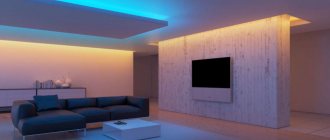
- To enhance the modern effect of the design, you can install spotlights around the ceiling.
Simultaneous installation of furniture and stretch ceiling helps to avoid mistakes
During repairs, you need to carefully think through each stage of the work, and ceiling installation plays an important role in this matter. In order not to damage the surface of the ceiling covering, it is recommended to initially choose the option of pre-installing a wardrobe; you should pay attention to the type of wardrobe and the specific materials from which it is made.
Plus, this will allow you to avoid paying installers for extra square meters and the mortgage amount will not increase during the installation process.
Guide profile – baguette
The main structural element that holds the tension fabric is a baguette . Baguettes are made from aluminum and plastic. Baguettes made of aluminum and rigid PVC are suitable for textile ceilings. They allow you to securely clamp the canvas with a clip.
Harpoon and wedge systems allow the use of any baguettes, both aluminum and plastic. They are chosen depending on the weight and size of the canvas. Aluminum baguettes are stronger and more durable, but also more expensive. Plastic baguettes are easier to attach to the surface, they are more flexible and cheaper.
Baguettes are divided into groups according to their purpose:
- Wall and ceiling profiles. Used when attaching the canvas to the wall. A variety of fastening systems require the use of various baguettes. The wall molding is attached with self-tapping screws to the wall or other vertical surface. The ceiling molding is also attached to the ceiling (horizontal surface) with self-tapping screws. The distance between the screws for plastic profiles should not exceed 10 cm, for aluminum profiles – 15-50 cm (depending on the design). It is possible to use a universal profile that is attached to both the ceiling and the wall.
- Ceiling curtain rod KP4042 is equipped with a groove for fastening the curtain. This cornice is installed tightly on the wall where the window is located, at the same level as other baguettes. The canvas is tucked into a groove located closer to the wall, the remaining grooves are provided for hanging curtains.
- Profile for level transitions. In a multi-level design, you can choose different shapes. The profile used for a single-color ceiling is called a bumper. It helps to form an even angle for the canvas and make a difference in heights. The material for the manufacture of this profile can be aluminum or plastic. The shape of the bump stop can be different.
- Z-shaped bumper. To install multi-level ceilings, which consist of different canvases, profiles of different modifications are used during level transitions. The KP 4000 aluminum profile is used for gapless level transitions. It does not require installation of plugs. It is attached to a vertical surface.
- KP 4000 for gapless level transition.
- Ceiling profile PP75 for gapless transition.
- PP 75 for gapless level transition
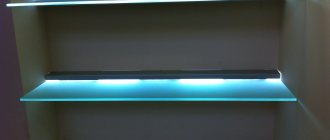
- The PL75 profile (similar to the PP75 profile) has a special groove into which the LED strip is fixed and covered with a diffuser insert.
- PL 75 for level transition with backlight.
Separating profile
Designed for joining panels of different textures and different colors in single-level ceilings. Based on the type of installation, these profiles are divided into horizontal and vertical. During the installation process, the blades are inserted into the corresponding grooves on both sides, and the junction of the blades is closed with a plug.
Dividing profile for harpoon system
- The corner profile is also a dividing one. It is designed for contours of both external corners and openings and columns.
- KP 4003 For floating ceilings made of translucent filmSeparating corner profile
- The separating profile KP4075 is equipped with a niche in the center into which the lighting is built in. The niche is covered with a translucent film of stretch fabric. Which creates a strip of soft light.
- KP 4075 Divider with backlight
- Installation of floating ceilings can be done using profiles of various designs and purposes: ceiling, wall, dividing, for level transitions (analogous to PL75). The material for these profiles is aluminum. To highlight the perimeter of the walls, the KP4003 wall profile is used. It is used for translucent films.
- KP 4003 For floating ceilings made of translucent film
- When using an opaque film on floating ceilings, the KP2301 profile is used, which creates a clear line along the perimeter of the walls. In this case, the LED strip, installed in a niche between the ceiling and the wall, is covered with a light-transmitting plug, the color of which determines the color of the backlight.
- KP 2301 For floating ceilings with a diffuser plug
- When installing a multi-level floating ceiling, profiles KP-2 and NP-5 are suitable, which are connected with self-tapping screws.
- KP2 and NP5 for level transitions with backlight
Profile Apply
Two-layer structures (for 3D and “starry sky” ceilings) involve the use of Apply profiles, which are produced in several modifications. They differ in the distance between the ceiling levels and the methods of fastening - to the ceiling or wall.
- The top layer is an opaque fabric, the bottom layer is a perforated or transparent fabric with a pattern. For illumination, an LED strip is sometimes installed between these layers.
- Apply 40 for the starry sky system
- Note. When choosing guides, it is important to consider their size in order to avoid installing additional devices.