No summer holiday on the seashore is complete without souvenirs, especially those that you can collect with your own hands on the coast. The most varied shells in themselves are already decoration, but if you add your imagination to everything, you can create something more original and unusually beautiful. For example, stylish candlesticks made of shells, which will not only remain as positive emotions from your vacation, but will also be a long, pleasant memory of your summer vacation.
Seashells come in a variety of shapes and sizes, so you can make different types of candle holders that will decorate your room or can create a cozy atmosphere for a romantic dinner.
How to paint a shell
If your sea or river shells are not a very beautiful color and you don’t see your future candlestick in them, it doesn’t matter. They can be easily painted in any color. Let's look at several methods.
- The fastest and easiest way is to spray paint from a can. Here you can use absolutely any paint - the shell will withstand anything.
- Acrylic or oil paint using a sponge. The brush will leave streaks. If the shell is small, then the easiest way is to dip it completely in paint.
- Using thin foil for decoration. Let's look at it in detail in the master class below.
Seashells spray painted
Flower
Tools and materials for the flower
Another craft that you will learn to make in this article is a shell flower. To create it you will need:
- Shells – 10-20 pcs.
- Stones – 1-2 pcs.
- Hot silicone – 1 pc.
- Glue gun – 1 pc.
- Tongs – 1 pc.
- Acrylic varnish – 1 can.
- Brush – 1 pc.
- 3D paint – 1 pack.
Step-by-step flower making
Having purchased everything you need for a flower made from shells, start the process of making it. It is implemented according to this scheme:
- From the available shells, find a beautiful middle.
- Glue flat shells to the selected middle one by one so that you get the outline of a flower.
- Bring the bottom row of petals under the overall picture. It can be formed from a wide variety of shells. If the tip of the central shell remains, break it off with tongs.
- Place the finished flower on the stone. For this also use hot silicone. The perimeter stone should also be decorated with shells.
- Using a brush, cover the finished craft with colorless acrylic varnish and let the craft dry.
- Outline all the shells with 3D paint and allow 2-3 hours to dry.
Shell decor with foil
We will need thin foil for decoupage, decoupage glue or PVA. Work order:
- Apply glue to the surface of the shell.
- wrap it in decorative foil, after 1-2 minutes the foil will begin to become saturated with glue and soften;
- wait 20-30 until it dries completely and remove the remaining foil with a soft brush.
Master class: making a candlestick from shells
We invite you to make a fairly easy master class with a photo of a candlestick made of shells in a marine style, which you can make with your own hands. To prepare such a candlestick you will not need to spend a lot of your free time and effort. You will need the following materials:
- Medium to large seashells.
- Residues from a paraffin candle or a candle in a metal stand.
- Wick.
- Scissors.
Before using shells, they must be prepared. First, rinse with running water or water with added salt. If this is not done, the shells may over time emit an unpleasant odor that will ruin your craft.
Take candle tablets
After this, take the candle and melt the paraffin in a water bath or on an electric stove, if the candle is in a metal stand.
Melt the candle
Then take a piece of wick, put it in a sea shell, securing it with a dry piece of paraffin, and fill it with melted paraffin, while securing the wick in place with something. Leave it until completely dry (1-2 hours). That's all, our wonderful candle is ready for use!
Pour wax into the shell
Installing the wick
To make the candlestick even more attractive, you can paint not the shell itself, but the wax. To do this, when melting the wax, you need to add oil dye.
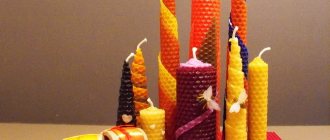
Colored shell candle holders
If you place them on sea stones you will get a great composition!
Hairpins
Tools and materials for hairpins
DIY seashell crafts can come in all sorts of different ways, and in this article, you'll learn about three things you can create using seashells you've collected or purchased. The first such thing is a hairpin. To make it you will need:
- Plastic bottle – 1 pc.
- Candle – 1 pc.
- Thick needle – 1 pc.
- Fastener for hairpin – 1 pc.
- Glue gun – 1 pc.
- Shells of various shapes – 10-20 pcs.
Step-by-step making of a hairpin
Once you have provided yourself with everything you need, start creating DIY shell crafts for children. This process will require you to complete the following tasks:
- Cut a rectangle out of a plastic bottle that is slightly larger than the barrette clasp.
- Round the edges of the rectangle with scissors.
- With the clasp and rectangle aligned, use a marker to mark the clasp holes directly on the rectangle.
- Using a hot needle over a candle, make holes in the areas marked with a marker.
- Using a glue gun, glue the rectangular plate and fastener together.
- Glue the shells carefully and evenly.
Video instruction
If you are interested in what can be made from shells, be sure to pay attention to the advice of professionals. Next, we invite you to watch a video master class in which experts give recommendations on how to create stylish hairpins.
From river shells
You can also make candlesticks from river shells using this method; they look especially impressive when there are a lot of them.
Unusual decor ideas
The assembled sea and river shutters and reels are very easy to adapt to decorate any room in the apartment. You just need to use popular ideas or choose the most unusual solutions for styling your home. For example, doors of different sizes and shapes are suitable for creating an amazing New Year's wreath. They are an excellent replacement for balls and cones. You just need to brightly paint them in the chosen color scheme. The creation of custom products can be carried out for simple styling of kitchens, living rooms, bedrooms and even verandas or terraces. With the help of beautiful cones and scallops, you can decorate not only your home, but also complement your everyday outfits. Using wire or jewelry accessories, you can create beautiful necklaces, bracelets and small rings. Seafood is also suitable for lining a wooden box in which such original jewelry will be stored.
Varieties of shell candlesticks
There are also many options for other handmade candlesticks made from shells.
Candlestick in the shape of "Lily"
A more complex version of such a candlestick would be to make it in the form of a lily.
Oyster candlestick
- To do this you need large shells, a wooden or ceramic base, a glue gun and acrylic varnish.
- Having prepared the base for the candlestick, glue the first row of shells, and then the second and all subsequent ones on top of the first, attaching the shells a little at an angle .
- Then apply a coat of varnish to the shells and eventually you can decorate them with gold or silver spray . Then insert a thick candle into the middle, and your candlestick will surprise you with its originality.
Wreath of river shells
From a vase or glass
A very simple, but at the same time very elegant candlestick can be made if you place a thick candle in an ordinary glass or vase, then fill it with sea sand (you can also use river sand), about a third. Place small shells and corals around the candle.
On a candle
You can create very beautiful candlesticks simply by gluing shells of any size to the candle with a silicone gun.
3. From an old wooden candlestick
If you want to throw out your old candlesticks, don't rush to do it. Restore them to give them an original appearance by covering them with shells of different sizes and shapes.
Magical seafood: using shells in the interior
Shells can be used in nautical and eco-style interiors, as well as in bathrooms and shower rooms.
Seashells are perfect for wall decor. They can be embedded in tile adhesive or plaster, finishing walls, openings, arches, semi-columns, columns.
Beautiful photo frames, mirrors, vases, boxes and paintings, decorated with shells collected from the sea, are a great way to prolong your vacation memories while benefiting your home.
Shells can be poured into transparent containers and the result will be excellent decorative elements. A transparent low vase, wide glass or other glass vessel is ideal for this. This decorative element will find its place on a bedside table, coffee table, bookshelf or on your desk in your home office. Pour some sand into a fruit bowl and place large shells and starfish on it. This decoration will be a godsend in your holiday table setting.
Shells are used to decorate flowerpots. One option is to place small shells inside the pot under the flower. And the second is decorating the pot with shells glued to its outer surface. Indoor flowers in the interior in such original pots look great.
The mirror in the bathroom will look chic if you glue beautiful seashells to its frame. Use acrylic paints in sea green, sand and other summer colors to give the mirror a more sophisticated look. The shells must be glued with strong glue so that they hold well when exposed to fumes in the bathroom, especially when exposed to water.
A mirror in shells will also look creative in another room. If it's a bedroom, use soft, pastel colors to paint the frame to look like shells.
Decorating a simple photo frame with seashells is quite easy. It is worth selecting the most suitable shells in color, shape and size and sticking them on a photo frame. For additional decoration, use beads and sparkles. Place these photo frames on the fireplace, shelves, furniture, and hang them on the walls of the children's room. In the same way, you can create paintings or panels from seashells.
Safety regulations
In conclusion, I would like to remind you to follow safety rules when using candlesticks with candles burning in them:
- A candlestick with a burning candle must be carried very carefully.
- Candlesticks should be placed only in places away from flammable things.
- Do-it-yourself candlesticks must be stable, and the candle itself must be firmly fixed.
- When creating candlesticks, you should use only those materials that are not flammable.
We wish everyone good luck, the best inspiration and creative success!
How to make a trendy chandelier in the style of capiz shell art from... paper
The fashion of the 60s, both in decor and in clothing, does not want to leave us anywhere. In addition, luxury interior details made from the famous “capiz” shells (named after the geographical area) have long earned themselves the title of timeless classics. In order to correspond to both of these directions today, let’s see how to make the most famous lamp model from these shells with your own hands: an ultra-trend “rustling” chandelier, but from vellum paper (material options are possible).
Capiz shell chandelier
It's amazing how a small addition can transform a room. In this example, in the photographs you can see how the chandelier transformed a very simple and even poorly furnished room into an apartment of a high ascetic style.
Materials and tools (look for analogues at the end of the article) : – Vellum paper (or wax paper of a color close to white, or sheets of thin translucent plastic, etc. – see more details below) – about 10-15 sheets; – A tool for cutting paper (working on the principle of a hole punch) to obtain circles with a diameter of 3.8 cm (replaceable with a set: compass, scissors, accuracy and patience); – A single craft hole punch that can make holes with a diameter of 1.5-2 mm (sold on the RuNet; replaceable with a large needle + a rubber mat into which you will stick this needle through paper circles); – Metal rings of small diameter (about 1.2 cm), a lot; – The base of the chandelier is made of thick, rigid wire or metal (the shape is round or square, you can twist it yourself, or you can adapt some ready-made element from previously purchased items); – Additional wire (a little thinner and not so rigid) if necessary; – Paint for the base of the chandelier; – A thin sheet of metal, if necessary, and a tool for cutting it.
The point is that - for a classic design - the chosen material of the circles is heat-resistant (does not deform under the influence of heat), is not completely transparent, but still translucent (like thin plates of shells), and does not have a bright white (otherwise the chandelier will look vulgar), but milky or barely yellowish in color. But do not forget also that you can experiment here absolutely at your own discretion, making the circles multi-colored (by painting over or initially purchasing sheets of different colors), achieving an ombre effect (from white circles through light to dark blue, for example), taking sheets with whitish pattern, etc.
1. As you can see in the pictures in the last paragraphs of the article below, our circles are hung on a wire base from above, which has several gradually decreasing bearings (here – squares) one inside the other. In this case there are 3 squares, but only 2 of them were used. Therefore, your chandelier base must have appropriate load-bearing elements. That is, if you have a good single base on your hands, you can always screw additional carriers on it from a thick enough wire that will not sag over time. The number of rows of garlands of circles, going one after another from the outside into the chandelier, is up to you, but according to the classics there are 2-3-4 of them. Remember that the more rows there are, the less light the chandelier will produce.
2. Paint the completely finished base with a suitable paint of the chosen color (here – muted gold) in a couple of layers (allow each layer to dry completely) and leave to dry until the garlands are ready.
3. Cut your chosen material for the circles into strips 4.5 cm wide. This will make it much easier to cut out the circles later.
4. Now, if you are using a purchased tool, place 3 strips evenly on top of each other and, holding them tightly together, insert them into the paper cutting tool, then press the handle. We get 3 mugs at once. We continue in the same spirit.
If you don’t have a tool, use a compass to draw a circle of the required diameter (3.8 cm) at the end of the first strip, then fold the accordion strip to the size of the circle and then, very securely and firmly holding the accordion layers in place, cut out the circles with scissors.
In order not to return to such monotonous work later (then you really won’t want to do it, believe me), cut a LOT of circles at once.
5. Then set aside 90% of the cut out circles and make 2 holes in each of this portion in strictly (along the line) opposite ends. Using a special hole punch with a hole diameter of 1.5-2 mm or a thick needle on a rubber mat. A regular hole punch will not work, as too large holes will reduce the aesthetics of the chandelier. It is very important not to crush the mugs in the process! At the same time, retreat from the edge by about 0.4-0.6 cm.
Make only one hole in the remaining 10% of the circles - these circles will go to the bottom of each garland on the chandelier.
6. Now take the rings and connect them, inserting paper circles into each other into the holes made. Open and close the rings using tapered pliers. Determine the length of the rows of garlands to your taste, the only thing is that those garlands that will hang in front should be noticeably shorter than those that you will hang inside the frame.
In this case, 12 garlands of 4 circles and 7 garlands of 8 circles were made. But you can even use a zigzag/wave at the bottom edge of each row; we’re just looking at a classic version of a chandelier here.
7. Using the same rings, hang each garland from the top wire base of the chandelier.
8. The easiest way to attach a finished chandelier is to an existing base of an old chandelier, devoid of all the details. Here this is done using 4 metal plates cut from a sheet, one end of each of which wraps around the edge of the base of the chandelier, and the other in one way or another clings to the remains of the old chandelier.
But the best thing, of course, is to hang hooks or brackets on the ceilings (around the screwed-in light bulb) around the perimeter of the base of the chandelier, and then “put on” them and hang the chandelier.
Options with materials: – Instead of rings, you can sew circles by the edges to each other on a sewing machine or hang them on threads/dental floss; – For a rich and catchy color scheme in the Pompadour style, use scrapbooking paper with patterns for the circles; – For small holes on mugs, you can use a shaped hole punch (hearts, butterflies, etc.); – As a round base for a chandelier, you can use hoops of different diameters or the base of an old huge floor lamp with a fabric shade; – Once attached to the chandelier, paper mugs can be sprayed with spray paint, resulting in huge, large, randomly scattered artistic “strokes” (for example, gold) - a great touch for a modern interior.
Source: www.instructables.com/id/DIY-Faux-Shell-Chandelier-Made-with-Paper
———-
Is summer over? So, is it time to buy an air conditioner? Or, despite all the discounts, is it still expensive? A chandelier fan may suit you. An excellent alternative to air conditioning, it will also perfectly complement your interior.