Types of fastenings for different shelves
There are three main types of shelves used in modern furniture:
- Wooden. The material is chipboard or MDF. The most common type.
- Glass. Manufactured from tempered glass through special thermochemical treatment. As a result, additional strength is provided, which allows them to be used in furniture production.
- Mesh or wire. They are a wire frame in the form of boxes or baskets.
Today, shelves are made from almost any material, including glass.
There are additional modifications to the shelves, such as folding, pull-out or height-adjustable. However, no specially designed type of fittings (with the exception of retractable ones) are used for their installation.
Shelves can have various modifications, including retractable mechanisms.
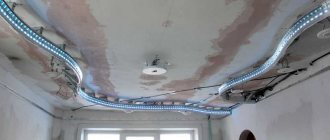
What dowels are needed to hang furniture on the wall of a room?
When installing modern furniture compositions, technical solutions from the manufacturer imply strong fastening of the furniture to the load-bearing foundations of the room. The main loads are distributed on hanging pieces of furniture for storing things. This situation is most common during the assembly of kitchen furniture when installing upper wall cabinets. In a built-in wardrobe, the installation of shelves and other elements is associated with a reliable inter-sectional connection. As well as hanging bookshelves, system fastening for safety in children's rooms, mirrors and hallways. In the process of installing a piece of furniture on the wall of a room, a hole is drilled in the wall, a dowel is driven in and a clamping screw or self-tapping screw is screwed into it. We would like to pay special attention to the types of dowels, where each modification is intended to be used for its intended purpose. They are divided by size: diameter and length. Depending on the characteristics of the building material of the wall, a specially selected dowel is used for durable fastening.
Universal dowel made of polypropylene with increased elasticity.
In a wall made of concrete or solid brick, it acts like a regular dowel. When used in hollow structures, the dowel is screwed onto a screw, which securely fastens the screw to the wall.
Nylon dowel with arcs.
It is used in most cases for porous walls, in aerated concrete for reliable fixation of the fastening element. A hole corresponding to the diameter and length is drilled for such a dowel. They insert it into the hole, and it is held at the base by expanding under the action of the screw.
Expansion plastic dowel with mustache.
The presence of locking tongues prevents the dowel from turning in the hole, and the teeth firmly secure the dowel due to friction in solid building materials. Suitable for dense structures made of concrete, brick, natural stone.
Steel dowel MOLLY.
The expansion console is folded into the empty space and pressed against the material while holding the dowel in the drywall. The most used dowel for single and double plasterboard when hanging furniture. It is necessary to monitor the force of the screwdriver when tightening the screw.
Mortise dowel.
This dowel is intended for installation on plasterboard structures; you don’t have to pre-drill a hole, but just screw the dowel into the material. Designed for hanging light pieces of furniture.
Drywall dowel (butterfly).
Used for fastening light objects, lamps, paintings, shelves to a plasterboard base or other thin-walled materials, plywood and others.
Anchor dowel
Anchor bolts. Driven anchor. Anchor anchors are capable of holding heavy suspended elements in brick and concrete. Used for hanging heavy pieces of furniture.
Sealant for filling the hole when installing the dowel
For reliable fixation in the wall, a specialized chemical dowel is used. This application creates a monolithic fastener in the wall. Chemical dowels are used for porous, hollow wall structures. And also for hanging heavy objects.
ofmebel-sborka.ru
Holder for glass shelf in cabinet
There are two most common types of glass shelf holders.
Special holders have been developed for glass ones.
Classic, support
In general, they represent a pin design and are structurally divided into two parts: countersunk and supporting. The first part is usually mounted into the wall. Support – designed directly to hold the plane of the shelf. It is made in the form of a platform: simple, coated, with a plastic gasket or an installed suction cup. Allows you to remove shelves without using tools.
Various modifications of classic holders may look different.
"Pelican": plug-in, with lock
This type of fastening can have different designs, but fundamentally it also consists of two parts: secret and receiving. The hidden part allows you to install fasteners on the cabinet wall, and the receiving part contains a groove where the glass is inserted and secured with a clamp. Installation requires a screwdriver or a special wrench.
Pelican holders look like this.
Attaching mesh shelves
Such shelves are often used in kitchen cabinets or wardrobes. If in the kitchen they are used, as a rule, for storing (drying) dishes, then fastening the shelves in the built-in wardrobe may require special reinforcement (in addition to the standard one or the one that comes included), since in this case mesh shelves are most often used for storage shoes
Such shelves are used in kitchens to store dishes. This imposes its own requirements due to the heavy load and increased size. In general, the mount is a stop with a pin part for mounting and a groove for placing the frame wire.
As a rule, they are attached to a supporting part.
Mounting methods
Let's start with the fact that you can only get by without a drill or hammer drill as a tool for installing shelves when installing light decorative structures on soft walls, which can simply be penetrated with a self-tapping screw and a screwdriver.
But usually you need to use an auxiliary power tool. Especially when you need to install a heavy shelf that will be subject to a significant load on the wall:
[adv1]
- from plasterboard;
- made of concrete;
- brick;
- from aerated concrete;
- from foam blocks;
- wooden, etc.
The first thing you need to pay attention to is the material from which the walls are made. Here it will become clearer to you whether you can do without drilling the wall or not.
When planning how to mount shelves on a wall, the type or method of fixation plays a key role. To do this, you need to study the installation options to choose the most acceptable and suitable for you.
[adv2]
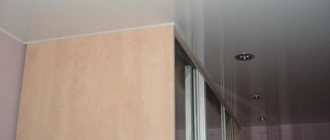
- No visible fastenings. This is a hidden fastener that allows you to make the fastenings invisible, and make the shelves themselves light and elegant. Suitable for brick, concrete, foam and aerated concrete walls. If this is a plasterboard partition less than 10 cm thick, it is better not to use installation with invisible fasteners;
- On brackets. It will not be possible to hide them, and therefore the brackets will remain visible. To save money, some are mounted on plastic or metal corners. But to create a beautiful interior, it is better to use appropriate brackets. Visible brackets do not suit all interior styles;
- Using holders. Relevant for shelves made of glass. There are rubber or silicone based gaskets that protect the glass from destruction. Shelf holders have different types and configurations, including suction cup options;
- On hinges and corners. The most common and easiest to implement method. Using hinges and corners of certain sizes, you can reduce or increase the load that the shelf can withstand. Fastening is carried out using guides or on metal stands;
- Through the bar. Relevant for hollow walls, where it is not possible to fix the shelf directly to the wall. First, a metal or wood strip is mounted, and the shelf itself is fixed to it. Suitable for those whose walls are made of thin plasterboard, hollow brick and other similar materials. Here it is important to fix the bar at the maximum number of points. Some fasteners will go into the void, but others will definitely catch. It will not be superfluous to know in advance about the location of the partitions.
The greatest number of questions are raised by fastening with invisible fasteners, as well as working with plasterboard walls. They are proposed to be considered separately.
Installing shelves in a closet: types of fasteners
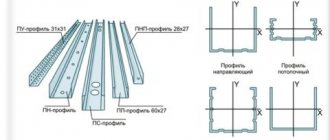
Furniture fastening fittings vary both in purpose and in the nature of the connection provided.
Fasteners for shelves differ in purpose and nature of the connection. According to the purpose of the fastener, there are:
- Frame.
- Mounting.
- Power.
By the nature of the connection:
- Collapsible.
- Non-separable.
Typically, fastening involves the use of tools such as a drill, forstner cutters, countersinks, screwdrivers, hex keys, chisels, and wood glue. In addition, some types of fasteners require the use of very specific tools, which imposes restrictions on the possibility of their use (Lamello Invis screed).
To attach the shelves you will need certain tools.
Before choosing the type of fastener, you should carefully consider the nature of the cabinet's use, so that later you can ensure trouble-free servicing of individual elements or complete disassembly.
Euroscrews (Euroscrews, confirmats)
Used to connect wooden furniture elements (chipboard, MDF). Such fasteners for a shelf in a closet impose a requirement for a wall thickness of at least 16 mm. Confirmations are manufactured in a certain range of lengths, from 20 to 70mm.
The wall for such fastening should be no thinner than 16 mm. To prepare the mounting hole, special drills with a countersink part at the base are required, as well as special keys to fix it in place. They are relatively easy to assemble, but may not be suitable for all types of furniture, since the screw head remains open. In addition, euroscrews do not allow organizing the longitudinal arrangement of shelves at the same height in the presence of vertical jumpers.
Such fastenings are quite reliable.
Fastenings for shelves in the closet: rastex (minifix)
This fittings belong to the so-called eccentrics, which indirectly indicates their principle of operation. This type of fasteners provides good joint strength, but is difficult to prepare, as it requires great precision in drilling holes. Structurally, it consists of a sleeve for the pin (footer), the pin itself, and a tension sleeve.
This is what Rastex fasteners look like. The footer is installed in the cabinet wall, in a previously prepared place. A pin is screwed into it. For the tightening sleeve, a piece of wood is selected with a milling cutter so that it fits flush into the shelf. A hole for the pin is drilled perpendicular to it, from the end. After the connection is assembled, the bushing pulls the pin and clamps it, thanks to the groove in the sidewall (hence the ex src=»https://severdv.ru/wp-content/uploads/2020/07/sverlenie-dlya-rasteksa.jpg "class="aligncenter" width="1500″ height="1143″[/img] This fastening requires precision drilling skills. Such a connection has two significant drawbacks: it cannot be used in a finished frame, and when marking it should be taken into account that when fixing the shelf can move in the plane.
Conical coupler
In this case, installing shelves in a closet is similar to installing using a minifix. Moreover, their schematic diagram is also quite similar: both have a liner, a tension sleeve and a pin. The only difference is the holding method.
This is what conical screws for fastening look like. If rastex ensures this using a groove in the bushing body, then here the fixation is carried out with a special conical screw, which, screwed into the cavity of the bushing, engages the corresponding hole at the end of the pin and tightens it, thereby creating the necessary tension.
Screw tie
Typically, this fastener is used to lengthen (splice) shelves, in particular in the presence of vertical walls. This solution provides both a fairly convenient installation method and high reliability. Can be considered as additional reinforcement of the frame.
The screw fastener is easy to install and reliable. The concept of this solution is extremely simple: a piece of wood is removed from the edge of the shelf with a milling cutter, forming a recess. A similar one is being formed in another regiment. A hole is drilled into the wall large enough to allow a threaded lag pin or screw to pass through. Specially shaped staples with a hole in the side are inserted into the recesses. The pin is threaded into the brackets and then tightened with nuts on both sides.
Fastenings for shelves in the closet: Rafix
Another representative of the eccentric type, but unlike the minifix, does not require drilling the end channel. The schematic diagram is approximately the same, only the pin is held in place with a special screw.
This is what Rafix furniture fastenings look like. The selection for the sleeve is made at the edge of the shelf, so that after processing with a milling cutter at the end there is an opening sufficient for the passage of the pin, which is installed on the cabinet wall. After this, the shelf with the inserted bushings is put on the pins. Fixation occurs by tightening the bolts. The disadvantages of Rafix include the inconvenience of installation, especially with low shelf heights.
Shelf holder
The simplest, yet no less effective option for attaching shelves. Structurally, it differs between mortise and hinged. Mortise involves a pin part with which it is installed inside the wall. Hinged - attached with screws or glue.
Shelf holders can be mortise or hinged. With this method, the shelf is freely placed on supports (under its own weight), which, if necessary, allows it to be easily dismantled. Structurally, a typical shelf holder in a closet can be equipped with a platform supplemented with spacers or a special protrusion to prevent the shelf from moving towards the door.
The convenience of such holders is that the shelf can be freely dismantled at any time.
Dowel
The same pin, only wooden - the oldest way to connect furniture elements to each other. Structurally, it is a small chop (20-30 cm in length) with corrugation along the side surface. The connected parts of the frame (or shelves) contain inlet and counter coaxial holes, so that the pin installed in the end of the shelf fits into the hole on the cabinet wall.
The wooden dowel has the shape of a small chop with corrugation on the side surface. In principle, just installing the dowels is enough. Nevertheless, for the reliability of the connection, as well as to strengthen the frame, the adjacent ends are additionally glued (sometimes confirmats are also screwed in). The obvious disadvantage of this type of fastening is the difficulty of dismantling. As a rule, such fasteners for shelves in a closet are used in non-demountable structures.
The disadvantage of such fastening is the difficulty of dismantling the shelves.
Corners
Also a simple and at the same time reliable type of fastening hardware. They differ both in design (in details) and in the material of manufacture. Of course, it is best to install metal corners, as they are stronger and more durable. However, they have a significant drawback - appearance.
Corners are simple and reliable fittings for attaching shelves. Since the installation of corners, whether to the wall or to the shelf, is carried out using screws, this may not always be acceptable. In such cases, the installation of shelves in the closet is carried out using open or closed plastic corners. The closed-type fastener has a special cover that hides the unsightly interior part.
However, recently metal corners have also begun to be equipped with decorative covers.
Husband for an hour in St. Petersburg
Attaching the shelf to the wall
The simplest jobs sometimes cause the most difficulties for home craftsmen. Shelves are necessary not only in the kitchen, but also in the office, as well as in the living room. Attaching them is quite easy, even if you do not have experience or special tools. Ideally, you will need the following items: laser or water level, pencil, hammer drill or drill, screwdriver or screwdriver, dowel nails.
Preparatory work:
1. Remove all unnecessary things from the work area (including paintings, furniture, chairs), cover the floor with cellophane, film, newspapers or cardboard.
2. Inspect the structure of the shelf, study the features of its fastening. It can be fixed using hanging loops, reinforcing elements-pins (structurally separated from the wall), plastic corners, as well as using a clamping structure - “pelicans”. The figure shows the second option, which is suitable for decorative purposes.
3. Mark the wall using a laser or water level and a pencil.
If you have a good tape measure and level ceilings or floors, use them to set the required distance.
4. Make neat holes using a hammer drill or drill for dowel-nails or self-tapping screws, choosing the appropriate solution for your type of wall (concrete, foam block, brick).
5. Screw in dowel nails, pins or other structural elements, check the strength of fixation
(if a structural element is loose, it is better to strengthen it).
Shelf fastening:
1. Lift the pre-assembled shelf and fix it on the fasteners; if necessary, tighten them or loosen them with a screwdriver or screwdriver.
2. Check the strength of the structure by pressing it from top to bottom without unnecessary fanaticism. If any edge sag or comes out of the dowel-nail, replace it immediately, as in the future it may tilt.
Helpful Tips:
1. When drilling walls, use a vacuum cleaner, bringing the hose directly to the perforation site.
2. Before installing the shelf, check the geometry of the fastening points using a laser or water level.
3. Apply markings under several rows of shelves, setting aside the required value from the previous points.
Then check the top row for level and make sure everything is done correctly.
4. When assembling large shelves, do the work sequentially: first, holes and fasteners, then installing the shelves.
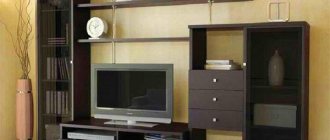
Mounting the shelf on the wall
Many people refer to special cabinets with glass doors as shelves. Such furniture is intended for storing dishes, equipment, books, souvenirs and other household products. There are frequent cases of such structures falling, which is very dangerous and very problematic. Proper mounting of the shelf on the wall will allow you to avoid such troubles, as well as complement the interior with a beautiful and elegant item.
Fastening cabinet shelves: key features
1. The key to success is proper marking of points for fasteners. The selected dowel-nails or screws must be able to withstand the weight of the cabinet when loaded.
2. Before hanging the cabinet on the prepared fasteners, be sure to check their strength, but without unnecessary zeal. For this purpose, you can use pliers or forceps, as well as other elements. But if you buy high-quality accessories, then this is not necessary.
3. In cases where the strength of the wall is of great concern, it is necessary to use a guide profile to which the cabinet shelves will be mounted. It is a metal strip that is fixed in several places, and the load is distributed immediately over the entire length of the structure.
4. It is necessary to install the shelves together with a partner, since it is difficult for one person to check the reliability of fixation in 2 or more places.
5. Shelf cabinets must be assembled on the floor, having previously installed all the elements (doors, fittings, decorative solutions), since doing this while hanging is much more difficult; if you are hanging a kitchen, then for convenience, the installed door must be removed using the fastening screw on the hinge. Since after hanging the modules, they are fastened together with ties and self-tapping screws.
6. Check the geometry “in fact” by applying a level to one of the planes. Only in custom-made kitchens and other furniture do fasteners make it possible to adjust the tilt; in all other cases, with cheap standard furniture and IKEA kitchens, you need to try to do the work accurately right away.
Rules for selecting fasteners:
1. Self-tapping screws are suitable for wood; they must have wide pitches and are intended for working specifically on this material.
2. For foam blocks and expanded clay concrete, special plastic dowels are supplied that fit tightly into the structure of the raw material and literally “expand” from the inside.
3. For solid brick and concrete, ordinary dowel-nails of the “fungus” type are suitable, the inner part of which has a special “whisker” that ensures strong fixation of the element.
4. When attaching shelves to plasterboard sheets, you need to either get into the guide profile (use a metal self-tapping screw), or use butterfly dowels or “parachutes”.
Wall shelf mounts
The cost of a kitchen set, for example, in America is comparable to the price of its installation, just like any other furniture. Alas, the importance of installing and assembling furniture is understood anywhere, but not in Russia. But if assembling cabinets that are installed on the floor is relatively simple, as many buyers think, since the kit comes with detailed instructions like in IKEA or Belarus furniture, then what about installing wall shelves? In fact, hanging kitchen shelves is easier than assembling and displaying the lower kitchen modules. A few simple tips will help every home craftsman do this work on his own, avoiding unnecessary overhead costs.
Proper marking of walls for kitchen units:
1. Determining the location of shelves in space. To do this you will need a tape measure, a pencil and preferably a laser level. It is necessary to indicate the height of the fastening point of each hinge of the hanging shelf by making the appropriate mark (cross) with a pencil. At the moment of start, the hammer drill should rest against the intersection of the lines.
2. Checking the dimensions of fasteners for shelves. After the holes for the dowels are made, you need to check their accuracy, and then proceed to installing fasteners.
3. Make sure there is enough space between the upper and lower cabinets by measuring the resulting space with a tape measure. As a rule, the “wall panel” gap is no more than 600 millimeters.
Features of installing kitchen shelves:
1. Installation of the guide profile. Modern kitchen units often come with a special metal strip that makes installation easier. Whether to use it or not is up to each master to decide for himself, but such a simple thing makes the work much easier and faster.
2. You need to start fastening the shelves from the inner corner and move towards the edges, as this will greatly simplify the task.
3. Kitchen cabinets are installed after the lower cabinets are installed, although many do the opposite, and electrical appliances are installed at the very end, including an extractor hood and a sink.
Useful tips for installing fasteners:
1. To ensure that the dowel-nail does not stick out from the wall and ensure a tight fit of the guide, buy dowels without a plastic cap, or if you have already purchased one, first cut off the edge with a knife, although this is not necessary.
2. If the brick wall is crumbling due to age, don’t worry, you can strengthen the guide in another place, since the entire guide for the kitchen canopy is in holes in 50mm increments. Just make a hole nearby.
3. Before driving in a dowel nail, make sure the hole is deep enough. To do this, you need to insert a nail without a dowel into the drilled hole. A dowel with a nail is convenient, but it holds much worse than a regular dowel with a self-tapping screw screwed into it.
How to attach removable shelves?
Removable shelves are often installed in a cabinet that is already in use. It may also be an initial decision pursuing its own specific goals. In principle, most of the above types of fastenings are suitable for their installation, but not all. The following are commonly used:
- Shelf supports.
- Corners.
- Screw or conical ties.
If you have the necessary tools, Rafix may also be a good solution, but only if the shelf does not need to be removed every other day.
The nuances of invisible fasteners
It makes no sense to talk in detail about this method of installing wall shelves if you carefully understand only 3 main issues.
See also:
Stopper for a sliding wardrobe: how to install and adjust it yourself
- Thickness of the wall used. Installation with invisible fastening is possible in situations where it is a brick or concrete wall. Moreover, the concrete partition must have a minimum thickness of 105 mm, and the brick partition - 250 mm. If the parameters are smaller, you will have to use additional elements. Cinder block and plasterboard walls with a thickness of less than 100 mm are suitable only for hanging decorative shelves on which there is no load or it is minimal;
- The thickness of the shelf itself. It is not recommended to use shelves that are too thin or too massive. The material should not sag, must be dry and have a high-quality finish. If the load on the shelf is minimal, the thickness is selected from 30 mm. If the shelf is for books and other heavier objects, the thickness is taken in the range of 45-60 mm;
- Fastening. Fasteners are selected based on point 2 and the purpose of the shelf itself. Invisible fastenings are made in the form of a hinged loop and a rod. The loop is mounted on the back of the shelf and markings are made. A hole is made in the wall and a plug is inserted inside. Next, all you have to do is screw in a screw or self-tapping screw to the desired depth and attach the hinges to them.
Be sure to consider the expected load to avoid unnecessary problems. The higher the load, the more hidden fasteners need to be used. Remember to have a sense of proportion.
Shelf holder in the closet: care and operation
As such, there are no special rules relating exclusively to the care of fasteners. Unless the plastic corners and tension sleeves are kept clean. The mode of operation is more important here. For example, a connection with Euroscrews does not tolerate loads in a perpendicular plane.
There are no special requirements for the care of fasteners. Minifixes, conical ties and especially rafixes have a greater degree of resistance. The weakest point of such fasteners is the cutouts for the pin. Therefore, you should not load the shelves more than usual. In addition, it is advisable not to allow excess humidity in the room, as this does not have the best effect on the mechanical properties of wood.
If the shelf is properly attached, it will last a very long time. Based on the large selection of available fasteners and auxiliary accessories, solving problems with installing a new shelf or fixing a broken one should not present much difficulty. Moreover, using original fastenings for shelves in the closet, you can try to optimize the internal space so that everything you might need fits there.