Types of door frames for installation
Door frame kits offered by hardware stores are divided according to installation technology into several options:
- Direct
- Diagonal
- Groove connection
Each of the mentioned methods has its own characteristics, so it would be useful to know the installation features before starting work.
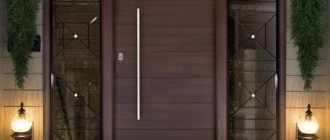
Door frame with right angle
Installation using this method is the simplest of all those listed and is accessible even for beginners. It does not require special skills or specialized tools, and is quite accessible for self-installation of an interior door with a frame.
The structural elements are sawed down, taking into account the dimensions, at right angles, and connected using special hardware. The door frame can be installed either separately or together with the door.
Advantages and disadvantages of an MDF door frame
An MDF panel is the most practical and inexpensive option for the door structure of interior doors that are light in weight. MDF is a material made from compressed and dried wood fibers with a reliable top layer of coating, which is processed using special technology.
Advantages of an MDF box:
- Easy installation, installation and assembly.
- MDF frames are smoother and more stable than wooden frames.
- Pleasant aesthetic appearance. MDF boards have a very wide palette of wood-like shades, which makes it possible to choose the right option for a harmonious combination with the color of the door.
- Assembly and installation of a box made of MDF is affordable and can cost an order of magnitude cheaper than similar work for a box made of natural solid wood.
- MDF is an environmentally friendly material, since the binding element of the fibers is a natural component that is formed when wood is heated.
- Hygiene, safety at home and resistance to the appearance of microorganisms. Fungi and mold do not form on MDF products.
Door frame with diagonal cut
Installing a box with a 45 degree cut has a much more attractive appearance.
When installing it, you will need a miter box, which will allow you to cut the planks more evenly. The connection of structural elements also occurs using self-tapping screws. Can be installed together with the door leaf.
Advantages and disadvantages of an MDF door frame
An MDF panel is the most practical and inexpensive option for the door structure of interior doors that are light in weight. MDF is a material made from compressed and dried wood fibers with a reliable top layer of coating, which is processed using special technology.
Advantages of an MDF box:
- Easy installation, installation and assembly.
- MDF frames are smoother and more stable than wooden frames.
- Pleasant aesthetic appearance. MDF boards have a very wide palette of wood-like shades, which makes it possible to choose the right option for a harmonious combination with the color of the door.
- Assembly and installation of a box made of MDF is affordable and can cost an order of magnitude cheaper than similar work for a box made of natural solid wood.
- MDF is an environmentally friendly material, since the binding element of the fibers is a natural component that is formed when wood is heated.
- Hygiene, safety at home and resistance to the appearance of microorganisms. Fungi and mold do not form on MDF products.
Disadvantages of MDF boxes:
- Installing an MDF door frame is only suitable for lightweight doors. Installation of solid wooden doors requires the assembly of a frame from a more durable material.
- It is not recommended to install an MDF frame in a kitchen or bathroom. The MDF material can swell and deform when exposed to large amounts of moisture, which can cause problems with the movement of the door leaf.
- MDF does not tolerate repeated twisting of screws in the same hole. The material has a layered structure and working with it requires special care. When screwing into the layered structure of the material, you need to make an effort so as not to twist the self-tapping screw. Nails are also difficult to drive - there is a high probability of damage to the surface of the material and bending of the nail.
- Relatively short service life - if a door needs to be replaced, a new door frame will need to be replaced and installed.
Interior door frame with tenon connection
The peculiarity of this method is that the connection of structural elements occurs with a slight overlap, not exceeding the thickness of the plank.
It is characterized by a sufficiently high structural rigidity, which allows the use of this method for doors intended to operate in difficult conditions.
Some manufacturers supply the market with kits already equipped with a prepared end connection. Self-preparation will require additional tools and some experience.
Advantages of door thresholds
Most modern households use it as an object that performs a specific function.
Here are a few views on the usefulness of this component:
- Helps reduce noise. This is true. But with all this, it is necessary to take into account the noise absorption of the door leaf itself. It is higher on a bulky wooden door than on a hollow one.
Fundamentally! If you use a threshold as sound insulation, then select a box in the store that has a rubber seal.
- The presence in the kitchen opening prevents the outflow of oxygen from other rooms if a double-circuit boiler with an open chamber is installed in the kitchen. In this situation, it would be better to install a plastic window with micro-ventilation. This will allow fresh oxygen to enter the room.
- When cooking, the kitchen door prevents oil smoke from entering other rooms. Here we recommend purchasing a good hood over the stove or an exhaust fan with natural circulation.
- Protects from draft and dust . You can't argue with that!
From all of the above, it is clear that installing interior doors without a threshold in the kitchen is quite acceptable. If alternative solutions to problems with sound insulation and air penetration through the gap under the door do not suit you, then use thresholds.
Tools required for installation
When wondering how to properly install an interior door with a frame with your own hands, it is worth considering that successful installation of a door frame largely depends on the availability of high-quality tools.
Before starting work, you should prepare the following tools:
- electric drill or screwdriver
- building level
- angle grinder
- miter box
- self-tapping screws
- locksmith tool
In addition to the above, it would be useful to stock up on small wooden blocks of different sizes. They will be needed to properly coordinate the assembled frame in the doorway.
How to install an MDF door
The above diagram shows that the most important thing when installing a single-leaf or double-leaf door is the correct installation of the frame. However, fixing the door leaf can also cause difficulties.
In principle, installing an MDF door leaf is no different from installing a wooden door leaf. However, in the first case there are advantages: in a factory product, as a rule, many of the marks are already present.
It will also be interesting to learn more about how the insulation of a metal entrance door occurs.
The installation consists of several stages.
- While the frame is being installed, the door leaf serves as a template for the exact dimensions of the timber, as well as for checking the correct installation.
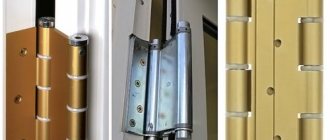
- Door hinges are first installed on the door leaf. Installation depends on the nature of the fittings: as a rule, they deal with a “butterfly” or other overhead or mortise hinge. At a distance of 20–25 cm from the edge to the end of the canvas, apply half a loop and trace along the contour with a pencil.
- The groove for the loop is cut with a chisel or a hand router. The fittings are secured with self-tapping screws. It is advisable to drill holes for them.
- The gap between the canvas and the frame slope is determined by the nature of the fittings. In any case, the gap should be large enough to accommodate the pivoting axis of the hinges.
- After installing the door frame, the leaf is hung on the hinges to check the correct installation. A door handle with a lock for interior doors is installed last.
- To do this, remove the sash, use a milling cutter or drill to select the material for the lock, and cut out holes for the handles. On MDF doors, as a rule, the places where the locks are attached are marked with stickers, and the locks and handles themselves are included in the kit.
- The technology for installing a lock and latch depends on their type. In any case, the counter part of the lock is installed after the lock is mounted in the MDF sash.
It is also worth learning more about how the installation of entrance door slopes occurs, and for this you should watch this video.
On video how to install an MDF door:
MDF door leaf is not uniform. It is advisable to use the areas indicated on the product for fastening, and drill holes for fastening. Pressed wood is not as strong as wood and requires care. Even if you made a slight mistake with the dimensions, MDF trim will completely hide the defects.
Door frame assembly
Assembly work must be carried out on the most flat surface possible; the correct fit of the door leaf along the entire perimeter of the frame will depend on this.
If it is impossible to find such a surface, you can get by with lining bars of suitable thickness.
Fitting the door, installing hinges
We lay the assembled L-shaped part of the box on the floor and place a door inside it. This is done so that, having set the necessary gaps, it is possible to mark the locations of the loops. I decided to retreat 35 cm from the upper and lower borders of the door leaf.
We set gaps to mark the locations of the loops
Necessary markings and how to do them correctly
Now you need to correctly mark the locations of the loops. First I marked and slammed them into the door. This is more convenient - it’s easier to mark the sizes. Please note that the hinges on the box are load-bearing. This means that the guide should be located exactly on it.
The markings should be done as carefully and carefully as possible. Having completed the necessary markings, the door leaf must be removed, and then the hinges must be cut into the frame. It's not too difficult to do this. Modern frames, like the doors themselves, are made from materials that can be easily processed. First, we install the suspension at the marked points and fasten it to two self-tapping screws. This is necessary in order to cut through the top layer using a regular stationery knife.
The hinges were screwed onto two self-tapping screws according to the marks
Afterwards, I cut through the top layer with a knife. I came to this action after I made a mistake, ruining the coating of one of the racks of the box. Of course, this is not fatal, but it spoils the entire appearance when the door is open.
After this action is completed, the suspension can be removed and proceed directly to the recess itself.
Carefully cut through the decorative coating along the edge of the loop
We delve into the canvas of the box
The recess is made in the same way as in wood. Only a chisel is used here. A hammer is not suitable for such work. The edges are periodically trimmed with a stationery knife. This is very important, because the aesthetics of the final result will depend on the quality of this work.
Carefully select the recess using a chisel
Periodic trimming of edges is required
After the depth of the recess has reached the required dimensions, you can install the supporting loop on the box and finally fix it with four self-tapping screws.
We fix the supporting suspension - we will not return to it again
Assembling the door frame at right angles
It is worth considering that with this connection method, the upper part of the box is attached to the upper ends of the side posts. Therefore, the length of the side pillars increases by six millimeters relative to the door leaf.
As a rule, when installing interior doorways, thresholds are not installed, so you should plan a gap between the floors and the door leaf within one centimeter.
Marking and measurements
Before assembling the door frame, it is necessary to take several accurate measurements and mark the materials. The door block is installed after the floors are ready and the walls are finished.
Dimensions are taken based on the height, width and thickness of the doorway. Indications should be indicated with an accuracy of 0.01 cm. If the measurement is inaccurate, a door installed with your own hands may not fit tightly or creak when opening and closing.
Of course, there are certain standards for door frames:
kitchen – 60 x 200 cm;
living rooms - 70-80 x 200 cm;
bathroom – 60 x 190-195 cm.
But taking into account the old buildings, the violation of the geometry of the opening and the difference in the thickness of the walls, it is better to play it safe and measure everything again. This will guarantee the correct operation of the door unit as a whole.
Interior door measurements
To take measurements, you need to have the following tools on hand:
pencil or marker;
Proceed to measurement:
Measure the height and width of the opening. To determine the correct horizontal line, the width is measured at the floor level.
Determine the dimensions of the door leaf. To do this, you need to subtract the width of the door frame beam from the width of the opening, multiplied by 2, and round the result to the nearest hundred. For example, if the measurement of the opening showed 90 cm, and the width of the frame beam is 25 mm, then the dimensions of the canvas are calculated using a simple formula (900 - 25 * 2 = 850). Based on this, the canvas should be 80 cm. The height is determined in a similar way.
Separately measure the openings in the bathroom and toilet. Here, due to the threshold, which prevents water from flowing out, the height is much less.
Calculate the depth of the door block. To do this, measure the thickness of the wall.
Important! It is not recommended to cut the door leaf; it must be selected based on the measurements taken. If you neglect this, you will encounter the formation of too large gaps or damage to the door.
Before installing the door frame, you also need to check the floor level. It is important that the floor is level. This measurement is made using a building level. The difference between the door frame pillars should not exceed 2 mm.
Assembling a door frame with a diagonal cut
The preparatory work for assembling the door frame is similar to that described above, with the exception of some points.
The dimensions of the side pillars are calculated as follows: door height + thickness of the top bar + two gaps (if there is a threshold, 3 mm, if there is no threshold, 10 mm).
Angle cutting must be done using a miter box, this will help to avoid unevenness when sawing.
The location of the hinges is marked on a vertical post, at a distance of two hundred millimeters, both above and below relative to the door.
How to make a ceiling with your own hands - 135 photos and video descriptions of how to make various types of ceilings- Combined bathroom - stylish design methods and examples of competent interior selection (125 photos)
- How to make a heated floor with your own hands - 160 photos and video description of how to make a heated floor
The place where the loops are attached is deepened based on the thickness of the loop. A similar operation is carried out on the door.
Determining box dimensions
The first and very important stage of the entire assembly process is the accurate calculation, down to the millimeter, of the length of the sill posts, the threshold (if any) and the upper lintel.
Measuring the racks
The height of the racks should be equal to the height of the door. Typically, the standard door height is 2000 mm. Having made sure of this, we add the width of the gap between the door leaf and the door by 2-3 mm to the height of the door leaf. When installing doors with a threshold, the width of two gaps of 3 mm each must be added to the height of the door leaf, for a total of 6 mm. In the version without a threshold, we add only one gap measuring 3 mm, and add 1 cm at the bottom so that the door leaf does not cling to the floor when opening and closing the doors.
Related article: Do-it-yourself combination door lock
As a result of accurate measurements, we obtain the following parameters: with the option with a threshold, the height of the doors and pillars will be equal to 2000 mm + 2 gaps of 3 mm = 2006 mm; with the option without a threshold, the height of the doors and pillars will be equal to 2000 mm + 3 mm + 10 mm of clearance = 2020 mm.
Measuring the threshold and upper jumper
The size of the threshold and the upper lintel of the door frame must be the same. Let us correctly determine their length, which will be equal to the sum of the width of the door leaf, the width of the gaps between the door and the door and the thickness of the profile beam from which the door will be assembled.
In addition, on both sides of the lintel and threshold sections, it is necessary to cut out landing sections, that is, cut off the protruding parts of the opening into which the door rests when closing. The cut should be equal to the thickness of the post at its widest point.
To correctly cut the samples, measure the thickness of the stand on both sides from the edge of the lintel and carefully cut it with a small hacksaw.
Next, having installed the jumper vertically, use a knife or chisel to cut off the excess part of the threshold or jumper.
After this, you can screw up the door frame with a calm heart.
Installation of a door frame in an opening
The finished door structure is mounted in the doorway and positioned along all planes. A laser level will allow you to get the most accurate installation; if you don’t have one, you can use a regular plumb line.
With the help of wooden spacers, the box is securely fixed in the wall opening. The resulting voids between the wall and the frame are filled with foam for installation work.
Before you start filling the voids, you need to check and fix the gap between the posts and the door leaf; it should be three mm around the entire perimeter of the frame.
The gap is fixed using wooden planks of equal thickness. After the polyurethane foam has dried, its remains are cut off with a utility knife, in the same plane as the doorway. The final stage of installation work will be the installation of platbands.
Assembly work on installing doors does not involve any difficulties. By spending a little time watching a video on how to install an interior door frame, you can learn the basic steps for installing it. By using this article, you can avoid major mistakes when installing it.
Selecting an interior door block
When choosing a door block it is worth considering:
Opening method.
The most popular are swing doors. If there is a lack of space, sliding sliding doors are used. They are mounted in a special way and open along guide strips, sliding into a special recess in the wall. Folding (accordion-shaped) and stable (representing 2 halves of the canvas, swinging in both directions) are used much less frequently. They are matched to the appropriate design of the room.
Noise insulation.
This quality is affected not only by the door leaf, but also by the frame of the interior door, as well as by the casings.
Weight of the canvas.
This factor depends solely on the material from which the door is made. The heavier it is, the better quality the fittings should be.
Execution material.
Doors are made from solid wood, MDF and chipboard. Products made from solid wood are considered to be of the highest quality; the downside is the weight of such a door.