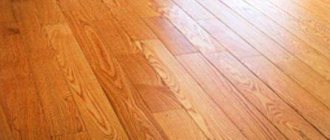
Coverage options
Today, there are two main factors on which the choice of flooring depends. The first factor is the characteristics of the soil at the construction site, and the second is the climatic conditions.
Naturally, the first and simplest floor in the garage is earthen. The site is leveled and compacted. Naturally, in this case the garage will not be protected from dampness, cold, etc. The only thing that can be added to somehow increase resistance to frost is to apply another layer on top of the ground. Clay mortar is used as the raw material for this layer. It is also carefully compacted and leveled.
Another budget option for garage flooring is a gravel pad. Instead of clay mortar, I pour medium-fraction gravel onto the ground, which is moistened and compacted. The method is inexpensive, not very practical and not durable. However, it can solve the problem of high humidity in the garage, which is not bad.
The third way to install a garage floor is to pour a concrete screed. This option is the most common when constructing a permanent garage. This method will allow you to equip an inspection hole indoors, and if the foundation is deep, then equip a good basement. The option is quite reliable and has a long service life, but, naturally, more expensive than the previous two.
Another method of installing a garage floor is to lay wood over joists. The base is quite simple to make and quite convenient to use. However, the risk of fire increases significantly here. If the wood is additionally treated with protective compounds, the service life of such a coating can exceed ten years.
The last option is laying tiles or stone. This method of floor preparation is the most expensive and difficult to implement.
Arrangement of the simplest foundation
It is best to start working on the base of the floor in the garage with its simplest options, that is, by arranging an earthen and/or gravel layer.
- The first thing to do in any case is to remove the top fertile soil layer by 15-60 cm, depending on the type of soil on the site.
- After this, the earth is watered and thoroughly compacted.
- If nothing is done, there will be high humidity in the garage, which will arise due to the flow of high groundwater. To reduce this percentage, you can coat the floor with a liquid layer of clay. You need to apply two or three layers of clay. However, before applying the next one, you need to let the previous one dry completely.
- It is important to add here that if the walls in the garage are wet, then the option of laying clay is excluded. In this case, sifted sand, which does not contain clay particles, can be laid on the floor in the garage. After this, a layer of red burnt brick or waste slag is poured on top and also compacted.
- Another option that can help reduce moisture when you have a regular dirt floor is ventilation. To do this, small holes are made in the corners of the building.
- Another budget idea is to lay old linoleum on the ground. The room will become much drier and warmer, but it will slide a lot. In addition, the linoleum itself should be laid with a slight overlap if the material is laid in pieces. To make it more convenient to drive in, you can lay several boards under the linoleum at the entrance to the garage.
It is worth noting that tiles can be laid on a gravel bed, which will be quite good. Such material cannot be laid on an earthen floor, as a good waterproofing layer is needed.
Working with tiles
In order to successfully lay tiles on the garage floor, you will need more effort and time than with the previous option. Here you will have to compact all the layers much more carefully, and therefore the ideal option would be to rent a vibratory rammer, since carrying out all the work manually will be very difficult and much longer. Each five-centimeter area must be carefully processed. The work can be considered successful if, after a person walks on the ground, there are no traces left on it.
The sequence of layers for laying tiles on the garage floor with your own hands is as follows:
- The first layer is sand with a thickness of 5 cm.
- The second layer is medium-fraction gravel. Layer thickness - at least 10 cm.
- Next comes another sand cushion, but with a thickness of 10 cm.
- Next, for the base you will need a cement base or purified sand, 5 cm thick.
- Finish coating of the selected tile.
Here we need to go into a little more detail. After the first layer of sand has been laid, it is recommended to lay one, or preferably two layers of waterproofing material. As such a material, you can use roofing felt or, for example, thick polyethylene film (300 microns). The most reliable option would be to lay geotextiles on the garage floor with your own hands.
If the base has two layers of waterproofing, they are glued together with double-sided tape or soldered. Strips of material are laid with an overlap of 5 cm. Each joint must be additionally treated with bitumen mastic.
When the tiles have already been laid, it is recommended to fill all existing seams with a mixture of cement and sand 1:3. This is done to prevent dirt from getting into them. The excess mixture is swept off the coating. After this, the seams are sprayed with water and left to dry. Any cement that ends up on top of the tiles must be removed immediately. A small nuance - you cannot use watering from a hose, since the water pressure will knock the mixture out of the seams; only working with a spray bottle is allowed.
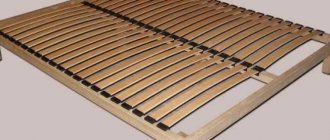
Arranging a wooden floor
How to cover the floor in the garage? Wood is a budget-friendly and quite acceptable option. The service life of this material in such conditions is up to 20 years, and if it is processed, even more. The sequence of work when arranging such a foundation is approximately as follows:
- it is necessary to remove the entire fertile layer of soil;
- the surface is compacted using a vibratory rammer with moisture;
- Next, you need to lay a layer of waterproofing - a material such as geotextile, roofing felt, film or a special waterproofing membrane will do;
- A layer of sand or crushed stone 10 cm thick is poured on top of this, which is also carefully compacted.
One very important nuance. When installing a heated floor in a garage made of wood, it is necessary to check each layer with a level so that it is perfectly level. If the garage is large enough, then it is better to use a laser level rather than a regular building level.
- The next step is laying the wooden joists. Here, boards with dimensions of 50x50 cm or 40x40 cm are most often used. This material must be treated with an antiseptic or resin and fire-retardant impregnation, which will protect against rotting and fire. An ideal option for lags would be railway sleepers, since they are impregnated at the factory with all the necessary compounds and will last much longer.
- To successfully install a wood floor in a garage, the joists must be installed in recesses. They are fixed against the wall with anchors or you can use a gypsum mixture. This option will be much faster and easier to implement.
- The pitch of laying the logs is 50-100 cm. It would be ideal to lay them so that the car, when entering the garage, passes over them or at least next to them. In addition, it is worth adding that the more boards are laid, the less the coating will “walk”.
- To provide a floor in a warm garage, you need to use extruded polystyrene foam. The thickness of the sheets must be at least 5 cm. In addition, this option is two in one. Expanded polystyrene and waterproofing and insulation.
- If you don’t want to use such material, then it can be replaced with granulated foam glass, which also performs two functions at once.
- There is an option for budget-friendly floor insulation. You need to use broken brick, glass and expanded clay. However, such a base will still allow moisture to pass through.
Economy option: plank flooring and classic concrete
Another cheap option for garage flooring is plank flooring; it can be single or double with insulation between the layers.
Considering that tires wear out wood quite quickly, a floor of this type will last about 5-7 years. To protect against dampness, it is necessary to have a concrete base under the flooring: if you put the boards on compacted soil, they will simply rot in a year or two. A wood garage floor is bad because it absorbs all substances, making it almost impossible to remove stains and odors.
Reinforced concrete is considered to be the traditional option for covering garage floors. Note that a layer of cement mixture is always present, but it is not necessarily the finishing layer. A concrete coating is called when a layer of cement screed is poured on top of the monolith. This type of garage floor is inexpensive, yet durable and resistant to harsh conditions. Cracks or potholes may appear on the concrete surface due to mechanical damage or temperature changes, but usually they are not even noticeable.
A serious disadvantage of concrete coating is that it is dusty, and any liquid spilled on it remains there forever, forming stains and stains, which can also cause an unpleasant odor.
However, these disadvantages can be mitigated by covering the top layer of a concrete garage floor with special paints or sealants, which will not only make the floor more convenient to use, but also give it an aesthetic appearance.
You can also do this very cheap finishing method yourself, using a brush, roller or sprayer to apply paint to the garage floor. By improving the concrete surface in this way, you get a good garage floor that will last for many years.
Return to contents
Budget option for wooden flooring
You can make a garage floor covering without insulation. In this case, you can lay the logs on the posts.
- The soil is leveled and compacted.
- Next, a gravel cushion is made, on which brick columns are installed. The size of the elevation is two bricks wide and the same in height.
- The distance between each support is one meter.
- The brick pillars are laid using cement mortar, which means that you will have to wait until it is completely dry before continuing work.
- The top of the support is covered with two layers of waterproofing or bitumen lubricant.
- The last stage is to install the logs and lay the wooden floor.
Video description
The video shows an example of installing a self-leveling floor in a garage:
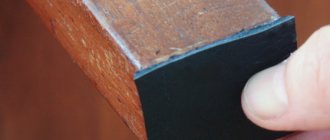
Rubber coverings
Materials of this class have proven themselves well in both private and public (community, corporate, industrial) garages. Rubber is highly resistant to chemicals and is not afraid of dynamic and static loads.
Special rubber coating can withstand heavy loads Source plastorip.ru
Manufacturers offer the following groups of coatings:
- Modular rubber coverings
- are easy to install, but require careful surface preparation.
- Roll coverings
— allow you to significantly reduce installation time. They are laid according to the principle of laying linoleum. To increase the tightness, sizing of the joints is necessary.
- Self-leveling rubber coatings
- one of the modifications of self-leveling floors with the addition of rubber crumbs. Allows you to obtain a seamless surface with excellent performance characteristics.
This might be interesting!
In the article at the following link, read about rubber tiles for paths in the country.
Which garage floors are better?
Another base option is a concrete screed. This option is rightfully considered one of the best. However, the work to create it requires much more effort, time and money.
Work begins with preparing the foundation for work. At this stage, you need to decide on the height of the floor. It is necessary to take into account the fact that the screed should be slightly higher than the threshold. Once this step is complete, you can begin removing excess soil from the garage area, if any. The next step is to lay out two pillows. The first is made of crushed stone with a height of 30 to 85 cm. This parameter depends on the type of soil. The second pillow is sifted sand. The thickness of this layer is from 15 to 20 cm.
Pouring the floor in the garage begins with the existing base being carefully leveled, compacted, watered and compacted again. You can use both improvised means and special equipment, if available. The surface should be almost perfectly flat. The slope should not exceed 5 mm per meter.
After this, you can proceed to arranging waterproofing, insulation and reinforcement of the coating. Any suitable waterproofing material, for example, roofing felt, is laid on the compacted surface. Recently, it has become very popular to use expanded polystyrene as insulation, and therefore sheets of this raw material with a thickness of 5 to 10 cm are laid on top of the roofing material. After this, the expanded polystyrene is covered with a film or waterproofing membrane. If the installation took place in separate sections, then you need to work overlapping, and tape all the joints together with tape.
Do-it-yourself self-leveling floor in the garage: pouring technology
Floor installation is traditionally carried out in 4 stages.
Step 1. Preparing the base
At the insistence of manufacturers, the base for self-leveling mixtures must comply with the requirements of sanitary rules and regulations 29.13330.2011 and 3.02.01-87. The grade strength of the concrete screed or slab is at least M250.
Advice! The best result is achieved at a temperature range from +10 to +25 ° C, humidity no more than 50% and a complete absence of drafts.
It all starts with cleaning the surface from dirt, dust, paint residues, varnishes, glue, oil and everything that significantly impairs the adhesion of the solution to the base. If there are loose areas of protrusions, they must be sanded, and cracks and holes should be expanded, primed and filled with putty or repair compounds. Afterwards, treat with a deep penetration primer or a strengthening primer in 1-3 layers.
Cleaning the concrete base.
If the base is completely loose, damp or heavily soiled, the best solution would be to install an independent, floating screed. The same technique is suitable for installing a self-leveling compound on bulk or natural soil. To do this, a separating layer - polyethylene with a thickness of at least 150 microns - is laid on a leveled and compacted base.
Advice! When forming a floating floor, the thickness of the self-leveling layer should be at least 4 cm. The optimal layer size for garages is 4-6 cm.
If the garage is installed on damp soils with a high level of groundwater, capillary rise of moisture is possible, then it is better to use coating-type waterproofing agents for concrete. Flooring (roofing felt, rubimast, hydrostekloizol) are not suitable in this case.
If you plan to form a slope or pour a thick layer, then you need to mark the walls with a construction marker or paint cord. The best solution is to use a laser level. When pouring, you will also need reference beacons.
When installing a floor in an unheated room, it is advisable to use a special damper tape around the perimeter or 1-2 mm polyethylene foam, cut into narrow strips.
Step 2. Preparation of the solution
Pour clean, free water at a temperature of +5 to +25 °C into the container in a pre-calculated amount, gradually add the dry mixture and mix thoroughly with a construction mixer at a speed of up to 500 rpm. Let the solution mature for 5-10 minutes, stir again. The finished mixture should be used within 20-30 minutes.
Step 3. Pouring self-leveling compound
It should be taken into account that the composition should be thicker and less fluid than a regular self-leveling floor. This is due to the need for a tilt device.
Application begins from the far corner with gradual progress towards the exit. The mixture must be poured out, carefully leveled with a squeegee or wide spatula, and rolled with a needle roller to compact it. Each subsequent portion is poured with a partial overlap of 2-4 cm onto the previous one. Deaeration of the entire coating is mandatory.
Formation of self-leveling floor.
If the room in accordance with SP 29.13330.2011 along the perimeter exceeds the dimensions of 3x6 m, then it is necessary to install expansion joints one day after pouring the floor. Subsequently, the seams must be separately filled with a thick solution of the bulk mixture and carefully leveled. After 7-14 days the base is ready for finishing.
Step 4. Applying a decorative protective coating
Before work, you need to carefully inspect the floor again, smooth out any unevenness with an emery cloth, and thoroughly remove any dust.
Applying epoxy paint for a garage.
The hardener should be poured completely into the paint, stirred for 5 minutes and wait 30-60 minutes until all chemical reactions are completed. You must first apply it with a brush along the perimeter, thoroughly coating the corners. Then use a brush or roller to paint the entire surface in one layer. To reduce the sliding effect, scatter decorative chips. After 3-6 days, the coating will be completely polymerized and will be ready for use.
Section reinforcement
How to fill a garage floor? To successfully create a concrete base, it is necessary to have a reinforced layer to strengthen the future floor.
For reinforcement you will need reinforcement rods with a diameter of 8 to 12 mm. This material is selected depending on what load will be placed on the base in the future. Naturally, if the garage is equipped for a large number of cars or for trucks, then the thickness of the reinforcement should be as large as possible.
All elements are connected to each other with wire. Only such a connection is possible. Welding is not suitable, since the structure must be characterized by a certain mobility, and welding the base will eliminate this possibility. 6 mm reinforcement can be used as transverse posts for the frame. The finished version should be a two-layer mesh, in which the distance between the rods is from 5 to 10 cm.
Next, you need to know some conditions by which the thickness of the concrete layer is determined. For example, if the soil is sandy and the area is characterized by the absence of low temperatures, then the thickness of the slab can be from 25 to 35 mm. But in those areas where there is low temperature, and the soil itself is considered heaving, it is necessary that the thickness of the concrete screed exceed 45 mm.
You also need to pay attention to ensuring that the reinforcement frame is separated from the walls by a compensation gap. The concrete base will need this space for free expansion or contraction, depending on climatic conditions.
What concrete composition to choose?
If you prefer to buy a ready-made concrete mixture, immediately choose B 150 or 200. To prepare the mixture yourself, you should prepare a concrete mixer for at least 0.4 cubic meters, and also strictly observe the proportions.
The main filler is mixed (20-50mm) crushed granite or quartz. It’s great if the crushed stone is freshly cut and without plaque, otherwise it should be watered with water first.
Challenges facing contractors of engineering surveys for construction- How to avoid mistakes when painting walls in an apartment
- Roller drive chain: what is the mechanism
To consolidate the mortar, add “Portland cement 400”, at a rate of one to four parts of the main filler. You should not use cement on a screed, especially one that is more than a year old. Or it is worth increasing its concentration by thirty percent.
Depending on the amount of crushed stone, it is necessary to add a third of sand.
Pouring the base
In order to have a good foundation in the garage, it is recommended to use durable and frost-resistant cement grade M300 or higher. If the area is characterized by rather harsh or difficult climatic conditions, then it is necessary to add special additives and plasticizers to the composition. One of the main requirements for ready-made concrete is a completely homogeneous consistency. Enforcing this requirement manually will be very, very difficult.
To solve this problem, the best option was to order a mixer for mixing concrete mortar. In addition, it is almost mandatory to do this, since the concrete screed must be poured at a time. It is impossible to divide this process into several parts, since in this case the integrity of the coating will soon be compromised.
When the mixture is being poured, a leveling rule is used, and beacons serve as markings. These are the ones you need to navigate. It is also important to expel absolutely all air bubbles that will appear in the concrete. The main goal that should be pursued at this stage is to obtain a continuous, even mass of solution that does not have voids inside.
The next day after the base has been poured, it must be covered with a solid rag, which must be wetted from the outside every day. Until the strength level reaches the desired point, it is necessary to avoid exposure of the solution to sunlight. Complete and final hardening of the concrete slab will occur only 28 days after pouring. Only after this can you begin the floor finishing stage, if necessary.
Rubber floors
Recently, rubber flooring for garages has been gaining popularity. It can be made in two versions. Either rubber floor tiles or rolled rubber flooring can be used.
As for tiles, its advantages include high resistance to abrasion, icing, static and dynamic loads. In addition, it successfully resists the effects of chemicals. It is very difficult to damage such material, and therefore using it as a garage flooring is a great idea. This version of the base is laid in separate sections, but for its installation it is best to call a specialist. When compared with rolled rubber floors for garages, two advantages can be distinguished:
- The first is that it is easy to replace. If any area is damaged, then it is enough to simply replace it with another one. If the rolled floor is damaged, you will have to replace the entire strip, and not just a separate section.
- The second thing is styling. To successfully lay such a base, you will not need to use special adhesives, since the segments have special fastenings.
As for the thickness of the sections, the maximum is 4 cm.
If we talk about rubber rolls, it is worth noting that they are produced from used car tires. For this purpose, there are special devices - drum-type vulcanizers. This flooring has a long service life and high durability.
Installation of rubber floor
You should start by laying modular tiles. If large loads are not planned on them, then you can not glue them to the floor, but only fix the edges of the segment. In addition, for ease of connection with each other, each section has docking protrusions. Because of this, installing the floor resembles assembling a puzzle. After several sections have been joined together, all remaining seams are sealed with sealant. The service life of a properly assembled coating is at least 10 years. In addition, to install this type of rubber floor there is no need to treat the base, which saves a lot of time and effort. In addition, the slabs can be installed on the subfloor even without first leveling it.
As for the installation of roll rubber coating, here you will have to work with the base. The rough layer of the base is carefully primed, after which it is covered with a special mixture of polyurethane glue and turpentine. Approximate primer consumption is 300 g per m2. The rubber rolls themselves are spread on a concrete base, after which they need to be allowed to rest for several days. In addition, unlike laying segments, the use of glue for installation is necessary in any case, regardless of further loads.
The latest technology for installing rubber flooring is self-leveling coating. The composition used in this case includes rubber chips, dye and polyurethane glue. The finished mixture is liquid. It is evenly applied to the prepared base according to the instructions. This substance can be applied by spraying, which allows you to easily apply it not only to horizontal, but also to vertical and inclined surfaces. It is worth noting that the cost of any of these three types of rubber flooring is quite high, but this is justified by the reliability and service life of the base.
From all of the above, we can conclude that the question of how to make a floor in a garage is no longer such a problem as it was before.
How to quickly assemble garage floors - flooring for a cold garage
High-quality rubber coating for garage floors. Rubber floor coverings “Resiplit-20” have enjoyed enormous and well-deserved popularity among our customers over the past few years.
The coating is universal in its application and is used mainly for street car parking and paving car parks in the country.
The “Resiplit-20” slab is also used for laying rubber floors in hangars for storage, operation and repair of: snowmobiles, mini-tractors, power plants, petrol-electric and diesel generator units, motor boats or boats.
And of course the champion application is the installation of durable rubber floors in personal garages.
"Resiplit-20" is perhaps the most widely purchased of high-quality molded rubber slabs for the floor in the garage and the sidewalk at the entrance to the garage.
The thickness of the rubber coating is two centimeters, allowing it to be used as a floor even in truck parking boxes and hangars for the repair of various agricultural mechanization equipment.
On the inside of the slab there are special relief seams that increase the damping properties of the rubber coating.
The outer side of the tile has a texture in the form of large “coins”, which gives the tile an original and attractive appearance.
Very often we are asked the question about the size of rubber paving slabs?
The working size of the tile is 50 by 50 centimeters.
That is, when assembled, the area of four slabs is equal to one square meter (without ears).
The overall size of the slab is 55 by 55 centimeters.
Many more people ask the question.
Why is tile sometimes also called “fibrous polymer”?
The answer to this question is very simple, because during production, fibers and polymers are added to the tiles to improve their strength.
I’ll also immediately answer a number of your questions:
How to assemble a floor from rubber slabs?
— Assembly of the floor covering is very simple and is done by laying the slabs, without glue, on any fairly flat (not ideal) and hard subfloor, compacted crushed stone, sand, or simply on the ground.
The tiles are simply laid groove into groove, the excess is cut off with an electric jigsaw.
Do I need glue to assemble a floor from Resiplit-20 tiles?
— No glue is needed to assemble the floor.
When assembling, you must have a rubber mallet, a ruler, a shoe knife and an electric jigsaw.
When installing rubber tiles, generally accepted safety regulations must be followed.
Are Resiplit-20 tiles stronger than similar tiles made from crumb rubber?
— Yes, vulcanized rubber tiles are many times stronger than any tiles or paving stones made from rubber crumbs.
And unlike tiles made from crumb rubber, Resiplit-20 does not accumulate moisture and does not crumble.
If you haven’t found the answers to your questions or are at a loss in choosing rubber tiles for your garage, call our specialist and he will help you make a decent choice of rubber or plastic flooring.