The main stages of forming a frame system, collecting equipment and marking
Modern TVs not only have a wide screen diagonal and an attractive appearance, but are also lightweight.
Today, an LCD TV with a 42-inch screen weighs no more than 4-6 kg. Based on this, the need for large and massive cabinets is gradually decreasing, and they are being replaced by more practical designs and techniques for installing TV.
One of these solutions is the formation of a frame system, which in its finished form will play the role. It can be made from various materials and their combinations, but the simplest and most economical would be to create a plasterboard system. Such a decision has many advantages, but requires a responsible approach and care.
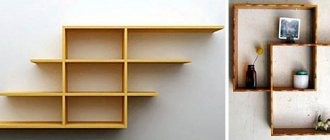
TV stand shelf option
Making a TV stand from plasterboard with your own hands will not be difficult, especially if you adhere to the following structure of work:
- collection ;
- design and marking;
- frame assembly;
- finishing.
The principle of creating a TV table does not necessarily have to have the above structure. However, it is precisely this that is optimal and makes it possible to complete the work in the shortest possible time. In this case, the first stage, marking the beginning of construction, is the collection of the necessary tools, the list of which is as follows:
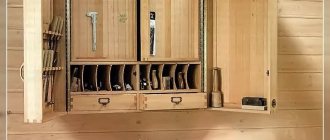
Tools for working with drywall
- pencil;
- roulette;
- plumb line;
- Screwdriver Set;
- metal scissors;
- screwdriver;
- set of spatulas;
- container for mixing the solution.
To create a simple TV stand from plasterboard, you don't need many tools. However, the above list is more than enough to carry out the installation of a frame structure. Design is the most important stage of work, since the result of the work largely depends on its accuracy and quality. Initially, you need to decide on the installation location of the system, its size and purpose. The creation of the frame is carried out exclusively using a ready-made template based on the available geometric data.
Drawing with the dimensions of a homemade plasterboard cabinet For a standard beam TV, more massive reinforced cabinets are used that can withstand the large weight of the device, and for new LCD models the design can be miniature but durable. Options for homemade TV stands can be seen in the photo:
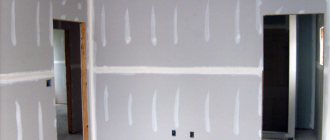
Assembling the sheathing, covering the system and finishing: step-by-step sequence of actions
After marking has been completed, you can proceed to the formation of the frame system. A TV stand made of plasterboard will have a simple appearance without shelves and with a table top. Its formation begins with the assembly of the frame, and the entire process of installing the system is as follows:
- According to the markings, it is screwed to the floor and walls, which is pre-cut to the required size with metal scissors. It is fixed with the help of, and its purpose is to provide additional rigidity to the system. In addition, its presence simplifies the installation of vertical structures, which are simply inserted into it and fixed. Attaching the profile to the wall
- The construction of the sheathing begins from the inner corner adjacent to the wall. The first stand is inserted into and fixed at the lowest point using self-tapping screws. After this, it is set completely vertically along a plumb line and in this position the distance to the wall, which runs parallel, is measured. According to the data obtained, a part of the profile is measured and cut, which is subsequently inserted into the vertical guide and plays the role of a horizontal cross member.
- The distance between the vertical elements should be no more than 20-30 cm. Moreover, each rack is additionally reinforced with crossbars, and their upper edges are covered with another UD profile, which will connect the entire structure and make it motionless. Model of a TV stand made of plasterboard
- To the finished sheathing (gypsum plasterboard). Each part of the coating is pre-measured and cut with a knife. After this, the material is applied to the racks and fixed to them using metal screws. At the same time, their caps are slightly recessed into the material, and the distance between the fixation points should be at least 15-20 cm.
- First, the side parts are fixed, and at the very end the main fabric is applied, which plays the role of the front side of the cabinet. It should completely cover the joints with the side parts, but not go beyond them. We cover the cabinet with plasterboard
- All with gypsum mortar. At the same time, they are preliminarily laid in them, designed to increase the strength of the seam and ensure its reliability. It is covered with 2-3 layers of the mixture, with the help of which the surface is completely leveled. And also all fastening points. We putty a plasterboard bedside table
- The top of the bedside table is covered with a tabletop, which is screwed to the horizontal crossbars. In this case, its front side should extend beyond the edge of the structure by 2-3 cm, and the sides should form a vertical level. Table top made of chipboard in section
- The finished bedside table is completely ready and can
Reading time ≈ 6 minutes
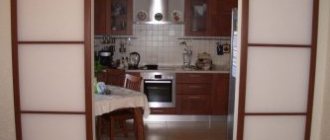
Plasma TV can be found in almost any home today; it has become an important and necessary part of the interior. Sometimes you want to beautifully play with this detail or hide it in the wall. The plasma must be in the wall and not protrude even a centimeter, which is only possible when creating a recess from plasterboard. This structure is perfect for equipment with thin LCD, LED and LCD screens.
A niche for a TV is a modern way to stylishly and functionally arrange a space. This design solution is very popular today; it gives the room dynamics and volume. A plasma panel in a recess can free a room from unnecessary shelves or chests of drawers, as well as visually enlarge it and make it more spacious. It is possible to assemble such a structure yourself; you need to act consistently and know some of the subtleties and nuances.
Peculiarities
TV monoblocks are attached to walls using various brackets, but this method is suitable for restaurants, cafes or clubs. When creating the interior of an apartment, comfort and safety come first, so it is important to hide all cables and wiring well. What are the advantages and disadvantages of covering a wall with plasterboard and creating a niche?
Advantages:
The downside is the possible reduction in the area of the room due to the wall in which the niche and plasma panel will be installed.
How to set up a niche
Before you begin constructing a plasterboard installation, you need to develop a project plan and sketch a sketch on paper. The sequence of actions will be as follows:
- Transferring the project to the wall, marking and installing the frame.
- Covering the inner walls of the future niche.
- If necessary, install backlighting.
- Placement of plasma and communication wire for equipment operation.
- Covering the frame with plasterboard.
- Final work on finishing the structure.
Required tools:
Installation process
Let's start installing a niche for the TV with our own hands step by step:
Now you know how to make a niche for a TV yourself, and you can start finishing. This can be painting the surface, treating it with decorative plaster or polyurethanes, as well as wallpapering. The main thing is that the design is in harmony with the interior and matches the style of your room.
Modern televisions are no longer the same “boxes” that every family had 15-20 years ago. They have become more elegant, thinner and wider, with high-quality images and many TV channels. I just want to spend the whole day next to a caring friend who will tell you about all the news, take you to an exhibition, demonstrate a current film and help you become a participant in an emotional talk show.
Do-it-yourself TV niche made of plasterboard
A niche for a TV is an attribute of modern technologies and a well-equipped home, because it requires 2 conditions: a flat-screen TV, which has replaced bulky boxes with lamps from everyday life, and drywall - a convenient, practical and easy-to-handle material of the new generation of construction. A niche for a TV is a great way to save space in a small home or to refine and make a spacious room stylish. Gypsum plasterboard, unlike gypsum board, has less weight and the ability to bend easily, but at the same time it is quite decorative and durable. A modern interior does not need either a bulky cabinet (because TVs have acquired a completely different look and weight), or a wooden TV shelf, because there is such a convenient thing as drywall.
To work with it, you don’t need any special skills other than the ability to handle a knife and a screwdriver, and in order to come up with a stylish design, you only need imagination. A portal mounted on the wall for a TV easily and organically fits into any interior and assumes any modification, up to a multi-tiered structure with space for books and CDs.
In terms of the cost of materials, this is a completely affordable project, and if it is done with your own hands, it will cost minor losses for the finances of the apartment owners.
Which option should you choose?
To make the time spent in the company of a caring assistant as comfortable as possible, experienced designers recommend not simply fixing the panel on one side of the room, but making a niche for it.
Despite the fact that a small part of the room's space will be occupied, this solution seems more profitable than hollowing out the surface and making a niche inside:
- if this side of the hall is load-bearing, then for any work with it it is necessary to obtain a special permit from the municipal housing and communal services service, and it is not a fact that it will be issued;
- if the house is brick, then no special problems are expected, but if you are dealing with concrete, then you will have to spend several times more effort;
- walls in houses come in different thicknesses, and if your design is supposed to have a thin surface, then you will have to act carefully so that instead of the desired design you do not end up with a through analogue.
There are plenty of different options for creating a cozy television alcove; they can be divided according to the following functional features:
- wall structure made exclusively for TV;
- an option in which part of the wall is involved, this can include shelves, a fireplace and other elements, the benefit is double, since all the shelves become part of a single complex, and they do not have to be attached to the surface separately;
- a solution where a niche is an element of a complex, beautiful design covering the entire wall, there are also a lot of winning nuances here.
In each of these cases, you can take advantage of ready-made opportunities that the Internet is replete with, try to fantasize on your own, or seek help from an experienced designer. With any choice, your living room will be transformed for the better, adding aesthetics and functionality.
This is the most budget-friendly project that will allow you to use any of the three possibilities described above. Wherein:
- you should choose a design where the panel will be completely inside, without protruding outward, this way you will protect expensive household appliances from accidental contacts and keep them in working condition;
- Acoustic speakers can also be located here; this advice is especially good for families with small children;
- another advantage of this type of arrangement of objects is that cables and wires can be removed inside the complex, adding aesthetics to the overall appearance of this side of the living room;
- The installed lighting in this alcove, which is comfortable for the eye, will decorate the room, illuminate the necessary area and create an additional effect.
Advice:
If you approach the issue creatively, you can not only save money, but also create an interior that will create the feeling of expensive decoration.
Anyone, even a novice designer, will advise you to choose from three alternatives the one that is most suitable for harmoniously filling one side of your living room; a niche for a TV could be:
- rectangular horizontal;
- rectangular vertical;
- oval.
However, there are no strict design frameworks here, and different versions can be combined within one project.
Advantages of the rectangular horizontal option
As a rule, most of these designs are made in a rectangular horizontal format. This solution allows you to fully arrange the thin panel and plan several more shelves to place some necessary items on them. A good addition would be lighting. This project is welcome for both large rooms and small living rooms; in the latter case, it will become visually more spacious.
The uniqueness of the rectangular vertical project
If you want to try experimenting with a rectangular vertical format, then it is advisable to place the TV approximately in the middle. The rest of the space is filled with speaker systems, books, paintings, CD stands and other items that logically complement the complex.
Rectangular niche - for wide walls
Drywall is an excellent building material for most interior details, be it a fireplace or an alcove. In our case, it is made in a curved form. This makes the whole room more impressive. In addition, the upper part of the room visually increases. Experts believe that this project is ideal for a living room with wide walls.
Oval alternative for large and small spaces
This is one of the least popular projects, because it requires more skilled craftsman due to the difficulties in technology. Of course, this does not detract from, but, on the contrary, favorably emphasizes the uniqueness of the structure. An oval is at least more interesting than any rectangle. If the room is small, then this choice allows you to further narrow the space visually. However, for large living rooms with high ceilings, such an alternative could not be more suitable.
How to make a plasterboard niche for a TV: step-by-step instructions with photos
- Using spot lighting in a niche, in this case the lamps can be mounted in both the lower and upper parts of the structure. A rather interesting solution would be the direction of lighting from bottom to top.
- LED backlight. Lighting elements are very often combined with a stereo system to create a kind of light and music.
- Sometimes the back side is finished with decorative stone, photo wallpaper, or simply painted with paint that is slightly lighter than the rest of the structure.
These are the main rules; as for all other issues regarding the dimensions or design of a niche, here you can give free rein to your imagination. The only thing you have to do is purchase a building level. The fact is that this operation requires strict adherence to the horizontality of all lines, so it is impossible to do without this product.
It is better that the depth of the niche is small - you should not divide more space than the TV could occupy. The main thing to remember is that a niche is not only a decorative, but also a functional element. The depth of the niche for the TV is one of the most important parameters that must be taken into account even before you design a niche for the TV. The dimensions of the niche should be at least 100 millimeters larger in each direction.
This way you can achieve an enhanced visual effect, plus it’s better to install the TV on a wide surface. This also applies to niches for speakers, which should be larger than the devices themselves, and the niches themselves should not be very close to the TV. It is extremely important to correctly determine the depth of the niche.
It is better not to overdo it here, since a niche that is too deep may not be justified in terms of the dimensions of the TV pedestal, and the entire structure will look too bulky.
Materials needed to build a niche with your own hands
What should be included in the list of materials for creating an alcove for a TV when going to a building supplies store:
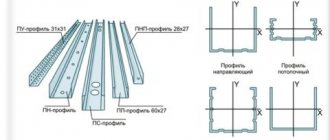
- you can’t do without aluminum profiles - CW (for fastening parts to the wall or ceiling) and UW (they are load-bearing elements that fix plasterboard panels);
- wood beams, from which the basis of the future project is created;
- It is better to purchase plasterboard panels with a thickness of 12.5 mm; this is the most common building material;
- elements of metal connections fastening profiles;
- dowels and screws.
If you have to work with an oval solution that involves arched elements, you should purchase a profile in the form of an arch, and select drywall so that it can be bent.
Among the tools for work you should take:
- screwdriver and screwdriver;
- drill with speed change mode;
- hacksaw for metal;
- a powered tool that can be used to process profiles;
- a plane, it is useful for cutting and smoothing plasterboard panels;
- construction knife;
- roulette;
- serpyanka (this is glass tape for reinforcing plasterboard parts after its installation on profiles);
- plumb line and building level;
- lace.
Instead of the latter, you can use a regular rope.
Do-it-yourself TV niche made of plasterboard
When renovating an apartment, you need to think through all the details in advance. One of these details is the availability of space for a TV. Some people hang it on the wall, while others use more traditional approaches. A do-it-yourself plasterboard niche for a TV will not only become part of the interior, but will also significantly embellish it.
Self-tapping screws are screwed in every 15 cm in all places where the gypsum board comes into contact with the profile. You need to screw them in as close as possible to the center of the profile so that the cap goes slightly deeper into the drywall. Using a level, ruler and plumb line, find the extreme points of the structure that will protrude from the wall as much as possible. All the same tools will help you draw lines on the walls, floor and ceiling, which will indicate the front boundaries of the assembled structure.
Difficulties always arise with markings and many people prefer to assemble the frame locally, and then come what may. This approach is not particularly good for those who want to end up with a high-quality plasterboard niche for a TV. A plasterboard TV shelf should be strong enough. Therefore, under it they not only make a reinforced frame with jumpers, but also sometimes sheathe it with two layers of plasterboard. This is done only with that part of the structure on which the TV will stand.
Then you can be sure that all structural elements will withstand possible loads.
Preparing for work
If you decide to work independently, without involving a specialist, it is important to sketch out a diagram of the future scope of work before starting work, and the more detailed it is, the easier the process will be.
This applies to both the designation of all materials used and dimensions, including the estimated dimensions of the TV:
- special requirements for matching the depth of the opening with the thickness of the panel; if a socket is supposed to be behind the TV, then these are additional sizing calculations (it is better if it is located at the bottom);
- it is best to make an opening that is 20 centimeters larger than the plasma panel; such additional distances are necessary to simply stick your hand through for settings and other functions;
- It will be better if the drawing starts from the center of the surface, and to avoid distortions, use the answer.
If the scheme does not include masking the wires, then before constructing the opening, hollow out a channel for them using a hammer drill, followed by masking with putty.
Stage-by-stage design
Installation and subsequent modification of the project is not difficult, the main thing here is to follow the sequence of actions:
- fixing UD profiles with self-tapping screws, this is done according to previously applied markings;
- vertical installation of CD profiles in UD profiles, it is better that the distance between the latter is 60 centimeters, U-shaped fastenings are welcome;
- horizontal fastening of CD profiles on the sides of the structure;
- when the frame is assembled, the TV cable and electrical wiring (backlight) are laid;
- drywall, pre-cut into pieces according to the drawing made, is attached to the metal frame profiles;
- the entire finished structure is processed using putty.
As you can see, there is nothing particularly complicated in this process. It is very important to prepare a diagram, materials and tools in advance - and then building a niche will not take much time and will be enjoyable.
Things to remember when constructing an opening:
Your TV niche is ready!
In the era of thin plasma and LCD TVs, the approach to their placement in the interior of the room has also changed. Now it is not necessary to clutter the room with a standard wall or TV stand, because the panels have wall mounts that allow you to hang them on the wall. For convenience and aesthetics, the TV is most often placed in a niche. But it cannot be done in a thin or load-bearing wall, so drywall comes to the rescue.
Photo options for niche design in the interior
Read: Greek style in the interior - photos of the secrets of unusual design
Let's discuss this article together:
Click to cancel reply.
Plasterboard construction for TV
Drywall is a versatile and easy-to-install material for creating all kinds of decorative structures. It’s easy to make a niche for a TV from plasterboard yourself. Moreover, the process will not require significant costs, expensive tools and special skills. Advantages of placing TV in a niche:
- A TV recessed into a niche will fit harmoniously into the interior.
- Lighting in the niche for the TV will create a decorative effect and the room will look brighter. And the backlight can be used as a night lamp.
- On the niche shelves you can place books or decor in the form of figurines and vases.
- The decorative recess guarantees the safety of the TV - it cannot be touched or damaged.
- All cords and cables will be securely hidden behind the false wall.
- A beautifully designed niche can become the central element of the interior.
- Soundproofing effect - a niche will help minimize sounds from the neighboring apartment. If the wall is side, then the plasterboard wall can serve as a kind of insulation.
This design has one drawback - it will reduce the area of the room slightly.
A niche may look like a shelving unit
Niche types
A plasterboard niche can be installed on a wall made of any material - brick, concrete or wood. The design can be rectangular, oval or combined. The first type is divided into rectangular-horizontal or rectangular-vertical. The most common is the rectangular-horizontal option due to the ease of its implementation. Such a niche will look natural even in a small apartment.
The most common niche option is rectangular
An oval niche is more difficult to make, but it looks more interesting. An oval niche is not suitable for small rooms, as it visually reduces the space.
The oval looks very catchy
Also, niches may differ in general design. For example, a niche can look like a decorative frame with a recess the size of a TV, or like a wall with shelves or stained glass windows.
Niche arrangement
- Before starting work on a plasterboard structure, you should carefully consider its design and the location of all communications (sockets, lighting switches, etc.). There are many options for designing a niche for a TV.
- It is advisable to illuminate the niche with spotlights or LED strip - then it will look impressive. Moreover, the lamps can be mounted both in the upper and lower parts of the structure. The rays of light coming from below look interesting.
- The back of the niche can be decorated with various decorative materials - wallpaper, photo wallpaper, stone. You can also paint it a different color - lighter or darker than the entire wall.
- A niche can consist of several sections in which shelves, speakers or decor will be located. You can even place an aquarium or an electric fireplace in the section.
- In special cases, a plasterboard structure for a TV can even zone a room. If you make it rotating, then you can watch TV from different angles.
- The stylistic arrangement of elements is also important. The symmetrical design is inherent in the classic style and will look good in the bedroom. The asymmetrical composition is suitable for high-tech, modern and minimalist styles. It is most often used in cases where it is impossible to allocate an entire wall for TV or if there is a door nearby. Asymmetry is good for zoned or combined rooms - kitchen-living room, child's room.
Photo gallery: design options for niches in the interior
A niche can be made in a false wall made of plasterboard. Finishing with stone imitates a fireplace. Very often, several niches with different functions are made in one wall. If you paint a niche in a different color, it will perform a zoning function. Making a semicircular niche will be more difficult. A real fireplace can also be sewn into a niche. You can combine several types of finishes A niche can act as a bright accent For the Scandinavian style, the niche is painted white If space allows, the niche can be made deeper False niches look beautiful The simplest design looks like a recess in the wall Asymmetry is a good technique for rooms in the Art Nouveau style
Choosing a shape and creating a niche design
For a niche, it is very important to choose a suitable design that will not only highlight the features of the product itself, but also fit organically into the interior. Most people find it very difficult to come up with any shape that will differ from an ordinary rectangle. If you are one of them, then you should start by browsing online pages with similar products, so you can highlight the main points of the design for yourself, highlight any design features, and ultimately create your own individual product.
If you are creating other plasterboard structures along with a niche, then perhaps it would be better to use the services of a designer who will definitely come up with a single composition of plasterboard that will please your eye in the future. Our advice is to make several sketches of a niche according to your fantasies, because it can be made not only square or rectangular, but also of complex shapes, with height differences and the presence of bends.
Measure the wall where the plasterboard niche for the TV will be installed. You need to know its dimensions and, preferably, area, in order to select the dimensions of the structure almost perfectly. In accordance with the sizes, but without focusing too much on them, make a niche project. In the project, you need to sketch a niche of the shape that you came up with, but do not forget that the dimensions of the product must also be indicated there.
Also, you should imagine how the TV will be attached to the support. The role of the latter can be played by both the wall and the niche itself (in this option, the bottom of the structure will have to be strengthened). All additional devices, for example, game consoles and various receivers, amplifiers, will need to be placed nearby, so make sure that there are shelves for them in the niche as well.
Creating a Sketch
The more data with exact dimensions is on the sketch, the less likely there are alterations. First, a sketch is made, which is checked and corrected during the process. Stages of creating a sketch:
- A metal frame is drawn from a profile for a plasterboard structure. All the nuances are taken into account - load, location, reinforcing jumpers.
- The sketch includes electrical wiring - sockets, wires and lighting circuit (if any). Sockets can be located both below and behind the TV, adding space for bending the wire and the plug itself.
- Cost-effective cutting of plasterboard sheets is carried out.
The sketch should be as detailed as possible
At this stage, it is already necessary to decide on the finish, because certain materials have their own thickness, which also needs to be included in the drawing. If it is tile or finishing stone, then at least 5 cm, plus the same amount for tile adhesive. At least 10 cm in each direction is added to the diagonal of the TV, the same applies to other equipment, for example, speakers. The depth of the niche should be such that you can stick your hand between the wall and the TV.
Tools and materials
To create a niche you will need the following tools:
- Drill (perforator).
- Construction knife or jigsaw.
- Grinder and metal wheels.
- Metal scissors.
- Level.
- Roulette.
- Pencil.
- Sandpaper (mesh) and skinner.
- Spatulas.
- Mixer or drill attachment for mixing the solution.
In addition, you need to purchase the following materials:
- Drywall 12.5 mm.
- Aluminum profile CW and UW.
- Self-tapping screws for metal and self-tapping screws with dowels (drive-in) for the frame.
- Corner for slopes.
- Finishing putty.
- Primer.
- Decoration Materials.
Price issue
The cost largely depends on the size of the structure. Let's take, for example, an average niche; it will require 3 sheets of drywall (about 500 rubles), a profile (about 400-500 rubles), putty, corners, grouting grids, screws (about 700 rubles). The total is 1700 rubles.
TV stands are a thing of the past; now it has become the norm to hang the TV on the wall, thanks to the thin body and wide diagonal, the TV looks great in a specially designated niche. Practicality of design, space saving and variety of design are all positive aspects of a plasterboard niche.
You can finish a niche without focusing on it. Then the TV will attract all the attention.
Step-by-step instructions for installing a niche
- If there is no outlet in a suitable place, then the first step is to install electrical wiring in the wall (as well as an Internet cable and antenna wire). Channels for it are cut with a grinder, hammer drill or chisel. The wires are laid in the channels, and, after checking their functionality, the channels are covered with starting putty. The wall on which the niche is mounted must be puttied and rubbed down in advance - before installing the frame.
All wires are sewn into the wall - The frame is marked on the wall using a level.
This is painstaking work requiring maximum precision. Markings are applied using a level - UD profiles are mounted on the marked places on the dowels.
CD profiles are attached to them with self-tapping screws (for reliability, you can use U-shaped fasteners). The distance between them should be no more than 60 cm. The profile is attached strictly according to the markings - Now you can start attaching the plasterboard frame.
The sheets are cut into segments according to size. The cardboard is cut on one side, and then broken, and then cut off on the other. The finished parts are attached to the frame with special self-tapping screws for drywall, the heads of which are recessed so that they are not visible under a layer of putty. The distance between the caps should be 10–15 cm. Excess millimeters of plasterboard are removed with a knife. The sheets are attached to the profile with self-tapping screws - After covering, finishing work is carried out. All seams and corners are puttied using reinforcing tape. When the putty dries, it is cleaned with a mesh or sandpaper. Next, a primer is applied.
Hiding the TV in the wall partially or completely would be a good solution, especially if there is already a system of shelves, niches, or a false wall that hides communications. We propose to consider the main options for hidden installation of household appliances and instructions for their implementation. Let's talk about how to make a niche for a TV from plasterboard with your own hands.
Photo gallery
Do-it-yourself ready-made plasterboard niche projects:
An area for a TV in the wall A small recess in the wall for a TV You can conveniently place the TV in a special niche Niches made of plasterboard for placing a TV and more A small area with decorative shelves It will be convenient to place any equipment here A separate area for placing a TV The living room takes on a completely different look with this design Excellent distribution of usable space Preparation of a recess for future appliances Niche for a TV made of plasterboard Separate niche with shelves
The construction of individual houses and apartments is increasing every year. Consequently, a person is faced with the problem of purchasing different furniture for each room (kitchen, bedroom, living room, etc.). The furniture industry is a rather conservative system. Having mastered the technology of making a sofa or wall and having invested certain funds, the owner therefore demands a return of the money with a profit in a timeframe that is favorable to him.
Design and design of a plaster wall for a TV
Typically, the return on capital investment is two years. To have individual furniture you must apply. Interior designers now have a versatile building material.
The design of the furniture made of plasterboard on a metal frame will be functionally adapted to install a TV with the necessary equipment. If you set a goal. Create a new interior for a room divided by this partition. Wood and glass with different textures can be used to decorate the TV wall.
To create a plasterboard wall for a TV, you need to complete a design project. Indicate the dimensions of the protruding parts and recesses.
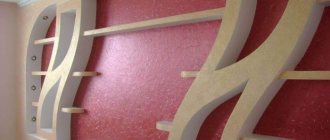
Ready-to-cover TV wall frame
Measure the radii and angles of the curved parts of the shelves. Prepare texture references for plasterboard surfaces. Places for attaching profiles to the main wall, if necessary. Having identified all the nodes in the project, they begin to lay out the future wall using measuring tools. Necessary materials:
Required tools:
- construction hammer and special drills for concrete, brick and wood;
- or ;
- screwdriver or drill;
- and scissors or a hacksaw;
- sandpaper for various purposes, spatula, etc.
Design option for the frame of a plasterboard wall for a TV.
The assembly of the metal structure frame is carried out in several stages:
Design task: how to fit equipment into the interior
Many people are familiar with Yugoslav walls with a niche for installing a TV or an aquarium. Televisions of that era, unlike modern panels, were massive, oversized and could only be hidden in a furniture cavity of the appropriate depth. Despite the fact that today a recess in the wall for a TV has a decorative rather than a functional purpose, both the design side of the process and the design side require close attention.
You can find countless images of concepts on the World Wide Web, but it is one thing to create a visual design, and quite another to carry out its technically correct implementation. The simplest version offers a classic niche, the back wall of which is either a load-bearing wall with a minimal layer of finishing, or a plasterboard surface with, again, minimal indentation from the rough plane.
A niche extending from ceiling to floor is otherwise called a portal and has a slightly different construction scheme. Such designs make it possible to realize the idea even when the walls do not have continuous leveling sheathing. At the same time, the portal looks like a completely finished and independent element of the interior.
The portal is flanked by two wide columns. You can choose absolutely any form factor: it does not affect the functionality in any way, but in the end, a niche with a complex configuration may require considerable time to level, smooth and finish it.
Unlike primitive imitations of rectangular pilasters, more complex columns may have curved front or side faces. It is also possible to have a radius design of the rear plane of the niche; such structures are called exedra, and in them TVs are rarely mounted in a hinged manner. An arbitrary number of smaller niches or shelves can be embedded in a niche or portal, as well as in the framing columns, for installing a home theater and other equipment or household items.
Living room interior design: designing a plasterboard niche
It is not necessary to maintain correct lines and equal distances. Complex geometry will only enhance the effect of the new element. Light colors and glass elements will visually increase the space. Dark colors and matte surfaces, on the contrary, will make the room seem smaller.
- Creating a recess in a room adds “zest to the room, makes it more dynamic and interesting.
- The original geometry of the walls allows you to hide existing imperfections.
- Using a niche instead of furniture helps to get rid of bulky walls, cabinets, cabinets, saving a considerable amount of money.
- Increasingly, apartment owners who think through their own design prefer to hide equipment in recesses. In addition to a TV or stereo system, a fireplace or an aquarium looks great in a niche.
Adding a variety of lighting will highlight the design of the room. It’s worth thinking about this at the niche design stage in order to install all the necessary lighting fixtures on time. It will be too late to do this after registration. There are quite a lot of lighting options: lighting devices can be different in color and shape, located around the entire perimeter or work in spots.
LEDs are in demand. Their advantages include soft diffused light, ease of installation and cost-effectiveness. If you are one of those who are ready not only to change the color of the wallpaper and rearrange the furniture, but also to transform the design of the room, it is simply necessary to consider the presence of a niche in the living room.
It will make your room modern and fashionable.
Mounting and load from the TV
Although modern television equipment has become more compact, it remains quite massive. This must be taken into account when assembling the niche frame in order to securely strengthen it in the right places.
Typically, television panels are installed on hanging brackets at a level of 100-120 cm from the floor. This installation does not require the installation of a reinforced shelf, due to which the portal as a whole looks quite light and discreet.
Otherwise, you can use a standard TV stand to install it on a horizontal plane. This option is not very attractive due to the fact that there is almost no way to tear the TV off the hanging bracket, but with a loose installation it is quite easy for even a small child to knock it over.
Mounting a television panel on a plasterboard wall has certain requirements that relate to both the internal configuration of the structure and the fasteners used. Only one thing can be said with certainty: the model of the TV and the type of mounting bracket must be known at the design stage. Depending on the weight of the equipment, an adequate method of reinforcing the rear plane is selected. Some people prefer embedded profiles directly at the fastening point, others limit themselves to two-layer reinforced sheathing.
The bracket should be attached according to the instructions. For reliability, at least four attachment points are used
Among the fastening elements for mounting equipment weighing over 30 kg, the metal dowel “umbrella” and the mount called “Hartmut” are well suited. Please note that if there is a brick or concrete wall behind the rear plane of the niche with a minimum setback of the false wall, it is better to fasten it with bolts or chemical anchors. A guarantee of reliability is good, because no one knows how fasteners will behave after several years under different operating conditions.
Niche decorative options
After watching a video with a selection of photos of plasterboard niches in the living room, you can be convinced that such a design is not only comfortable, but also elegant. Made in the style of strict minimalism or bright modernism, it will successfully harmonize with the overall design of the room and match a fireplace made of natural stone.
There are many possibilities for improving niches in a plasterboard wall:
- the design is similar to the general design or, conversely, in contrast to the use of mosaics, stained glass, decorative tiles;
- application of molding;
- the presence of mirror inserts that visually expand the room;
- the use of special interior solutions, such as drapery.
When creating niches from plasterboard, there is no need to be afraid to experiment. There are many design options for these structures, after viewing which you can choose the appropriate option for your own room.
Frame assembly
Unlike other popular designs, a niche or portal for a TV has special assembly specifics. As in most cases, the frame consists of a main part and load-bearing shaped elements that have no other function other than shaping.
The main set of profiles for creating a frame of almost any shape. Profiles CW and UW are used to form the base, CD and UD to strengthen the planes on which the drywall will be attached
For curved shapes, it is better to use a special bent profile that can recreate the bend of the correct shape
Assembly of the main part begins with the installation of guide profiles. Since niches are rarely made with a depth of less than 60-70 mm, the most suitable profile size for adequate load absorption is 50 mm. At least four vertical rows of guides are nailed to the rough plane of the wall, or, if continuous sheathing has already been completed, to profiles hidden behind the drywall. In the latter case, the section of wall for constructing a niche must be reinforced with horizontal crossbars every 40-50 cm - the assembled structure is attached to them.
All profiles in direct contact with the main wall, floor or ceiling must be glued with damping tape made of foam polyethylene
At the very bottom of the niche it is necessary to mount a small podium, which in plan will protrude beyond the rest of the structural elements. Its height is purely symbolic - up to 10 cm, and its purpose is to ensure the correct installation of the floor plinth. When using suspended ceilings, a similar design can be useful in the upper part.
For side columns, if they are straight, the guide profiles are duplicated in a position opposite to those already fixed to the wall. Fixed-length jumpers are inserted between them, which determine the depth of the recess. For the smallest niches, the second group of guides is simply inserted into the first.
If the columns have a curved front surface, the second row of guides is made with a segmented profile. Before installing it, you need to cut out the side segments of the sheathing, fold the drywall in four layers and follow the common marking line with a jigsaw. After sewing the sidewalls, a flexible profile is rolled along their edge; in the simplest case, this is a self-made “herringbone”.
It is a little more difficult to make the side edges curved: both groups of guides must be made of a flexible profile, and it is attached to the wall according to the marking line, which, in turn, is formed by tracing a template cut from plasterboard with a pencil. It will subsequently be used to sew the front edge, but first you need to screw a flexible profile around the perimeter of the wrong side. The structure is fastened, as in the general case, using spacer inserts.
Profile connection options. 1. Connection using bent “wings”. 2. Using a connecting “crab”. 3. Special insert for profile extension. 4. It is best to connect the profiles to each other using a cutter
The space between the columns forms a niche, which can be divided by a shelf for installation, or have a reinforced rear plane. In the first case, the frame is assembled in the same way as for columns: two profile lines connected by jumpers. If the shelf is slightly recessed, a pair of vertical posts will be needed for more rigid support. It is also necessary to strengthen the structure with braces, so loaded shelves are usually sheathed all the way to the floor, hiding the details of the frame structure.
Reinforcement of the rear wall is carried out using the counter-lattice method, applied to the rear side of the frame, repeating the step of installing the vertical posts. Here it is allowed to use a ceiling profile with a width of 60 mm, however, profiles in both directions must be attached to the wall with direct hangers.
Before sewing up the frame, lay the power cables for outlet groups and lighting, television wires and twisted pair inside the cavity of the frame. If the conductors used are not self-supporting or armored, they must be encased in a corrugated sheath. The cable train should not be attached to the frame - only to the wall, while at the exit point the wire is folded into a loop and laid in such a way that it can be easily reached through the hole under the socket installation box.
Niche cladding and finishing
In conclusion, a few words about finishing. The cladding is not particularly specific; all work is carried out by analogy with the installation of multi-level ceilings or arches. Drywall for covering curved surfaces must be prepared by soaking or making cuts on the outside of the bend.
In the case of television niches, the requirements for protecting joints and corners are the most stringent. General structural reinforcement with non-woven fiberglass scrims is also encouraged. From the options for finishing internal cavities, choose paint with a pronounced antistatic effect. For reasons of practicality, it is better to cover horizontal shelves of any size with thin glass of appropriate sizes.