Chipboard (chipboard) is a material often used for flooring due to its low cost and high strength. The slab is used in standard and tongue-and-groove versions for laying on a concrete base and joists. However, the quality of installation and durability of the finished floor largely depend on the correct selection and installation of the material.
Chipboard: general characteristics and properties
Chipboard is a chipboard that is produced by hot pressing wood waste with the addition of a gluing component. The slab can have one, two or several layers and is divided into grades A and B, which differ in moisture resistance, flexibility, resistance to deformation and a number of other technical characteristics. Chipboard is also divided into grades I and II. The first grade is a high quality slab with minimal defects. The second grade has chips, cracks, depressions, protrusions, stains, etc.
In the construction industry, chipboard with a coarse-grained, unpolished surface is most often used, since the decorative qualities of the material are not important.
Technical parameters to pay attention to
The technical and geometric features of the tile are of great importance when laying it on any base, especially on a vibrating one, which is chipboard. ISO 105-45-7 is an international standard by which the density of tiles is determined and there are 5 categories - the higher the number, the lower the abrasion:
- PEI-I - very high abrasion, therefore, use is only possible for walls and ceilings;
- PEI-II – suitable for floors with low traffic (bathtub, toilet);
- PEI-III - the load can be increased - such tiles can cover the floor in the kitchen, hallway or hallway;
- PEI-IV – used for shops, hospitals and public buildings of various types;
- PEI-V - can be laid in enterprises in workshops where light vehicles (trucks, loaders) are used.
Mechanical strength depends on the porosity of the ceramic; therefore, the looser the tile, the softer it is, and at the same time, water absorption and frost resistance increase. There are 3 classes in total, these are:
- B-III is the most porous tile, it cuts and breaks easily, but it is not advisable to lay it on the floor - only on the wall or ceiling;
- B-II – suitable for indoor flooring. Not frost-resistant;
- BI – used for both indoors and outdoors. Frost-resistant and very dense.
Advantages of using chipboard in floor installation
- Low cost. It is thanks to the low price of particle boards that they are widely used in the furniture and construction industries.
- Ease of processing. Chipboard is easy to cut with conventional saws and does not require special skills for processing and installation.
- Environmentally friendly. The high-quality slabs sold in our online store comply with state environmental safety requirements and technological construction standards.
- Good performance. Chipboard has a long service life, so laying it under the main floor for leveling and strengthening is reliable and durable.
- Multifunctionality. Wood-based installation is suitable for floors made of any type of coating - both synthetic material and fine parquet.
- Insulating properties. Particleboards absorb sound well and reduce heat loss.
The disadvantage of this material is its vulnerability to moisture and steam, due to which it swells and deteriorates. Moisture-resistant chipboard can withstand a maximum of 4 wet cycles. This feature should be taken into account when designing.
Chipboard floor with joists.
The article “Plywood floor on joists” described in great detail the method of constructing a floor on joists. All preparatory work, the process of installing joists and directly attaching the plywood are considered. Installing a chipboard floor on joists is done in exactly the same way. Except there are some nuances. Since chipboard is a less durable material, under no circumstances should you install joists with a distance of more than 40 cm between them. The slab around the perimeter must lie on the logs; often, due to the large size of the chipboard, this is forgotten at the stage of installing the logs. You can attach chipboard to the joists either with nails every 20cm or with self-tapping screws, and the distance between them can be increased to 40-50cm.
In conclusion, I would like to note that many people do not like chipboard because of the prevailing opinion that it is harmful to health. The harmful substances in it are phenol-formaldehyde resins, which are used in the production of chipboards. To believe or not to believe the prevailing opinion is decided individually. Manufacturers claim that modern particle board is no more harmful than wood, however, I think people working with chipboard would not use it at home.
The main advantage of chipboard is its cost. It is approximately two times cheaper than plywood or OSB. You can make either a plywood floor or an OSB floor on joists, but if we talk about environmental friendliness and not worry about the cost, then the best option would be natural wood. By placing a solid board on the same joists, there will be no need for a finishing coating. However, this is no longer a budget option.
Recommendations for choosing chipboard sheets for floor installation
When selecting chipboard for laying on the floor, you should adhere to the following recommendations and criteria:
- Plates with a density of up to 550 kg/m3 are used to organize a subfloor for laying under the main covering. This material increases the thermal insulation properties of the structure.
- Plates with a density of 500 to 750 kg/m3 are better suited for laying under parquet or laminate. This is a more durable material that levels the floor well and does not deform when installed on joists.
- Chipboard with a density of 750 kg/m3 is characterized by increased moisture resistance and can withstand several wet cycles. It is advisable to use it in rooms with high humidity. The slab marked with the designation P5 has the best moisture resistance - it increases in volume by no more than 10% per day when completely wet.
- When choosing chipboard for laying on joists, you need to correlate the thickness of the slab with the width of the step. It is better not to use slabs thinner than 24 mm for this installation at all.
- For floor construction, the best option is grade 2 chipboard. This material is strong, durable and inexpensive.
- Wood-based materials of class E-2 (chemical safety) contain ~30 g of formaldehyde per 100 grams of weight. They are recommended for use on subfloors.
In the production of green boards, urea-melamine resin is used instead of formaldehyde. This material is harmless to humans and has increased moisture resistance.
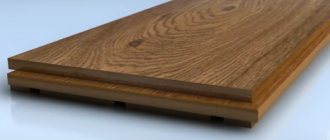
Characteristics of tongue-and-groove chipboard sheet
Compared to a concrete base, gypsum fiber sheets, regular or bakelite plywood and traditional screeds, this material wins for three reasons: firstly, it creates a perfectly flat surface, secondly, it wins in price and. thirdly, it can be used on joists.
Tongue-and-groove chipboard has a number of undeniable advantages:
- first , it is very durable and reliable,
- the second is produced using new technologies and polymer components,
- third , this material itself is of very high quality.
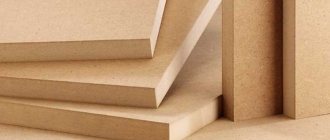
Which furniture is better made from chipboard or MDF can be found in this article.
In the video - tongue-and-groove chipboard for the floor:
One more thing can be added to the listed advantages - the possibility of reusing it, after dismantling, using it in another place. The basis of tongue and groove chipboard is wood, which is fastened with resins; to impart moisture resistance, a paraffin emulsion is added to the mixture, as well as glue with a low-toxic synthetic polymer.
How edge tape is used for chipboard can be found in this article.
Most often, a subfloor is laid from tongue-and-groove chipboard. It can be laid on logs or floating. In the first case, first the logs are laid in increments equal to the width of the slab, insulation is laid in the spaces between the logs, and then the slabs themselves are laid. In the second case, chipboard slabs do not need to be fixed to the base, but are laid freely on a layer of expanded clay chips; to close the temperature gaps formed between the chipboard slabs and the walls, plinths are used, securing them to the walls; this design is more durable compared to the first option.
What is better than chipboard or chipboard or MDF can be found in this article.
In the video - moisture-resistant tongue-and-groove chipboard for the floor:
Fiberboard or chipboard, which is better described in the article.
When laying on joists, one slab covers two spans between the joists, the sheets themselves must be laid staggered in order to evenly distribute the load over the entire floor area, a 10 mm gap should remain from the wall to the slab, the slabs are connected to each other along the joists, and they are secured using self-tapping screws and using glue; when installing screws, the caps must be recessed.
When deciding what base to lay as a subfloor, you should give preference to tongue-and-groove chipboard, which will save both time and budget. Despite the fact that traditional options have long been tested and known, modern technologies are in no way inferior to them, and sometimes even outperform them.
Construction nuances that influence the choice of chipboard for floor installation
Chipboard is an inexpensive and durable material for flooring, but its scope of application is limited. Firstly, it is sensitive to humidity and temperature, so it is not recommended to install it in rooms with a relative air humidity above 60% and a temperature below +10˚C. Secondly, the material is not recommended for use on floors that will be subject to heavy loads.
However, chipboard is an excellent choice for a living space in which floor insulation is planned. In this case, the slabs are mounted on logs, between which thermal insulation material is laid. In addition, they can be used to successfully level plank floors before installing a new floor covering.
How to choose?
For finishing, builders advise choosing 3- and 5-layer flooring. Among the quality indicators of sheets, tensile strength (0.2-0.6 MPa) is distinguished. Also, the plate must withstand fracture under pressure up to 25 MPa. The permissible degree of swelling should not exceed 25%.
In terms of strength and water-repellent properties, the slab is marked in two classes:
- Class A - slightly swells when exposed to water. Suitable for use in rooms with high humidity.
- Class B is less resistant to humidity, so it is advisable to use only in dry rooms.
When purchasing, you need to understand that a first-class product should not contain cracks or irregularities. Such layers can be used to level the floor.
The content of toxic formaldehyde in resins during the manufacture of chipboards must be indicated by the manufacturer on a prescriptive document - label, packaging, etc.
- E1 indicates that 100 grams of dry material contains about 10 mg of formaldehyde.
- E2 – no more than 30 mg.
- E3 – has no more than 60 mg of harmful substances per 100 g of wood.
Sheets with a high resin content are used for exterior finishing or well-ventilated and technical premises - warehouses, utility rooms and others.
Correct material calculation
In accordance with today's government standards, chipboard sheets have a width of 1830 mm, a thickness of 8 to 38 mm and a length of 1830 to 5680 mm. Our online store sells slabs in sizes 2500×1830×16 mm, 3500×1500×16 mm and 2750×1830×8 mm.
As an example, let’s take a room 6 meters long and 4 meters wide, for which sheets of 2500 * 1830 mm are purchased. The total area of the room is 24 m2. The area of one sheet is 2.5 × 1.83 = 4.575 m2. Accordingly, 24/4.575 = 5.2 m3 of material is required for installation. You will have to buy 6 sheets. There is an alternative option - buy sheets 2.75 × 1.83 (5.03 m2). Taking into account the distances from the walls, 5 sheets will be enough.
Areas of application for tongue-and-groove moisture-resistant chipboard
Experts identify several main areas of application of moisture-resistant chipboard with tongue and groove:
- The most in demand is moisture-resistant chipboard for flooring. With its help, a false floor, a “floating” floor, a prefabricated dry screed, which has compartments for insulation, can be installed, without the use of water-based mixtures for filling;
Helpful advice! For the construction of running tracks, tennis courts, podiums and other structures that require reinforcement, moisture-resistant tongue-and-groove chipboard is successfully used.
- moisture-resistant boards are ideal for leveling wall surfaces. They are successfully used as a basis for subsequent finishing (decorative plaster, wallpaper, lining, plastic). Chipboard panels, having heat and sound insulation properties, are perfect for constructing an interior partition. The plates are attached with self-tapping screws to a pre-assembled frame made of slats;
- moisture-resistant tongue-and-groove chipboard 12 mm thick can ideally replace ceiling plasterboard. It is much lighter and more convenient to use than its fragile counterpart. It is used as a leveling base for the finishing coat;
- the slab is indispensable for roofing work. The light weight of the sheet, high density (820 kg/m³) and moisture resistance allow the material to be used for constructing the internal insulating layer of the “roofing cake”;
Tongue-and-groove moisture-resistant chipboard as a finished floor covering
- foundation. Excellent for removable formwork for pouring at the initial stage of construction work.
Helpful advice! When constructing any structure using tongue-and-groove chipboards, all joints must be treated with a sealing material (glue, mastic, liquid nails).
It is not advisable to use tongue-and-groove chipboard for making furniture. For these purposes, you can buy chipboard for furniture; the price per sheet in this case will depend on the dimensions and type of material. You can also order individual cutting of chipboard according to the dimensions required to create specific furniture products.
Construction of a subfloor using chipboard with tongue and groove
All installation work can be performed independently without the involvement of specialized workers. Work should be carried out in a clear sequence.
The first step is to lay the logs at a distance that corresponds to the thickness of the chipboard sheet. For slabs with a thickness of 16 mm, the step is 30-40 cm. If you use slabs with a thickness of 22 mm, the step will be about 60 cm. All voids between the joists are filled with a compactor, gaps resulting from unevenness of the floor are filled with sand.
Subfloor made of moisture-resistant chipboards
Next, starting from the far wall opposite the door, the laying of chipboard sheets using self-tapping screws begins. The next sheet is inserted into the groove and fastened with self-tapping screws to the joists, similar to the first plate.
Helpful advice! The installation of sheets should be carried out so that the seam between adjacent slabs falls on the beams. In a narrow, long room, logs are laid across the direction of movement.
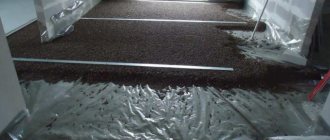
Installation of a floating floor
This method allows you to install floors using dry screed. The result is a multi-layer structure, which is completed by laying tongue-and-groove chipboard. This method consists of several stages:
- A layer of vapor barrier is laid on the concrete base.
- Expanded polystyrene slabs or expanded clay base are installed.
- The next layer is the substrate. Plastic, construction paper, and membranes can be used for it.
- The final layer is moisture-resistant chipboard with tongue and groove.
Various flooring options using tongue-and-groove moisture-resistant chipboard
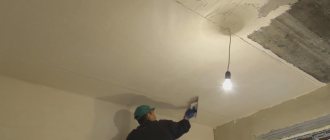
Installation of material on ceilings and walls
Installing a sheet of tongue-and-groove chipboard on a wall is done using self-tapping screws in increments of 30-40 cm without the use of lathing. If you use nails, then they must be driven in at an angle of 45 degrees.
To install chipboard on the ceiling, 12 mm thick slabs are used. They are attached to a pre-arranged frame made of wooden slats using self-tapping screws, nails, and special staples. The joints of the plates must be sealed with special mastic or glue.
Tongue-and-groove chipboard: differences and advantages
The tongue-and-groove chipboard differs from the standard version by the presence of a tongue-and-groove locking end connection. It allows you to create a stronger and more stable structure from several slabs. The tongue-and-groove slab has the following advantages:
- allows even an inexperienced installer to create a strong connection between slabs without any problems;
- simplifies the installation of slab flooring without differences;
- easily dismantled if necessary;
- has increased strength characteristics for pressure and fracture;
- laying under a tongue-and-groove chipboard floor has high rigidity due to the partial distribution of the load between the slabs.
Laying tongue-and-groove particle boards requires carefully checking the horizontal plane of the joists. After installation, the slabs form a common panel that will “play” on the depressions and protrusions. To strengthen and seal the connection between the sheets, the tenons are coated with PVA glue before inserting into the groove.
Features of using chipboard for flooring
Chipboard for flooring is made by pressing a mixture of wood chips and resin. The resulting material has good performance characteristics, however, there are some restrictions on its use:
- Chipboard flooring is used only in dry rooms with low traffic. In rooms with such a floor, no more than 55% humidity is allowed, and the air temperature should be above 8 degrees. It is not advisable to use this coating in the bathroom or steam room.
- Sheets are not stacked in places where they may be subject to significant mechanical stress, for example, in warehouses and stores. Under serious weight, the floor can become deformed and collapse.
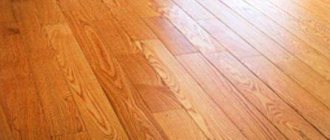
- Chipboard is rarely used as a finished floor, more often as a rough floor. Laminate, parquet and other coverings fit perfectly on it. These sheets are also used to insulate and level floors.
- If it is planned to insulate the floor in the room, then the chipboard is mounted on logs. The presence of high supports makes it possible to fill the gap between the floor and the sheets with heat-insulating materials.
- Chipboard is sometimes used to restore old wood floors and can also be laid over existing flooring.
Important! A wider area of use is available for waterproof tongue-and-groove chipboards, which have some properties superior to ordinary sheets. In the manufacture of waterproof types of chipboard, instead of formaldehyde, urea-melamine resins are used, which are more resistant to moisture. These products have a green color and do not contain harmful fumes, which allows them to be used in living rooms.
How to install chipboard correctly
The main use of chipboard is the construction of a subfloor. It is often also called a dry screed, because it performs the same functions - leveling and insulating the surface, but no water is used during installation. The finishing floor covering is laid on top of the subfloor: laminate, parquet, linoleum, carpet, etc.
How to install a chipboard subfloor for leveling:
- Logs are installed on top of the concrete or wooden subfloor. When using chipboard with a thickness of up to 16 mm, the logs should be 30-40 cm apart from each other, and for thicker ones - 400-600 mm. When calculating the material and location of the logs, keep in mind that you need to retreat 20 mm from the walls.
- When installing the floor on the ground floor, it is necessary to install thermal insulation made of polystyrene foam, polystyrene foam, expanded clay or other suitable material. Please note that before backfilling you need to lay a vapor barrier film on the base.
- Before laying chipboard, use a long building level to check the horizontality of the joists.
- To prevent squeaks during floor operation, paper or construction plastic is placed on top of the joists, preventing direct contact of the particle board with the boards.
- Laying chipboard begins from the far wall of the room (relative to the entrance). For more precise positioning and to prevent sheets from moving, it is recommended to install wedges near the walls. The sheet is fixed in the joists with self-tapping screws located at a distance of 20-25 cm from each other. When tightening, it is recommended to recess the fastener heads by 1 mm.
- The next slab is tightly applied to the previous one, aligned with the walls using wedges and fixed. For reliable pressing against each other and a strong tongue-and-groove connection, the slabs are beaten with a mallet through a block attached to the end part. This prevents the fragile edge from being destroyed. When using tongue-and-groove material, the end connections are coated with construction mastic or PVA glue.
- An important requirement when connecting boards of slabs is the location of the seams strictly on the joists. Ignoring this rule significantly reduces the strength and rigidity of the structure. In narrow rooms, logs are always located perpendicular to long walls.
- At the end of installation, uneven surfaces are sanded and the floor is cleaned of dirt and dust (it is better to use a vacuum cleaner). Next, the finishing coating is installed from tiles, parquet boards, linoleum, laminate, etc.
When installing particle board flooring on joists, it is recommended to place the panels in a checkerboard pattern to increase strength.
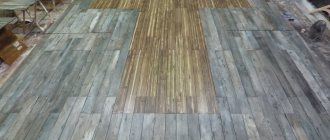
Chipboard for floor leveling
In the first case, that is, to level the floor with chipboard sheets, you must first prepare the old base. As a rule, plank floors are leveled in this way. Before laying chipboard, it is necessary to get rid of the creaking of the boards, which almost always appears in places with increased load, for example, passages. Find the old place where the board was attached to the joists and use a 150mm nail to make a new connection. Thus, eliminate the creaking of boards over the entire floor area.
When you dismantle old skirting boards, note that there is a gap of about 10mm from the laid boards to the wall. The same gap should be observed when installing chipboard floors. This gap for the expansion of the material will later be closed with a plinth, but if it is not left, then with seasonal changes in temperature and humidity in the room, the chipboard sheets may rise, damaging the finishing floor covering.
Taking into account the gap, prepare chipboard for the entire area of the room. You will probably need to saw the sheets. Here you need to act carefully, because the slab crumbles when sawing. For a high-quality cut, use a hacksaw with fine teeth, and it is better to stick adhesive tape or masking tape along the cut line. If you need to drill into chipboard, do it with a sharp drill bit at high drill speeds.
Chipboard, like any wood material, is extremely sensitive to moisture, so it is recommended to completely treat the sheets with two layers of drying oil before laying.
Now you can start laying chipboard sheets on the floor. There is nothing complicated here: you lay the sheet, level it and fasten it with nails or self-tapping screws to the floor. If you are laying linoleum on top, then to fasten the holes you must first countersink with a large-diameter drill. After laying the entire floor area, again, depending on the finish, it may be necessary to seal the seams and fastening holes. To prepare the putty, you can mix sawdust with PVA glue, or use wood mastic. To completely hide all the irregularities, sand the seams with fine sandpaper.
Laying chipboard on concrete
If the concrete base is initially perfectly level or a leveling screed has been made, the particle board can be laid directly on it without lags. The work is performed in the following order:
- The surface of the base is cleaned of debris, dirt and dust using a construction vacuum cleaner. If you had to resort to wet cleaning for preparation, leave the premises until completely dry and ventilated.
- Chipboard is treated with a moisture-resistant impregnating agent. For example, drying oil.
- The slabs are laid at a short distance from the walls in a checkerboard pattern. To avoid squeaks during operation, they are placed at a slight distance from each other. 1 cm away from the walls of the room.
- To fix the sheets on a concrete base, dowel nails are used. On average, 14-16 fasteners are required to secure one sheet. They are installed in corners, along the edges and in the center.
In our Remonstr online store we have a large selection of chipboards that are suitable for installing floors, both on joists and directly on concrete. Store managers are always ready to provide you with advice on the material, help you choose the best chipboard for a specific project, simplify payment and arrange delivery. Thanks to this, you will receive high-quality material at an affordable price, without spending extra time on selection. For greater shopping convenience, we suggest you use an online calculator to calculate the required amount of material.
How to lay chipboard on joists?
If you have carpentry skills, then you can use a very convenient option for installing chipboard on joists - it works out quite quickly, without the hassle of screeding, is relatively inexpensive, and also comes with additional insulation. In addition, this method is more environmentally friendly.
The same principle of arrangement of sheets is used here as when working on concrete - you should start laying from the threshold, and you can use any slabs, including laminated, plain and veneered.
Important! The joists need to be laid quite often, since chipboard is not a very durable material. The step width can be a maximum of 40 cm.
The work process looks like this:
- Place polyethylene on the base (this is optional, but recommended).
- Install the bars at a distance of 20 cm from the wall and then in increments of approximately 30-40 cm.
- Place joists on the beams.
- Fix the frame with self-tapping screws, check it for horizontalness using a level.
- If there are cavities under the beam, then fill them with wedges.
- Having achieved a horizontal surface, secure the frame with anchors.
- If the floor is being installed in a private house where there is a cold underground floor, then the distance between the joists must be additionally insulated. To do this, place sheets of mineral wool in the cells or fill in expanded clay.
- Install the slabs with a gap from the walls of at least 1 cm.
- Place the joints of the edges of the chipboard sheet strictly in the center of the log.
- Next, fix the sheets on the joists using self-tapping screws, with the heads of the screws slightly recessed into the slab.
- Seal the holes from the caps with putty, and also treat the joints and seams with putty.
- After drying, sand the surface with a sander, and then paint the surface with paint or varnish in two or three layers.
Important! If you plan to lay a finishing coating such as carpet or linoleum on top of a chipboard sheet, then there is no need for sanding.