Surely each of us has had to face the problem of installing or replacing a faucet at least once in our lives.
It should be remembered that before installing the tap, it is necessary to turn off the water supply to the apartment.
And I would like to note that installing the mixer is possible even with your own hands, since you do not need to have special skills for this. How to connect a faucet in the kitchen correctly?
Preparing the tool
Before installing the faucet on the kitchen sink, you need special equipment. To complete this job you will need:
- FUM tape for sealing. It must be non-swelling from exposure to water.
- Set of different keys. You definitely need a pipe one. It is used if you have to tighten the nuts on the sink in places that are difficult to reach. Open-end wrenches are also used - 10 or 11 (in some sink models, 12 is used). A small key will probably be useful in your work, so you should have that ready too.
- Special installation kit. It should include rubber O-rings, a nut, one or two studs, and a metal half-washer, which is made in the shape of a horseshoe.
- Pliers.
- Screwdriver.
- Plumbing connections (or hoses) - 2 pieces.
You will also need auxiliary items for your work: a basin, several rags of different sizes, a flashlight that will illuminate hard-to-see areas.
One of the most important functions in replacing a faucet is performed by plumbing connections. Definitely, if you are replacing an old faucet, you also need to change the hoses. Sometimes they are replaced separately, so any repair service should have a supply of them. Before using eyeliners, it is important to choose the sizes. They should be neither too long nor too short, so they are often purchased separately. Practice has shown that the most optimal length for plumbing hoses is 86 cm. At the same time, it is the dimensions that are a common problem with factory hoses - they are often produced too short.
Another important factor is the material of the eyeliners. For example, you should not use silumin hoses, as there are complaints from experts regarding their reliability. Usually, eyeliners are sold complete with rubber gaskets to ensure greater tightness. It is believed that if the hoses bend well, then their installation will not take much time. At the same time, with intensive use, they will quickly become unusable, as they are subject to wear.
About the geometry of the faucet spout
When it comes to such characteristics of a mixer as a spout, the buyer is presented with a huge number of modifications:
- tall;
- horizontal;
- curved;
- low;
- short;
- rotary and others.
Various brands advertise their products, citing the opportunity to place a tall vase or kettle under the tap, fill a carafe with drinking water, or wash a large watermelon or melon. Each of them is convenient and functional in its own way.
Options with a high spout are considered universal.
These types of kitchen faucets require a large space from the sink to the tap. This arrangement makes it convenient to fill a bottle with water, wash dismountable parts of kitchen appliances, and fill pitcher filters. A useful improvement is the rotating mechanism of the faucet, especially if the sink is of a two-section type. The advantage of such models is the ability to install them anywhere on the sink, not necessarily in the center. This allows you to harmoniously decorate the wall space with shelves, hooks, and local lighting fixtures.
A faucet with a horizontal spout looks stylish. He's always tall.
When choosing to install a horizontal spout, you must take into account that the sink must be deep for this, because such a faucet “steals” space.
Models of faucets with a short spout are an accessory for small kitchens and oversized sinks. They have a centrally located faucet and a shallow single-section sink. The negative point is the inconvenience of washing frying pans, large pots, tall vases and jugs. A short spout does not exclude the possibility of its rotation, however, it is often fixed permanently in a straight position.
Models with a flat “gander” look more modern and stylish. They favorably complement kitchens in high-tech and modern style. Typically, for such options, the manufacturer chooses practical materials that have a high price and long service life. More often, flat options are used in horizontal models.
It is more common to see round spouts in medium-static kitchens. They are easier to clean, rotate without problems in rotary models, and have a higher or lower bend.
Removing a non-working mixer. First stage of replacement
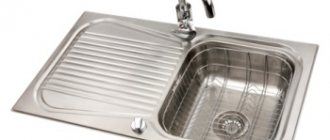
Before installing a purchased faucet in the kitchen, you should divide the workflow into five points. The first stage is the dismantling of the crane that has become unusable. First, the water supply to the apartment is cut off. Place a rag on the bottom of the sink. This is necessary in order to collect small parts that may accidentally fall apart during disassembly of the mixer. Using a rag will also prevent nuts and bolts from getting into the drain hole, and the cloth will also save the surface of the sink from unwanted damage.
The tap is disconnected from the cold and hot water supply pipes using open-end wrenches. However, if convenient, you can do this work with your hands. Rags are placed under the pipes, and a basin is installed into which the residual water is drained. After it has all flowed out, wipe the pipe threads dry. Then take a tubular wrench and unscrew the clamping nut. It can be placed on one or two studs, located on the sink or under it, but it is with its help that the faucet is secured to the sink.
Following the clamping nut, the half washer is also removed, after which the mixer itself is carefully pulled out of the hole in the sink.
How to choose a kitchen faucet
When visiting hardware stores or construction websites, many people wonder: how to choose a kitchen faucet? Which properties are considered main and which are secondary?
Available models should be differentiated into groups:
- by height;
- form;
- material;
- the presence of a rotating mechanism;
- complete with additional devices;
- price.
On this topic:
Glass tables for the kitchen - a modern take on luxury...
Assembling a kitchen set - secrets of craftsmanship
Create home comfort by choosing kitchen curtains
What material should I use to decorate the ceiling in the kitchen?
BACK FORWARD 1 of 5
If the sink has a small perimeter and depth, it is unlikely that you should choose a high spout. The water will splash when it reaches the bottom, leaving a coating on the walls. Deep sinks, on the other hand, require a massive faucet option with a swivel mechanism. For this case, you can consider horizontal spouts, which often have a flat configuration.
Pay attention to the material of the product
Performance properties, price and appearance depend on the raw materials used to make the mixers. For the body it is metal.
An alloy of brass and bronze is relevant today. Its advantages are: moisture resistance, anti-corrosion properties. The faucet does not become overgrown with metal salts from the inside.
In second place are brass bodies. They are environmentally friendly, practical and hygienic. They have a long service life.
Somewhat less frequently, mixers are made from alloy steel. Their disadvantage is a short service life (especially in areas with high water hardness. Such steel quickly becomes “contaminated” from the salts it contains. The most economical technical devices are made from simulin. The substance contains silicon and aluminum. However, such models are characterized by fragility and rapid yield If the choice is not limited by the financial side, you should pay attention to bronze faucets with applied brass threads.
In addition to metal models, water supply devices are made of plastic, ceramics or coated with a layer of chrome (enamel).
Although such options have a shorter service life, they have their advantages. Among them:
- low thermal conductivity;
- ease;
- resistance to water reactions;
- strength.
Applying a nickel layer (as well as chrome or enamel) to the outside also serves the purpose of protecting the surface from the development of microorganisms and bacteria.
Ceramic faucets are attractive and corrosion resistant. A kitchen with such an appliance acquires special expressiveness and charm. According to many experts, the most functionally advantageous modification is when the internal device has a ceramic base and the external elements are metal. Granite faucets can be installed based on individual preferences. Moreover, they often accompany sinks made of the same granite.
With or without filter
It is rational to choose a model with a filter. Not only because you can get purified drinking water without additional devices, but also to prevent plaque deposits on the tap.
By using filtered water, there is no need for additional cleaning of taps and sinks.
The argument for choosing a faucet is the expected functional load on the sink. Washing large pots, pans, and cauldrons is inconvenient with a low spout fixed in one position in the middle of the far side of the sink. For such situations, a flexible hose or spout with a high bend is more convenient.
Selecting a mixer based on design
Modern kitchen ensembles require technical appliances to be able to choose their colors, shapes and additional amenities. Styles such as country, Provence, and classic are continued in bronze, gold, and copper faucets. It is harmonious when they have two-valve mechanisms and a high spout. There will be a flexible hose in place.
Ceramic handles and levers will complement the effect of the chosen style. Such equipment cannot be called inexpensive, but it will serve for a long time and with high quality.
For the Scandinavian style, you will need chrome or beige models with a simple, single-lever mechanism. For high-tech, designers recommend touch controls, matte or glossy chrome paint, and a discreet geometric shape.
A mixer of delicate rich colors is suitable for the Art Nouveau style. They have a single-lever mechanism, are made of practical materials, and can transform their spouts.
A matter of taste is the shape of the spout. Sometimes users choose models equipped with unusual and extravagant details. Examples include: R-, J-, S-, L-shaped shapes and other unique design solutions.
Second phase. Assembly
The main point of assembling the mixer is its connection to the inlets connecting the device to the central water supply. The spout (tap) is inserted into the body. The guideline for this is the restrictive ring. After you have inserted the spout, manually tighten it with the tap nuts. Next, take FUM tape and wrap it around one end of the eyeliner. It acts as an additional spacer, so if you don’t have tape at hand, it’s not critical.
After this, the tip of the first line is inserted into a hole specially provided on the mixer body. The hose is screwed on first by hand, then using an open-end wrench. The second liner is fixed in a similar way, and it doesn’t matter which one you start with - for cold or hot water. When twisting the hoses, try to maintain balance. If you don't tighten enough, you risk unreliable operation and water leakage, and if you overtighten, you risk damaging the gasket, which will also negatively affect the functions of the mixer.
A pin is placed in a special hole (its location is noted in the instruction manual). There may be several or one, depending on the model. Next, the connections are threaded through the o-ring and firmly fixed to the base of the housing.
Installation technology for a new mixer
Before you start installing a faucet in the kitchen with your own hands, you should familiarize yourself with its design and installation instructions. New faucets are available with two mounting methods.
In some, fixation to the sink or countertop is carried out by one or two studs with nuts screwed into the mixer body. These models fit better into thick countertops, from 22 to 50 mm thick.
Others are secured with a wide nut screwed onto the body of the device. This type of fastening is preferable when installed in metal sinks made of thin stainless steel sheets.
The hole for the mixer is selected using a 28 or 32 mm crown. On a wooden tabletop this is easy to do yourself. For metal, high-precision equipment will be required. It is better not to deal with a ceramic sink yourself, so as not to spoil the expensive equipment. Leading manufacturers provide a hole for the mixer during manufacture.
With washer mount
This design can be immediately attached to the sink, since the long cylinder at the bottom will allow you to freely attach flexible hoses without interference.
- in the box with the mixer you need to find a rubber o-ring and place it in a specially provided groove at the bottom of the wide part of the body;
- carefully, so as not to knock off the thread on the cylinder, insert it into the hole in the sink or countertop;
- check that the sealing ring has not fallen out of the groove or become distorted;
- Place a sealing gasket made of rubber or elastic plastic onto the cylinder from below;
- attach a wide nut to the thread with the wide part towards the sink or countertop, make sure that it is not warped;
- screw the nut all the way into the countertop; on high-quality faucets this can be done by hand;
- Using a wrench or adjustable pliers, carefully tighten the nut until it stops, holding the mixer in the desired position by the upper part;
- If the position of the spout needs to be corrected, the nut should be backed off half a turn, tighten the mixer and tighten the nut again.
Do not overtighten the nut - this will not increase the reliability of the fastening, but it will increase the risk of stripping the thread.
After the mixer is securely attached to the sink, it is time to screw flexible hoses into its body. Their threads do not need to be wrapped with sealing material; sealing is ensured by rubber rings located at the ends of the fittings. Here, too, you need to be careful when tightening the thread - the fitting is screwed in by hand, after which one to one and a half turns are made with a wrench.
With stud fastening
How to install this model correctly? For them, the nuance lies in the need to first screw on the flexible hoses, and then fasten the mixer. If you try to do the opposite, the studs will interfere with tightening the fittings of the eyeliners.
The installation sequence is as follows:
- unscrew the studs;
- twist the flexible hoses with your hands and tighten them with a wrench;
- twist the extended brass nuts from the studs;
- screw the studs into the body by hand and tighten them with a flat-head screwdriver using the slotted slot at the end;
- place the o-ring on the bottom of the mixer;
- pass first the eyeliners into the hole in the sink or countertop, and then the pins;
- put an elastic gasket on the ends of the studs and then the fastening shaped half-ring from the kit;
- attach the extended nuts from the kit to the studs and tighten them manually;
- After making sure that the mixer is correctly oriented relative to the sink, tighten the nuts on the studs one by one, several turns at a time, ensuring their equal load and the absence of distortions.
Attach the sink to the countertop or in the washing module.
Final installation of the faucet on the sink. Third and important stage
It is much more convenient to work if you install the mixer on the sink before you build it onto the countertop. There are special holes in the sink where hoses are threaded and the faucet is installed. The operation will be easier if it is performed in conjunction with an assistant. A second person is needed to hold the sink while threading the hoses and installing the faucet. This will significantly increase labor productivity.
At the bottom of the sink, we also attach a rubber pressure washer to the liners. This way the case will be provided with maximum protection. Following the rubber pressure washer, a horseshoe-shaped metal washer is also secured. The last step is to install the stud-nut at the bottom of the sink. It is convenient to use an open-end wrench to tighten it, but it is suitable if the sink is not yet secured. If for some reason it is already installed on the countertop (for example, you did not dismantle it because you are only changing the mixer), then use a tubular wrench to secure it.
Where to attach
When choosing a kitchen faucet, you need to decide in advance how it will be secured.
Today there are three options:
- directly at the car wash
- there is a headset on the tabletop of a special table;
- on the adjacent wall.
Any of the options requires preliminary preparation, for example, a corresponding hole is cut in the tabletop or a method of mounting on the wall is determined.
To be able to mount the mixer on the wall, it is necessary to remove the water supply pipes in a special way. If there are tiles around the sink, additional holes are made in it.
When choosing a suitable option for water distribution equipment, you need to pay attention to the angle of rotation of the spout provided for by a specific model. Most of the economical mixers in demand today have a permissible rotation angle of 140 degrees. It is convenient and functional: you can easily fill the vessel with water without placing it exactly in the middle of the sink. More expensive models also require a larger rotation angle (up to 180 degrees), or even complete rotation around its axis. Whether the housewife will be able to use such an addition depends on the method of installing the entire system: it is necessary that the cabinet for installing a sink on it has a special island.
Modern manufacturers, in the struggle for the sales market, enrich their products with convenient gadgets that not only improve their functionality, but also save, for example, water. Thus, some faucet models are equipped with water pressure limiters and temperature sensors. No one today is surprised by the presence of compensators and thermostats in such a system.
Models with touch controls, as well as options with short spouts, have found practical application.
Choosing a faucet for the kitchen is not an easy question. Its functionality should be intelligently combined with appearance, and its price should reflect quality. And if the kitchen is the most visited room in the house, then a high-quality faucet on the sink is an accent that will not go unnoticed.
Connection to pipes and preliminary check of operation. Fourth and fifth stages
If the sink has not yet been installed on the countertop, then after completing the above operations it is necessary to do so. Then the last task remains - to correctly connect the mixer connections to the central water supply pipes. According to standard schemes, cold water is supplied from the left pipe, and hot water from the right. However, there are also alternative modifications of water supply systems. In these, cold water is supplied from above, and hot water from below.
The very last stage is testing the assembled and installed mixer. To do this, water is drained. Correct connection and a strong connection is indicated, firstly, by the absence of leaks, and secondly, by the condition of the supply hoses. If they bend in a U shape, then you did everything right. If leaks are detected, this is an indication that there is a weak seal installed somewhere in the system. Troubleshooting is easy: you need to carry out an inspection, find the damaged gasket and replace it.
Installation instructions
As a rule, the reason why a decision is made to install a mixer is either the old one has failed, or the desire to change the entire furnishings, down to the smallest detail. Before you begin the installation, it should be noted that the work process is divided into three main stages.
The structure of the mixer, taking into account small parts and gaskets.
- First of all, you have to decide on the choice of device, plan the entire work process, prepare the necessary tools and (if necessary) materials.
- The next step is to install the mixer, securely fasten all the elements attached to it, screw in the hoses supplying hot and cold water.
- The last thing left to do is to check how correctly you performed the installation. Having assessed the work visually, if none of the individual elements of equipment raise any doubts, turn on the water and make sure that the mixer is working. Such caution is necessary due to the fact that during installation you may not have noticed possible defects in the components. This way you will eliminate the possibility of water leakage. Particular attention should be paid to the hoses.
You may be interested in: How to choose the right kitchen sink?