03.09.201616638
If there are arched doorway designs, arched doors must exist. The design features of an arched doorway do not allow classic rectangular panels to be placed in it. The exception is the option in which the upper (rounded) part of the arched opening is filled with a fixed canvas that repeats the design of the sash. The lower part of the frame, together with the vertical walls of the opening, forms a rectangle into which traditional rectangular doors are mounted. This type of arched structure allows you to save on manufacturing, while looking not much worse than a full-fledged arch.
Arched door
- Design features
- Materials used for manufacturing and finishing
- Making doors for arched openings
- How to make it yourself
- More complex designs
Types of arched doors:
- Lancet (Gothic) opening. The rounding of the upper part of the arch consists of two arches with a diameter greater than the width of the opening. The arcs converge at the top of the arch, forming an acute angle. They look elegant and slender, but at the same time require higher ceilings than traditional arches. Visually increase the height of the wall.
- Semicircular view. Rounding without sharp corners, regardless of shape. An obtuse angle is allowed at the junction of the circle and vertical walls. Divided into several subspecies:
- Semicircular - the upper part of the arch is made of half a circle with a diameter equal to the width of the opening.
- Ellipse is a rounding of an elliptical shape, one of the diameters of the ellipse is equal to the width of the opening.
- Romance - a rectangular arch with rounded corners.
- Modern - a symmetrical or asymmetrical arc with a diameter larger than the width of the opening. At the junction with vertical walls it forms an angle.
- Horseshoe design. It may have options with a semicircular or pointed top, in the form of an Orthodox dome.
More complex designs
Arches cannot be made according to a traditional design, since they do not have a top side to accommodate the sliding mechanism. Manufacturers made some tricks in the design.
- Single leaf. The arched shape is maintained only on the door handle side. The opposite part of the door is rectangular in shape with a mechanism installed on it. When the door is completely closed, you cannot see what kind of bend it has, since it is hidden by the opening. When opening, only the part on which the handle and lock are installed is visible.
- . Both halves are made in a rectangular shape. The pattern or windows on the canvases follow the curve of the arch, and closed doors look like a repetition of the arched opening.
This option is suitable if the mechanism for hanging sliding doors is hidden in the wall. If the curtains are hung on one side of the wall, both halves of the sliding doors are rectangular. The design is made in such a way that on one side the doors look arched, repeating the curve of the opening. On the opposite side there are ordinary rectangular sliding panels.
Finishing the door leaf
The topic of this article is the manufacture of arched doors, their installation and the intricacies of these processes. We will talk about the types of doors with arches, note their varieties and the features of each type. We will also give recommendations for making your own entrance door in the form of an arch from solid wood.
Today, arched openings of various shapes and styles are used in the construction and decoration of most premises. They are used as entrance and interior doors.
Types of arched doors and their classifications
Let's start with the differences between arched doors and rectangular ones. If we take a global look at both designated types of doors, then the differences will be observed only in the shape of the arch - for arched ones it is rounded, and for rectangular ones it bends at right angles.
There are several classifications of arched doors.
- Depending on the purpose, there are interior and entrance ones. If the first type is made mostly from wood and its derivatives, then the second type is made from metal.
- We gradually approached the second classification, which is based on the material of manufacture. In addition to metal and wood, it is also worth highlighting plastic. Plastic doors are taken for installation in a balcony opening or as an entrance door.
- The third classification is based on the design of the door and the number of leaves. As a rule, these are swing doors with one or two leaves. For narrow interior doors (less than 1 m), one leaf is sufficient, but for entrance or other types of doors with an opening width of more than 1 m, it is better to use two leaves.
- In addition, you can also select blind ones and with inserts - in our case we are talking about glass inserts, which can be transparent and colored, as well as matte or decorated with stained glass. They not only give the product uniqueness, but also make the design visible, which is convenient in a number of cases.
Types of arched doors photo
As for the classification by type of opening, almost all arched doors operate on the principle of swinging the leaves, but there are also pendulum and folding doors (accordion doors).
All the variety of arched doors in this video.
Types of arched openings
From the variety of doorways in the form of arches (see Arches in the interior), the following classification can be made:
- Semicircular
arches. They are the most common and are also divided into subtypes:
- Classic
(semicircular) - they have a smooth radial shape. - Ellipsoidal
- made in the shape of an elongated oval. - Modern
- have intricate shapes with various protrusions. - Romantic
- shaped more like a rectangle, with the upper edges slightly rounded.
- Horseshoe
arches. They are shaped like a horseshoe. They can have not only a smooth semicircle, but also an elongated, pointed top. Most often, openings of this type are used to decorate premises in national styles. - Gothic
(pointed) arches. These structures have an elongated, pointed shape, without smooth transitions.
Classification
Arched door structures are made from metal, plastic or natural wood. If you plan to save money, fiberboard is used in manufacturing. Among modern materials, veneer, laminated door leaf or glass are widely used. Glass doors perform an exclusively decorative function and serve to visually increase the interior space of the room.
In terms of shape, the most popular types of doors in the form of arches are the following:
- semicircular (most common);
- classic in the shape of a semicircle (distinguished by a smooth radial shape);
- in the Art Nouveau style (have non-standard protrusions and shape);
- pointed, in the Gothic style (distinguished by the absence of smooth transitions and the presence of a pointed top);
- in the shape of an ellipse;
- romantic (in the form of a rectangle rounded at the edges);
- in the form of a horseshoe (used when decorating premises in national style).
At the installation site, entrance and interior arched doors are distinguished. Metal or arched plastic doors are often used as entrance doors, decorating the facades of office or commercial buildings.
To delimit rooms, arch-shaped doors made of solid wood are used. In order to increase aesthetic appeal, they are supplemented with standard or stained glass.
Arch doors come in single and double leaf types. Doors with one leaf are made of any material and are used as interior or entrance doors.
The standard entrance group is represented by double-leaf doors designed for non-standard or wide openings. Often one of the doors is tightly fixed with a latch, and the second part of the structure is used for entry. Sometimes there are arched doors consisting of 4 elements: the two central ones act as an entrance group, and the outer ones serve for decoration.
Based on design features, there are 2 types of such products:
- Standard cutting sheets, on top of which the rounded part of the structure is mounted. They have a moderate cost and allow you to make a swing or sliding door. The height of such a structure is calculated using a special formula: add 2 m 10 cm to half the width of the doorway.
- Canvases that repeat in detail the cut of a door arch. Such doors are quite expensive, because... the process of their production is labor-intensive and lengthy.
What types of arched doors are there?
Arched doors have many varieties and are classified according to various factors: installation location, material of manufacture, design features
Types of arched doors at installation site
There are two main categories here:
- Arched interior doors are located inside residential and other types of premises. Most often they are made of wood and have glazing. Stained glass compositions are often used for glazing such structures.
- Entrance doors in the form of arches are used mainly in the entrance groups of establishments: shops, organizations, shopping and entertainment centers. Made from plastic profile.
What are arched doors made of?
Due to the complexity of manufacturing this type of door leaf, the variety of material for their production is not very abundant:
- Plastic.
This material is used to produce profiles from which not only entrance doors are made, but also windows. - Solid wood.
Wooden door leaves in the shape of arches are used for entrance areas in the private sector, as well as inside any type of premises.
Structural features of arched doors
Based on the characteristics of operation, the complexity of installation and the cost of the finished product, the following arched door structures can be distinguished:
The peculiarity of such doors is that their production takes a long time. They stand quite high. Such models are made from wood, since arched plastic doors are made using a different technology.
. Such doors are somewhat cheaper, since their arched part is mounted separately and does not open together with the door leaf. It also becomes possible to use not only hinged, but also sliding versions of the canvases.
Important! The opening height for such doors should be large enough. It is calculated according to the formula: Vpr = 210 cm + half the width of the opening.
- Single doors
. They are usually used as interior and entrance options for private houses and public spaces. - Double doors
. For wide openings it is advisable to use two sashes. One of them can be fixed in the opening using a latch. Relevant for entrance groups. In this case, more often than not, the “working” part of the door is 2 times wider than the fixed part.
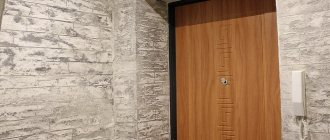
Entrance arched doors
Most often, arch-shaped entrance doors are made of metal. Such doors are not only reliable, but also very beautiful. They are chosen for country houses, the entrance to an office building, entrance or other public premises. An arched steel door will give a luxurious appearance to the facade of the building, emphasizing the status and artistic taste of the owner. Entrance doors can have one, two or even three leaves.
As a rule, metal arched doors are installed at the entrance, but no less reliable are structures made of natural wood, for example, oak. Also, the entrance door can be made of PVC. However, such a door is not very reliable, so this option is suitable when installing a double door. The first door (external) is made of iron, which has good thermal insulation and high security characteristics, and the second (internal) is decorative, made of PVC or wood.
Arched entrance doors can have a wide variety of designs. The designs can be supplemented with transoms, ordinary glass inserts, stained glass or mirrors, MDF panels, wood, and veneer. Forged doors are also produced.
Entrance metal doors in the shape of an arch are made only to order, which is due to the peculiarities of their design.
Making an arched door yourself
Despite the difficulty of making such canvases, it is possible. Now you can see for yourself. You and I will learn how to make wooden arched entrance doors.
It is better to order the box part according to your dimensions, and we will make the canvas with our own hands (see Size of entrance doors).
We prepare everything you need
First you need to prepare tools, boards and available materials. We will need:
- Jigsaw with wood saws.
- Electric milling machine with two types of cutters: disk (for grooves) and cylindrical.
- Sanding machine with sandpaper of different grain sizes. The best one is tape.
- Boards, 5 centimeters thick.
- Wooden wedges.
- Two small bars and 4 wood screws. The length of the screws should be 30mm greater than the thickness of the bars.
- Carpenter's waterproof glue. PVA is possible.
Making a blank for the arched part of the canvas
To make the arched part of the door leaf, we first need to measure the final width of the opening. That is, from the total width we subtract the thickness of the “box” part and a gap of 2 mm
between the door and the opening (frame).
After this we do the following work:
Important! Before making an arched door, you need to select well-dried boards. Since if they are damp, the canvas will warp over time.
- Now, using an electric router, we make grooves for a tighter connection. To do this, we take a disk-slot cutter. We make the grooves in such a way that the protruding part is about half the thickness of the board. That is, 2.5 millimeters. The same goes for the internal groove.
- Next, we clean the entire surface of the grooves from dust and apply wood glue to them. After this, we connect all the boards and leave them to dry.
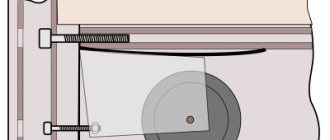
Important! In order for gluing to occur better, you need to take a board and attach pre-prepared bars to it with self-tapping screws. The distance between the bars should be 10–20 mm greater than the width of the glued workpiece. Place the workpiece between the bars and spread it apart with wedges.
Cut out a semicircle from the blank
For this operation, we recall the experience of installing plasterboard arches. We use one of two options to outline the arched shape:
- If the arch has an even semicircle. Mark the middle at the bottom of the workpiece. Then we take a pencil and tie a non-stringent thread to it. Cut the thread exactly to the length of the arch radius. Apply one end of the thread to the mark and draw a semicircle with a pencil.
- If the shape of the arch (as in the photo) has an elongated semicircular or pointed shape, then we use a different method. To outline the boundaries of the bend contour it is very convenient to use a long metal ruler. We also make a mark for the middle and draw a line from it strictly vertically to the length of the radius of the arch. Next, we place the ruler on the edge and bend it so that one edge touches the radius mark, and the other coincides with the edge of the workpiece. After this, draw a line with a pencil. On the second side we follow the same steps.
Important! Make sure you get a symmetrical arched neckline.
Next, take a jigsaw and carefully cut the workpiece according to the markings. After this, we take a grinding machine with the coarsest sandpaper and process the surface of our arched part of the door on both sides. After this, we repeat grinding with a finer abrasive.
Now the most beautiful part of our door is ready. Arched interior doors can be decorated with the same elements. However, it is worth considering that glazed arches will be more elegant for interior spaces. And their manufacture requires carpentry skills.
Finishing the door leaf
Now we have to make the rest of the door. It will be assembled according to the same principle as the previous part. The only difference will be that the boards will not be positioned horizontally, but vertically.
You should also provide a horizontal part at the very bottom of the canvas. This will help extend the life of the door.
As a result, our door leaf will consist of 3 parts:
- Horizontal bottom cross member.
- Shield made of vertical boards.
- Upper cross member. It is also the arched part.
After all 3 parts of the door are ready, we connect them using the tenon method. To do this, we use a milling cutter to perform the appropriate operations and place all 3 parts on glue. Don't forget to support the canvas with wedges.
The final stage is treating the entire surface of the door with a protective agent and finishing coat. Pinotex or any other wood protection is suitable for this.
If the door will always be on the sunny side, it is not recommended to cover it with laminating coatings. In this case, it is better to use ordinary colorless varnish for exterior use.
Arched doors are gaining more and more popularity in the construction segment. On the one hand, this is an affordable opportunity to change traditional solutions, on the other hand, it is a correction of the standard sizes of entrance and interior doors. The “arch” theme began with the appearance of arched corridors, after which it smoothly moved to door structures.
The main classification of arched doors is carried out according to the following criteria:
- design features - entrance and interior doors, prefabricated and non-removable;
- arch shape - round, oval and rounded;
- manufacturing material - wood, plastic, metal, glass, veneer, mirror, combined products;
- the shape of the arc is round or gothic.
In addition to the fact that arched doors themselves are becoming more and more in demand, it is worth noting the popularity of arched openings both under doors and as an independent structural element.
Making doors for arched openings
Door for arch
Making interior arched doors is a labor-intensive process, with the exception of options with traditional rectangular panels built into the arch. At the slightest discrepancy between the curves of the canvas and the box, the structure will jam.
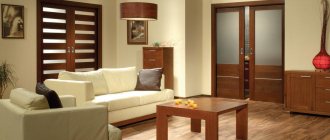
Arched doors made of wood attract buyers with the elegance of their design and beauty of execution. Semicircular shapes have always created a cozy atmosphere in the home and emphasized a non-standard approach to office design. For formal premises, the arched style gives a feeling of solemnity and festive mood.
Even the high cost does not deter customers. A typical wooden arched pine door costs more than 20,000 rubles (the cost of plastic doors starts from 9,000 rubles). Making custom arched doors will lighten your wallet by 50,000 rubles. (minimum). A non-standard design made of valuable wood will cost several hundred thousand. Installation will increase this amount by another 10-15%
For those who like to save money, canvases for arches are made from MDF, costing from 12,000 rubles. It is not recommended to buy such doors for residential premises, as they quickly lose their presentable appearance. Or the same plastic - arched brown plastic doors from a distance look like cabinetry, and the cost is 20 times lower.
As you can see, materials for arched structures can be to suit every taste and wallet thickness. You can install the doors yourself, saving a considerable amount. If you know how to hold tools in your hands, try making a door for an arched opening with your own hands.
How to make it yourself
The manufacturing rules are not much different from a similar procedure with traditional door leaves, but there are some peculiarities.
- First of all, an arch template is cut out, usually from fiberboard.
- The canvas is assembled in a rectangular shape, taking into account the fact that the upper cut will not bear the force load.
- The upper part is cut according to a template with allowance for further processing.
- The outer side of the rounding is carefully adjusted to the shape of the template, maintaining the perpendicularity of the end part. It is more convenient to edit the outer edge with a milling cutter. If there is no access to the machine, this can be done using a belt sander.
- The arched top of the box is made along the contour of the canvas. The arc can be bent according to a template or a set of several bars connected with spikes can be made. The vestibule is selected using a milling cutter.
- The upper loop is installed as close as possible to the beginning of the rounding.
- The fittings are attached in the same way as on a rectangular door.
Tools:
- assembly table with clamps;
- hand-held circular saw with milling capability;
- surface planer, planer, jointer;
- electric jigsaw;
- drill;
- Sander.
Double-leaf swing doors are made using the same principle. First, rectangular panels, then general marking of the arched curve according to the template, and after that - the door frame.
Types of arched openings
An arch is a relatively simple design solution that allows you to divide a room into zones without the use of doors and partitions. The most popular place to install an arch is, of course, the hallway, but arched openings at the entrance to the kitchen, balcony/loggia, recreation room, etc. are becoming increasingly popular. This is an opportunity to change traditional solutions for organizing space.
Varieties of shapes and materials of manufacture
According to the shape, the outlines of the arch are divided into:
- lancet;
- round.
In turn, the round outline is divided into the following main types:
- classic - even radius;
- modernist - arc (oval) with a rise;
- romantic - with a central straight part and rounded corners of the desired radius;
- ellipse - a regular or irregular oval is taken as the basis of the shape.
- horseshoe-shaped - part of the national interior in the form of a smooth or pointed upward semicircle;
- Gothic - with an elongated, pointed shape without smooth elements.
Types, material of manufacture, design
The main difference and aesthetics of arched doors is the presence of a rounded top that follows the smooth line of the doorway. Until recently, this model of doors belonged to the eastern form of organizing space and was little used in European culture. Over time, the non-standard shape of the door has won its niche, and today few houses can do without arched openings and doors. The main secret of popularity lies in association. What is an arched door in the understanding of each of us? This is the entrance to the palace, to a beautiful tower. This is a trend from the past, when kings ruled the world. It is this feeling of a fairy tale that attracts with its special design.
Arched doors can be classified according to a variety of criteria, of which the main ones are:
- place,
- material,
- structural characteristics.
Installation location and material of manufacture
There are 2 main types in this category - interior and entrance. The first option is doors installed inside any room. The main material is plastic, wood, combi with glazing.
Entrance doors are the main element of the entrance group of all kinds of premises. For their manufacture, various types of metal, veneer, wood, plastic, and, less commonly, tempered glass are used.
Due to the peculiarities of the design and the complexity of manufacturing the panels, plastic and wood are most often used; for interior doors, combination with glass panel is the most successful. The wood used for the production of the entrance group must undergo a complex of treatments to prevent the development of fungi and mold.
Design characteristics
The first and main feature of arched doors is the structure of the door structure, which is traditionally divided into:
- a single complex of canvas and opening, characterized by a perfect match of the two elements due to point cutting and individual assembly. The most expensive type of doors;
- standard door complete with arched part. In this case, the manufacture and installation of both parts is carried out separately. Recommended for installation when choosing swing and sliding models.
- single-leaf doors are the most popular type of door, not only arched, but also standard in shape. Can be installed both at the entrance and in the house.
- double doors are the ideal solution for wide doorways. It is recommended for installation even in small rooms, where, due to the wide area, the “working” part will seem 2 times more focused.
Rounding the corners significantly reduces the height of the opening. Calculate it using the formula: 2.10 m + ½ opening width. This figure may be higher, but it should not be reduced.
Do it yourself
A variety of standard doors allows you to choose the right product for any size. Arched doors are not yet so popular among manufacturers and therefore you may either not choose any model at all, or you may not find the right size. Therefore, we suggest you make wooden arched entrance doors yourself.
You can actually make the canvas yourself, but the boxed part will have to be purchased either at a specialized store or go to the forest.
Tools:
- jigsaw;
- electric milling machine;
- belt sander with a set of sandpapers of several degrees of grain;
- board 5.0 cm;
- small wedges;
- beams and wood screws, with the height of the screw being at least 3 cm greater than the width of the beam;
- wood glue or PVA glue.
Procedure
- First, determine the net width of the opening, for which you subtract the thickness of the box part from the total width of the opening and plus 2-3 mm of margin.
- The arch will be smooth and beautiful if its radius coincides with the radius of the doorway. To do this, you select boards, and then determine by width how many are needed, based on the fact that the boards are laid horizontally.
To make arched doors, always use only wood that has undergone forced drying under industrial conditions (chamber, heat, air exhaust, etc.). A damp or insufficiently dried fabric will eventually begin to move to the side, sag or warp in other ways.
- Using an electric router, you cut grooves on the boards that will allow you to connect the parts together as tightly as possible. On the reverse side you also make small shallow grooves for forced ventilation. Cut the grooves at the rate of 3.0 mm wider than the thickness of the board.
- Clean the boards with a soft brush and apply a middle layer of PVA glue or other carpentry analogue. Give it time to dry.
- Cut a circle from the workpiece and check the level of the plane.
The outline of the shape depends on what the arch will be like in the future. So, if you are planning an arch in the shape of a semicircle, mark a point at the very bottom. Take a marker or pencil and attach a thick, non-stretchy thread to it. Attach its end to a point and draw a semicircle with a marker.
If the shape of the arch is pointed or elongated, you will need a metal ruler. Place a point at the bottom of the workpiece, from which you draw a line straight up at an angle of 900. Next, place the ruler on its edge and carefully adjust it to the radius mark and along the edge of the workpiece. Trace the ruler with a marker. Do the same with the other side, maintaining complete symmetry of the lines.
- Using a jigsaw, cut the workpiece along the drawn lines and grind it. First with a larger abrasive, then with a fine one. This completes the arched part.
- The bottom of the door is prepared in the same way, except that the board is now laid vertically.
Be sure to add a horizontal part to the door, which will maximize the life of the door.
The finished canvas consists of three elements:
- lower;
- shield made of vertical slats;
- arched part.
You connect, as already mentioned, using the tenon-groove principle, for which you use a router to cut tenons, which should protrude by 2-2.5 mm. Remove the dust, apply wood glue and place the parts on top of each other in order. Be sure to support the already assembled canvas with wedges.
After 2-3 hours, after the glue has completely dried, finish the almost finished door with any protective agent. It can be “Pinotex” (universal impregnation) or any other. The best solution would be to use a clear varnish. On the sunny side, laminating coatings quickly lose their effect, but on the shaded side, it is simply unnoticeable.
An arch in the interior is an architectural technique that allows you to divide the space of neighboring rooms. Arched vaults allow you to add individuality to the layout of a typical apartment. Before delving into the technological intricacies of how to make an arch in a doorway, you should decide on its configuration and finishing option. Only a correctly selected form and design will give the interior of both rooms the necessary coziness and comfort.
Self-installation of an arched door
If the installer had experience installing a regular door, then an arched door will not cause any big problems. The operating algorithm is similar, only the nuances differ.
Required Tools
Door installation
Before work, stock up on the following tools and materials:
- wood saw;
- electric jigsaw;
- electric milling machine with different types of attachments (cylindrical and disk);
- boards, beams and wooden wedges;
- grinding machine (ideally a belt grinder);
- pencil, marker;
- polyurethane foam;
- roulette;
- long iron ruler;
- special waterproof glue (PVA), etc.
Cutting the opening
The work of processing the opening is not particularly difficult; it is more difficult to do it with the necessary accuracy. To do this, place a box against the wall and trace it with a marker or pencil. Adhering to the technological gap, knock out an opening in the wall, trying not to touch the excess surface. Otherwise, you will have to seal the holes and waste time removing your work mistakes.
Manufacturing from door leaf
To calculate the width of the canvas, it is necessary to subtract the thickness of the box and the size of the expected gap (about 2 mm) from the total width.
The size of the arch height is even easier to calculate: ideally it is equal to half the width of the door leaf.
Making an arched structure with your own hands requires the presence of 3 parts:
- Arched part (upper crossbars).
- A board made of boards laid vertically.
- Shield made of horizontal boards.
The thickness of the web of vertical boards depends on the purpose: for the entrance structure you will need wood no thinner than 5 mm, and for the interior you can use any wood.
The boards are processed with a plane or sanded. The shield is assembled by gluing boards with PVA glue with waterproof characteristics. It is important that the boards adjoin perfectly; gaps are not allowed! To do this, the entire shield is pulled together with wedges and left until completely dry. After the structure has dried, the wedges are removed, the canvas is sanded again, making sure that there are no glue drips, deformed or convex unpolished elements on it.
While the vertical part of the door is drying, begin making the transverse part. The algorithm of work is similar, only the boards are joined in width.
To make a door dome, first all measurements are taken and a template is made. The prepared wood is carefully cut into the required shape without any errors. The process is similar to working with drywall.
If the dome has a pointed or elongated shape, mark the middle and draw a vertical line along the entire length of the radius of the future arch. Then the metal ruler is placed on the edge, bent so that one more edge touches the radius mark, and the other is adjacent to the edge of the workpiece. Draw lines with a pencil and duplicate all operations on the other side of the canvas.
If the dome should have the shape of a semicircle, at the bottom of the arch it is necessary to mark the middle, where a pencil with a thread tied to it according to the size of the radius of the arch should be applied. In this way, a perfectly even semicircle is drawn.
Do-it-yourself arched doors are completed by combining 3 parts of the canvas into one whole. This is worth taking seriously. A milling cutter using a disk-slot or cylindrical attachment is used to process the tenons and grooves at the joints, which increases the durability of the blade. All 3 parts are placed on glue, and then pressed tightly using the same wedges.
After joining all parts of the floor, you should once again check that the boards are in the same plane. If gaps still remain between the boards, they are sealed with a mixture of PVA and wood dust remaining after sanding the board.
Processing of finished fabric
After the arched canvas has dried, it is treated with protective agents or materials intended for wood, as well as a special finishing coating. For this purpose, Pinotex is used.
If it is assumed that the front part of the canvas will be constantly exposed to the sun, then it can be additionally treated with veneer or simply coated with varnish suitable for outdoor use.
Installation of the canvas is accompanied by adjustment using special two-millimeter shims that take into account the gap. Then a door lock is installed, after which the door is hung on hinges (decorative or carved ones look beautiful).
Important! If double-leaf wooden entrance doors are installed, then the levels must be strictly observed. An error of even a couple of millimeters can lead to inconsistencies between the panels in the center of the opening!
Arched doors are stylish and respectable. With their help, you can clearly indicate the status of your home and emphasize the good taste of the owner.
Forms
There are several options for doorway shapes. When choosing, you should take into account the features of both rooms - ceiling height, width of the doorway, etc. Some designs look good only in high rooms, others require widening the doorway.
- Classic arch - suitable only for rooms with high ceilings (from 3 m). The correct bend radius is half the width of the doorway. Those. with a door leaf width of 90 cm, an arch will occupy at least 45 cm up from it. If we take into account that during the work the opening width, and therefore the bending radius, will increase, then a 2.5 m ceiling height may simply not be enough.
- Modern – used to design a doorway inside standard apartments. The radius of curvature exceeds the width of the door. Corners can have rounded or sharp edges.
- Romance is a good option for a wide opening; a direct insert is made between the rounded corners, either horizontally or at an angle.
- A portal is a common treatment of a doorway in the shape of the letter “P”.
The configuration can be wavy, polygonal - it all depends on the imagination, taste of the home owner, and the properties of building materials.
Cost of arched doors
The average cost of professional installation of a wooden arched door is about 5 thousand rubles. Additional nuances are calculated by managers of production workshops or design studios. They will charge another 3 thousand rubles for processing the slopes, from 1.5 thousand rubles for widening the doorway, and 500 rubles for removing the locks. and so on.
The price of the canvas is calculated based on the height of the canvas 2.5 meters. For non-standard orders you will have to pay extra from 30 to 60 rubles. for 1 cm, depending on the type of tree.
The cost of the canvas depends on the type of wood. Its most popular varieties used in the manufacture of doors are pine (the cheapest), beech and oak (the most expensive). In addition to the type of wood, the presence of panels and glass plays an important role in the pricing of the product.
A door leaf with an arch, made of pine, but devoid of decor, costs about 10 thousand rubles, and the same oak leaf costs more than 19 thousand rubles. If the canvases are supplemented with decorative glass, then a pine product costs from 12 thousand rubles, and an oak product costs from 21 thousand rubles.
Additionally, a wooden arched box is calculated. Pine costs about 9 thousand rubles, and oak costs more than 12 thousand rubles.
Arched metal doors are not cheap at all (the price can reach 90 thousand rubles), but are considered the most durable and reliable. Aluminum arched doors look presentable and expensive, while protecting the house from uninvited guests.
Despite the fact that all arched doors are considered a premium product, you can reduce costs by ordering a door made of material that imitates natural wood. A standard veneered arched door with one leaf together with the frame costs from 18 thousand rubles.
Material
The arched system can be made of concrete monolith, brick, wood, metal, plastic. They can also be made from chipboard, gypsum board, fiberboard, plywood, etc.
In addition, an infinite number of options for combinations of building materials and finishing, installation of lighting, metal and glass stained glass is possible. There are also options for finished products.
Process
First of all, you should decide on the configuration and finishing method. This can be done in two ways:
The appearance is chosen according to the interior design, and it must correspond to the interior of both rooms. From different sides, the arched system can be designed in different styles.
First, the old door frame is dismantled. The hole is expanded to the required size. The simplest option is to install a finished structure.
Note!
If the building material is stone, brick, concrete, then you should take care of the foundation for their installation, as well as tying the masonry to the wall using reinforcing elements.
Sheet materials. The best option is to make a full-length template before you start making an arch in the doorway. In this case, it is necessary to provide for the installation of a lighting system, stained glass, and other built-in elements.
- Aluminum guides are attached.
- Before bending the metal profile, it is necessary to cut it every 5 - 7 cm.
- Next, frame parts are made using the template.
- The finished frame is mounted using self-tapping screws.
- Then a strip of the required dimensions is cut out to cover the structure. Its length should be 10 cm longer and its width 3 cm.
- To bend the gypsum board you need to wet it. Plywood and fiberboard are bent using water and a hot iron.
Note!
Finishing work begins only after all modules have completely dried.
Theoretically, installing an arched structure yourself is not difficult. Installation work does not require expensive professional tools. A drill, a hammer, a hacksaw, and metal scissors are enough - available to almost every home craftsman. If you have no experience with such tools, it is better to turn to the services of professionals.
Photo
Often the interior passage in an apartment is not closed with a door, but left open. This allows you to elegantly unite the space and make the interior design of the rooms more elegant. To do this, you can purchase a ready-made structure from assembled elements or cut out individual parts with your own hands and then assemble everything in the doorway. But how to make an arch yourself so that it looks smooth and beautiful? After all, there are a lot of materials and technologies for installation; you need to choose wisely.
Designer arch
What arches can be installed in an apartment?
Installation of an arched structure in place of an interior door can be done without the involvement of professional builders. You just need to choose the type of arch and materials for its manufacture. Following the step-by-step instructions below will help you avoid mistakes and make an arch with your own hands.
Arch curves can be the most bizarre
Design features and significant differences
In construction, arched structures are supports for overlying elements of walls and structures. But in apartments, doorways to the corridor and between rooms are not load-bearing. In the first case, construction materials are selected based on serious external loads, and in the second they must withstand only their own weight together with the finishing.
Arch with bar counter
An apartment door arch, installed instead of a door, is an element of interior design. Its frame can be made from a lightweight profile for gypsum boards or bars with a cross-section of 20–30 mm. This design can easily withstand the weight of finishing materials. You just need to firmly fix it on the walls so that the decor doesn’t warp or fall off after a couple of weeks.
Reference! In private houses and city apartments, an open door arch between rooms serves exclusively decorative functions. In this case, the load-bearing loads are placed on the concrete walls on the side or on the lintel above the opening.
Finished plastic arch
Shapes of arched openings and their capabilities
There are many options for arranging interior arches in shape:
- "Classic".
- "Romance".
- "Modern".
- "Ellipse".
- "Trapezoid".
- "Portal".
The most popular types of interior arches
The first option at the top has the shape of a regular semicircle, and the last one has strict rectangular outlines throughout its entire height. The rest are intermediate versions between them. But other variations are also possible with one side “support” or two curved posts.
The shape of the door arch and its design are chosen to match the design style of the room. This takes into account the height of the ceiling, the size of the opening and the features of the premises on both sides. In some houses, classic shapes with a regular curve in the form of a semicircle will look ideal, while in others - a rectangular portal. This is more a matter of the taste of the home owners and the general style of interior decor. Some people even prefer cone-shaped contours.
- It is recommended to choose the classic option only for high ceilings in the region of 3 meters and above.
- In typical panel high-rise buildings, it is better to design the entrance to the kitchen with a “MODERN” arch.
- For a wide doorway from the hall to the corridor, “ROMANTIC” with large wide racks is more suitable.
- The rectangular “PORTAL” looks best in an interior where clear horizontal and vertical lines predominate in the decoration. This type of doorway design is ideal for houses made of timber or logs. In such a home, its rectangular corners will look elegant and fit the theme as much as possible.
Classic in the interior
What to build a designer doorway from with your own hands
To quickly make an arch in the doorway of an apartment, it is enough to purchase a set of prefabricated elements made of plastic or laminated chipboard lumber. They must be cut to the desired height and then secured in the places specified according to the instructions. But such options are standard and quite expensive. Plus, not every opening can be fitted with a ready-made model with the required dimensions.
Components of an interior arched system
To make panels of arched posts and arches you will need one of the following materials:
- drywall;
- plywood;
Advice! It is better to choose plasterboard sheets for covering the frame. GCR can later be finished with a large number of different materials. However, thin plywood is much easier to bend.
Finished veneered arch
The frame for an interior arch can be made:
- from a metal profile;
- from wooden blocks 20x20 and 30x30 mm.
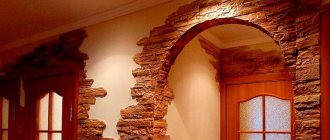
Brick decoration is ideal for connecting a balcony
You can also make an arch instead of a door from concrete, brick or aerated concrete blocks, and only then decorate them with one or another finishing material. But these options are more for those who like capitalism and solidity. Plus, they weigh a lot; it is impossible to build anything from them in the apartments of old apartment buildings.
The use of metal is limited not only by its weight, but also by its high cost. Manufacturing metal structures of complex shapes at home is a very difficult project to implement in practice. The easiest way to do it yourself is to work with drywall and its profile.
Advantages and disadvantages of arched doors
An arched door is considered an excellent option for decorating the entrance to a basement or basement. Handcrafted arched doors are complemented by iron awnings and door handles, giving them a monumental and secure appearance.
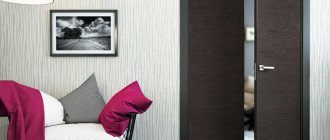
Interior arched doors visually expand the space and significantly increase the ceiling height. However, this rule applies only to ceiling surfaces with a uniform light color. In the case of dark colors, the door arch, on the contrary, will visually make the ceiling heavier and lower.
Custom-made arched doors are convenient in size for tall people. With the standard door height of 2m, taller people have to bend over, which is inconvenient. And with an arched door, these moments are eliminated.
Standard model
Arches allow you to realize the most daring design ideas and serve as elements of the individual style of the room. If you decorate not only doorways, but also window openings with arches, the overall appearance of the building will be rich and sophisticated.
No particular shortcomings were noticed behind the arched door structure. Among the negative aspects, the price of the product is not affordable for everyone and some difficulties with installation. Such doors require an opening cut out of the wall in a specific shape, and then carefully processed for subsequent installation. These issues can be easily resolved by specialist carpenters, but if necessary, you can try to install the arched door yourself.
Step-by-step instructions for self-installation
The photos and recommendations below will allow even a novice master to cope with the improvement of a doorway. To do this, you first need to create a frame, and then sheathe it and decorate it. You can do everything yourself, you just need to do everything consistently and without mistakes.
Scheme of a plasterboard arch
Preparing the doorway
- First, the leaf and frame of the existing door (if it exists and is in place) are dismantled.
- Then the opening is expanded to the planned dimensions.
- There is no need to plaster the cut walls under the frame; they will still be covered with sheathing. It is enough to straighten them and remove everything that can fall off (plaster, pieces of concrete, falling bricks). The main thing is that the supporting profile can be secured securely and in a strictly vertical position without tilting.
- If you are planning a backlit design, then you need to install the wiring in advance.
- Measurements are always taken at several points in the opening so as not to miscalculate the dimensions.
- If the walls are uneven, then the thickness of the racks (depth of the arch) is selected according to the thickest point.
- To simplify the marking and cutting of sheet material for covering the arched frame, it is necessary to make a life-size template from cardboard. This will allow you to avoid mistakes and preview how the contours of the structure being formed will look.
Important point! The upper part of the arch takes about 10–15 cm away from the height of the doorway. At least 20 cm should remain from it to the ceiling. When calculating and marking, these numbers must be taken into account.
Fastening the guides
Creating a load-bearing frame
- To make a frame for an arch, you first need to create a main contour from a profile around the perimeter of the opening, fixing it to the walls.
- Then the upper curved part of the frame system will be attached to it. Sometimes only a curved element is made on top, but this is only possible with perfectly smooth slopes.
- Vertical guides in the doorway are attached with an indentation from the plane of the interior wall by the thickness of the plasterboard sheet plus 2 mm for subsequent plaster on top of it.
- After plastering you should have a single, flat surface.
- On each side and at the top of the arch being created, you will need to secure two such profiles parallel to each other.
Advice! If the walls are made of wood, then self-tapping screws are sufficient to attach the guides, but in the case of concrete or brick, dowel screws will be required. The spacing between fasteners should not exceed 30 cm.
If the columns of the arch are made of small thickness, then two arches can be easily replaced with a wide profile. All cutting and bending manipulations in this case are carried out according to a similar pattern. However, transverse installation will no longer be necessary. When using wooden blocks instead of a profile, the frame for the arch is made using a similar technology. Only the original material of the supporting frame structure changes.
Two ways to bend plasterboard sheet
Rough sheathing of the frame
After completing the assembly of the arch frame, all that remains is to mount the gypsum board or wood board on it. To give plywood or fiberboard the desired shape, they will have to be pre-moistened, fixed on a template and steamed with a hot iron.
Ideally, you need to use special arched plasterboard, reinforced on both sides with non-woven fiberglass. It is enough to stretch it in the longitudinal direction and give it the desired shape.
There are two ways to bend a regular plasterboard sheet: wet and dry.
- Wet technology involves soaking the back side of the gypsum board with water and gradually bending it onto a template of the required shape and fixing it on it. This process is lengthy; haste can lead to rupture of the cardboard layer of the sheet. And the resulting part can be installed and secured with self-tapping screws on the arch frame only after the plaster has completely dried.
Advice! It is possible to speed up the process of moistening gypsum board to give it elasticity using a needle roller.
- The dry method involves making parallel cuts on one side of the sheet, which affect the plaster and the upper outer layer of cardboard. But the front cardboard layer remains intact. The bend is smooth and of the correct shape.
Installation of the main element of the arch
Cutting sheet material is best done with a jigsaw. When using a hacksaw, the cutting edges will certainly be less even. The sheathing is fastened with self-tapping screws in increments of 5–6 cm. After fixing it, the edges of the plasterboard and plywood sheets are sanded. And then a special plastic corner with perforation is attached to the curved edge to protect it from chips.
GKL fastening
Putty for perfect surface leveling
The next stage of finishing a plasterboard arch is primer and putty. After applying the first one, you need to wait until it dries. And fiberglass mesh is used to reinforce the second layer. The corners are also reinforced and leveled using a mesh.
The edges must be smooth
Surface putty
Putty joint with wall
Mesh reinforcement
Edge reinforcement with mesh
Next, apply the third finishing layer. The putty, which has hardened after 10-2 hours, is sanded with sandpaper to remove excess and make the surface as smooth as possible. There should be no protruding screw heads or dents left on it.
This is what the arch should look like