Secure to the tabletop
For these purposes, it is important to adhere to the following action plan
- It is necessary to draw the contours of the future sink on the countertop. For this spruce, a regular pencil will do. Be sure to take care of the indentations from the front and rear edges of at least 5 cm. After this, you can take measurements where the bowl will be concentrated. Using these measurements, it is worth drawing the outline of the hole for the sink.
- the line along which the cut will take place should extend 1 cm outward from the sides of the bowl. Make a hole at one point of the contour. If the shape of the bowl is in the form of a rectangle, then the hole should be made in the corners of the designated contour.
- Attach masking tape to the outside of the outlines. Thanks to it, it is possible to protect the tabletop from damage that a jigsaw can cause to it. In the process of cutting the opening, it is necessary to screw self-tapping screws into the cut to a small depth. Thus, it is possible to protect the inside from falling. The element to be removed should also be secured from below with support.
- Treat the ends of the table top along the saw cut using silicone sealant. This way you will protect your products from moisture. Application of sealant is also possible along the drawn perimeter.
- Insert the sink and installed mixer and siphon into the prepared opening. Secure it to the tabletop using clamps. These fasteners are included in the plumbing fixture complex. All that remains for you is to connect the mixer to the water supply and drain the product through the sewer siphon.
Here's a video of attaching the sink to the countertop from below:
Installation
We lay out the tools and accessories in advance so that they are at hand. It is also advisable to decide on the mixer and siphon so that everything is installed at once, otherwise it will be difficult to install later. How to attach a stainless steel sink to a cabinet? This is not difficult if you have already completed the assembly of the frame itself.
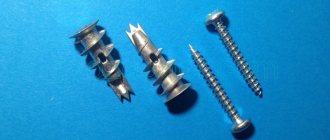
- L-shaped fasteners are installed, either included in the kit or purchased separately.
For fastenings, it is better to purchase L-shaped plates with oblique slots at a fastening store. You will need 4-5 plates.
During the assembly process, make sure that all holes are at the same level.
We suggest you familiarize yourself with How to install a water meter in an apartment with your own hands - diagrams, video instructions step by step
Before installing the overhead sink itself on the base or cabinet and securing it, you need to assemble it completely - secure the siphon and mixer in their places, install gaskets.
This product provides additional fastening of the sink to the cabinet in the kitchen.
The fasteners are placed on self-tapping screws and moved along the slot. This presses the sink against the cabinet.
Take care of the accuracy of the work and reliability.
If water leaks out, the system is assembled incorrectly.
The sink is secured to the cabinet with fasteners and a sealant. This is the most reliable method, quite durable.
So the question of how to install a stainless steel sink on a cabinet has been resolved. If the work is done correctly, it can stand for a long time.
Many people attach the sink to the countertop. There are options when, when ordering kitchen furniture, the need for a hole in the countertop for installing plumbing is specified. Then there will be little work involved in installing the sink.
If there is no specially allocated space on the countertop, then you will have to do everything yourself.
- Mark the contours on the surface with a pencil. Take into account the margins from the edges (5 cm). Take measurements for the bowl.
Remember that the gap from the edge of the countertop to the side of the sink must exceed 50 mm. If this distance is less than 50 cm, then the sink needs to be deepened.
To make a hole in the tabletop you will need an electric jigsaw.
To avoid chipping on the front surface, choose the opposite direction of the tooth.
Stepping back a couple of millimeters from the edge of the hole, we apply the silicone in a thickness just above the side of the sink.
The sink needs to be inserted into the hole and the edges should be pressed firmly so that the silicone strands take the shape of the sink and left for a few minutes.
So, having looked at how to attach a stainless steel sink to a cabinet with fasteners and to a countertop, you will notice that doing this is not as difficult as it seems.
https://www.youtube.com/watch?v=Ndnm8yp-fLs
The most difficult thing is to make the hole correctly. If it turns out to be larger than expected, the paws will not be able to hold the sink.
Using mounting brackets
Installing an overhead sink requires a little less time and can be done using special metal corners. They usually come with it. In total, you will need at least 4 mounting plates, which will be fixed on the outside of the cabinet using self-tapping screws. Since the wall of the stand cabinet rarely exceeds a thickness of 18 mm, the screws in the set are 16 mm long.
The step-by-step process looks like this:
- We screw in the screws 5-6 mm.
- We hang a mounting bracket on them (with the inner corner part facing the cabinet).
- We tighten the screws, but not completely, leaving room for adjustment.
- We place the sink on the stand so that the powerful main fastening screw is fixed in the very depths of the metal corner.
- We tighten the screws all the way and make sure that they are securely fastened
Installing a countertop sink in the kitchen and bathroom
There are several ways to install countertop sinks. It can be completely “recessed” into the cabinet, installed on top or made partially rising above the tabletop. In all cases, the drain is located inside the cabinet. To perform installation work you will need a standard set of tools:
- electric drill;
- hacksaw or jigsaw;
- screwdrivers;
- clamps;
- pliers;
- brush and spatula;
- pencil;
- level;
- rags;
- plumbing tow;
- silicone sealant.
Installation of the sink begins with markings. Included with the sink you will find a standard template. It is used to apply the correct markings. Determine the location where you would like to install the sink.
Attention! You cannot place an overhead sink close to the wall or at the very edge. This is a safety requirement and a guarantee of your convenience!
Photo 3. Installing a sink into a countertop requires all the necessary installation tools and tools.
If there is no template, turn the bowl over and outline it on the countertop. To create an outline, take a simple pencil; it is easy to erase and will not leave marks.
Next, measure the distance from the mounting eyes to the edge of the sink. The resulting centimeters are the distance by which you need to move inward from the previously outlined contour. Taking these dimensions into account, we make new markings. If the sink is of a traditional shape, then simply step back 1.5 cm from the outline and draw a new outline of a smaller size.
Sawing the tabletop along the contour
The “shape” obtained on the tabletop needs to be cut out. Here you will need a jigsaw or a hand-held fine-toothed hacksaw. The hole for the sink cut with a jigsaw will be smoother. If you don’t have a jigsaw, then to use a hacksaw you need to drill a hole inside the contour closer to the marking. From there we begin to cut out the excess. Try to minimize pressure on the countertop covering. Allow the hacksaw to move slowly, almost on its own. Speed is your enemy here! Chips will appear. Before cutting, cover the edge of the tabletop with adhesive tape to avoid damaging the decorative coating.
How to attach an overhead sink
You can attach an overhead sink without a cabinet directly to the wall. To do this, you need to use special brackets (sold in plumbing stores or departments with furniture fittings). First, make the first marking at the desired height from the floor (about 80 cm). Then, just below the first, make a second marking - it should correspond to the thickness of the wall of the sink at the back - this creates a line for attaching the brackets.
The simplest option is to install an overhead sink on a special cabinet (underframe). In this case, it should be wider than the underframe. Those. You can simply install an overhead sink between the sides of the cabinet, and its sides will cover the ribs of the cabinet. To do this, treat the end of the cabinet under the sink with silicone sealant, place the sink and press down. After the sealant dries, the sink will be firmly fixed.
We invite you to familiarize yourself with the smell in closets with clothes.
In normal situations, the overhead sink is secured with special fasteners (4 pieces), which can come with it or be sold separately. Initially, screw the screws into the walls of the cabinet from the inside. Then attach brackets to them (the corner should be facing the cabinet). Next you need to tighten the screws a little.
If fastening with standard brackets seems unreliable, fixing the sink with wooden blocks and furniture corners will save the situation. To do this, you need to put wooden slats in the box of the overhead sink. Then screw four metal corners to the slats around the perimeter of the sink and install it on the cabinet. And only then should you fasten the second part of the corner from the inside to the walls of the underframe.
Short description
The modern range of kitchen sinks is impressive in its diversity. The final choice directly depends on the wishes of the buyer himself, the design of the room and the required dimensions. Experts identify several key parameters:
- Material. Manufacturers most often use stainless steel with chrome or nickel plating, as well as porcelain stoneware, glass, and acrylic.
- Fixation method. Sinks come in wall-mounted, overhead and embedded types. The first option is practically not used today, since the product will look harmonious only in government agencies and communal apartments.
- Form. Modern technologies make it possible to produce oval, round, rectangular, square and corner models.
- Mixer location. The purchased faucet can be installed on a wall or sink.
- Complete with additional elements. The user can install an overhead sink on the cabinet with his own hands, and then complete it with outlets for the washing machine and water filters.
The most popular today are stainless steel sinks. If the product is of high quality, then the magnet is attached tightly, otherwise the product may deteriorate before the time specified by the manufacturer.
Mounting on a kitchen cabinet
In this case, the DIY installation process is carried out as follows:
- Prepare the place where the bowl will be installed. It is worth turning it upside down and tracing the outline with a pencil. You can cut the hole using a jigsaw.
- To prevent the embedded part from falling prematurely, it must be secured with 2-3 self-tapping screws.
- After this, try on the sink to the resulting hole. If it is placed normally, you can attach it to a set, equip it with a siphon or mixer.
- Attach the faucet to the bottom using nuts and washers. Screw flexible hoses into it.
- The siphon is assembled using union nuts. When the sink is equipped with an overflow, it is also worth connecting it to the siphon. Although it is not uncommon to find ready-made siphons for sinks with overflow. The finished sink is installed in a prepared place, and then connected to the water supply and sewerage system. Seal all existing spaces with sealant.
The video shows how to attach a countertop sink to a cabinet:
Detailed installation instructions
Let’s look at how you can independently install an overhead sink from “A” to “Z” without resorting to the services of hired installers and furniture manufacturing companies.
The instructions will be useful to anyone who is used to doing all the simple housework with their own hands, and the sink itself will find a place in a country house or in an apartment kitchen as a temporary replacement.
Step #1 - selection of materials and tools
To assemble more quickly, the cabinet can be purchased ready-made, but only if it is sized to fit the sink.
The second solution is to order from a furniture company, but this option is only advisable if the cost of the order is low.
To put together a cabinet and attach a sink to it, you will need the following materials:
- thin boards, sheets of chipboard or MDF plywood;
- steel sink;
- kitchen faucet with hoses;
- fastenings for washing (screws, corners);
- sealant or polyurethane foam;
- hinges and handle for the door;
- siphon with sewer fittings;
- antiseptic impregnation;
- legs or rollers.
To attach the sink to the cabinet, you only need a screwdriver or a screwdriver to tighten the screws, but to cut out the walls, base and door you will need a hacksaw, circular saw or jigsaw.
To clean the ends, you will need sandpaper, and to drill holes for self-tapping screws, a drill with a thin drill bit. We do not recommend using nails: they are more difficult to hammer into particle board panels, and besides, the structure fastened with nails becomes inseparable.
It is better to purchase all materials in advance so as not to waste time searching for the necessary parts during the assembly process. The listed tools are usually found in the home workshops of amateur craftsmen, especially if they are in charge of a dacha farm.
Step #2 - making a kitchen cabinet
The sink cabinet has a design that differs from conventional kitchen cabinets. It does not have two elements: a back wall - for free connection to communications, as well as a countertop, since it is completely replaced by an overlay sink.
Sheets of chipboard, thick plywood or moisture-resistant plasterboard - sometimes it’s easier to take some materials left over after repairs - we take in such a volume that there is enough material for two full walls, a bottom and parts for the connecting “belt”.
- first we cut out the large elements - two identical side walls and the base, then - the horizontal connecting parts;
- We carefully cut and, if necessary, clean and process the edges;
- if we use planed boards or plywood, before assembly we cover all elements with antiseptic impregnation, varnish or paint;
- we connect the elements according to the drawing using self-tapping screws and metal corners;
- Attach legs or rollers to the bottom side of the base.
If possible, we adjust the legs. If desired, the space under the cabinet can be covered with a plank. Lastly, we hang the door. This is best done after installing the sink.
It is recommended to place drawers (transverse stiffeners) directly under the sink and at the very bottom. You can also make additional crossbars in the middle if the structure is voluminous.
Having assembled the structure, we check its strength. We install it at the chosen location - it is desirable that it is as close as possible to communications.
Step #3 - choosing a suitable sink
Metal overhead sinks are sold in plumbing stores and can also be found in garden departments. They are similar to each other, but may differ in design and size.
In addition to single sinks, which are a traditional rectangular or square product with rounded corners of the bowls, there are models with drying shelves on which it is convenient to stack washed dishes, vegetables or fruits.
When choosing the size, you need to take into account the dimensions of the cabinet, if it is already ready. Otherwise, the sink is chosen according to needs: single or double, with or without a drainer.
The metal from which the sink is made can be shiny (traditionally “steel”) or matte. In terms of technical characteristics, both options are the same.
Next, we’ll look at how best to attach an overhead sink to a kitchen cabinet.
Step #4 - installation of faucet and siphon
Once the cabinet is assembled and adjusted, the hardest part of the job is over. All that remains is to fix the sink, having previously fixed the mixer and siphon to it.
First, you can install the mixer using the fasteners and gaskets included in the kit.
If only cold water supply is available at the dacha, then instead of a mixer, install a simpler device - a single tap for cold water.
Next you need to install a siphon. It is necessary to prevent odors from the sewer pipe from spreading throughout the living quarters.
It is also advisable to attach it to the bottom of the sink before installation, but it is also possible after - there is enough space under the sink to manipulate the plastic fittings.
Thanks to the prefabricated design, plastic siphons are installed quickly - according to the scheme proposed by the manufacturer.
Step #5 - installing the sink on the cabinet
Often, to install metal sinks, plastic “corners” are used - L-shaped pads, which are fixed to the upper ends of the side walls.
If the sink and cabinet fit perfectly in size, linings, screws or other fasteners do not need to be used.
Installation of an overhead sink
The affordable overhead (built-in) sink is made of stainless steel. It is mounted on a separate module and covers its entire upper part. The installation is very simple here - special L-shaped elements with an oblique slot are used for fastening. About 4-5 such fasteners are provided for one sink.
Advice! The connection of the mixer is carried out before the stage of installing the sink (the sink is installed with the equipment already installed) - otherwise it will be inconvenient to do all this at subsequent stages.
How to attach an overhead sink with your own hands:
- You need to attach the L-shaped fasteners to the cabinet from the inside and make notes;
- Screw the screws in the marked places. It is important to choose short 15 mm screws and screw them in so that at least 5 mm remains above the mark;
- Cover the end of the drawer with sealant - it will protect the furniture and additionally glue the sink;
- After this, the sink is installed on the screws screwed into the cabinet and moved until it fits completely;
- Then the fasteners are fixed, the excess sealant is wiped off, and you can begin connecting the sink to the water supply and sewerage system.
Washing
How to attach a sink to a cabinet if it is made of thin metal and has little weight? Obviously, in this case it is not enough to eliminate the possibility of lateral displacement: the sink must be fixed in both the horizontal and vertical planes.
Plastic fasteners
The standard mount, which is often supplied by kitchen furniture manufacturers to the cabinet, is a set of plastic corners with oblique grooves in them. The groove is designed in such a way that it can be fixed in several positions. When displaced relative to the screw that secures it, the corner presses the edge of the sink to the ends of the walls.
Fastening with plastic corners is not particularly difficult:
- Having installed the corners on the edges of the walls, we drill holes for the screws with a thin (usually 3 mm) drill. The depth of the holes is no more than 12 millimeters, the location is in the middle of the oblique groove.
Tip: to avoid drilling through the walls, use any method to make a mark at the required distance from the tip of the drill. This is usually done using a piece of duct tape or lipstick.
- Tighten the corners with 4x16 mm screws so that they move relative to the walls with noticeable force.
- Lift the corners and place the edges of the sink under them, then move the fasteners to the side and down until they stop.
Plastic fasteners, however, have one unpleasant feature. It will prevent the sink from moving to the side or rising above the cabinet; however, forward displacement remains possible in most cabinet designs.
To prevent this, apply a small amount of sealant to the ends of the walls before installing the sink. It will securely fix the structural elements, and it will not interfere with removing the sink to replace the faucet or flexible hoses to it.
Corners
To attach the sink, you can also use a steel or aluminum corner cut into 5-8 centimeters. It is attached with two self-tapping screws and fixes the sink using a piece of rubber pressed to the edge of the sink on top - a plumbing gasket or a piece of a car inner tube folded in half.
Thanks to the elasticity of rubber and the high coefficient of friction characteristic of it, the sink will be clamped quite reliably. However, the force on the screws screwed into walls made of chipboard will be quite significant and sooner or later they can be torn out.
But for home-made structures, this solution is quite suitable: a do-it-yourself sink cabinet is often constructed not from chipboard, but from much more durable plywood 12-15 millimeters thick.
Bar
Finally, the most reliable fastening is using a bar and plates made of galvanized steel.
- A block is placed under the edges of the sink along the perimeter or only on the sides (depending on the configuration of the cabinet). It should be so thick that its surface and the inner surface of the walls of the cabinet are at the same level.
- Then the block and walls are tightened with overhead plates and 4x16 mm self-tapping screws. In laminated chipboard walls, it is better to pre-drill holes with a 3 mm drill.
Installation of a free-standing sink
If the sink and its cabinet are not part of the set, but are installed separately, then connecting the structure is usually even easier. All necessary brackets are most often included in the kit, and the absence of interference from other items makes the headset easier to access.
We suggest you familiarize yourself with Ways to clean the faucet from limescale
If the sink is built-in or embedded in a cabinet, the operating procedure is exactly the same as described in the previous sections of the article. If the sink does not have a cabinet, it is placed on brackets screwed to the wall. The supplied communications can be hidden in the decorative “leg” of the sink or hidden in a decorative box.
Instructions: installing a sink in a countertop
Let's start solving this problem by preparing and purchasing new equipment. Before you go to the plumbing store, decide what kind of sink you need. Manufacturers offer models of different shapes and designs, sizes and materials used. Installing a countertop sink in a kitchen usually involves using a stainless steel, acrylic or stone sink. In the bathroom, preference is given to white porcelain, earthenware, marble, and granite.
Built-in sink
The built-in sink is an element of furniture for the toilet and bathroom. Its place is on the nightstand. The set includes a mirror, other plumbing accessories and lamps. We allow the installation of a sink in the countertop of kitchen furniture for this type of sink. You can install such a sink in a table, a single console, a countertop or a cabinet. The progenitor of the built-in bowl is the well-known Soviet “Moidodyr”.
Photo 1. Built-in sink.
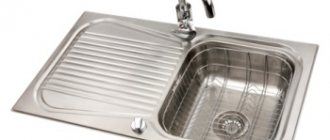
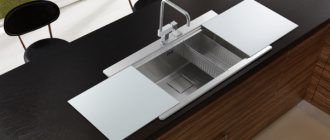
Countertop sink
Overhead models are a new word in everyday life and bathroom design. This is an option when the sink is simply placed on a countertop or a special cabinet. The stand can be any smooth, flat surface of suitable size. There are also many specialty countertops available for sale. They can be used as a sink stand. There are options for countertops with ready-made recesses for the sink.
Installing an overmount sink on a countertop has its advantages. Its advantage is the absence of joints, as a result of which it is easy and quick to deal with leaks. The surface of the countertop is also functional; it is used to store various accessories and kitchen utensils. Overhead structures are freely placed above the washing machine. This option is ideal for small bathrooms and compact kitchens. We will tell you how to install a countertop sink on a countertop later.
Photo 2. Overhead sink.
Distinctive features of overhead models
If we do not take into account sinks that are a thing of the past, which are attached directly to the wall on special brackets and do not require a cabinet or countertop as a support, all products for washing kitchen utensils can be divided into 2 categories: overhead and mortise.
The main difference between the two types is the installation method. The first ones, chosen exactly to size, are “put on” the top of the cabinet, and to install the second ones, you need to cut a hole in the tabletop.
From here follow the distinctive features expressed in design, material, and shape.
Unlike mortise sinks, which can be round, oval, or complex in configuration, overhead models have only a rectangular shape. Modern overhead sinks are made from stamped sheet steel, while mortise analogues are made from metal, artificial and natural stone, ceramics and even glass Overhead models are designed for installation on free-standing kitchen cabinets, therefore they have edges bent down on all sides, except one - the wall one.
On the contrary, it is bent upward. Overhead models have standard sizes: 600*600 mm, 600*800 mm, 500*600 mm, etc., and do not differ in variety. Mortise ones have many options, depending only on the imagination of the manufacturer. Overhead two-cup rectangular model. The sink is made of sheet steel. A standard square-shaped sink.
Products that do not require additional processing of the base are preferable for self-installation, and they are on average cheaper.
However, design features rarely allow the use of “overlays” in modern kitchen sets with a single countertop and built-in appliances. Overhead models are also quite often chosen for installation in the bathroom, but these plumbing fixtures have a more attractive design, material and size than kitchen fixtures.
For installation, you need a separate cabinet without a table top, which you can make yourself by cutting parts from a sheet of laminated chipboard or MDF and connecting the parts with self-tapping screws
But there are similarities between the two types of sinks. For example, installation of a tap and siphon, as well as connection to water supply and sewerage, is carried out using the same technology.
Sink installation
1 Ergonomics in the kitchen
Food preparation must occur accurately and quickly. This is primarily influenced by the location of kitchen furniture and appliances. In accordance with the principles of ergonomics, kitchen equipment must be placed depending on the order of work, that is, from left to right: refrigerator, dishwasher, sink, stove, and between them work surfaces with cabinets.
The minimum distance between individual devices should be:
- 40 cm between the refrigerator and the sink, as well as between the sink and the stove,
- 40 cm between the refrigerator and the stove.
For right-handed people, the most convenient way is to place separate workspaces from right to left. Regarding the sink, this means that the sink should be on the right and the drain on the left.
It is best if the sink is installed near the connection to the water supply and sewerage system.
The drainage system at the sink is made of pipes and siphons with a diameter of 40 and 50 mm.
When choosing a kitchen sink, you should pay attention to the following factors:
- Capacity. It is determined by the number and size of dishes washed daily.
- Functionality. It is determined by the nature of the work carried out in the kitchen, the number of additional bowls in the sink and wings for drying. If you have to carry out several personal manipulations in the sink at the same time, then these compartments will be very useful.
- Ease of use. You must be comfortable standing and working at the sink.
- Stability and durability. These parameters are determined by the material from which the sink is made.
- Combination with kitchen interior. The sink should match the style, design, color scheme and, of course, the size of the entire kitchen.
From an installation point of view, there are two main types of sinks:
- applied to a kitchen cabinet (overhead),
- built into the kitchen countertop (mortise).
When installing built-in sinks, it is necessary to accurately cut a hole in the countertop for the selected sink. In the case of slabs made of chips, this is not a big problem, but if the tabletop is made of stone, conglomerate or composite, then special cutting tools are necessary.
MATERIALS USED FOR THE PRODUCTION OF WASHES
Surface-mounted sinks are made of stainless or enameled steel. The two most common options for the appearance of steel sinks are smooth and linen-textured.
Drop-in sinks are made of stainless steel, mineral-epoxy composites and hard artificial materials.
Composite sinks often have an impressive grain structure, reminiscent of polished stone. Sinks made of artificial materials can be completely one-color. This group of kitchen accessories is characterized by an impressive appearance and high resistance to abrasion, scratches, dents and high temperatures.
WASH FORMS
Steel sinks have the widest range of shapes and varieties. In addition to the usual single-bowl sinks, there are sinks with several bowls (usually 2-4), which can be either shallow or deep, with additional side dryers.
3 Installation of an overhead sink
|
4 Installation of a mortise sink
Built-in sinks are designed for installation in kitchen countertops.
The first step is to cut a corresponding hole in the tabletop. In tabletops made of wood and laminated particle boards, we cut out a hole with a wood jigsaw.
For countertops made of stone, conglomerates or composites, special devices are used when cutting holes, so this service must be ordered when purchasing them. It is necessary to indicate the dimensions of the hole and the exact location of installation of the sink. The size of the hole for the sink is obtained by measuring the length and width of the apron on the bottom of the sink.
Share on social media networks:
A kitchen sink is as necessary an attribute as a stove or refrigerator. There are a huge number of types of sinks, however, the most popular design is the overhead kitchen sink, the availability and ease of installation of which create high demand among consumers. Operation of overhead plumbing fixtures is impossible without the kitchen cabinet on which it is installed.
In other words, the sink and base cabinet represent a single structure in the kitchen interior. Therefore, it is very important to attach the stainless steel sink to the cabinet correctly so that washing dishes and food is comfortable and convenient. In our article we will provide an overview of the most common methods of fixing sinks to different bases and describe an algorithm for doing the work yourself.
Sink mount: overview of different ways to install sinks
Effective and reliable fastening of the sink to the cabinet, countertop or wall console is one of the prerequisites for its reliable and durable operation. The sink bowl must be fixed as rigidly as possible, and we can achieve this result only if we choose an installation method that is ideal for our conditions.
What you need to pay attention to and how to correctly install different types of sinks - we will tell you below.
Types of sinks by installation method
Nowadays there are many models of sinks for kitchens and bathrooms on the market. They differ not only in appearance and dimensions, but also in installation methods. To make it easier for you to understand, we have presented the main characteristics of the most popular varieties in the form of a table:
| Kitchen sink type | Highlights of design and installation |
| Tabletop | Tabletop-type products are now virtually not used. In most cases, such a product is a bowl that is installed on top of the countertop and is in contact with it only at the location of the drain hole. A small number of tabletop sinks are represented by premium models, so their price will be appropriate. |
| Invoice | Overhead units are mounted on a cabinet without a top: flat areas near the bowl replace the missing tabletop. In most cases, such models are made of stainless steel, and therefore they are characterized by a relatively low price. |
| Mortise | Unlike the overhead, the mortise design is “recessed” into the countertop, which significantly complicates installation. The mount for the mortise sink is installed from the reverse side and reliably presses the sides of the bowl to the kitchen furniture. |
| Podstolnaya | The bowl, as the name suggests, is placed below the level of the tabletop. In most cases, models for tables made of non-natural stone have this design. To fix the product, special brackets are used; in addition, the joint of the bowl with the lower plane of the table top is sealed with a special glue. |
| Integrated | The most expensive variety. The bowl is installed in the countertop so that the gap between them is minimal. In most cases, products made of synthetic stone have this design, but it is also possible to find experienced varieties made of stainless steel. |
It must be emphasized that attaching a sink to a countertop made of artificial stone or installing an integrated structure is a rather labor-intensive task that should be entrusted to specialists. But attaching an overhead sink to a cabinet or installing a mortise product can be done by any craftsman with sufficient dexterity.
Installation technology
Overlay design
The instructions for installing an overhead sink will be the simplest, so let's start our review with that.
It should function according to this scheme:
- To begin with, we set the cabinet-underframe according to the level . The more stable this design is, the easier it will be for us in the future.
Note! In many cases, it is possible to install the sink on a movable cabinet, but it will still need to be secured and leveled before connecting the mixer.
Advice! The fastening for the overhead sink should be tightened manually, and not with a drill or screwdriver - this way we minimize the risk of deformation of the rather narrow metal.
- Instead of brackets, it is possible to take wooden blocks with attached iron corners . The sequence of actions in this case will be the same as when using standard fasteners: we install the sink on the screwed bars, which we then press with the corners.
Mortise design
In addition, it is possible to install a mortise structure with your own hands, but here you need to be more careful:
- We attach the template that comes with the bowl to the tabletop.
Note! If necessary, you can make your own template from thick cardboard.
- We draw marking lines according to the template, and then cut out a piece of wood or MDF along these lines using a jigsaw. To make the cuts more correct, it is possible to first make a couple of holes with a wood drill.
- We apply silicone sealant to the edges of the hole, and lay butyl tape around the perimeter.
- We install the part, carefully smooth it and press it to the lower plane of the tabletop, using iron brackets.
- In addition, if necessary, we drill an additional hole and fix the mount for the mixer to the sink, if its presence is provided for by the design. In most cases, the valve is located at the bottom with a clamping nut.
Wall mounting
In many cases, it becomes necessary to install the sink directly on the wall.
In this case, we proceed like this:
- To begin with, we apply markings on the wall, choosing the optimal height for mounting the bowl.
- After this, we take the brackets (their dimensions must correspond to the dimensions of the product) and apply them to the selected section of the wall. We mark the points where the fasteners will be installed.
- Using a hammer drill, we make holes in the wall. Installation of sink mounts is carried out using anchor bolts with an iron sleeve.
Note! The heavier the bowl, the thicker the anchors should be and the deeper they need to be embedded in the wall.
- We install the sink on the brackets, if necessary, fixing it from below with special fasteners. We seal the joint between the wall and the sink.
- Then we attach the siphon, which we disguise using a decorative console: it will also serve as an additional support.
Conclusion
Attaching a stainless steel sink to a cabinet or countertop, and installing sinks made of other materials must be carried out according to a strictly defined algorithm. Only in this case it is possible to guarantee that the structure will be durable enough. For a more detailed introduction to installation techniques, you should carefully study the video in this article.
Advantages and disadvantages of overhead sink design
The advantages of an overhead sink made of stainless steel can be described by a combination of four main functions: it works durable, is easy to install, looks normal and is inexpensive.
- Affordability. These are the most inexpensive sinks on the market.
- Easy to install. Assembling the sink involves placing it on top of the cabinet and securing the assembled structure with self-tapping screws.
- Sufficient operational durability. Stainless steel countertop sinks are resistant to water corrosion, so the sink will last for many years without the need for painting or rust removal.
- Aesthetic appearance. The shiny surface of the metal is easily cleaned of grease, and does not require special expensive cleaning agents (such as marble).
The disadvantages of overhead structures appear when you save money and purchase a sink with thin walls (up to 1 mm). Such sinks:
- prone to dent formation;
- the mixer does not hold well;
- make a lot of noise when a stream of water falls.
In general, increased noise production is typical for all metal sinks, regardless of the type of structure (surface or mortise). You can significantly reduce it by purchasing a sink with a normal metal thickness (1 mm).
Sometimes claims are made against overhead structures for the lack of diversity and design of the sink. Indeed, overhead sinks are standard and are available in several of the most popular sizes. However, such a charge is not relevant and is not a defect. The fact is that this type of kitchen equipment (due to affordability) does not pretend to be an expensive designer kitchen arrangement.
Conclusions and useful video on the topic
Video instructions for installation on a kitchen sink:
An overhead sink is not the best solution for improving the kitchen. But when a suitable cabinet is idle at the dacha and you need to quickly create comfortable living conditions, it is considered one of the most successful options. What is also attractive is that installation work does not require special skills, time and effort - everything can be done with your own hands.
Would you like to supplement the step-by-step instructions outlined above with useful tips or point out nuances that we did not mention? Please write your comments and recommendations under this article.
Or maybe you want to share your personal experience of installing a sink in your dacha? Tell us how difficult this work was for you and how much time it took you to assemble the structure.
Universal plumbing → Articles → Sinks →Proper installation of a sink in a countertop: nuances of the process
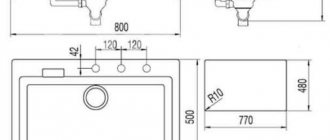
Dimensions of overhead sinks
The dimensions of overlapping sinks are standardized to the perimeter dimensions of manufactured kitchen cabinets. The most common size of an overhead sink is 50x60 cm. The most commonly used overhead sinks (and, accordingly, cabinets) are sizes 50, 60 and 80 cm in various variations.
- 50×50 cm;
- 50×60 cm;
- 60×60 cm;
- 50×80 cm;
- 60x80 cm.
The width of the sink can be 50 or 60 cm (sometimes 55 cm), a size of 80 cm will be too wide and inconvenient to use (you will have to reach for the tap). The length of the sink varies in wider dimensions and depends on the presence of a monolithic countertop. If there is a table for dishes, then the length of the sink reaches 80 cm; if there is only a bowl, the length of the sink will be 50 or 60 cm.
The depth of the bowl can be 16, 18 and 19 cm, while the size of 19 cm will be more convenient for washing, since the walls of the sink will better limit water from splashing on the walls and clothes.
Double-bowl countertop sink
Drawing for a stainless steel kitchen sink 80 cm
Before you start making a sink cabinet, you need to decide on its materials, design and dimensions. The dimensions of a piece of furniture are determined depending on the availability of free space in the room. For small kitchens, compact and small corner or straight models are made. If the kitchen is spacious and roomy, a massive trapezoidal sink with a wide countertop will fit perfectly in it.
We suggest you familiarize yourself with a leaking boiler, what to do: ways to eliminate leaks
The standard sizes of a sink cabinet are:
But, as practice shows, housewives prefer sinks with a width of 80 cm. These are what we will discuss in our article.
How to attach countertop sinks to a wooden countertop?
Let me immediately note a number of important points:
A countertop sink is a sink whose bowl is located on the surface, in your case, the countertop.
Overhead sinks are different not only in the material of manufacture, but also in the configuration, that is, the platforms that are attached to the surface are different, this must be taken into account (meaning the contact of the platform with the countertop.
The mixer can be mounted on a countertop sink,
if provided for by the design, it can be attached to the tabletop,
or even be embedded in the wall.
And this is taken into account when installing an overhead sink (are holes needed for water supply hoses).
The countertop sink can have an overflow
This point is taken into account when purchasing a siphon for an overhead sink.
This is an expensive product (a countertop sink) and, as a rule, siphons are included.
Some siphons for overhead sinks come with a special clamping nut, which, together with a sealant, securely fixes the bowl to the countertop.
As you already understand, it is not possible to cover everything, there are too many nuances.
Marking the hole in the overhead sink for the siphon.
We drill a hole; in your case, it is better to drill a hole for the siphon using a wood crown.
We degrease the place of contact between the countertop sink and the countertop (the countertop is dust-free and degreased).
We apply silicone (only on the sink, the ends of the holes are also silicone.
Installing the sink. We mount the siphon, tighten the clamping nut from the bottom (I recommend doing it by hand).
In general, that’s all, this is the installation of a round sink, if it’s rectangular, then silicone covers the entire area, the hole for the siphon is the same.
If there is a mixer, holes for hoses.
If the mixer is mounted on a countertop, there are holes for the mixer and hoses.
the system chose this answer as the best
The sink, of course, is perhaps the central element, both in the bathroom and in the kitchen. Overhead sinks are a fairly new, I would say, modern type of sanitary ware, which is in demand among some designers, and the most fashionable owners are chasing it. Overhead sinks are mounted on countertops or any horizontal surface. There are several variants/models of such shells, despite their comparative novelty, for example, one of the most popular is the so-called “water lily shell”. The advantage of this model is its flat bottom, which allows it to be mounted even above a washing machine. Agree, it saves a lot of space.
Installing a countertop sink is not particularly different from installing a regular sink that we are all familiar with. The differences are minimal, but they still have their own characteristics. So, it is necessary to drill holes in the base (in the countertop) for the water supply and drainage hoses. We install the sink on the countertop and connect it. High-quality sealing of the connections between the sink and the countertop is very important. This will extend the life of the countertop and prevent excessive dampness in the bathroom. The mixer can be installed in the same countertop, or you can choose the option of installing it into the wall. When installing the faucet into the countertop, it will be necessary to carefully monitor cleanliness, since there will inevitably be high humidity and an environment for the development of fungus. It’s better not to start this process and keep it clean. It is especially important to monitor the condition of the countertop in winter, when condensation will appear on the faucet.
But as for the overhead sink for the kitchen, by this I rather mean a slightly different model. The overhead version of the kitchen countertop sink can be classic (ordinary) and sliding. The first refers to direct installation, when the upper perimeter of the open cabinet is carefully coated with sealant and a sink is installed on top. In the case of a sliding sink, the sink is equipped with special curved slides on the front and sides. The bedside table also has grooves. It is also recommended to strengthen the cabinet with internal lathing so that over time the sink does not collapse under pressure and cause problems.
add to favorites link thank