Based on the principle of placement on the underframe, sinks are divided into overhead and built-in. The surface of the washing panel can be located above the plane of the countertop, be flush with it, or be below the level of the desktop. In any case, the bowl under the mixer should be installed between the sections of the set to place dirty dishes and for cooking and serving dishes.
Kitchen sink diagram with dimensions.
The cabinet on which the overhead sink is mounted is often a separate element of the kitchen interior. Mortise and integrated sinks are mounted into the continuous surface of the desktop of the floor-standing modules of the sets.
Installation of an overhead washing panel
Sink connection diagram: 1 – mixer pipe; 2 – gasket; 3 – fixing nut; 4 – flexible hose; 5 – pipeline supply; 6 – overflow hole; 7 – combined drain; 8 – drain device; 9 – compression ring; 10 – compression coupling; 11 – double-turn siphon; 12 – drain pipe.
Overhead types of sinks are easier to install than others. This is the traditional way of installing dishwashing equipment. In the kitchen interior, it is a free-standing cabinet with a sink, complemented by a panel for storing washed kitchen items.
The panel is fixed on the cabinet using fasteners in the form of brackets or is pushed onto the base into the grooves of the cabinet using special slides.
The sink kit may include an adhesive tubular seal that is inserted into a groove on the panel. The joint between the cabinet and the washing panel is coated with silicone sealant to protect against moisture penetration.
Rubber seals do not adhere tightly to the joining surfaces and have a short service life. More often they are replaced with a moisture-resistant sealant; it tightly fills the gaps and retains its properties for a long time when dry.
Attaching the sink to the countertop.
The underframe usually does not have additional internal elements; this provides access for repairing supply pipelines, cleaning the siphon and sewer pipes. Sometimes supporting bars are attached under the overhead sink, reinforcing the strength of the structure.
You may be interested in: Independently connecting a sink to a sewer
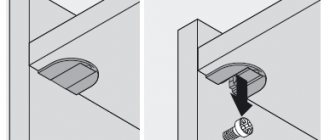
Before attaching the sink to the countertop, the mixer, water supply hoses and siphon are installed. The overhead sink is secured with L-shaped fasteners with an oblique slot. 4-5 such elements are installed. Self-tapping screws are screwed into the mounting points marked on the inner surface of the cabinet. They should protrude 5 mm from the walls of the underframe. It is better to screw in the screws with a screwdriver; if you use a screwdriver, the tabletop may be damaged.
During installation, the fastening grooves are placed on the screws and the sink is moved until it is firmly fixed to the overhead sink. Then the screws are tightened and the protruding sealant is removed.
Sealing rules
When installing a sink with your own hands, it is imperative to carry out sealing - any type of modern plumbing equipment is equipped with special gaskets. But in order to work with them correctly, you need to follow the following rules :
- Any sealing must be carried out on completely dry components. If necessary, they can be dried with a hair dryer.
- Make sure that your fingers do not come into contact with the surfaces of the sealing gaskets. If the opposite happens, then you need to degrease the gasket before installation - just wash it in a solution of any detergent and dry it thoroughly.
- Red and/or yellow rigid gaskets (paronite) are installed between the metal supply pipe and the plastic parts.
- All pipe cuts must be absolutely straight - the slightest distortion will cause a leak, even if the sealing is carried out according to all the rules.
- Before installation, rubber gaskets must be treated with silicone-based sealant. Both rubber and silicone individually are very durable, strong and reliable materials, but when they are used simultaneously, the most reliable connection of parts is obtained; the seal will last for many years.
From the material presented, you can understand that installing a sink with your own hands is a simple matter; it is much more difficult and important to make the right choice when buying a sink and all its components.
( 88 votes, average: 4.70 out of 5)
DIY floor waterproofing
How to hide pipes in the bathroom, kitchen, toilet?
Related Posts
Installation of a mortise sink
To prevent water from splashing when washing dishes, choose a deep sink and install a low tap.
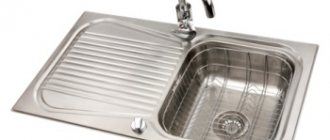
The sink is installed in a pre-cut hole in a solid countertop. Moreover, the sink itself can be made of various materials: stainless alloy, earthenware, porcelain, etc.
To insert a washing container, you will need some tools and additional materials:
- jigsaw with a fine-toothed file;
- drill, screwdriver;
- pencil, ruler, tape measure;
- self-tapping screws, silicone sealant;
- wrenches for installing the mixer;
- sandpaper, construction knife.
The contours of the installed panel are marked with a pencil, turning it over and laying it on the countertop. The distances from the front and rear edges of the latter are at least 5 cm. Then the location of the bowl relative to the edges of the panel is measured. The outline of the hole cut for the sink appears along them.
Diagram of a double overhead sink.
The bowl can be of various shapes, so it is necessary to transfer its geometric parameters to the surface of the tabletop as accurately as possible. Manufacturers of mortise sinks often include a template with the kit, according to which the shape of the hole is drawn.
The cutting line should extend outward from the sides of the bowl by about 1 cm. A hole is drilled at one of the points on the contour to insert a jigsaw blade. For a rectangular bowl shape, holes are drilled in the corners of the intended contour.
You may be interested in: Connecting a kitchen faucet
Painting tape is glued to the outside of the outline. It will protect the surface of the tabletop from damage by the jigsaw foot when cutting. On a removable tabletop, the material is sawn with a jigsaw from the front side, so the surface cladding is less damaged. In the process of cutting the opening, self-tapping screws are screwed into the cut to a small depth so that the inner part does not fall out during operation. The sector to be removed can also be secured from below with support.
The edges of the tabletop along the saw cut are covered with silicone sealant to protect the material from moisture penetration. The sealant is also applied under the edges of the panel along the drawn contour. A sink with a built-in faucet and siphon is inserted into the prepared opening and secured to the countertop with clamps included in the plumbing kit. All that remains is to connect the mixer to the water supply and drain the sink through a siphon to the sewer.
Sink bowl and variety
The bowl-shaped sink model is very popular today. More and more owners of apartments and houses are purchasing it when renovating. There are several bowl shapes: round, oval, rectangular. However, don't think that the variety ends there. Plumbing stores are pleased to offer many of the most bizarre shapes:
- drop-shaped shells;
- in the form of a wave;
- semi-pedestal;
- square and so on.
It will be interesting: Rating of jacuzzi with hydromassage for cottages and apartments
The sizes can be very different, so you can easily choose the option that suits exactly the characteristics of your room.
A separate category includes a bathroom countertop sink. They are often paired with a countertop to create a unified look. If you place the bowl itself not in the center of the tabletop, but on one edge, then the second part can be used as a table and keep everything you need at hand. You can also store household chemicals, towels, and personal hygiene products under the countertop.
If you have a custom layout or want to make the most of the surrounding space, choose corner bowl sinks. They can easily be placed in that very corner and thus make a standard apartment bathroom more spacious.
Sanitaryware is most often used for production. However, if it looks out of place in your bathroom, you can always choose other materials. Modern manufacturers of sanitary equipment, both domestic and foreign, are pleased to offer sinks made of glass, acrylic, metal, marble, artificial and natural stone.
Needless to say, metal structures are the strongest and most durable. However, options made from marble and natural stone also have excellent performance characteristics and a long service life.
However, most materials require careful, delicate, careful handling and special care. In this regard, the models made from sanitary ware are the most picky. The modern variety of available materials will amaze even the most scrupulous buyers.
Which pedestal to choose for your bathroom at home?
Apart from the appearance, enamel color and design, pedestal sinks are not very different from each other. However, it is important to understand these differences so that you do not buy the wrong or short-lived model:
Material
It is recommended to choose a pedestal made from the same material as the sink. But if you haven’t bought it yet, we advise you to consider the following features of various materials:
- Pedestal for ceramic sink. These are the standard models and materials used in the production of most pedestals. Ceramics are primarily distinguished by their resistance to high temperatures and high mechanical strength - thanks to this, we can place really heavy sinks on such pedestals without fear that they will break. It should also be noted that ceramics are very easy to clean and bacteria do not accumulate on them;
- Porcelain Sink Pedestal - The main advantage of porcelain is undoubtedly its elegant appearance, which will suit almost any bathroom. For this reason, porcelain products are relatively expensive - they are also characterized by lower strength compared to ceramics, so they should be installed with relatively lightweight sinks;
- Pedestal for glass sink . Glass is an even more fragile product than porcelain. Of course, glass legs in the bathroom look very impressive and unusual, there are even irregularly shaped glass pedestals that look great in modern-style bathrooms. However, you need to understand that such legs can only support the lightest sinks; under heavy weight, the glass pedestal will crack and may even fall apart;
- A pedestal for a wooden washbasin is a rare and unusual solution. Although many homeowners of wooden houses in the old style (for example, country, rustic, chalet, rustic) categorically do not accept the look of ceramics surrounded by wood. If you choose a wooden pedestal, pay attention to what kind of wood it was made from. It should be a type of wood that does not rot or break down when exposed to water. These are, for example, larch and teak.
Pedestal height
Obviously, the height of the product must be selected according to the height at which the sink was installed. Luckily, there are pedestals that are extremely varied in this regard.
Assembly type
Some pedestals are wall mounted, while others are floor mounted.
Maximum load
A very important parameter that determines the choice of legs for installing a sink. Good quality products can withstand weights of up to 150 kg. Many manufacturers make it easier for buyers by attaching information to the pedestal about the recommended washbasin that should be mounted on it.
Tips for decorating a small bedroom
Hood to the kitchen. Which one is better to choose for your home?
Why have houses made of laminated veneer lumber replaced traditional ones in developed countries?
Elite country housing in the Moscow region. What is the difference between elite and ordinary villages?
Buying a Home Using the Short Sale Method
Venetian plaster. Is this paint or plaster? And what is important to consider when choosing it for the walls of your home?
Why is it important to know the quality of the soil on your site?
24 useful tips for the home handyman
How to paint roof tiles at home? What is the best paint to choose?