How to hang a cabinet on the wall
It’s easy to hang a cabinet on a wall, including plasterboard.
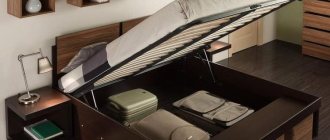
It is important that the cabinet is securely fastened to the wall and does not fall under its own weight. This is especially true for large, heavy wall-mounted kitchen cabinets, when the weight of the cabinet along with its contents can reach 50 kg or more. It is equally important to hang the cabinet level. Both conditions can be achieved in various ways, but the simplest is to use special hangers for mounting wall cabinets. To hang a cabinet on the wall, there are special furniture canopies. The two most popular types of awnings are the adjustable awning with a slatted awning and the awning with a bar.
Adjustable canopies have a large load capacity (up to 50 kg per canopy) and allow you to precisely adjust the position of the cabinet on the wall. Therefore, they have gained great popularity, and most furniture manufacturers prefer them.
The adjustable canopy consists of two parts: the canopy and the mounting rail. There are several modifications of these elements, but the operating principle and installation procedure are the same. The adjustable canopy is secured to the cabinet using self-tapping screws, and the rail is mounted on the wall using dowel nails. To hang the cabinet on the wall, simply insert the canopy hook into the groove of the rail, and then adjust the position of the cabinet on the wall using the canopy adjusting screws.
Adjusting the canopy is very simple. Screw 1 (bottom screw) adjusts the position of the cabinet in the horizontal plane. those. brings you closer or further away from the wall. Screw 2 (upper screw) adjusts the position of the cabinet in the vertical plane by raising or lowering it.
Adjustment diagram and filler dimensions
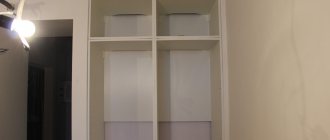
If you purchased a ready-made wall cabinet, for example, from IKEA, then the canopy will already be installed there, or there will be places for its fastening. However, if you install a mounting rail, as shown in the photo above, you will not be able to hang the cabinet close to the wall. To do this, the mounting rail must be installed correctly. The peculiarity of installing the strip is that it must be installed in the place where the canopy is attached, and ensure that the strip does not protrude beyond the canopy area. This way the rail will not interfere with hanging the cabinet close to the wall, without a gap.
If the cabinet is not equipped with an adjustable canopy, you will have to install it yourself. To do this, you need to cut a small hole for the canopy hook in the back wall of the cabinet, and secure the canopy with self-tapping screws, resting it against the side and top wall.
If the wall is brick, then you can use dowel-nails 60 - 80 mm long to attach the slats. If the wall is made of plasterboard, then it will not be possible to secure the rail with dowels and nails, and, consequently, it will not be possible to hang the cabinet. Special dowels for drywall are also not suitable. In general, heavy objects cannot be hung on a plasterboard wall. Therefore, if it is necessary to hang cabinets on a plasterboard wall, then when installing the wall, special sealing is provided in the places where the mounting rail is installed.
What to do if all this is not provided for in advance? There is an exit. The rail can be attached to a frame made of metal profiles on which the drywall is mounted. To do this, you should use special fasteners for drywall, such as “butterfly”. This type of fastener must securely secure the mounting rail.
A canopy strip is a metal strip with several holes and an eye. Such parts used to be made by schoolchildren during labor lessons. To hang the cabinet on the wall, you need to install two hanging strips along the edges of the rear wall of the cabinet. The cabinet is hung on self-tapping screws installed in the wall. The disadvantage of this method is the low weight that the canopy bar can support, and more importantly, the inability to adjust the cabinet. Those. It is very difficult to hang the cabinet on the wall evenly using such a canopy.
As you can see from the above, hanging a cabinet on the wall, including one made of plasterboard, is very simple. The best way to do this is to use an adjustable canopy and mounting rail. Thanks to this hanging system, the cabinets can be hung very level, and what is equally important, they will be securely attached to the wall and will be able to withstand heavy loads.
Installation of cornice assembly
Before fixing the cornice strip, install the front façade board. The section size of the board is 100×25 mm. In some cases, the board is replaced with a profile sheet. The element is secured with self-tapping screws or galvanized nails to the ends of the rafters.
Metal tile units
An under-roof panel is attached to the front board. On the outer board of the sheathing, the attachment points for the gutter holders are marked. The required number of metal brackets are sewn along the marked marks.
The number of products is taken taking into account the gutter slope of 3 mm per 1 meter. The average distance between the holders is 30-40 cm. The brackets are secured to pre-drilled markings.
Professional metal scissors are used to cut the material. After installation, the lower edge of the eaves strip is brought inside the gutter. The distance between the edge of the roof overhang and the top of the gutter should be 25-30 cm. This ensures efficient drainage of water from the roof into the gutter of the drainage system.
Attention! It is prohibited to use the grinder as a cutting tool. The abrasive material of the cutting wheels and high temperatures destroy the polymer coating layer.
After cutting, the edges of the material are coated with oil paint. The coating protects the edges from rust.
Compliance with the methods of fastening products will reliably protect the roof from destruction. Careful adjustment of the components increases the aesthetic qualities of metal tiles.
To protect against moisture entering the under-roof space, special metal strips are installed on the eaves overhangs.
Video on the topic: Installation of cornice strips and drainage system
Publications on the topic
Laying metal roofing tiles step by step
Diagram and detailed description of fastening metal tiles with self-tapping screws
Purpose and methods of installation of abutment strips for metal tiles
Step-by-step instructions for attaching wall cabinets in the kitchen
A modern kitchen set consists of wall and floor cabinets. The installation of wall cabinets should be approached with great responsibility. Firstly, they are attached to the walls, as a result of which any distortion will be clearly visible. Secondly, cabinets filled with kitchen utensils and products place quite a large load on the fasteners. Therefore, it is very important to choose reliable fasteners.
Mounting strip
The mounting strip, as a fastening for kitchen cabinets, appeared later than furniture hinges. But masters and home craftsmen immediately appreciated its superiority.
- The process of installing wall cabinets is carried out by one person.
- There are not holes made in the element, but grooves that allow you to move the cabinets along the wall, which allows you to adjust them to each other in a vertical plane. The grooves are wider than the diameter of the set screws, so it is possible to align the installation of kitchen cabinet fasteners horizontally.
- The length of the bar is enough to hang several elements of a kitchen set on it. True, such fasteners also have their disadvantages:
- High price.
- The rear wall of the cabinet does not fit tightly at the top, resulting in a small gap.
The most critical moment in hanging kitchen cabinets on a mounting strip is installing and securing the strip. First, the installation height is determined; for this purpose, a horizontal installation line is marked on the wall. It is on this that the bar is attached. To do this, it is applied to the wall surface exactly along the drawn line, and several marks are made through the mounting holes. Holes are made in them for dowels, which after drilling are inserted there. After this, the metal rail (mounting rail or strip) is attached to the wall.
Without additional equipment, cabinets cannot be hung on slats. Therefore, special canopies are attached to them. All additional elements are sold separately; many furniture manufacturers include canopies with cabinets as an integral part. Such canopies are attached to the sides of cabinets, as to load-bearing elements, with self-tapping screws or bolted connections.
Today, furniture fittings manufacturers offer a huge variety of canopies, both in design and in the shape of each element. But they are all hung on a rail (tire) using hooks. The mounting strip has two shapes: with one protrusion and two. An element with a one-sided protrusion must be installed with the protruding part facing up. Hangers for kitchen cabinets will be attached to it.
There is no need to place hanging pieces of furniture exactly relative to each other and the nearest wall. The bar allows you to move the cabinets easily and quickly. After installing the tire, the first cabinet is installed, then the second is pressed against it, and so on. Then all the elements of the kitchen set are fastened together with self-tapping screws or bolted connections. Finally, the fronts are hung and the shelves are installed.
To simplify the work associated with leveling cabinets in a vertical plane, adjustable awnings for kitchen cabinets are used. So that you understand what we are talking about, pay attention to the photo below, which shows one of the models of adjustable awnings. Using it, you can raise or lower the device, as well as move it to the sides.
The device works like a rocker arm. By screwing in screw “B”, pressure is created on the shoulder, which lowers the hooks of the canopy, and, accordingly, raises the wall cabinet. Doing the same thing, only in reverse, lowering is performed. The photo shows one model from the wide variety of adjustable canopies that furniture manufacturers offer today. These devices simplify the process of leveling wall cabinets relative to the horizon. Therefore, there is no need to precisely install them on the back walls of the cabinets. Of course, there are certain standards and requirements, but small errors are allowed, which cannot be allowed during installation and fastening to furniture hinges.
Installation instructions
The installation process involves two stages - adjustable awnings designed for kitchen cabinets are fixed to the back wall of the cabinets, and a metal track is attached to the wall.
When attaching fittings, it is necessary to take into account the material of the module:
- from fiberboard - two small holes are cut out for the fastening tabs, the canopy is pressed against the upper wall of the module and fastened with self-tapping screws to its side;
- from laminated chipboard - the cutout is formed directly under the canopy and fixed flush with the laminate.
After the cabinets are equipped with hanging fittings, we move on to the wall. Installation of the metal strip is done as follows:
- the height of the upper and lower pedestals is added up, as well as the distance between them (pedestals, upper module, work apron);
- subtracted for the shrinkage of the structure by approximately 45 mm - we get the size that should be marked on the wall;
- a horizontal line is marked using a level - a metal tire is applied to it;
- the bar has holes for fittings every 15 cm - to hang shelves, it is not necessary to drill them all - just self-tapping screws in the corners of the structure are enough.
How to hang kitchen cabinets and more
When buying or ordering a kitchen set, you always have a choice - use the services of furniture assemblers and installers or do everything yourself. Choose the latter for many reasons. Most often - out of savings. Less often - because of doubt that everything will be done efficiently and unwillingness to pay for something that you can do yourself. How to hang kitchen cabinets is one of the questions that arises when installing a set. Actually, it concerns hanging absolutely any cabinets and shelves with your own hands. After all, the process itself will be absolutely similar, no matter what you install: a kitchen, a wall with hanging modules above the TV, or a schoolchild’s corner.
Errors during selection and installation
When choosing a rail based on material and size, the type and weight of the devices to be installed on it are often not taken into account.
The main mistake when installing a DIN rail is neglecting the installation of plugs. Due to vibrations, equipment on DIN rails can gradually move. If the plugs are not included in the kit, you can secure the device with pliers - just straighten the jaws of the rack.
Also, during installation, the width of the device being fixed is often not taken into account, which leads to a lack of free space for fixing other devices.
Source: electric-tolk.ru
What kind of fasteners should I use to hang kitchen cabinets?
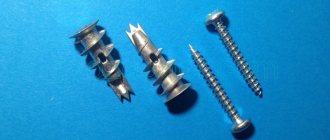
The choice of dowels, anchors and other fasteners is selected depending on the wall material. It may be different. For example, to hang kitchen cabinets on drywall, you will need special butterfly fasteners, umbrellas, and long anchors. You can read more details here.
The cabinets themselves can be hung on regular canopies (hinges) of various shapes and a mounting rail (bar + adjustable canopies). Let's look at each type in more detail.
Let us immediately note that there is some confusion in terminology.
Furniture hinges are the movable fasteners that connect the cabinet door to the frame.
And non-adjustable canopies, which will be discussed, are often called furniture hinges. Be careful in your selection and description.
Non-adjustable awnings for kitchen cabinets, types, pros and cons
From the whole variety, three types of non-adjustable canopies can be distinguished, which are used to hang kitchen cabinets, shelves and other modules on the wall:
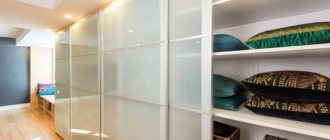
- Hidden installation (furniture makers often call it “mirror” because it is used for hanging mirrors and other panels such as wall hangers, etc.).
- R-shaped invoice.
- Invoice "ears".
Non-adjustable, concealed-mounted awnings are indispensable when hanging cabinets and panels that are completely within view or are hung quite low. An example in the photo is when the sides and lid of the cabinet are clearly visible.
Any other canopy will be visible and untidy. This is the main advantage of a hidden non-adjustable canopy. The downside is the difficulty of installation and lack of adjustment. Markings for a non-adjustable concealed canopy must be done extremely accurately, down to the millimeter. The cabinet is “put on” on the heads of screws screwed into the dowel and lowered to the locking position.
Overhead R-shaped awning and eyelet awning for mounting kitchen cabinets are used complete with a hook.
Thanks to the elongated shape of the hinge, the cabinet can be moved horizontally. “R-ki” have special notches in the hinge that prevent the cabinet from sliding horizontally after the selected position. But it is impossible to say that this is their advantage. It is purely a matter of taste - some furniture makers are accustomed to working with “ears”, others – with “R-s”.
The main advantage of all non-adjustable awnings is their low cost and ease of installation. With relatively flat walls, hanging cabinets will not cause any difficulties for a home craftsman. If all the measuring work and markings for fasteners, the drilling was done accurately.
Adjustable canopies and mounting strip (rail)
More and more modern kitchens are equipped with adjustable awnings. They cost more than unregulated ones. Plus, for installation, they require you to purchase a separate mounting plate (rail, bus - called differently in different regions). But they provide obvious advantages:
- There is no need to measure and drill holes for each cabinet separately. It is enough to “beat off” the level of the hinge under the kitchen cabinets and attach the mounting strip to it. Cabinets are hung on it and moved if required.
- The design of the canopy is such that with the help of screws on it you can adjust the position of the cabinet itself. Alignment is carried out in two planes: higher and lower, tighter and weaker against the wall. This way you can align a number of cabinets on the same level, regardless of the curvature of the walls.
Accommodation
Before proceeding with installation, it is important to choose the most suitable location for the awning canopy. Please note:
- size and shape of the awning or awnings;
- reliability of structures intended for fastening guy wires;
- possibility of installing additional racks;
- location of garden structures that pose a fire hazard (barbecues, barbecue grills, etc.);
- the daily path of the Sun;
- wind speed and direction typical for a given region.
Attention: Awnings should not be used near open flames.
Of course, not all factors that may be specific to your specific situation are listed here.
When choosing a place where there will be an awning, it is important that its shadow in the middle of summer at noon is created directly under the awning.
Next, after choosing a location, you need to decide on the attachment points for the guy wires. This could be, for example, a house wall, a tree, a fence. If the required number of attachment points is not enough, then support posts should be installed. The distance between adjacent attachment points should be 10% greater than the size of the side of the awning. This is enough to use tension mechanisms for each corner of the awning.
How to properly hang kitchen cabinets on a backsplash
Usually, kitchen cabinets are hung after the bottom row of cabinet tables has already been installed. This is due to the presence of an apron: sometimes its role is played by decorative panels, skinals, which are placed on the tabletop. The edge of the apron (of any wall top) may or may not go behind the cabinets. It all depends on the type of material from which the kitchen apron is made:
- The laid tiles (tiles) go behind both the lower and upper cabinets. The overlap is small, about 10-20 mm.
- A wall top made of MDF or chipboard 8-10 mm thick is placed on the countertop and goes behind the upper cabinets. The places where the top is attached to the wall are hidden behind the baseboard and the edge of the upper cabinets.
- Wall decor panels thicker than 10 mm and glass skinnels are attached exclusively between the upper kitchen cabinets and the countertop. This type of apron can be installed last, after hanging the cabinets. But before cutting into the sink and household appliances! A sink with a mixer, protruding parts of the hobs can prevent you from “bringing” the decor panel onto the wall for subsequent installation.
When installing wall-mounted kitchen drawers on a DIN rail, does it need to be cut?
IMHODom › Forums › hands from shoulders › When installing wall-mounted kitchen drawers on a din rail, does it need to be cut?
- This topic has 13 voices and 18 replies.
When installing wall-mounted kitchen drawers on a DIN rail, should it be cut into pieces for each drawer, or one piece for the entire length?
It’s just that if there is one for the entire length, then the drawers hang at an angle.
Tilt left, right or forward?
rather to the right and forward
The cabinets are mounted on short sections of these same strips. Their length is approximately 7-10 cm. If there is some kind of defect in the wall with a void inside (well, like a window closed with plywood between the kitchen and the bathroom), then a larger plank is taken, well 10-20 cm. Two drawers are mounted on one plank (one on the right, the other on the left). Then the cabinets are adjusted in height to each other so that they are level. To do this, they twist something with a screwdriver INSIDE the cabinets on a suspension that is already installed at the factory. Then the cabinets are also bolted together; for this purpose, there are holes made at the factory on the side walls.
At what height should kitchen cabinets be hung?
According to general recommendations, the height of the kitchen apron (aka the distance between the wall cabinets and the countertop) is about 550-600 mm. The hood (and, accordingly, the cabinet above it) is hung higher, about 650-700 mm from the level of the stove (and the countertop in general).
This is true if the kitchen design involves hanging classic kitchen cabinets with a height of 720-900 mm or more, under the ceiling. Often, when designing a kitchen, the top is “unloaded”, leaving light hanging shelves and low kitchen cabinets about 400-500 high. In this case, the height at which they need to be hung increases to 700-800 mm. In fact, it is tied to the hood level.
But these are standard recommendations. Modern kitchen units can be designed to suit the height of family members. And at the same time, the height of the lower modules also changes.
What is attached to the din rail?
To secure modular electrical appliances, no third-party fasteners are required. All devices are mounted on a standard DIN rail.
The protrusions located on the edges of the slats serve to hold the devices installed on it, which can move relatively freely along it. To prevent such movements, special locking plugs are installed along the edges of the slats.
However, in switchboards when installing modular devices, they are fixed using existing or additionally made external holes in the cover in accordance with the established number of switching equipment. For these purposes, the windows for the instrument elements located outside do not open fully; some of them are covered with retractable curtains.
Tip No. 2: If there is less equipment than can be installed, the remaining free part of the window is covered with plugs.
All modular-type machines, RCDs or switches have latches. They are installed by hooking the groove of the device onto one edge, while the lower part is clamped onto the rail with a little force until it clicks. To remove the part, you will need to use a flat-head screwdriver to move the latch downwards and remove it from the groove. Some devices are locked in the open latch position.