Features and methods of laying tiles on the floor
Most often, tiles are laid in bathrooms and kitchens.
Ceramic coating is used in rooms of varying functionality. During installation, take into account the features of working with a concrete, wooden or other floor base. Each option requires certain elements that are installed using a specific technology.
Before laying tiles on the floor, several problems are solved:
- choose the appropriate type of base, level it or remove it if the old layer has become unusable;
- the adhesive for the tile layer is selected taking into account the humidity conditions in the room during subsequent use;
- if the scheme differs from the standard installation, markings are made on the floor area along which the elements will be laid;
- for complex configurations, the tiles are cut in advance, then laid out on the floor to see the result and determine the detailed installation procedure;
- sometimes the laying is done from the corner, but in complex versions the first tile is placed in the center of the floor;
- For reliable fixation, the surface is treated with deeply penetrating primers, which must dry completely before starting work (4 - 5 hours).
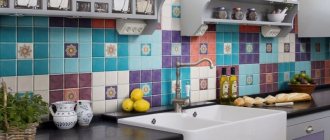
A suitable pattern is selected after viewing finished photographs of the floor using a specific type of tile. In the living room, elements imitating laminate are placed; in large rooms, it is preferable to put calm colors of the same tone. The bathroom allows for multicolor due to the small floor area. A light gloss will expand the room, while a dark surface that absorbs rays (matte) will have the opposite effect.
Traditional
Laying floor tiles involves placing flat parts parallel to the plane of the floor. The elements are placed tightly next to each other, in even, identical rows. They use square and rectangular shapes, this method makes it easy to lay the ceramics yourself. They diversify the traditional method by using plates of a different color.
With a simple installation method, the following nuances are taken into account:
- the tiles must be the same size up to 1 mm, otherwise unequal seams will be visible;
- small manufacturing defects and small defects immediately become noticeable with this installation option;
- the surface has a monotonous appearance.
It is important to check the uniformity of the masonry and the dimensions of the perpendicular and adjacent spaces between the slabs, but in general this method does not require special skill.
Mark the tiles in two rows located perpendicular to one another in the central area.
The method is used in rooms with irregular geometry, protrusions on the walls; this layout is used to frame central panels on large floors.
Diagonal
It is difficult to create a beautiful drawing if you treat the work carelessly. The difficulty lies in correctly marking the axes along the diagonal of the base and cutting the edge tiles at a certain angle. The oblique arrangement partially hides the curvature of the floor; it is used on small-sized and non-standard surfaces.
Features of the diagonal version:
- the pattern grid has an angle of 45° relative to the edge of the surface;
- Square slabs look good, but rectangular parts are also used;
- interesting appearance even when installing monochromatic parts;
- there is a lot of waste in the work due to cutting edge tiles;
- the original scheme visually expands the room.
The process of laying floor tiles assumes that the first row is installed using the standard method using rectangular elements. Their side size corresponds to the diagonal of the main parts. The second line is laid with cut triangular parts, which are placed with the hypotenuse down. Subsequent phalanges are laid out in horizontal stripes, taking into account the diagonal direction.
Running
The surface pattern resembles brickwork. Plain rectangular parts are better suited; the use of square slabs is not excluded.
Features of this layout option:
- monotony is eliminated, hides unevenness, slight slope, gives comfort;
- looks good in the kitchen, in the hallway, on the balcony.
The laying is done staggered in horizontal stripes so that in the next row the seam between the tiles coincides with the center of the element of the previous line.
It is important to maintain the same size of the gap; for this, take tile crosses of a certain size (1 - 4 mm). Wide seams will look sloppy and cumbersome because at this size the discrepancy between the corners and edges of the tiles is clearly visible.
First, beacon parts are installed to determine the surface level. Subsequent stripes are arranged in rows along the lighthouse. For leveling, use a wooden or rubber hammer. The beacons are removed as the masonry is completed; it is important to control the horizontal level at each stage.
Herringbone
The method is complex; after installation, the appearance of the floor resembles parquet. Rectangular tile parts are used.
There are two options for placing slabs:
- standard herringbone (for parquet);
- option with an attachment, in which additional small rectangular inserts are installed in the form of a mosaic.
More often they use plain ceramics with imitation of different types of wood. If the surface of the elements is made in the form of stone, this color is not used for the herringbone due to the unnatural combination of stone and parquet pattern.
The method involves unfolding the elements on both sides alternately, while maintaining the diagonal direction. As a result, waste is kept to a minimum. The pattern is used in the kitchen, bedroom, hallway, and is used in offices and common rooms.
After 5 - 6 m from the first strip, a coordinating line is drawn to find the best option between perpendicularity and diagonality. Measurements are taken along the line, which should be identical to each other.
If neighboring elements compress or diverge in different places, the masonry is leveled until the mortar hardens.
Modular way
The modular effect on the floor surface decorates the room, but requires precise marking, design and calculation of the required pattern. The technology eliminates the mediocrity of the finishing layer, although it does not provide for expensive decorative details.
The result is achieved in two ways:
- installation of tiled elements of different sizes, but selected so that their dimensions are multiples and do not protrude from each other;
- masonry with large slabs on which small parts of different formats are applied.
You can design the pattern yourself, but keep in mind that in a modular grid, a non-uniform pattern must be repeated many times. The store sells sets of tiles for this layout and diagrams according to which the parts are laid. It is mandatory to use dividing crosses to form identical technological gaps.
A 1 cm wide gap is left around the perimeter of the room between the coating and the wall to allow for thermal expansion. Wooden or plastic wedges are placed in the gap. As the glue hardens, remove the crosses and inserts.
With shift
In the scheme, square slabs of large and small sizes are placed, the dimensions of which differ by 4, 6, 8 times. The complex method is not always successful for beginners, because the design can be skewed. The design differs in that it hides the slope, so it is placed in the bathroom, where there is a water drain into the floor funnel, or in the shower. The layout looks good on a terrace, veranda; heated floors of this configuration are installed in a children's room.
A large difference in the size of the fragments is suitable for the loft style. The masonry looks in the form of intertwining stripes with a middle square in light or dark tones.
It is advisable to check the combination of elements when purchasing so that there is no error with the sizes.
The drawing looks original in the interior if the shades and colors are well selected. In small rooms it is better not to use a variety of colors. Elongated rooms can be visually reduced by using transverse contrasting inserts in the design. In large areas, you can lay tiles in such a way as to highlight functional areas with shades.
The influence of the scheme on the interior
The layout scheme affects the impression of the interior. Indoor renovation work begins with the selection of flooring materials. In accordance with the tiles, skirting boards, borders and other design elements are chosen to create an original design.
The rules for laying out tiles affect the consumption of materials, since the schemes require different numbers of finishing products per 1 square meter. m. Direct laying is the most economical. Combined, chess and other complex compositions require greater consumption of materials. When designing non-traditional schemes, additional processing of elements and the purchase of auxiliary parts are required.
The placement method and texture of facing products visually change the size of the rooms. Horizontal installation with textured seams visually expands the room, but reduces its height. The use of vertical tiles in the bathroom optically narrows the space. The herringbone laying method will help in visually expanding the room if you select narrow elements. A scheme using massive square-shaped materials will visually make the spacious room smaller.
Using different shades will create bright accents when decorating the floor. The inclusion of elements of contrasting shades in the masonry will introduce elements of modernism style into the interior. Laying wood-effect tiles in a herringbone pattern will give the surface a resemblance to parquet flooring. Marble facing elements, laid out like parquet, can be the main covering or accent inserts.
Required tools and materials
If a tiled floor is being installed in a bathroom, toilet, or kitchen, an additional waterproofing membrane is installed or standard polyethylene is used. Often the tiles are combined with a heated floor, then you will need an electric heating system and material for dry or wet screed. To treat the surface, soil is prepared, the tiles are set on glue, which comes in the form of a dry mixture.
Required tools:
- construction or laser level;
- tile cutter, pliers, rubber hammer, emery stone;
- tape measure, pencil, cord;
- scraper, notched and rubber spatula;
- bucket, drill with whisk, grinder with diamond wheel;
- rags, foam sponge, protective gloves.
For a traditional layout, take tiles by count, since it is easy to calculate the number of elements. Other layout methods require the use of a coefficient of 1. – 1.2, depending on the arrangement of parts in the diagram and the number of trimming places. Packs of the same batch are taken from the warehouse to eliminate discrepancies in color shade. To treat joints, buy grout of a similar or contrasting color.
Diagonal
Laying diagonally (rhombus) repeats the classic straight layout in everything, except for the direction. Placement of materials is carried out at an angle of 45 degrees relative to the walls. With this pattern, square tiles look best. The cladding will have to be cut along the edges near the wall line.
Diagonal layout of tiles on the floor is popular. On walls, the same scheme is used less frequently - when creating small areas with a color or texture accent. Before laying the tiles in a diamond shape, it is necessary to prepare calculations and mark out a composition plan.
The scheme is suitable for small rooms, as it allows you to visually expand the room. The advantage of placing elements diagonally is that it helps disguise unevenness. It is necessary to take into account the high consumption of materials, since the cladding adjacent to the edge needs to be leveled.
Base preparation and marking
The base must be perfectly level
Laying tiles on the floor begins with putting the base in order. The area is leveled so that there is no slope and the angle between the vertical wall and the horizontal floor is 90°.
Level the surface in different ways:
- cement screed;
- self-leveling solutions;
- sheets of chipboard, moisture-resistant plywood.
The screed is carried out on a concrete floor; for this, cement and sand are taken in a concentration of 1:3, respectively. Water is added so that a thick dough is obtained, otherwise when it dries, the screed will shrink and there will be indentations. Before pouring, place a plastic film, a vapor barrier membrane or a layer of roofing felt to protect against moisture.
Self-leveling mixtures are poured onto the cleaned surface, they spread, forming an even area. The sheets are stuffed onto wooden floors, parquet, and they are used to level concrete.
Mark out the ceramic laying diagram to get the correct pattern. The tiles can be pre-laid out (if the room is small) or the direction axes can be marked with a cord.
The tiles are scattered
The staggered pattern is an installation of rectangular elements with every second row offset by half the width of the tile. The result will be a beautiful pattern, similar to brickwork. For original design solutions, the square shape of the elements can be used, which will create an unusual visual effect.
Laying tiles in staggered patterns is recommended for high-traffic areas of the apartment - kitchens and hallways. With this method, tiles are laid out only horizontally. The pattern with imitation brickwork creates a special atmosphere in the interiors. Glossy rectangular elements laid out staggered are suitable for rooms decorated in retro style. Brown tiles with scuffs are used in country style designs.
Step-by-step instructions for laying tiles on the floor with your own hands
The glue is prepared according to the instructions on the package. The dry composition is poured with water and stirred with a drill and whisk until the lumps are broken. Prepare a portion so that it can be used within an hour. During the mixing process, take a break for 7–10 minutes to better bind the components, then shovel again.
The step-by-step process includes the following operations:
- applying glue to the surface;
- cutting tiles;
- laying whole and cut elements;
- grouting gaps.
The adhesive is applied with a notched trowel to the area where 4 tiles will be placed. The perforated relief will help to distribute the mixture evenly under the tiles. The elements are placed on the solution and, scrolling, pressed to the required level, taking into account the marking lines. To plant, tap with a hammer, but it is not advisable to move it too much.
If the tile has dropped lower than necessary, remove it and add mortar.
Small elements are easier to install because there is little adhesive mixture underneath them. Remove the crosses and dissolve the grout. It is applied with a spatula, filling the seam, then a strip is formed, and the remains are removed. The surface is wiped with a wet sponge after the solution has hardened in the joint.
Kaleidoscope
Laying in the “kaleidoscope” style involves combining elements of different shades randomly or in a given order (radial, horizontal). The color palette of the cladding is contrasting or monochromatic. For masonry, a transition of shades is also used, when dark shades are placed in the center of the composition, and light shades are placed at the edge. Small tiles look good in the kaleidoscope pattern. Laying involves a combination of elements not only of different colors, but also patterns when decorating interiors in the patchwork style.
Floor tiles under parquet are usually laid offset or diagonally (“herringbone”). From this article you will learn how to correctly lay ceramic parquet so that all the seams match exactly and the corners are straight.
Quick navigation through the article
Laying tiles on tiles
This method is not used if there is sewerage, water supply, electricity under the old coating, and there are no wells. Voids are identified by tapping the surface and, if there are many of them, the old tiles are removed. It is not advisable to lay tiles on tiles if the height of the room is up to 2.4 m, since the new layer will further lower the ceiling.
Provide connection between the new and old layers. To do this, clean the surface, degrease it and make notches, and also remove the grout from the seams. Use a grinder to make a rough surface. After mechanical work, debris and dust are removed, and the surface is primed.
Laying on old ceramics is no different from ordinary work. The seams of the new coating should not coincide with the old ones. Mark the pattern and apply glue, then install the elements.