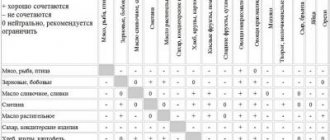
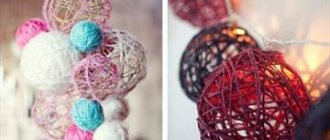
Panels and curtains using macrame technique. Ideas, master classes
I have already said more than once that the macrame technique has been completely undeservedly forgotten by modern needlewomen; few people use it in our country and it is more often used to create jewelry. But I want to show you what wonderful possibilities the macrame technique opens up for creating interior objects - panels and curtains. I really hope that the above ideas and master classes will inspire you to master the wonderful multifaceted technique of macrame and create your own home masterpieces. And who knows, maybe this very creativity will become your profitable business in the future, why not :)
Enjoy watching!
And some useful information
Although winter still won’t come this year, you shouldn’t risk your life and health by continuing to drive your car with summer tires - as my personal experience shows, frost, snow and ice happen very suddenly, and at this moment all tire shops are clogged the same “conscious” drivers :) Therefore, it is worth taking care of changing shoes in advance. If your winter tires cause you doubts about the quality or you have been driving them for a long time, it makes sense to purchase new ones and I recommend doing so in the specialized online auto goods store ShinaDiski - https://www.shinadiski.com.ua/zimnie_shiny.html, It is unlikely that you will find such a wide range of products at more than adequate prices. Take advantage and let winter roads bring you only positive emotions!
Master class on creating a wall panel from craftswoman Geneva (apairandasparediy.com)
A 60 m clothesline and wooden beads were used for the work.
We fix the wooden holder for the panel
We cut: 16 ropes of 3.5 each and prepare one rope for hanging. Fold the ropes in half and tie them to the holder. Don’t forget to tie a rope in the middle for hanging - this rope will not take part in weaving.
Next we weave a fixing row
Now, starting from the left side, tie the threads diagonally with knots.
In some places we string wooden beads onto the ropes
Next, we tie four ropes each as follows:
We repeat again
And again we knit knots diagonally
At the end of the work, we tie four ropes with double knots, untwist the ends, and cut off the excess.
And add a little color
Result:
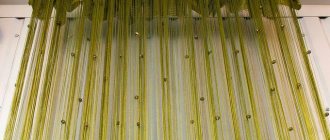
Master class on making curtains using the macrame technique from Emma Chapman (abeautifulmess.com)
Formation of nodes
Master class on weaving panels with knitted stripes from Roxy Tagawain (brit.co)
The author independently made “yarn” for weaving by cutting knitted fabric into strips
Panel with amber effect from craftswoman Sam (bloglovin.com)
Master class on making panels from Corinna (formyloveof.net)
The work also used metal tubes and bamboo painted with gold paint.
And a panel from Moria Seal (blog.homedepot.com)
The macrame technique is very versatile and multifaceted; it allows you to create a huge number of interesting things for the home. Master the technique and let macrame creativity bring you pleasure!
I wish everyone a positive day and a great mood!
Source
sam.mirtesen.ru
Macrame weaving patterns for panels and bags with pockets
Beautiful products can now be created from synthetic materials
Among the various types of applied arts, the art of macrame is one of the oldest. The history of this unusual craft originates in the East, in Ancient Egypt, China and Japan. Even the ancient Incas had a developed system of knotted writing, the mystery of whose messages is still being tried by scientists all over the world. Gradually, the art of filigree weaving developed, acquiring an army of fans on all continents. The basis of needlework is the ability to knit beautiful knot combinations, which were transformed into skillful products by the skillful hands of craftsmen. A new generation of needlewomen has breathed new life, creating new forms, inventing new beautiful combinations, offering unique design solutions. For beginners in macrame creativity, weaving patterns are the main auxiliary tool, after mastering which you can easily create openwork products.
Materials for work
Today it is difficult to answer who was the discoverer of the unusual weaving method, but the whole world is grateful to him. The uniqueness of knot weaving lies in its simplicity, beauty and budget. To weave beautiful interior hand made items and accessories, such as panels, owls and other amazing crafts, you will need very little. First you need to determine the base and choose the material for weaving.
Before choosing the necessary colors and material, you need to decide on the theme.
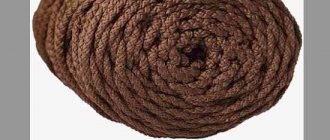
Most often used for work:
- hemp or linen ropes;
- cotton cords and twine;
- sisal and any flat braid.
In ancient times, products using the macrame technique were made from leather cords, straw and even plant fibers. Modern materials will surprise even the most experienced craftswomen with their variety. For example, reinforced threads, colored floss, lurex, all kinds of cords and threads with a waxed texture will become the basis for an original and stylish decoration. Centuries-old practice shows that natural materials like flax or cotton are more pliable for knitting textured knotted patterns.
Threads and cords in macrame
It should be remembered that the threads for creating panels, handbags or bracelets using the macrame weaving technique must be as strong, pliable and moderately twisted as possible.
You should not choose threads with a “shaggy” texture for knot weaving. Increased “fluffiness” will hide the unique patterned relief of the product from us. Skillful combination of several types of applied arts, such as embroidery, knitting or crocheting, beading, will create a truly exclusive masterpiece.
Selecting tools
Before starting to study and select macrame patterns, beginners should acquire a “magic chest” that will contain all the necessary tools for creative work. One of the main advantages of such needlework is the minimum financial costs.
If you want to get a clear relief pattern, then the material for weaving macrame needs to be tightly twisted
For weaving you will need the simplest sewing tools:
- safety pins to secure the threads;
- tailor's scissors with a sharp blade;
- sewing needles and threads;
- PVA glue to fasten individual elements of the pattern;
- simple crochet hook.
In addition to a simple sewing kit, you should prepare a work surface. This can be a small pillow that can be easily sewn with your own hands. The pillow can be replaced with a board, which is upholstered with foam rubber and then tightly covered with cloth. Such a simple device will prevent the threads from getting tangled and will provide the craftswoman with comfort during the weaving process.
After the pattern of macrame products has been selected, threads or rope are fixed to the surface, and the components are carefully laid out in the desired order.
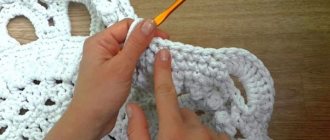
Master classes
Weaving with threads is fun and interesting. Experience is valuable in any job. These skills will allow you to make elegant wall panels, original crafts, beautiful bedspreads, macrame napkins or curtains.
Original crafts
You can also weave stylish accessories, jewelry, bags and anything that your imagination tells you.
Wicker jewelry
To master macrame for beginners, all you need to do is choose high-quality material, get in a creative mood and get acquainted with detailed master classes from experienced craftsmen.
Original panel "owl"
A panel in the shape of an owl is an original decoration for any interior style that will emphasize the warmth and comfort of the family hearth. Interestingly, the wise bird in the house is the protector of prosperity.
One of the main elements of woven patterns are all kinds of chains
According to the teachings of Feng Shui, owls protect the home from evil. The most popular of all macrame products is a panel in the shape of an owl. To make it, we will need strong and thick threads in a skein 10 meters long, two round sticks, paints and a brush, two beads and PVA glue.
If during the weaving process the thread suddenly runs out, do not despair. We tie a new thread, tying the two ends with a knot on the wrong side of the product.
The weaving algorithm is as follows:
- Divide the length into ten equal segments 1 meter long. We secure them to the stick with a simple loop knot, resulting in 20 working threads.
- We secure the stick on the table with electrical tape to make it easier to weave the pattern. We carry out weaving according to the pattern, starting from the frontal part.
- We weave knots using the simplest checkerboard pattern. The result should be a triangular-shaped canvas.
- Separately we weave the bird's eyes. From the first two threads on the right we knit a right-handed loop knot, repeat the element with two adjacent ropes and continue like this until the end, edging the right eye. We repeat the process in a similar way, but using left-sided loop knots. Sew beads into the middle.
- The bird's beak is woven from four central threads, weaving them alternately into flat double knots.
- We continue weaving with a checkerboard pattern in five rows.
- To tie the wings, we use four components on each side, braiding them with double-sided knots. After this, we return to the “checkerboard” pattern again, connecting it with the wings.
- Next, we place the next stick, which will be a perch, and thread threads numbered 3,4,5,6, as well as from 15 to 18, onto it. We get the bird’s legs.
- Next, we complete the pattern according to the diagram, and at the end we cut the threads diagonally.
An exquisite and original panel, made by the hands of a talented craftsman, will warm you with warmth and decorate your interior.
Weaving the “owl” panel, part 1
Weaving the “owl” panel, part 2
We weave a handbag organizer
An original wall organizer in the form of a bag will help not only decorate the interior of the hallway, but also collect all the necessary little things, such as keys, a comb or gloves, in one place.
Each type of knot requires a certain length of thread.
The knitting algorithm is as follows:
- For work, we take a thick cotton rope 40 meters long, a round stick made of wood or plastic. You can take threads of two colors to separate the base from the pocket.
- We divide the rope by cutting it into 20 equal components. We divide yarn of a different color into 12 parts, each 1 meter long.
- We fix 20 components on a stick using the classic knot fastening method. We begin the weaving process, strictly adhering to the diagram in the figure.
- We knit the first five rows with square knots, braiding the mesh. We move on to weaving a pattern in the form of small rhombuses. 12 threads are involved in the work. We connect the diamonds together with a knotted chain.
- The pattern of diamonds and a grid of square knots are arranged in a checkerboard pattern.
- Let's start creating the pocket. Separately, we knit a mesh of square knots. The pocket is slightly smaller in size than the base itself.
- Use a sewing needle to sew together the two parts of the product. We weave a strap on top to hang the organizer on the wall.
A similar pattern can be used to create an elegant summer handbag that will ideally complement a fashionable look.
This elegant, openwork macramé bag will complement your outfit.
The art of macrame is a universal type of needlework. Having mastered the simplest basics of weaving, learned to read diagrams and select high-quality materials for work, you can safely experiment.
Charming macrame bags
A wonderful gift would be hand-made openwork pots for indoor flowers, wicker lampshades, macrame napkins and tablecloths, as well as fashion accessories.
Might be interesting
samrukamy.ru
Amazing Features
A macrame panel in a photo is unlikely to look as attractive as it impresses and delights in real life. Like any handmade decorative elements, amazing wall images that form numerous knots are recognized and popular among connoisseurs of original works and handmade.
In the macrame technique, patterns for weaving panels in a manner close to the modern one, and the name “macrame” itself received the original type of needlework only in the 19th century. The highlight of the unique author's works, in addition to the silk threads, laces and gold thread used, can be called spectacular decorative elements, including amber and natural pearls, original beads and wood.
The incredible popularity of macrame is explained very simply. A fashionable passion or hobby can easily develop into a successful professional activity if you approach the learning process with full responsibility and care.
Anyone who has endurance, patience and perseverance can master the knot technique. You won't need too many materials: thread, braid or rope, pins and a pad. The result of your efforts will be an amazing macrame panel or any other miniature thing that will amaze with its grace and originality.
scheme. Macrame weaving for beginners
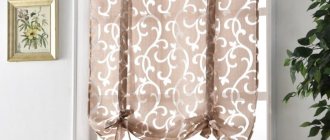
Macrame is one of the most popular types of needlework, which is based on weaving various knots. The macrame technique is used to make various wall panels, flowerpots, lampshades, women's jewelry, curtains, chair covers, napkins with geometric patterns, and so on.
Materials
Weaving macrame is not easy work that requires special attention and patience. Not all beginners know what materials are best to use for the macrame technique. Schemes for beginners will help you figure out how to weave a beautiful thing step by step. First you need to choose a non-slip thread, for example, cotton or thick clothesline.
To make jewelry and clothing accessories, floss, linen, woolen threads, lurex, and iris are used. Things that are made of leather cut into thin strips look very interesting.
Products using macrame technique
Interior decorations are woven from thick threads: ropes, cords, synthetic threads, fishing line. Variegated threads are not suitable for macrame; they look unclear. An excellent addition to such needlework can be using beads, seed beads, wooden rings, balls, and sticks.
The product will hold its shape better if you use thin wire, maybe colored. First, a frame is prepared from wire, and then threads are hung on it. Many girls and women are interested in the question of how to weave macrame.
On a note
When working with silk threads or twine, you need to moisturize your fingers. It is necessary to wear fabric gloves when braiding rigid ropes. It is better to boil hard natural threads before use - they will be softer and more elastic.
Silk threads unravel during work; to make it easier to weave from them, you need to lubricate them with glue or tie knots, and in synthetic ones, melt the ends over a fire.
When preliminary calculating the material consumption, you need to remember that the working thread becomes 4 times shorter when tying knots, when weaving with double flat knots - 6-8 times, when weaving a mesh - 3-3.5 times.
What is needed for weaving macrame
When working with thin threads, you need a pad that is filled with sifted sand or foam rubber and covered with soft fabric. For beginners, you can use the soft seat of an old chair, a foam board, as well as a wooden board (20*45, 20*35, 15*30 cm), on which 6-8 cm thick cotton wool or a layer of foam rubber is placed and then covered with fabric.
For such work you also need scissors, decorative pins, PVA glue, “Moment”, needles with a large eye.
ABC of macrame
First you need to learn the names of the threads that are used in macrame. The weaving pattern is not complicated if you know some techniques.
Carrier thread - in macrame, this is the thread on which all the threads for this product are hung. Knotted thread or warp - knots are woven around it. It must be pulled tight, otherwise the knot will not work. Working thread - knots are tied from it around the warp, its length should be 30 cm. Additional thread - additionally woven into the product, despite all those previously hung.
Methods of attaching threads
If you want to get into macrame, the weaving patterns are described in detail below.
Front fastening of threads with a lock. Fold the working thread in half and lower it behind the warp, loop down. The resulting two ends of the thread are lowered down onto the warp and into the loop. The horizontal bar of the loop should be on the face of the set.
Purl fastening of threads with a lock. The working thread is also folded in half, but brought under the warp with the loop facing up. Then the loop is lowered down onto the base and both ends are passed into it. The loop crossbar will be on the wrong side.
Extended facial thread fastening. The thread is folded in half and secured with a lock on the base on the front side. Then the threads are separated: take the right one, insert it up under the warp, then down onto the warp and into the loop; with the left one repeat the same actions as with the right one. This type of thread fastening is used for a dense row of knots, with no supporting thread visible between them. If you make more turns at each end of the threads, the fastening will be even tighter.
Extended purl fastening of threads with a lock. Fold the working thread in half and fasten it inside out to the base with a clasp. Then the right thread is brought up onto the warp, down under it and into the loop. Do the same with the left.
Uneven thread fastening is used when making a chain. In this case, the working thread decreases 4 times faster than the knot thread.
Main nodes
Hercules' knot. Two 10 cm threads are placed vertically on the pillow, the ends are secured separately with a pin. The right thread is brought under the left, and the left thread is brought from bottom to top and into the loop. Then the knot is tightened.
Knot chain. Take two threads. Alternately, each one is either working or nodular.
Rep knot. It is knitted from left to right and from right to left.
Rep knot from left to right. A knot thread is placed in front of the working thread, the working thread is thrown over the knot thread on the left side and passed onto the knot thread, then the working thread is thrown over the knot thread again, but on the right side, and the end of the thread is pulled through the formed loop. The coils are aligned and tightened. This macrame technique, the diagram of which is described above, can be used to make any interesting thing.
The rep knot is knitted from right to left in a similar way, only first the working thread is thrown to the right and then to the left.
Triple horizontal knot. Using a working thread, a horizontal knot is tied on the knot thread. Then the used thread is placed again on the knotted thread and inserted down into the loop. From such knots you can weave patterns in the form of diamonds and zigzags.
Diagonal rep knot. Take three threads, hang them on a knot and weave a diagonal knot. With your left hand, hold the first knotted thread on the right, placing it diagonally. The second is thrown to the right through the knot and pulled forward, up onto the knot on the left and down into the loop, the knot is tightened. With the third thread, do the same as with the second using the macrame technique (the diagram will help you figure it out).
Double flat or square knot. It is most often woven using 4 threads (2 working and 2 knotted). The leftmost thread is thrown over two knotted ones (they are located in the middle), the right one is passed over the left and then under the knotted ones and pulled out over the left working thread. A left half-knot is formed.
Place the rightmost thread on top of the knotted threads. The left one is on top of the right one, passed under the knotted threads and brought out on top of the right thread. A right half-knot has formed.
From two such half-knots, a double flat knot is obtained, and by repeating the half-knot, a twisted cord can be obtained.
Chess. By tying double flat knots in rows and leaving space between them, you can get a checkerboard pattern.
Macrame weaving also involves a number of auxiliary knots: simple, horizontal knot, cross-arm knot, tatting, Chinese, capuchin, tie and Armenian.
Beginning of work
Before you start working with macrame, you need to hang the working threads on a knotted thread. There are many different hanging methods:
Braided ring. In order to make a sample, you will need only 10 threads: one thread one meter long, two 1.6 meters long, three 0.3 meters long, four 0.15 meters long. One thread should be laid vertically on the pillow and pinned in the middle. From the center in each direction you need to set aside 10 cm.
The second thread should be carefully folded in half and applied from the wrong side to the middle part of the first thread. Next, you need to weave a chain of square knots 20 cm long. The chain needs to be folded in half, the ends of the first thread connected together. After this, you should tie a flat knot in the following sequence: second - first - second.
Next, you need to secure the threads using the “trap” technique. The last thread should be folded in half and laid with the loop down. The third thread needs to be wrapped around the first thread, 7-9 turns should be made. After this, you need to pull out the loop at the two ends located on top.
Macrame: master class
In order to make a beautiful thing, you will need a frame from an old lampshade; it must first be covered with new fabric. How to weave macrame for a lampshade?
You need to take a rope with a diameter of approximately 3 mm and cut the threads 6 times longer than the lampshade itself. The threads should be folded in half and hung with an extended purl fastening on an additional thread, which is equal in circumference to the upper part.
The threads should be distributed into groups of 4 each and weave flat chains of three double flat knots. It is necessary to weave all the ends of the chains onto the horizontal thread with rep knots - now a border has been formed.
In order to weave the central part of the lampshade, the ends should be distributed in this way: 12 ends each for fragments of double flat knots. The four middle threads must be woven into flat chains. Josephine knots are placed on bundles of loose threads under diagonal bridles.
The lower part of the lampshade should be woven in a mirror image. The ends that remain must be secured using the macrame technique. The lampshade weaving pattern will help you do the job correctly and competently. This beautiful original lampshade is ready to use!
fb.ru
Workshops in different Macrame techniques
In our studio you can attend separate workshops on macrame techniques (volumetric macrame). Macrame workshops are held immediately after the master class or as the group is recruited by appointment. The total time of each workshop is determined by the teacher.
Price
Group workshop (from two people): 600 rub./hour (60 min). From the 3rd hour of class onwards 300 rubles per hour. Individual lesson – 1000 RUR/hour (60 min). The cost of the required minimum set of materials is 100 rubles.
description of the checkerboard, pocket with a pattern, mesh and photo of the napkin, cords and bookmarks, detailed
Using the macrame technique, you can create beautiful and original products. Weaving each product using the macrame technique begins with a diagram. You can come up with it yourself or look it up in books or on the Internet. Schemes are presented in the form of a graphic image or verbal description. It is easier for beginners to work with master classes, where, in addition to step-by-step pictures, there is also a detailed story about the progress of the work. Professionals are able to “read” the knitting of a product from a pattern made by another craftsman.
Macrame weaving with diagrams and descriptions
You can weave almost anything using the macrame technique. Furniture, clothing, animal figurines are just a small part of what is made from threads. In any case, to weave even the simplest craft, such as a Christmas tree or a turtle, you will need a clear diagram. It can be taken from books or found in other sources.
Curtain diagrams can be with or without step-by-step descriptions. The first option is good because by following the points of the master class, you will be able to check the woven part of your work with the picture. Using only a diagram is much more difficult since not everyone knows how to read them, but sometimes the author explains before the image which node symbolizes a particular sign.
You can get acquainted with interesting macrame patterns on the Internet or in specialized stores
Schemes consist of one part or several - it depends on the complexity of the product.
Butterflies, fish, Christmas trees, tablecloth, dragonflies, snowflakes, angels, curtains and even earrings are simple products; they use a diagram that even a beginner can read. A voluminous dog, a spider and a cockerel, a clutch, a cradle for a newborn, dresses and sweaters are examples of complex products that need to be assembled from several parts.
A diagram is a very important element in any handicraft; with its help, masters of their craft pass on their experience to beginners. And it is thanks to these pictures depicting the structure of the product that anyone can learn macrame
Macrame element “Chess”
Checkerboard is a macrame element consisting of square knots that are arranged in a checkerboard pattern. Such beautiful patterns are used when weaving fabric for a basket or mesh for the lower circle of a hammock. Square knots are woven from four threads, so the number of threads used to weave a checkerboard must be a multiple of four. When practicing weaving this element, you can use ribbons or thick cords.
The product will turn out to be interesting and unusual if you use the “Chess” element when weaving
Description of the weaving of the “checkerboard” element:
- Attach six threads folded in half to the base. In total you should have 6 groups of 2 threads each.
- Take the first four threads and weave them first into a right-handed flat knot, and then into a left-handed one. Weave the remaining eight strands into square knots.
- In the second row, take the two threads on the left and right to the sides. Weave square knots from the eight threads located between them.
- Knitting the third row begins with a knot consisting of the first four threads on the left (including those that were pulled to the sides in the last row).
- In the next row, the two outermost threads are again pulled to the side, and square knots are woven from the eight remaining threads.
Once you have woven about five rows, you will notice that the square knots are staggered, creating an interesting pattern.
Macrame pattern: Chinese knot
Chinese knots look very intricate and definitely carry some meaning. Sometimes, for the first time, it is difficult to weave knots of this type even if you have a diagram at hand. However, having learned how to perform such elements, you can make even the lightest product unusual, for example, bookmarks and New Year's toys in the form of butterflies, fish, turtles, dogs and roosters.
The loop for hanging Christmas decorations and pockets can be designed in the form of a beautiful Chinese knot, which, among other things, is also a symbol of good luck.
Today, many needlewomen often use the Chinese knot when weaving products.
The knot that you will learn to tie today is called “Luck”. By following the detailed master class, even children will be able to create this element.
We weave together the Chinese knot “Luck”:
- Fold the thread in half and place it on the pillow.
- Take the left end of the thread, step back 4 cm from the bend and bend the thread in this place so that petals 4 cm long are formed on the top and left. Do the same on the right side. You should get a cross with three petals, 4 cm each, and the lower part should consist of 2 ends of the threads and be long enough.
- Take the right petal and place it on top of the top petal.
- Curl the upper petal around the part of the right one lying on it, and place it on top of the left petal.
- With the left petal, go around part of the upper petal lying on it, and place it on the lower threads.
- Using the lower threads, go around part of the left petal and insert their ends into the loop formed after bending the right petal.
- Gently and evenly pull the petals and lower threads in different directions until the knot reaches the desired size.
You should end up with a knot with three large petals on each side. To improve the appearance of the knot, you can pull out three micro petals from the middle.
Macrame pattern of a cat's pocket
Every home has a bunch of little things that don't have their own place. These can be pens, small pieces of paper with the necessary notes, buttons, rolls of ribbons and much, much more. Usually, unsightly boxes are used for storing them. To make the interior of your home more attractive, you can weave your own pocket for small items in the shape of a cat.
Using the macrame technique, you can make a beautiful pocket in the shape of a cat, where you can put various little things
Master class on weaving a cat pocket:
- Prepare 14 pieces of thread. Their length should be 6 times the size of the cat. Please note that the lower part of the cat will be folded and sewn to the upper one. To calculate the length of the threads, you need to determine the size of the finished product, add half the resulting value to it, and then multiply the amount by 6.
- Fasten 13 threads folded in half to one of the threads.
- Weave 7 rows of checkerboard in each row, starting from the second, leaving two new threads hanging freely from each edge. As a result, your seventh row should consist of one square knot located in the center.
- Weave a row of diagonal bridle along the chess board on both sides.
- Now take the first four strands on the left and weave them into a twisted strand of flat knots. There should be a total of 40 flat knots in the bundle. Make the same tourniquet on the right side.
- Take the next four strands from the left side and weave them into a twisted cord of 30 flat knots. Do the same on the other side.
- Weave the next four threads on both sides into twisted cords of 15 flat knots.
- Take four central threads and eight threads from the shortest strands. Using the two outer strands of short strands, tie a square knot on the remaining eight central strands. The knot must be raised to the central corner of the checkerboard.
- Now take the outermost threads from the central chains and tie a square knot on all the threads between them. Raise the knot to the previous square knot. In the same way, connect the outer strands with the central threads.
- We weave two strands from the first and last four threads, each of which should include 15 flat knots. The following bundles must have 10 flat knots. The central two bundles should contain a total of 5 knots.
- Now we weave the checkerboard fabric until the length of the cat (including the pocket) reaches the desired size.
- The last row should be what is called a clean edge.
The main stage of weaving the cat-pocket is completed. Now all you have to do is weave the tail and make the pocket.
Weaving using the macrame technique: diagram of connecting the elements of the cat
After the main stage of weaving the cat is completed, you can move on to knitting the parts and sewing all the elements together. In addition to the head of the body with a pocket, the cat should have a tail and beautiful bright eyes.
You can learn more about weaving a cat pocket in an interesting and exciting master class
Stages of weaving and connecting all elements together:
- Raise the bottom of the canvas up two-thirds of the cat's body. Sew the folded pieces of fabric together on the sides. You will end up with a pocket that is at the level of the cat's belly.
- Now, on the right side at the bottom of the cat, tie two threads folded in half and weave the fluffy tail with picot knots. Sew the tip of the tail to the cat's body. The threads for this element should be 16 times longer than the tail itself.
- The eyes need to be made from chains of looped knots folded in the shape of an almond. These chains need to be glued or sewn onto pre-painted cardboard bases cut out in the shape of a cat's eye.
- They need to be sewn immediately under the checkerboard triangle, on the cat’s head.
In such an original pocket you can store stationery, cosmetics, or even make a newspaper holder out of it. If desired, the cat's tummy can be decorated with white beads.
Macrame napkin diagrams and description
Using the macrame technique you can also weave beautiful, but very easy to make napkins. For such napkins, it is better to choose white threads of medium thickness.
A creative and beautiful knitted napkin will stylishly decorate the interior of a kitchen or guest room
Detailed master class on knitting napkins:
- Prepare 44 threads 1.2 meters long and one half-meter thread. Tie a small thread into a ring and attach 44 threads folded in half to it in a circle. Secure the ring thread to the pillow. You should have 44 groups of two threads.
- Take 4 groups of threads and weave one square knot from them. In this way, weave the entire first row.
- Step back 2 cm from the first row and weave the second row, staggered in relation to the first.
- Weave the third row with the same checkerboard, but step back 3 cm from the second row.
- In the fourth row you will have to deviate 4 cm from the previous row.
- Weave the last row, departing 5 cm from the fourth row.
- Cut off the excess threads so that there is a small tassel after each square knot.
Despite the apparent simplicity of this product, the macrame napkin looks beautiful and expensive. You can decorate your dining table or wooden cabinets with these crafts.
Detailed macrame weaving patterns (video)
Macrame weaving patterns allow us to make interesting little things that were once invented by other craftsmen. Having gotten your hands on other people's products, you will be able to come up with your own crafts, the diagrams of which will be viewed with interest by your students.
Examples of macrame weaving patterns (photos)
Attention, TODAY only!
Add a comment
kitchenremont.ru