To create home comfort, some people buy new furniture, while others like antique things.
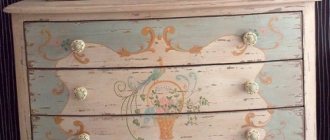
However, creative individuals successfully decorate an old mirror with their own hands to give the room individuality. Thanks to this, ordinary glass turns into an original element of the interior. There are several principles that help beginners learn how to create magnificent masterpieces. Let's find out what the experts say. On this topic:
How to make the work of a summer resident easier: a miracle shovel with your own hands,...
Aug 15, 2020
A note to poultry farmers - how to make a drinking bowl for chickens...
Aug 1, 2020
How to make a tree of happiness with your own hands - general...
Jun 2, 2020
DIY polycarbonate gazebo, photo
May 14, 2020
BACK FORWARD 1 of 41
What materials can be used
Although the decor is made from scrap materials, you need to purchase a few things:
- Glue and paints, including in cans, as well as varnish.
- Paper masking tape to separate and limit areas of the work surface.
- Twine, rope and wooden skewers, if you like the design of the frame in these materials.
- Liquid silicone for gluing beads and glass marbles, which may also need to be purchased.
- Contours and stained glass paints for painting and filling patterns on the mirror itself.
- Gold leaf and stencils to achieve the effect of antiquity.
- Oil paints and brushes for artistic painting.
- Solvent for thinning paints, varnish, removing bad fragments and washing tools.
A heat gun and glue in sticks will be a good helper. Not all of the materials listed will be needed. The choice depends on which decoration method you prefer.
It is worth noting that expensive art materials can often be replaced with budget ones - from the construction department. Especially if large-scale work is expected.
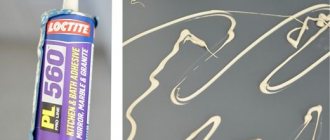
So, objects to be painted can be glued to the frame with acrylic sealant, which is sold not only in white, but in black, beige and brown.
Silicone sealant with a smell is inexpensive, but it contains acid, which, before it dries, eats away paint and mirror amalgam. Thus, using a caustic compound you can glue the beads onto the mirror itself. To fix decorative elements on the back of the mirror, you should choose a neutral sealant.
In addition, in construction stores, spray paints are also cheaper than in art stores. The range of coating types includes matte and glossy monocolor, hammer effect, crackle, sand.
Varnish in building materials is also available in glossy, semi-gloss and matte. Acrylic, alkyd and nitrocellulose. The price of a liter jar is similar to 100 ml of varnish in the art department.
When choosing, pay attention to the drying time of the materials - until they set. This is the period of time when corrections can be made to the work.
Comfortable and attractive materials - buttons, coins, keys and beads. Natural - branches, shells, stones, cones.
A mirror decorated with disassembled clothespins looks unexpectedly interesting. Plots with nautical motifs will perfectly support ropes and twine.
| Material | Features of the material | In what interior styles can it be used? |
| Natural wood | Rich appearance, environmental friendliness | Classic, art deco |
| Textile | Easy to use, environmentally friendly | Provence, classic, postmodernism |
| Natural materials: dry plants, shells, stones | Availability, the ability to create the most unusual variations, environmental friendliness | Provence, loft |
| Decorative elements: beads, beads, foamiran, pieces of broken multi-colored glass | Beauty, style and modernity | Pop Art |
| Various household items (disposable tableware, clothespins) | Cheap, easy to use, the ability to create a very original product | Modern, eclectic |
Unusual frame made of wooden pegs
Methods for attaching mirror tiles
Installation diagram of mirror plates.
Fastening with self-tapping screws differs from gluing; if necessary, any tile can be removed and replaced if it is damaged. This method is used if it is not possible to level the surface or if you need to decorate the ceiling space as quickly as possible. However, if there are significant differences, this method is not recommended; it is best to prepare the surface.
Related article: How to hang a ceiling cornice with your own hands
To make a mirror ceiling using this method, you need to prepare the following set of materials and tools:
- mirror tiles;
- decorative special screws;
- drill;
- building level;
- protective gloves;
- pencil.
The work is done this way:
- First you need to calculate the number of products and screws. After this, markings for fastening are carried out.
- Using a drill, holes are made for fasteners for the tile itself and for the section of the plane.
- The tiles are screwed to the ceiling surface using decorative screws. When drilling holes, it is necessary to apply the tile to the base so that all fastening points coincide. It is advisable to make position marks on the inside of each element that will coincide with the marks on the ceiling. Then installation will be quick and easy.
A mirrored ceiling is an unusual but beautiful surface design option. It can be done in various designs, but the simplest is the option of gluing the tiles to the ceiling in a small area. This makes it possible to highlight a certain space and make the interior more attractive. The work itself is simple, you can handle it even without much experience.
Ideas for decorating an old mirror: benefits of the procedure
To breathe new life into an old mirror, you can completely replace the frame or update the existing one. The following popular techniques will help with this: decoupage, gilding, aging and many others.
Simple Braided Rope Frame
There are many advantages to homemade decoration:
- By creating mirror decor with your own hands, you can get a product of any shape and size.
- The opportunity to receive an item that will 100% harmoniously complement the interior of the room.
- Saving money - buying materials and decorating the product yourself will cost 3-4 times less than buying a ready-made mirror.
Spectacular three-dimensional frame made of paper strips
An accessory made carefully with your own hands is the only one that can decorate an apartment. Such things are individual and inexpensive. Handmade products are expensive. The second advantage is freedom in choosing the material: beads, beads, old boards, leather and much more.
These mirror frames are environmentally friendly and are not treated with substances hazardous to health. And the right design visually expands the boundaries of the room.
Designing a mirror yourself has become so fashionable that it is difficult to list the options that have accumulated in practice:
- Framing with wooden or multi-colored plastic clothespins is both cheap and practical, it is possible to clamp notes;
- Tubes rolled from colored magazine pages and glued around, painted to match the wood;
- Cut out fabric patterns pasted onto the edges of the mirror and frame;
- A frame covered with spices, herbs and other products: pasta or coffee beans, peas and beans, seeds and nuts;
- Aluminum wire finishing;
- Decoration with pieces of mirror with translucent coating;
- Decorated with leather rollers with padding polyester inside;
- Plaster stucco for classic, baroque or retro style;
- Small old toys painted the same color pasted onto the frame;
- Cover the frame with shells or pebbles.
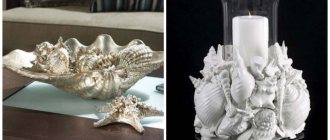
We decorate the yard, garden or cottage with seafood
They are simply laid out near plants, bushes, and fountains in the yard. They can make a great addition to your pool.
So, don't hide shells in closets or sideboards. They can be used to decorate various items in the house in an original way. Even an ordinary soap dish, complemented with shells, can transform a bathroom.
You can also decorate balconies and pendants. You need to use your imagination, and then create original decorated objects.
Everyone who at least once in their life vacationed at sea probably tried in every possible way to preserve the memory of these happy days - they took pictures on the beach, collected shells in different boxes and bags, which they then, carefully and not very carefully, put in hard-to-reach places in their city apartment, creating chaotic decor from shells.
Unfortunately, having returned home and visited our favorite work, we most often forget about the warm sea, an invariable attribute of which is beautiful sea shells. Residents of seaside towns also treat shells casually: if they cannot be sold to vacationers, why are they needed? Well, perhaps they were used to make greeting cards in long-gone Soviet times.
decor from shells for the Christmas tree
So, gentlemen, shells are back in fashion! Don’t be lazy and take out the treasures of Mother Nature hidden in the dark corners - now they will symbolize the beauty of the seascape right in your home, because talented designers call on you to make your home unique and cozy with the help of these shells, as beautiful as Eternity itself. Have you ever wondered how long it takes for a shell that you step on to grow in the sea? It turns out that there is a lot, and this is a number with many zeros! Let's follow the recommendations of modern designers - collect all our shells and start creating a new style in the home interior using shell decor - marine, Mediterranean, or, as it is also called, ecological!
- Marine theme in the interior
Some practical advice
Photo gallery - shell decor:
Yes, today they are not as popular as pebbles, and cannot be used to cover home floors, but shells look simply excellent when decorating walls, columns and arches! They can be combined with pebbles, gluing both to the walls using special types of glue and plaster.
flower pot decorated with shells
A transparent vase filled with shells will decorate any setting; add well-placed mirrors, as well as nautical-style frames for paintings and photographs - you can’t go wrong! Once you learn how to make shell wreaths, you can decorate doors or hanging flower pots.
In general, when visiting stores, you should often pay attention to a variety of interesting decorative elements in which seashells are used, because they can become both a successful addition to the already established unique style of your home, and the first step towards further improvement. Don’t forget about comfortable accessories made from artificial materials, the shape of which follows the silhouette of sea shells.
a vase decorated with multi-colored shells will add originality to the interior
Shell decor in the bathroom
“A rug made of pebbles with shell decoration will not only decorate the bathroom, but will also provide a useful and pleasant foot massage, and when placed on a heated floor, it will create the effect of being on the beach.”
Whatever the overall decorating style of your home, shells and pebbles always belong in the bathroom, because there is water.
The easiest way to place a simple but expressive element on a mirror shelf is a vase filled with shells. Don’t be lazy to inlay the mirror set or the outer surface of the bathtub with shells - you will achieve a simply stunning effect. The most industrious among us can even line the walls with pebbles and shells, creating a decor worthy of Neptune himself.
A rug made of pebbles decorated with shells will not only decorate the bathroom, but will also provide a useful and pleasant foot massage, and, being on a heated floor, will create the effect of being on the beach.
white table decorated with shells
Shells in the kitchen interior
In the kitchen, shells should be used to decorate any vases, flowerpots, pots and jugs, combining these elements with paintings and photos on a marine theme, as well as various souvenirs and dishes in the same style.
Marine style living room
Interesting souvenirs brought from the sea are used as independent decorative elements made from shells, as well as as decoration for a wide variety of objects.
Shells do not burn, which means they can be used to decorate sconces and lamps in any room.
a picture of shells in the living room will always remind you of warm sunny days
You can pour shining candy wrappers into massive shells from distant exotic seas, or plant epiphytes in them - unique miniature decorative flowers.
Seashells filled with wax make spectacular candles.
A painting made of shells, pebbles, and, if available, even corals and pearls will add a special charm to the living room interior. You will not see such a painting hanging on your neighbors’ wall - it exists only in one copy and is a manifestation of your individuality. Even simple dogs and shell boats, unobtrusively reminiscent of the sea, add quiet romantic notes to the atmosphere of the room.
mirror decorated with large shells in the living room interior
Seashells in bedroom decor
Sea pebbles forever keep the warmth of the summer sun, and ornate scrolls of shells - the sound of the sea surf; all of them will help create a unique and sophisticated aura of magical memories in your bedroom, because only you know where and when the sea waves presented these expensive gifts.
Try decorating mirrors and photo frames with shells, decorating a chest of drawers and an elegant dressing table with them - the marine style will take you into a world of fantasy, far from the problems and difficulties of everyday life.
Marine theme in decorating mirrors
Mirrors decorated with seashells and pebbles, using additional materials such as decorative beads, ropes or pieces of rope, look incredibly impressive. Elements of the composition can be painted with acrylic paints and coated with shiny varnish, and they are secured with glue (you can use PVA or Moment).
a mirror decorated with white shells goes well with the pale blue shade of the walls
A small fish, long lost among children's toys, and a keychain in the shape of a sea anchor will successfully fit into the original decor of shells that you came up with to decorate the mirror frame. The decorative rope will symbolize the ship's rope on your favorite photo frame, in the corner of which there is a small starfish. Ordinary things will come to life if their owners give free rein to their imagination.
Decor options in a marine style
“You can decorate flowerpots inside with shells, but it’s even better to stick them on the outside in a chaotic order, or using an interesting ornament as a basis.”
The number of options for using seafood in room decoration is limited only by the decorator’s imagination; they are essentially limitless, but there are a few time-tested successful ideas that are worth knowing about.
a dressing table and a mirror decorated with different-sized shells will become key elements of a marine theme in the bedroom
So, select the most attractive and beautiful shells, arrange them according to shape and size, change the color with paints if desired - and scatter them along with colored beads around your favorite photo frame. Photos decorated in this way can be placed on shelves or hung on the walls of the living room, bedroom and children's room. If you are endowed with artistic talent, do not hide it, but use the inspiration that appears to create a beautiful picture that the people around you will contemplate with delight.
Bedside tables, coffee tables and shelves will take on a completely new look if you place on them transparent vases filled with sea sand, pebbles, shells, starfish, corals and pearls. Such compositions are also well suited for decorating banquets and richly served tables.
You can decorate flowerpots inside with shells, but it’s even better to stick them on the outside in a chaotic order, or using an interesting ornament as a basis.
You can make this craft from shells yourself and place it on a shelf
In a country plot, shells and pebbles look great too! Scattered here and there: among garden trees and flowers, around a fountain or artificial pond, they will emphasize the beauty of the natural landscape and remind you of the sunny days you spent on the seaside.
The interior of the house can also become an object of decoration. Soap dishes in the bathroom and pepper shakers in the kitchen, original candle sinks, garlands, flowerpots and even lampshades for lamps in a marine style - this is just a small list of original ideas and possibilities for using natural materials brought from the seashore.
floor vase decorated with shells
- Since the shells were taken from natural conditions, which means that mollusks previously lived in them, they cannot be used to decorate premises without preliminary treatment - the shells are characterized by an unpleasant odor. In addition, often large specimens recently raised from the bottom of the sea are covered with a rather thick layer of algae that has grown to them, which can only be removed mechanically after soaking in water.
- Externally clean shells can simply be poured with boiling water for five minutes, then drain the cooled water and repeat the procedure for another three minutes.
- Don't forget that the shells can be painted if desired.
- The process of processing sea shells is completed by a one-time coating of acrylic varnish; this will provide the shell decor with an attractive natural look for many years.
Techniques for aging a mirror
You can give the frame an unusual aged look using acrylic paint. To do this, you need to cover the finished mirror frame with light paint, wait until it dries and apply another layer on top, but of a darker shade. Immediately after creating the second layer, it needs to be erased in some places using a regular sponge.
An aged mirror will fit perfectly into a loft style interior
Plastic spoons for a bright flower
The decor is suitable for a round mirror. The scooping parts of the spoons are used and the handles are cut off. Begin gluing from the inner row on top of the glass or behind it.
The next row is placed at the back, placing the spoons in the spaces between the two. The number of rows is at your personal discretion. To paint, take paint in a can.
Smooth pebbles will create a noble and discreet character. To make a frame for a mirror from stones, you should select them by color, shape, and size. You can even lay out a plot or stone patterns.
A frame with glued artificial glass or plastic multi-colored pebbles will bring a joyful mood.
For a style like in the photo of a mirror decor in the form of a luxurious flower, you need to prepare scoops from plastic spoons. Then cut out a round base from thick cardboard with a diameter wider than the mirror. You can use thin hardboard.
Place the mirror in the center of the base, circle and remove. Decorate the base with plastic petals, pressing them closer together so that the cardboard does not show through. Color the petals. When the work is finished and dried, a mirror is glued to the center.
The outer end part of the rings is decorated with sequins. For small work, it is better to use glue in a tube with a long spout. Moment Crystal will do.
A mirror frame made from disposable spoons will look no less unusual. Making it couldn’t be easier: you need to attach the top of the spoons to a previously prepared surface using a glue gun, and if desired, paint the composition with acrylic paint. To keep the frame neat, you need to cut off the “caps” of the spoons with a sharp object - scissors or a stationery knife.
Take a small round mirror
Draw two circles on a piece of cardboard - one the size of a mirror, the other about 5 cm wider
Trim the edges of the cardboard with scissors
Cut off the bottoms of plastic spoons
Glue the spoons in three rows using a heat gun
Spray paint spoons and cardboard
Attach a hanging loop to the back wall and glue the mirror itself to the front
This method of decorating a mirror has already been described - we take the decor and glue it on. But not on the mirror surface itself, but on the frame. The frame can be made from the same piece of fiberboard, or you can buy a mirror in a plastic (for example) frame.
Decorating the frame for the mirror
From mosaic
To create a mosaic you will need mosaic pieces; you can use fragments of ceramics or colored glass, mirrors. You will also need glue (silicone) and grout for the seams of ceramic tiles (can be white or colored).
From fiberboard (cardboard will not work, as the decor will be heavy), cut out a frame for the mirror, place it in the center, and draw an outline. Next, apply strips of glue to the frame and lay mosaic tiles or pieces of glass on it.
Mosaic mirror frame
After everything has been laid out and the glue has dried (about three days), take the grout and dilute it to a thick sour cream state (the proportions are written on the packaging). This mixture is used to fill the gaps between the tiles. When all the gaps are filled, remove the excess with a damp cloth. To prevent the mosaic from looking dull, you need to remove all the grout so that the tiles are clean. And this must be done before the grout dries.
Homemade mosaic mirror frames
This mirror decor is perfect for the bathroom. The decor is washable and fits well into the bathroom design concept. Such a mirror will look especially decorative if the mosaic is matched to the tone of the tiles.
Looks natural in the bathroom
Bright decoration on glass
You don't have to create a stylish frame to give an old mirror new life. It is enough to place elements of the original decor directly on the glass. For example, transparent pebbles of various shades, which are glued along the entire perimeter.
To create the decor of a large mirror with your own hands, use artistic painting. Stores sell different types of paints. Some are suitable for applying an outline to glass. Others paint various flowers, patterns and ornaments. Craftsmen especially like shiny glitters made in the form of circles, hexagons or stripes. The elements are glued to the glass surface using sealant.
In addition, the masters offer to create new ideas for decorating a mirror with their own hands, using:
- beads;
- fragments of ceramics;
- wooden frames with rhinestones;
- plastic rings.
Almost all work is carried out according to the rules established by specialists. The material is found at home or bought in a store. You also need to have alcohol on hand to degrease objects, brushes of different sizes, cotton wool, masking tape, and toothpicks.
For example, to make decor from beads, a place is set aside on the mirror for a decorative border. Then apply silicone with wavy movements and distribute it well over the surface. Beads are poured onto paper and carefully scattered, forming a border. After 72 hours the decoration is ready.
The mirror is attached to the wall and used for several decades. As you can see, in order to achieve the goal, it is important to be patient, turn on your wild imagination and start working with courage.
Mirror using steampunk technique (master class)
A frame made of paper lace looks very unusual and homey. It can be purchased at any store that sells disposable tableware.
We have to:
- Paper lace for cake.
- Double-sided tape.
- Round mirror.
- Covering paper.
- Aerosol paint.
- Scissors.
Technology step by step
Take some cake paper lace and spray paint it. Dry well for 1-2 hours.
Paint the lace with spray paint
Cover the back of the mirror with double-sided tape. Then cut off the protruding end of the tape.
Apply double-sided tape to the mirror
Trim the excess tape along the contour
Removing the protective film
Remove the protective film and place the mirror on the previously painted paper lace and press well.
Making external mounts for the mirror
Place a mirror in the center of the lace and press the tape well
Hanging a mirror on the wall
The final touch remains, attaching it to the wall.
These frames look especially beautiful if there are several of them!
The frame for the mirror can be decorated with artificial petals; they are usually sold in bags in goods for decoration.
Mirror decor with petals
For this we use:
- Petals of artificial silk flowers.
- Glue gun.
- Round mirror (or oval).
- Aerosol paint (any color).
Work order
- We paint the frame with white paint, how and with what to paint the wood - in detail in this article.
- Starting at the outer edge, use a hot glue gun to glue on the petals.
- And so we lay the petals row by row.
- We insert the mirror into the frame. Your amazing mirror is ready!
Row by row, hot glue the petals in a circle.
Finished mirror with petals
An unusual and modern mirror will be created if its edges are decorated with gold leaf. If you don’t find it, you can take regular thin foil.
Mirror decor with gold leaf
We have to:
- Glue gun.
- Mirror of any shape.
- Foil or gold leaf
Decor technology
- Take the foil and tear it into different shapes.
- Using a glue gun, glue the edges of the mirror with pieces of foil or gold leaf, placing them tightly on top of each other.
- Let dry for 1-2 hours.
Glue the foil onto the mirror with a glue gun
The more unusual the better when it comes to home decor items. To create a more original mirror, you can rely on steampunk - a science fiction movement inspired by steam energy of the 21st century. To create a mirror you will need levers, valves and gears made of metal, which can be purchased at craft stores or borrowed from mechanics, a glue gun and personal imagination.
To decorate the frame, you can use a variety of objects.
Sequence of actions:
- Degreasing the surface to be decorated.
- Gluing parts.
- Applying a protective layer of clear varnish.
A frame coated with paint to resemble old copper will look stylish
Such a mirror will fit perfectly into the interior of a teenager’s room, study, fantasy bedroom or living room.
From unnecessary items
Keys, old watches, thimbles, spools, dull scissors... These items will turn into a harmonious frame if you decide to decorate a large mirror.
To get the effect of depth, use 2-3 paints. When a bright or light color is needed, the composition is first primed with white. Then they paint with the main color.
After complete drying, contrast paint is applied with a sponge or brush so that all the recesses are filled. Then use a soft cloth to wipe off the paint from the convex parts.
After drying, fix with varnish. You can use combinations of white-turquoise, beige-brown.
Tempera is suitable for filling, as it has high hiding power over acrylic and oil bases with a short drying time.