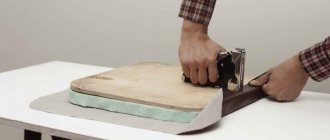
The overwhelming majority of city apartments belong to the old housing stock. Such premises were built based on the standards accepted at that time, developed in the spirit of necessary minimalism. Transformable kitchen tables for a small kitchen are the only opportunity to create more or less comfortable conditions. There are many different designs on the furniture market.
It is difficult to harmoniously fit standard items into the cramped conditions of a small room. The best solution would be to have a custom-made table made in your chosen style in a specialized workshop. Such pieces of furniture, of course, are individual, but their cost is much higher than serial ones. This circumstance stops most owners of small-sized housing who do not have high incomes.
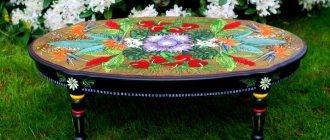
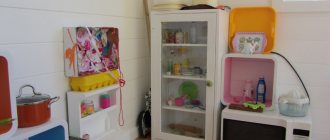
Transformable dining table
The way out of this situation is simple: you need to make a table with variable geometry on your own. The guide below, equipped with photo and video descriptions of this technological process, will be a good help in this matter. As practice shows, you can cope with this task if you have a certain set of tools and the necessary materials (also find out which materials are best suited for the kitchen).
Selecting a table transformation mechanism.
I selected a suitable mechanism for transforming the table. First I chose how the table would be laid out, I really liked the Acrobat mechanism, but it is not supplied to Russia. Well, the only alternative available on the market was the mechanism of the following principle:
This mechanism is produced both in Russia and there are analogues from Europe and China. Supported the Russian manufacturer! The mechanism comes with springs or a gas lift, which are needed to help unfold/fold the table - for a softer ride. Without a doubt, I chose the option with a spring, because... The simpler the design, the more reliable it is. In addition, the spring is hidden in the mechanism body and is not visible when unfolding the table, unlike the gas lift which is too noticeable.
Designing a transformer table.
I made a layout of the future table in the PRO100 program. I used this program for the first time in my life, I figured it out in 1 evening. I made the layout in about 2 evenings. I took a picture from the Internet of a similar table as a standard and calculated the dimensions myself. It turned out to be nothing complicated. Many recommendations were sent in advance of the purchase of the mechanism, I was guided by them when calculating the sizes.
Cutting and edging laminated chipboard.
I ordered cutting of chipboard. In fact, there is an application for the PRO100 program that makes a cutting map, but since... I was too lazy to search and figure it out - so I made a cutting map manually and quite quickly.
There are also third-party elements on my map, because... I ordered another cabinet with the table. These extra elements are marked on the map with an X. The color of the laminated chipboard was wenge, the thickness, as recommended by the manufacturer of the transformation mechanism, was 22mm. The tabletop should be at least this thick. The mechanism is designed for such a load; the table body itself can be made from 16 laminated chipboards. But not everyone will order 2 sheets of different thicknesses with a large number of scraps) I ordered the edging immediately with a cut, the tabletop was 2mm PVC edge, the rest was standard melamine edge.
Initial fitting of parts.
I brought sawn and framed chipboard. I bought all the necessary hardware for assembly. I tried to fold the elements to exhale and make sure that I had not made a mistake with the sizes. Everything worked out, I was right with the sizes.
Assembling the table frame.
We assemble the table frame into confirmations using a special drill. We mark on dark-colored chipboards using stickers. This idea came suddenly after I tried to apply markings with a pencil on a dark laminated chipboard: nothing was visible and the pencil reflected and glare. The sticker solved the situation - the markings are accurate and there are no traces of glue left on the chipboard. In addition, the solution is quite cheap.
Well, the actual assembly of the table frame for confirmations:
We will fasten the mechanism through the end-to-end method, because The weight of the mechanism is impressive - 8 kg. every. There is no need to be afraid because... We have everything calculated and the overhead legs will hide all the technical holes and fastenings. We make markings for fastening the mechanism in the same way
We drill through holes for the bolts and then use a Fosner drill to prepare a place for the bolt heads to recess them.
Well, we bolt the mechanism. You shouldn’t be afraid of the number of bolts, they are all necessary, they fasten the walls of the table together even more firmly and make them self-supporting.
Assembling the transformer table legs.
Assembling the table legs. The legs must be very strong to support the weight of the table (which is approximately 45 kg) and the weight of the dishes on it. Therefore, it was decided to fasten the legs together with ties.
Screw the legs to the table. To do this, you need to very accurately mark the leg fastenings. To keep things simple, I drilled in place. We will install it on these metal bushings
For them, we drill holes in the legs according to the mark.
This is the position in which all the legs were screwed. The legs hide all the technical holes in the table frame.
Assembling the tabletop.
The tabletop must be assembled with particular precision, because the tabletop folding hinge must be strong and ensure smooth folding/unfolding of the tabletop. When I bought it, I doubted the hinges and for good reason. In principle they work, but it’s hard to hold the hinge in its sockets, and the screws that are supposed to do this don’t do the job. Therefore, I advise you to look at other hinges for the tabletop. Marking holes in countertops:
Assembled the countertops
Dear visitors to the site “Visiting Samodelkin,” from the material presented by the author, you will learn how you can independently make a transforming table for a gazebo from a 30x80 mm board.
I used different types of boards for the table: birch, pine, aspen, but it is best to take hard types of wood, such as birch, because the table and two benches are designed for 6 people, that is, the structure must withstand high loads.
The advantage of this table is that it compactly folds into a bench with a backrest and back into a table with two benches; it takes up little space when folded.
So, let's look at what exactly is needed to make a transforming table?
Materials
1. board 30x80 mm of different species (it is better to take birch boards) 2. metal corners 3. wood screws 4. wood glue or liquid nails 5. varnish 6. stain 7. M12 bolts 8. nut 9. washer 10. nails
Tools
1. hacksaw 2. screwdriver 3. drill 4. hammer 5. ruler 6. pencil 7. tape measure 8. protractor 9. angle 10. brush
Step-by-step instructions for creating a transforming table with your own hands.
After a long search on the Internet for a suitable drawing, I got to work, first of all I drew templates for the legs directly on the floor, you can also use a sheet of plywood.
Next, he saws the boards according to size; the author used different types of wood: aspen, pine, birch, but it is best to use hard wood. Please pay attention! There will be two benches, namely internal and external. First of all, the master makes an external bench; he showed us all the detailed dimensions directly in the photographs, which, mind you, is very convenient. The height of the legs is 440 mm, the width of the legs at the bottom is 400 mm - this is very good for the stability of the bench. Attention important point!
The length of the internal crossbar is 150 mm, we remind you once again
that the crossbar is located inside.
The length of the outer bench is 1380 mm; before direct assembly, all workpieces should be thoroughly sanded and be sure to chamfer so that the surface is smooth, even, as they say, “Without a hitch.”
The bench turns out to be simple, and the master makes the fastening using wood screws, wood glue and, for greater reliability, adds metal corners, since the structure must be extremely strong.
So, let's move on) Now you need to assemble the Inner Bench
Note! The height of the legs on both benches should be strictly the same, but the crossbar that fastens the legs is moved outside and its length is accordingly increased to 400 mm, the length of the top bar is 350 mm where at a distance of 40 mm from the edge a hole is drilled for an M12 bolt and drilled out to recess the bolt head into cavity of the board so that nothing protrudes. The author indicated all the necessary dimensions directly in the photographs.
The length of the bench is 1440 mm, but in each individual case the dimensions may vary, because everyone makes it for themselves, but as a standard we use the dimensions presented by the master.
Holes are drilled in the top bar.
After both benches are ready, you need to try them on and one should fit into the other with a small gap (see photo)
That is, two benches when folded should create one whole.
This is exactly what should happen in the end.
We've sorted out the benches a little, now let's move on to considering the author's further actions, namely the manufacture of brackets from timber. The angle of connection of two bars should be about 100-105 0 (see photo) where beam “A” is responsible for the width of the tabletop, and beam “B” is the height from the top of the bench to the tabletop.
A hole is drilled in timber “B” for an M12 bolt and drilled out to recess the head into the cavity of the wood.
After that, the resulting brackets should be connected to the inner bench; we place a washer at the connection point so that there is no mating.
The head of the bolt is recessed into the drilled hole.
The same is true on the opposite side.
In general, 2 brackets are fixed in this way, which are responsible for the height and width of the tabletop.
Then you should align both brackets evenly.
And now the fun begins)) you need to connect the tabletop with the outer bench, this is done using a straight strip, its dimensions are indicated in the photo.
These strips need to be made in 2 pieces, the author struggled for a long time to get the exact size during the fitting process, so in each individual case there may be errors. To begin with, the master drove nails along the edges of the planks and made a mark with them, that is, he drove a nail so that it stuck out a little on the other side and made a mark, and then drilled a hole for an M12 bolt
Everything must first be carefully adjusted, and then drilled calmly, as they say, “Measure twice, cut once.”
It is imperative to make a limiter on this bar so that your tabletop does not move apart; for example, the author’s one looks like this.
That is, when unfolded, it will fix the tabletop in a level position and will not allow further movement.
As you can see, everything is quite simple, a piece of board is cut at a certain angle and attached to the plank using 2 self-tapping screws.
For complete symmetry, everything is done the same on the second bar.
I have long wanted to make with my own hands both a coffee table and a transformable dining table. The idea of creating such furniture is that the assembled table can instantly turn into a full-fledged kitchen or dining table. I decided to make my own transforming coffee table from wood. As a project, using my experience in drawing, I drew a diagram for assembling furniture. Before starting work, I prepared the appropriate tools and purchased the necessary materials.
Assembly Features
Be sure to tighten all bolts on the mechanisms securely. Since the table will be unfolding all the time, you need to take care of its strength in advance. Assembling a transformable table from Much Furniture will not take much time if you follow the instructions.
Carefully study the assembly diagram and do everything as indicated in it. Even small deviations will change the quality of use of the table.
Assembling the table legs Assembled base Screwing the legs to the body Fixed spring in the table Transformation mechanism inoperative Mounting the smaller part of the tabletop Fixing the upper movable part Hiding the loop for fixation
Remember that there are different types of original transformer tables. When purchasing a specific model and assembling it using a video, make sure that it shows exactly what you need. In general, most of them are similar, but even some decoration elements can spoil its appearance. The most popular models today are:
- Dolphin;
- Caesar;
- Levmar;
- Demi.
When assembling a transformer table, the question often arises: how do the mechanisms withstand such heavy tabletops? There is nothing unusual in this, because their strength is in no way inferior to sofa options. They can withstand a lot of weight, and their service life, established by the manufacturer, will surprise any buyer. Steel fasteners do not come apart even after many years of daily use, the main thing is to secure them firmly.
Self-assembly requires sufficient physical strength. A weak woman is unlikely to be able to tighten bolts and nuts well enough, so men should do this task. Tables from Much Furniture have been and remain one of the highest quality and most reliable, and that is why they are so popular. Having assembled the model you like, you will understand that you were not mistaken with your choice.
Delivery cost to Moscow within the Moscow Ring Road and to Nizhny Novgorod within the NKAD: + 500 rub. bedside table (1-2 pcs.); ottoman, coffee table; mattress up to 1.0 m (inclusive), chair-stool (1-2 pcs) + 700 rub. dresser; shoe rack; TV bedside table without add-ons; computer desk and desk; table-book and dining table; pouf-sofa; pouffe bed; 1 hallway element; chair-bed; kitchen corner (cabinet); kitchen sofa (soft) up to 1.5 m; a mattress wider than 1.0 m, a chair-stool (3-4 pcs), a rack (like a column) + 1000 rub. hallway, closet, wall, kitchen up to 2.5 m; kitchen corner (soft assembled); sofa; dining table + 4 chairs, shelving (like a closet) + 1200 rub. hallway, closet, wall, kitchen from 2.5m to 3.5m; + 1500 rub. hallway, closet, wall, kitchen more than 3.5 m; corner sofa (ottoman); sofa + 1 armchair; children's room with mattress; single-tier bed and ottoman: up to 1.40 m (inclusive) +1000 rub; with mattress (orthopedist) +1200 rub; with mattress and orthopedist +1400 rub. wider than 1.4 m and 2-tier: +1200 rub. Delivery to Moscow within the Third Transport Ring: at 4-5 am - no extra charge; not at night - + 500 rub. Delivery to shopping center (products to other regions of our country) + 500 rub. to the invoice and the client’s consent for lathing and insurance Delivery outside the Moscow Ring Road or NKAD + 35 rubles/km. Delivery within St. Petersburg: 1 module of a modular sofa, cabinet, chest of drawers, shoe rack, dining table, coffee table, hanging shelves, desk, dressing table, chair-stool (1-4 pcs.), pouf, mattress - 1200 rubles, computer table, kitchen cabinet corner, armchair, banquette, pouf-sofa, kitchen sofa up to 129 cm - 1500 rubles, hallway, wardrobe, wall, TV stands with add-on, kitchen up to 2m, bed without mattress - 2000 rubles, hallway, wardrobe, wall, children's room (w/m), kitchen from 2 to 3 m, sofa, straight ottoman, ottoman bed, kitchen sofa, bed with mattress - 2500 rubles, hallway, closet, wall, children's room with mattress, bedroom, kitchen from 3 to 5m, bed + mattress + drawers, orthopedist; corner sofa, corner ottoman, sofa + 1 armchair - 3000 rub. Delivery outside the Ring Road - 30 rubles/km. Delivery time for orders is up to 2 weeks. When issuing an invoice, a surcharge of +6% is added to the total cost. Manufacturer: Atlant.
Lifting conditions
Ascent floor by floor (elevator = 2 floors) + 150 rub. lunch or magazine table; 1 hallway element; chair (kr-kr) + 250 rub. hallway, closet, wall up to 2.5 m; sofa; kitchen corner (corpus and soft); dresser; computer table; bed (any) + 350 rub. hallway, closet, wall, kitchen from 2.5m to 3.5m; corner sofa or ottoman; bed (ottoman) with mattress + 450 rub. wall, closet, hallway, kitchen more than 3.5 m.
Assembly conditions
Assembly of upholstered furniture: + 200 rub. sofa, + 300 rub. corner sofa, corner ottoman Assembly of cabinet furniture: + 10% of the cost, but not less than 1000 rubles, if there is space for assembly on the floor; + 15% of the cost when assembling vertically, i.e. gathers in place (standing); + 20% built-in furniture and kitchens; +150rub. for 1 hole when hanging or mounting on a wall Assembly of wooden beds: + 600 rub. single bunk bed without drawers; + 1000 rub. bed (1 and 2-tier) with drawers and orthopedist.
Source: acronistrueimage.ru
Materials
I bought all the necessary materials at a construction supermarket. I had some in stock. The list of all materials turned out like this:
- edged pine board 4100 x 400 x 25 mm;
- screws 20 mm – 40 pcs.;
- screws 50 mm, 70 mm – 10 pcs.;
- metal corners 40 x 40 mm – 4 pcs.;
- stain 0.5 l.;
- furniture varnish PF 170 – 0.5 l.;
- wood glue “Stolyar” - 125 g;
- wooden dowels 30 mm - 24 pcs.;
- round self-adhesives – 8 pcs.;
- piano hinge 400 mm – 4 pcs.
Delivery
You can order delivery from us or pick up the selected product from the warehouse yourself in Moscow.
Hassle-free delivery! Read our delivery terms - we will deliver the selected product directly to your address.
Delivery within Moscow within the Moscow Ring Road: RUB 900.00. to the entrance
Delivery outside the Moscow Ring Road to 900.00 rub. plus 30.00 rub. for 1 km.
Pickup from the warehouse in Mytishchi
Delivery throughout Russia by transport companies
Climb
Ascent without an elevator 1 (one) package for 1 (one) floor RUB 60.00.
Elevator ride = 1 (one) package 120 RUR (any floor)
Purchase returns
When you receive your order, carefully check its contents and colors.
Be careful! Immediately inform the driver if the product does not correspond to what you ordered or is defective.
If a product is found to be defective or incomplete after shipment, re-delivery is carried out at the buyer's expense.
Our furniture production facility provides professional furniture assembly services.
Assembly is 10% of the cost, but not less than 1,500 rubles.
Additional assembly work will be charged separately.
You can check with our managers for more detailed information about the cost of assembly.
It is possible to schedule assembly as early as the next day after delivery (depending on the workload of the assemblers). The departure of the assemblers is agreed upon with the manager in advance.
The buyer has the right to carry out assembly independently, in accordance with the attached instructions.
Before assembling, be sure to make sure it matches your order.
Remember, purchased goods can only be returned in disassembled form, without traces of attempted assembly!
Be careful when opening the goods, keep the packaging until you are completely sure that your order has arrived in the desired color and configuration. Removal of packaging is carried out independently.
Attention! In case of unprofessional assembly, defects may occur, which leads to loss of the right to warranty service.
Many novice craftsmen are wondering how to assemble a kitchen table without instructions, spending a minimum amount of time on all the work. The easiest and fastest option is to use a ready-made tabletop and legs. This design, if installed correctly, can last quite a long time. There are other options for kitchen tables: completely wooden, corner, folding. They are all assembled according to approximately the same principle.
Step-by-step instructions on how to assemble a coffee table - transformer
- I sawed a board 400 x 25 mm, 4100 mm long, with a jigsaw into pieces:
- table top and sides 800 x 400 mm – 4 pcs.;
- legs 900 x 50 mm – 4 pcs.;
- 2 crossbars 700 x 50 mm and 650 x 50 mm;
- triangular struts with sides 5, 10 and 11 cm – 4 pcs.
- I cleaned the entire surface of the wood with an emery wheel and a sander.
- The boards were covered with stain.
- Then the wood was coated with furniture varnish in two layers.
- I cut the ends of the table top and the adjacent ends of the other two boards with a jigsaw at an angle of 45 0.
- At the ends of one side of two 80 x 40 cm boards, I drilled mounting holes for wooden dowels with a drill.
- I smeared the dowels and ends of the adjacent sides of the two boards with wood glue and connected them into one tabletop.
- He tied the tabletop with straps and left it alone for a day.
- A day later, I removed the tension straps from the tabletop.
- I installed a folding mechanism in the form of piano hinges, connecting the side boards with the tabletop.
- I attached legs to the sides of the table with steel corners, the ends of which were cut at an angle with a jigsaw. The fastening was done with screws using a screwdriver.
- I installed struts, connecting the tabletop and legs with them. To do this, I made holes in the adjacent sides of the parts. I inserted dowels into them, coated with wood glue.
- The legs on each side were connected by crossbars. I secured the crossbars with screws using a screwdriver so that when folding the table they would not interfere with each other.
- The screw holes in the legs where the crossbars are secured were covered with self-adhesive tape.
- I glued pieces of felt to the ends of the sidewalls, which become supports when folding the table. This will prevent abrasion of the surface of the supporting part of the sidewalls.
- I also glued felt nickels to the supporting surfaces of the legs. The table will not scratch the floor with its legs, and it can be easily moved on any floor covering.
- He opened the small table and set it on its legs. It turned out to be a comfortable dining table, which I placed in the living room.
After I assembled the transforming table with my own hands, I summed up how much money I spent and how long it took to assemble the furniture.
How to make a transforming table with your own hands: drawings, choice of mechanism and installation steps
If you decide to make a folding table yourself, first you will need to draw up a drawing. For the product, drawings can be done by hand , on paper, because there is nothing particularly complicated in them. You don't have to be an engineer or carpenter to create product drawings yourself.
Many will be pleased to create such an intricate thing with their own hands. Which table is better to make? It is better to choose a regular folding option, since homemade furniture that transforms into another is too difficult for a product lover.
If you decide to make a folding table yourself, first you will need to draw up a drawing
Among the stages of creating a table are:
- marking sheet material;
- trimming with a router;
- pasting the ends of the tabletop using PVC edges;
- processing of sharp parts of aluminum corners;
- center mark on each corner;
- each side of the guides is applied to the corner;
- the guide is laid on a flat substrate;
- Retractable guides are installed on the two halves of the tabletop;
- The fixed half of the telescopic guide is attached to the left side of the cover, and the movable half is attached to the right.
- hinges and latches are installed next to the sliding system;
- an additional panel is installed;
- installation of additional tabletop hinges;
- attaching the legs.
Cost of materials
- edged pine board 0.04 m 3 x 4200 rub. = 170 rub.;
- screws 2 cm – 40 pcs. in stock;
- screws 50 mm, 70 mm – 10 pcs. in stock;
- metal corners 4 x 4 cm – 4 pcs. x 2.5 rub. = 10 rub.;
- stain 0.5 l. = 100 rub.;
- furniture varnish PF 170 – 0.5 l. = 50 rub.;
- wood glue “Stolyar” - 125 g = 70 rubles;
- wooden dowels 30 mm - 24 pcs. in stock;
- round self-adhesives – 8 pcs. in stock;
- piano hinge – 400 mm – 4 pcs. = 4 x 44 rub. = 176 rub.
Total: 576 rub.
Assembly steps
Let's look at how to assemble a kitchen table with chrome legs. This option is simple and can be applied to any countertop. First, let's put marks for the subsequent screwing of the legs. Let's lean the mount against the tabletop and mark the points for the screws with a pencil. After this you need to screw the mount. To do this you will need a screwdriver or screwdriver. Then you need to install the leg into the mounting location. It easily screws into a special hole in the center. Similar actions need to be done with the remaining supports.
A more difficult question is how to screw the legs to a wooden kitchen table. Such a design is much more difficult to assemble, since you need to think about the types of connections.
The classic one is strengthened with the help of a special base, which is a frame made of timber. The minimum height of each plank is 12 cm, and the thickness is 3 cm.
If the legs are made of timber, then their cross-section should not be less than 6x6 cm. Traditionally, the entire structure is assembled using a tongue-and-groove connection. Then a metal corner is used to fasten the slats and legs. After this, they move on to installing the countertop. It can be connected to the base using screws.
Labor costs
The time spent on assembling the transforming table was reflected in tabular form.
This is pure time spent only on performing individual operations. Taking into account technological breaks and rest, I assembled the table in 2 days.
A table of this design, when assembled, can serve as a convenient surface on which newspapers and magazines will be placed. The table is suitable for serving breakfast or dinner. When folded, the structure occupies a minimum of usable space. If necessary, the transformer can be “turned” into a fairly spacious dining table.
Folding furniture is attractive for use in the country, in summer pavilions and on picnics. The table easily fits in the trunk of a car.
An elementary sense of common sense prompts you to assemble a transforming table with your own hands - cost savings in this case will range from 50 to 75%, depending on the model and materials. It may not be possible to make an extendable table without significant loss of time if this is your first experience in making furniture. However, the time spent is compensated by the acquired skills, which allow further projects to be carried out much faster. After all, not a single home master picks up an instrument just once: in the living room, bedroom, hallway there is always a place to apply his strength and creative imagination.
Transformable table for the living room
A transformable table for the living room can be either a TV stand or a computer stand. If you expand such a table, you can get an additional work surface, which is important for families with schoolchildren or students.
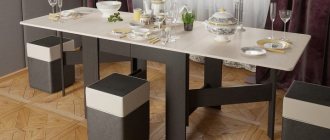
Folding book table
In many families, a large dining table is not needed all year round. However, its presence can help out if guests arrive. The sliding mechanism is ideally suited for these purposes; a modest wooden table equipped with it stands discreetly in the corner, performing auxiliary functions. But when his time comes, he stands in the center of the apartment.
It is proposed to make a frame furniture mechanism with lowering halves of the lid. Materials you will need:
- planed bars 20x50 mm;
- plywood or thin 10 mm planks (for boxes);
- furniture board: chipboard, laminated chipboard or MDF (on the lid).
Fig.1. Drawings of a folding table-book: 1 – driving frame; 2 – rotating frame; 3- folding plane; 4 – drawer; 5 – assembly of the side part of the main frame (option B); 6 – medium narrow chipboard tabletop option B
Fig.2. Table assembly diagram: 2 – elements of the rotating frame; 3- folding plane; 4 – drawer; 5 – driving frame
Mechanism for assembling the table-book:
- The table legs are sawn off to the required length.
- Markings are applied to them.
- According to the markings, grooves are hollowed out for the longitudinal drawers (transverse slats connecting the table legs).
Note! Grooves for the lower slats can be made at an arbitrary height, and when hollowing out the upper slats, take into account the height of the drawer.
- The longitudinal drawers are sawed off to length.
- Single spikes are filed down at their ends.
- Glue the side frames (2 pieces), after checking the accuracy of the assembly with a square.
- While the side frames are drying, make 2 supports for the side covers of the table. They are also of frame construction (in Fig. 1 and 2 - No. 5).
Installation of a table-book
The length of the support legs corresponds to the height of the table legs. The size of the other vertical post is equivalent to the distance between the outer edges of the longitudinal frames. And in order for the supporting support in the folded position not to look beyond the table, the width of the support should be equal to half the length of the table sides.
Mechanism for assembling the table-book (continued):
- On the bars intended for support, it’s time to make single through and blind tenon joints.
- The bars are connected with glue.
- In the dried sidewalls, saw down and select recesses for attaching short transverse drawers (No. 2 in the diagram).
- The sides with these short drawers are connected with glue and screws.
- Guide rails are attached to the inside of the upper longitudinal drawers to move the drawers (No. 4 in the diagram).
- The side walls of the drawers (cabinets) are made of plywood or thin 10 mm boards.
- The front wall of the cabinet should be made of a thicker board.
- Quarters are cut along the edges of these boards to attach the sides of the box.
- All elements of the cabinets are held together with glue and screws.
- The bottom of the cabinets (drawers) is cut from thin plywood or fiberboard.
- Note! A special feature of the design is that the front wall of the drawer extends inside the legs. This means that the front plane of the wall and the edges of the legs are flush. And in order to achieve this, clamps are attached to the guide rails and upper longitudinal drawers, which do not allow the drawer to move further than necessary (No. 3 in the diagram).
- Table tops are cut from chipboard, laminated chipboard or MDF. Begin work by marking and cutting out the middle cover.
- Note! The edges of the middle cover above the table structure will protrude 20-25 mm. This will allow the support support to be hidden under the lowered half of the lid.
- The middle cover is secured with four metal corners (No. 3 in the diagram), screwed with screws from the inside of the upper transverse frames.
- The side covers are attached to the middle one with a piano loop. It is screwed on from the bottom with screws.
- Note! If you turn the furniture structure over, connect all the lids and only then start tightening the hinges, it will be more convenient to work.
Desk
What else can be made from wooden boxes? For example, a comfortable desk. How to do it:
- take 4 drawers and a tabletop of the desired size
- fasten two drawers together along the long side
- put upside down against the wall
- fix the tabletop on top
Thus, a person will receive a desk with shelves for storing necessary things.
Was regular - became folding
To assemble a transforming table with your own hands, you don’t have to start everything from the very beginning. You can convert an existing wooden single- or double-pedestal table into a sliding furniture mechanism. The design solution in both cases is not particularly different - the tables are equipped with a retractable element.
Fig.3. The mechanism for converting a two-pedestal table into a sliding one is represented by the front panel of the top drawer (1); persistent chipboard board (2); loops (3); horizontal chipboard board (4); screws (5)
To modernize a two-pedestal table, as the drawings show, it is necessary to get rid of the top drawer of the right cabinet. If, due to the layout of the living room, it is more convenient for you to part with the pull-out cabinet on the left cabinet, carry out the project in a mirror manner. This issue is not fundamental; the selected desk drawer must be completely disassembled. Only its front side with the handle should remain.
Another board is attached to this board with screws (5) at the end, the dimensions of which coincide with the dimensions of the box that was previously there. Loops (3) are screwed from below, on which the thrust board (2) is fixed.
Board No. 2, when folded, should be in close contact with board No. 4 so that entering the space freed from the box is problem-free. When extended, board No. 4 will serve as an additional table, and board No. 2 will serve as a support for it. To avoid distortions, this plane should be tilted completely 90°.
Differences in retrofitting a single-pedestal table
A table with one cabinet, after modernization, will increase its area much more than a two-pedestal one. In addition, its disassembled geometry will be different from the layout of a two-pedestal structure.
Fig.4. The mechanism for converting a single-pedestal table into an extendable one is represented by a horizontal cutout (1); desk drawers (2); retractable board (3); thrust board (4); wheels of the thrust board (5); squares (6); side wall of the table (7); additional slats (position 
As in the first case, you will have to remove the drawers. But this time it will not be cabinets located in the cabinet, but drawers located at the top of the table itself. Both boxes should be removed, and a horizontal cut should be made on the left side of the box (1). The width of the completed opening should be equal to the thickness of the selected sliding board (3), which in the near future will become the plane of the elongated table.
The mechanism for smooth sliding of the retractable board in the formed internal niche of the table will be provided by additional slats (8), installed along the direction of its movement. To prevent the board from falling out from the end that goes into the furniture, you should make 2 stoppers. From the side of the second end, a thrust board (4) on wheels (5) is attached to the sliding board at a 90° angle with squares (6). Board No. 4 is rigidly attached to board No. 3, and when assembled it fits tightly to the side wall of the table (7). In the place where the drawers (2) were previously located, a decorative plate is installed, after which the sliding furniture mechanism can be considered ready for use.
It is understood that the dimensions of your table may differ from what our drawings show. However, the measurements of all elements and the mechanism for re-equipping the table, presented in Fig. 3 and 4 can be taken as a basis when performing conversions.
Kitchen tables
In a small kitchen, a neat round transformable table will be a very relevant solution. When folded, the round table does not take up much space, but it looks very stylish. If necessary, such a table can be extended to an oval one and six to eight people can comfortably be seated at it.
A sliding transforming table is one of the most popular solutions. It can be made of any material. Lovers of the classics choose models made from wood or solid wood furniture. Adherents of modern styles prefer transformers made of tempered glass.
Two-level table
The proposed wooden table can be used as a coffee table all year round. However, if necessary, it easily and elegantly turns into a living room decoration - a large dining table. Drawings of this product in different sources may differ slightly, we offer optimal sizes. Judge for yourself, when folded, this is a wonderful coffee table; it reaches a height of 752 mm. But by lifting the top of the structure until the supporting pedestals are disconnected, turning the lid 90° and sliding the pedestal (3) into the pedestal (6), we get a high dining table.
Fig.5. Coffee-dining table for the living room. Consists of table top (1); base plate (2); cabinets (3) attached to tabletop 1; support rail (4) of cabinet 3; stiffener beam (5); cabinets (6) attached to the base plate 2; support rail (7) cabinet 6
The design of the coffee and dining table is panel, all elements are attached with dowels and glue. Making this item for the living room interior will require precise measurements; it is especially important to maintain the dimensions of the cabinets. In addition, you should pay attention to the strength of the connection of the slats (7) on which the cabinet (3) rests.
One of the greatest inventions in home improvement is the folding table. Lightweight and compact, it is perfect as a picnic table or camping table. This is a great gift idea for friends or neighbors. It’s easier to buy such a transformable table in a store to save time and effort. But by making it yourself, you can not only save money, but also develop its design as you wish.
Various options are possible: wooden, plastic, aluminum transforming tables.
With just three simple materials, every DIYer can make his own folding furniture in the shape or form he likes.
By spending time productively and visiting local lumber and tool stores, you can select and purchase ready-made materials. In addition, you can simply walk around in the yard around your own house, perhaps you will also be able to find something there that can be used: all kinds of remnants of wood or nails left over from last year’s renovation or something else. All this can be used in a new project.
How to choose a coffee table for the living room
Even small homes can have living rooms. Transforming tables are very popular there. Which product to choose for the living room? There can be many options: large and small, shades similar to the interior or brightly standing out against its background...
Have an impressive living room? Then there is room to turn around! Product sizes vary. Various transforming tables will fit here! These are both miniature options and those with a large area. When choosing, you should first of all be guided by the amount of space in the room.
In small spaces, the round option is very convenient. This will help avoid injuries that could result from collisions with sharp corners. This is an excellent choice for larger living rooms. If the table has corners, it is advisable that they be properly rounded.
In small spaces, the round option is very convenient
This piece of furniture can be used, for example, when guests come. Such events often require additional furniture and space. That's why a light-colored folding table will be very convenient in such circumstances. Why is light better? If the room is small, light colors of the interior and furniture will expand the visual space, while dark objects, on the contrary, will look bulky, and sometimes even oppressive.
Children's room: choosing the best design for two children
If there are no plans to use the table directly during guests’ visits, it is better to purchase a compact piece of furniture that will perform purely utilitarian functions for the owner of the house. In this case, it’s worth thinking about style. An important point is the harmony of the table and the surrounding interior.
The transforming table can be used, for example, when guests come
Are there a lot of light shades around? The situation may be different: sometimes it is better to take a table of the same light color, and sometimes, on the contrary, for the sake of variety you can choose a table of black or dark brown color. But the last option, perhaps, is relevant only in fairly large premises.
Are your living room and home decorated in Scandinavian style? Then folding furniture is definitely a must. This style presupposes space, scope, minimalism... Naturally, with this approach you will have to take as much care as possible about the functionality and rationality of the things purchased.
A folding table in this case is a wonderful solution! For the Scandinavian style, light colors are not surprising, because they help emphasize the scope of the home, its scale and the minimalism of the decor. There is even something solemn about it! And of course, in this situation, it is better to choose a table that matches the color of the walls.
Folding furniture is a necessity
Materials and tools
For one small portable wooden table you will need:
- Approximately 1-1/2 inch wood board for table top. You can also use a thicker board or sheet of plywood. It all depends on the expected load on the table for which it is intended. It can be any wood: pine, cedar, oak, etc., the main thing is that it must lie long enough to dry. You can also use plastic as a tabletop.
- A thin piece of plywood for the rim of the table top or any other material that matches the type and method of processing with the table top.
- 20*45 block for making table legs. You can also use a metal tube or corner as legs.
- Wooden parts for support rails according to the selected table dimensions.
- Electric drill and drill set.
- Screwdrivers, wrenches (including socket wrenches).
- Saw (manual or electric).
- Brass hinges (long, garage type).
- A set of screws, nails and other fasteners that may be needed. In this case, be sure to take into account the conditions in which the table will be used: for outdoor use, galvanized metal products should be used.
- For finishing: sandpaper, paint or varnish, stain, brushes.
- Preparation of the drawing.
First, you need to “sketch” a drawing of the proposed table in order to decide in advance on its design and correctly calculate the dimensions. This table will have few details:
- tabletop (one, two or three parts);
- frame with stiffening ribs;
- legs.
It will be easier to keep to scale and change dimensions if necessary if you make such drawings on graph paper. You can download a copy of the sketch of the table model you like from the Internet. But since, despite all the efforts made by the authors of DIY sites, there is a possibility of errors in the dimensions of the drawing, it is worth making sure they are correct by checking the calculated values.
Return to contents
Folding desks
At first glance, it may seem that a stationary option is always convenient as a desktop. This is wrong. Depends on what the needs of the person working at the desk are. If a person works every day, and does not work constantly, for a certain period, but from time to time, then a monolithic non-folding table is a rational choice.
However, if you need to work only occasionally, and there is no desire to interrupt your activities by being distracted by other things, you should think about the folding option. Such a desktop can be very relevant in many cases. For example, it will save space that would be constantly occupied if the table were monolithic.
If you need to work only occasionally, and there is no desire to interrupt your activities, being distracted by other things, you should think about a folding desk option
The product is perfect for those who move frequently. It’s convenient when the table is always the same, always with you. Yes, it is unlikely to be suitable for those who are just traveling. It is more likely for people moving, with luggage. A small laptop on an elegant folding desk will be very convenient.
Choosing the perfect dining table for the kitchen wisely
If you want to place a desktop computer on a table, then it is probably better to think about a monolithic option, for example, a computer desk. But for writing something or reading, such a small table is just a godsend! Compactness combined with elegance make the product suitable for people of various professions...
Compactness combined with elegance make the transforming table suitable for people of various professions
Design and assembly of elements: step-by-step instructions
You can design a coffee-dining table in the computer program PRO100 or Sketch Up . They are easy to understand, so even a beginner can quickly figure them out. True, drawing up a project and drawings of the desired table is a labor-intensive process, so you will have to wait 2 hours for the result.
Having received the drawings, we begin cutting materials. You can cut it in the same program, or rather in the application to it. After printing out the cutting map, it's time to make the cuts. It is advisable to assemble the finished parts from laminated fiberboards together without fastening them yet, in order to be sure that the dimensions are calculated correctly.
Now it's time to assemble the table frame, using ties to hold the wooden elements together (confirmants). They are immersed in wood using a screwdriver.
To make clear markings on parts made of dark laminated chipboard, you can use regular stickers. A pencil is not suitable for this purpose - the lines drawn with it are barely noticeable, since the graphite glares and is reflected. When using stickers, there is no glue left on the surface at all.
It's time to equip the structure with legs. They must be thick, because all the elements of the transforming table will put pressure on them. Together, their weight can be about 50 kg. It’s better to play it safe and connect the legs to each other using zip ties.
Then you can screw the legs to the table. But first you need to accurately mark the fasteners and drill holes in them. The legs are usually installed on metal bushings. The created holes will not be visible, since the upper part of the legs is hidden in the frame.
Assembling a computer desk according to instructions
Ordering a ready-made table without assembly and delivery will save a significant amount, and the process itself, although it requires accuracy and painstakingness, is quite simple. Even if difficulties arise with the table assembly diagram or during the process, you can always contact the support center of the store that sold the product.
Before assembly, check that each necessary part and the diagram itself are present. The fastest and easiest way to assemble a cabinet, and the most difficult stage is the installation of moving parts, so it is recommended to start with a cabinet.
Carefully fasten the supporting components to the tabletop so that the finished structure does not wobble.
Transformer Table Lots of Furniture Assembly Instructions
Detailed assembly of a Transformable Table from a Lot of Furniture Do-it-yourself assembly of a Multi-Furniture table
Detailed assembly of a Transformer Table from a Lot of Furniture Do-it-yourself assembly of a Multi-Furniture table Instructions.
Assembling a Transformer Table from a Lot of Furniture
I decided to film a manual for assembling a Transformer table from the Much Furniture store. It all took about 3 hours.
Beta transformable table. Assembly
Instructions for assembling the Beta transforming table produced by PF ASM-Module. www.asm-modul.ru.
Table transformer. Assembly.
How to QUICKLY assemble a transforming table.
Write about advertising: .
Instructions for assembling the Transformable Coffee Dining Table | FURNITURE-TRANSFORMER.COM
In this video you will learn how to assemble a transformer table on your own. Buy and find out more.
My transforming coffee table (Irina Sokovykh)
FOR COMMERCIAL INQUIRIES: MY INSTAGRAM
Assembly of the transforming table Grace sv-37
Play and earn real money - ☀ For those who are losing customers from the site - .
Assembling a transforming table from a lot of furniture
Dining table Prestige. Furniture Progress
Video instructions for assembling the Prestige dining table produced by Mebel Progress PJSC. This table is for sale.
How to assemble a transformable table Secret Mebelson Review Unpacking
I present to your attention a review, unpacking and assembly of the Transformable Table Secret of wenge and milky oak colors.
Assembly instructions for the LAVENDER Transformer Table
Lavender sliding table - a tabletop made of high-quality plastic with a “Butterfly” transformation mechanism.
Video about how I assembled the Asti table from Much Furniture.
Transformable table Mebel-Star. Packaging-assembly-Result
This video was processed in YouTube Video Editor ()
Table transformer.
How to assemble a kitchen table yourself from Much Furniture How to assemble a kitchen table
I am assembling the Asti kitchen table myself and chairs from a lot of furniture company. Video instructions on how to assemble the free one yourself.
Assembly of a transformable table from Mebel Star
To assemble the transformer table, you will need a screwdriver with a bat for the firmmats, a self-propelled screw, and a hammer.
Unpacking and assembling a bedside table from a lot of furniture
If you are interested in household goods, you can follow the Unboxing link.
LOTS OF FURNITURE | How they SCREW CUSTOMERS! #mrs_evgeniya
NEVER BUY A LOT OF FURNITURE FROM A STORE. Hello everyone) Today I’ll tell you a not very good one.
Assemble the transformer table instructions!
Transformable coffee table
Transformable coffee table. Folded 800*800, unfolded 1600*800. Full description: .
Transformer table, Lots of Furniture, table top without fastenings
I'm assembling a table, the last moment has come, I need to screw the tabletop, but there are NO fasteners. I had to do it myself.
Transformable Table Lots of Furniture
The Transformer table in a universal wenge color is a smart space saver! With the help of one.
Review, unpacking and assembly Coffee table SZh-1 SK_20717
I recommend purchasing from mebelion - Good afternoon! Today I will assemble, unpack and review it in a magazine.
Sliding multi-sectional table (transformer) TL-06. Installation nuances.
In this video you will learn all the features of installing the multi-section table TL 06. Please note! Lower ones.
Instructions for assembling the Transforming Table Console | FURNITURE-TRANSFORMER.COM
In this video you will learn how to assemble a transformer console table on your own. Don't forget to come in.
Video instructions for assembling a transforming table
EXPOSING AMI FURNITURE | THE SECRET OF DECEPTION OR HOW TO SELL LOMACHIE
Mad Critic on Social Media: Facebook - . VK - Instagram.
Table "New Delhi" TM Biformer. Assembly instructions.
Problems when assembling a transformer table.
Luxury bed 160 mxf
Optima luxury bed 160 2264x1688x1102 bed size 1600×2000 lots of furniture assembly instructions.
Assembling Christie's table (Lots of Furniture) sliding mechanism
Assembling the book-table "Premiere". Mebeltp.ru
Assembly instructions are provided by Mebel Torg Plus. Cabinet furniture for the kitchen, modular furniture.
Mobile table for furniture assembly.
transformer table a lot of furniture assembly
Master of furniture assembly and disassembly in Novosibirsk. 89659992652 Ivan Inexpensive, high quality and fast! -Assembly, disassembly.
How to assemble one wall 'Prague' a lot of furniture
Products from all over the world, cheap, here How to assemble a wall alone, detailed instructions.
How to assemble an extendable kitchen table.
Assembling a folding kitchen table. All the details of the assembly are outlined in detail.
Furniture from the “Lots of Furniture” showroom is of low quality
The furniture in “Lots of Furniture” is of very poor quality, made from cheap materials! They sold us such furniture in the city.
Review, Unpacking, Assembly Wall Denver STL.151.01 STL_151.01
I recommend purchasing it from mebelion - I present to your attention a review, unpacking and assembly of the wall.
Assembling the SZH-6 table from the hoff store
Assembly review of the transformer table.
Assembling the Atlant Sofa from a lot of furniture
Assembling the Atlant sofa from the Mnogo Furniture store. And also detection of jambs.
Transformable table Boston
Transformable table Boston.
Assembling a Luxury Bed from a Lot of Furniture
It takes a long time to assemble a Luxury bed from a lot of furniture. Watch to the end before collecting. I made mistakes in.
How to assemble a sliding wardrobe RIM 180 yourself from a lot of furniture How to assemble a Cabinet
Products from all over the world, cheap, here If you are interested in household goods, you can.
ASSEMBLING A MALTA WALL A LOT OF FURNITURE/DISAPPOINTMENT/GIFTS TO MITI/ON THE HILL/EVERYTHING IS EXPENSIVE/COOKING CUTLETS
WE'RE ASSEMBLYING THE WALL OF MALTA A LOT OF FURNITURE / DISAPPOINTMENT / GIFTS TO MITI / ON THE HILL / EVERYTHING IS EXPENSIVE / I'M COOKING CUTLETS.ELENA.
Transforming table mechanism | SmarTABLE 587
The SmarTABLE 587 mechanism turns a coffee table into a full-fledged dining table for 8 people. -Folded.
MULTIFUNCTIONAL TRANSFORMER TABLE (Tabletops). Assembly instructions - Official Video 2017
A set of tabletops for placing fishing rods is one of several options for additional hanging elements.
table transformer
three in one table, stepladder, shelving.
Assembling a sofa from Much Furniture - Berg
How to assemble a Prague wall from A lot of furniture: Prague wall assembly diagram
Diagram and instructions for assembling the Prague wall from Much Furniture. View instructions on how to assemble the Prague wall.