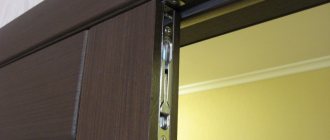
Overhead hinges
It is believed that door hinges are unreliable and are only suitable for light interior walls. However, today the most advanced and reliable materials are used in their manufacture: steel alloys, brass, stainless steel, which expand the scope of their application. In order to achieve smooth opening of the blade, as well as to increase service life, the product can contain from two to four ball bearings.
The butterfly loop is treated with high-quality galvanic coating. Available in the following colors: bronze, copper, chrome, matte. After installation, they take on the appearance of ordinary hinges. But still, some serious professionals are wary of such innovations and prefer traditional overhead hinges with a door insert.
Installing hinges using a router
Inserting hinges with a router is easier than if you had to work with a chisel. There are several types of routers that facilitate manual labor when hanging hinges.
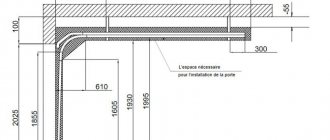
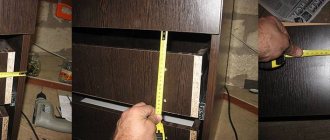
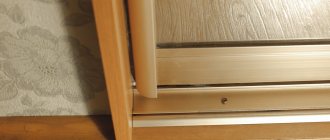
Classification and applicability of hand routers Before installing new interior doors, it is necessary to prepare the doorway and door frame for installing hinges. Previously, this required the use of a chisel and a chisel: the process was tedious and took a lot of time and physical effort. But now there is a manual milling machine - a driven electric tool with which you can prepare grooves of complex configurations in wooden products. From now on, questions such as how to remove a door from its hinges, how to insert new hinges, how to beautifully and firmly connect complexly profiled planks together, and many others can receive qualified and clear answers. A video will help with this, as well as detailed step-by-step instructions on working with a router, which will be discussed further. By performing such operations yourself, you can significantly save time and save family funds. Since such devices are designed for the production of various profiles, the final result will depend on the type of working tool - the cutter. The milling cutter is purchased either as a set, if the milling cutter will subsequently have to perform other similar work, or specifically for the required groove profile. Milling cutters are divided into: Vertical - relatively impressive-sized machines, the milling head of which moves in the vertical direction using special guides. Edging – designed for cutting and decorating the edges of wooden products. These machines are compact and light in weight. Combined - with their help, both vertical and horizontal milling operations are performed. These power tools are especially useful when installing entry doors. Special - for example, for power installation of dowels in concrete surfaces, for vibration processing of edges (trimmers). The standard sizes of some types of hand-held milling cutters are summarized in the table: Model Purpose of the milling cutter Stroke of the milling head, mm Power, kW Number of revolutions, 1/min Weight, kg HitachiM8SA2 Vertical 60 0.9 25000 3.5 D26204K Vertical 270 0.9 16000-27000 2, 9 Bosch POF 1400 Combined 55 1.4 11000-28000 3.5 Bosch GKF 600 Edge - 0.6 33000 1.5 Makita 3710 Combined 70 0.53 35000 1.6 When choosing a router model, you should pay attention not only to its technical characteristics and capabilities, but also on completeness, as well as ergonomic indicators. The machine must be comfortable to hold, otherwise you may cause harm to your own health. Usually, for multiple jobs of this kind, a universal router is purchased, and if the work is one-time in nature, you can rent the machine. When installing entrance or interior doors (similarly for cabinet doors), the following work is performed with a router: to prepare recesses - in the case of hanging doors on loops; for inserting locks; for preparing connections of individual elements, for example, door frames. Before using the machine directly, you should practice on unnecessary carpentry elements. However, the process of controlling the router is quite simple, and you can easily master it yourself using training videos. Preparing for cutting in awnings This procedure is the most common and is used both when replacing an old door and when installing a new one. In addition to the cutter, you will also need an ordinary carpenter's ruler, as can be seen in the video. At the first stage, it is necessary to mark the frame for the existing hinges of the interior door so that the adjustment takes place quickly and correctly. The position of the hinges should be adjusted taking into account the least likely distortions when opening/closing the door. Marking can also be done using a special template that you can make yourself. Sometimes an unnecessary fragment of door molding, the dimensions of which coincide with the dimensions of the door frame, is also adapted to the template. First, one of the edges should be trimmed. The marked square is installed on the outer sides of the door and strips of adhesive tape are glued in the necessary places - they will serve as a kind of limiter for the movement of the router. Working with the machine The template block is placed at the selected location on the door leaf. The width of the template bar and the hinge must match, otherwise the sealing rubber may extend beyond the dimensions of the door and it will not close properly. The end of the template is aligned with the previously made markings and lightly trimmed with a sharp knife. Now it’s the router’s turn: we attach to it a ruler, which is usually included with the unit, and a molding thickness compensator. You can do it yourself, as in the video, or you can simply take this thickness into account when milling the groove. Particular care is taken to adjust the position of the standard ruler of the router. The length of the milling section is set according to the length of the loop, and the width of the milled groove is 1-2 mm less than the width of the loop. Such a reserve is necessary in the event that you have to remove and hang the door again - a procedure quite likely if you need to adjust the relative position of the product in the door frame. Milling usually starts from the edge to avoid possible chipping of the surface, and then the seat for the hinge is milled directly. Tapping into the material must be carried out at maximum cutter speeds (for models with adjustable speed) and at low cutter feed - this way the likelihood of damage to the surface of the blade during tapping will be minimal. The prepared loop is applied to the milled groove and, if necessary, manual finishing is done using a chisel or file. The complete process of inserting loops with a router is shown in the video. Safety precautions during operation A manual machine during the tapping process has a high rotation speed of the milling head and therefore vibrates noticeably. Before starting work, you should carefully check the reliability of fastening the collet with the cutter and adjust it. Vibrations can also damage the door leaf. It should be noted that natural wood defects – in particular, knots – may appear on the surface of the door frame. Therefore, it is not advisable to carry out milling in these places. If it is impossible to do without this, then either reduce the speed of the collet or reduce the feed force of the milling head. Before work, be sure to check the machine and, if necessary, lubricate moving and contacting parts and adjust them. The same goes for storage - you need to lubricate and adjust the router before storing it. The slats of the door frame may have some curvature, so before hanging the door, it is worth checking the uniformity of the gaps for opening/closing the door and, if necessary, adjust them (for this purpose the groove was made of reduced dimensions). If the gaps are equal and sufficient, the same work as previously performed on the doors is carried out on the door frame. To complete the installation process, all that remains is to lift the finished door in its hinges, lubricate the hinge joints and hang the finished product in the door frame. A training video about the process of installing an interior entrance door will help you figure out how to do it correctly. In a similar way, you can embed the hinges of hinged cabinet doors in case of updating or replacing them. Some differences consist only in the technology of making grooves in the body of the cabinet body. For example, for high-quality processing of a groove with a router, you must first lift it in the hinges and then remove the old door. Then you should first prepare a template for the new hinges and mark the recess in the cabinet body. Next, carry out all the operations described regarding the front door, be sure to lubricate the hinges and adjust them. Sometimes, instead of cutting in along the hinges, markings are made along the cabinet body. In this case, it is even more convenient, since the cabinet door is noticeably lighter than the entrance or interior door. Cutting door hinges using a router is a highly productive operation that can be done independently.
Design features, pros and cons
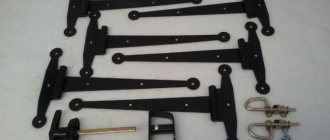
First we need to consider the design of these models. In appearance they resemble a butterfly, which is why they got their name. They belong to the category of card models, as they consist of two integral parts.
What are the differences from regular mortise hinges? Standard samples are installed on pre-treated surfaces. First you need to remove a few millimeters of material, make a recess on the door and frame, and then proceed with installation. Overhead types do not require preparation and are attached directly to the facing of the canvas.
This installation without insertion is ensured by a number of nuances.
When closing the door, both halves of the product should result in a tight fit of the end of the door to the door. This plate design allows this to be done. Conventional models have straight and solid surfaces, which requires them to be deepened into the material. The butterfly hinge consists of two parts of one plate; when the door is closed, one fits into the other without leaving any gaps, reminiscent of a puzzle.
Advantages of hinges without mortise:
- The main advantage of a door product without a mortise is the ease of installation; you just need to mark their location and fasten it using a self-tapping screw.
- They are not divided into right and left models, they are universal.
- Aesthetic appearance without traces of wood manipulation.
- They are made from high-quality materials, so they are practically not in danger of abrasion.
- Cheap and widespread.
- Reliability during long-term operation.
It is worth considering the disadvantages, which are as follows:
- The canvas cannot be removed from the hinge. If such a need arises, the hinges will have to be completely unscrewed, that is, in essence, dismantled.
- Over time, distortions are possible, which are an obstacle to the movement of the door.
- Such products are only suitable for light door installations.
- For installation, butterfly hinges require a perfectly flat surface of the doors and frames.
Therefore, due to the list of disadvantages, some still prefer mortise models. If you are new to installing door leaves, then the overhead option is just for you.
Working with a chisel
It is best, of course, to carry out the insertion with a milling cutter - a tool that a professional specialist cannot do without. But if you can’t use it, a hammer and chisel will come to the rescue. The latter must be well sharpened.
First of all, you need to outline the outlined contours with a sharp knife, deepening it by about 2-3 mm. This move will help you work better with a chisel in the future. Now you need to make a selection: insert the sharp part of the chisel into the scratch formed by the knife and, by briefly hitting it with a hammer, make a small indentation. It is important here not to overdo it so that the hole fully matches both the size and thickness of the loop. The latter should fit into the workpiece almost perfectly, not rise above the door leaf, but also not be very deep. Don't rush to finish the job with a chisel. It’s better to spend more time, but do everything carefully and efficiently.
Related article: Warm water floor: on a wooden base, how to lay a board, laying and installation using Finnish technology
By the way, a chisel may not always be the working tool. It is convenient for making cuts on a canvas made of hardwood. If the material of the interior door is soft, then you can use a sharpened cutter.
Installation
How are such products attached? To install butterfly hinges you will need the following tools:
- Screwdriver
- Self-tapping screws,
- Drill,
- Awl,
- Pencil,
- Roulette.
First you need to choose a mounting location . To do this, use a tape measure to measure about 20-25 cm from the top and bottom edges of the canvas. This will become the starting point for each loop. To reduce pressure on the top hinge, attach the bottom one further from the edge.
Since installation is carried out without insertion, immediately attach the plate to the end of the door and mark future holes with an awl. After this, carefully drill them, this is necessary so that the screws can be screwed into the canvas without effort.
Then you need to decide where to attach the plates to the door frame. To do this, attach the door and roughly outline their location. After this, unscrew the hinges and more accurately mark the drilling points.
All the holes are ready, which means it’s time to apply the sheet to the opening and secure both plates with self-tapping screws. Check the movement of the door , because in some cases defects occur, however, they are not difficult to eliminate.
Screwing in self-tapping screws
Inserting a hinge into an interior door with your own hands ends with its fixation using self-tapping screws. But before you screw them in, you need to make small holes for them with a drill. Thanks to this, it will be possible to avoid possible cracking of the door leaf. Only after this do the screws take their place, and their heads should not rise above the surface of the part. It is also important to choose the most suitable drill size, which will determine how tightly the screws fit, because the reliability of the fastening depends on this.
Features of the sidebar
As you know, hinges can be detachable or non-detachable. If you have to deal with the former, then half of it is put on each part, after which the box stand is attached. The position of the hinges is marked on the jamb post, and then all stages of their insertion are carried out in the same way as described above. By the way, it is more convenient to carry out all manipulations with the stand of the box, and not with the whole thing. If detachable parts are inserted into an interior door, you need to ensure that the landing pins always face upward, otherwise it will be impossible to seat the door leaf. And, of course, in the case of detachable parts, before you start working with a chisel, it is necessary to take accurate measurements so that ultimately there are no problems with opening and closing the door.
Article on the topic: Rustic kitchen - design, decoration, photo