Home craftsmen often have to assemble furniture with their own hands. This happens both when purchasing ready-made interior items and when making cabinets, cabinets, tables, and the like on your own. At the same time, correct fastening of the guides on a wide variety of drawers becomes a real stumbling block. Despite the apparent simplicity of this work, installation errors can lead to dire consequences. In the process of further use of the furniture, serious difficulties may arise. Therefore, it is important to immediately determine the type of guides themselves and the method of their installation.
Types of guides
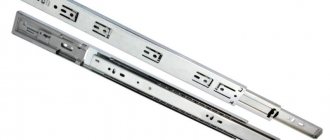
At the moment, there are 2 main types of guides that are installed on a drawer. These are roller and ball systems. There are also other designs: hidden, with closers, telescopic, and so on. But they don’t install them with their own hands. This installation is carried out in a factory setting.
Roller guides usually consist of 2 strips with perforations for fasteners. Plastic wheels are attached to the ends of the structures. Thanks to them, the drawers slide out.
Figure 1. Types of guides.
Such systems have a number of significant disadvantages:
- When in use, the drawers make an unpleasant sound.
- The wheels are unreliable and quickly become unusable.
- If there is a strong pull, the box may fall out of its intended slot.
But such guides also have advantages. They are cheap and easy to install.
Ball systems are also called full extension guides. This is a telescopic design that allows you to extend the drawer the entire length of the bar. Inside the system there are metal balls that ensure smooth and almost silent movement.
The main difference between roller and ball systems is that the first one consists of 2 profiles independent from each other, and the second one is one-piece. In the first case, 1 strip is attached directly to the wall of the box, and the 2nd – to the furniture. The rollers are disassembled only during installation. And when assembled they look like a solid structure. It is this feature that ensures the reliability of the fastenings: the storage space does not fall out even with a strong tug. The appearance of different guides is shown in Fig. 1.
At the moment, you can find guides of different sizes in stores. This allows you to select a ready-made design for interior items of any type and depth. As a rule, roller systems are placed on boxes that are not expected to bear heavy loads. They can be found in linen and clothing closets, kitchen modules (for example, for storing cutlery), and hallways. Ball structures are placed on linen drawers of beds and furniture intended for children's rooms.
Return to contents
I'll show you how all this can be done as accurately and quite quickly as possible.
But first, the following conditions must be met:
- The box must be aligned diagonally (must be geometrically correct).
- The drawer located in it must also have the correct geometry.
Along the front edge, holes are drilled in it.
Their number depends on the size and weight of the facades being installed.
If they are small, then there can be three holes, and if they are large, then four (do not forget that if a handle is planned on the facade, then it will also serve as a fastener).
We measure the position of one of the holes made on the box relative to the entire module (with the necessary indents), and transfer these coordinates to the docking side of the facade, marking them with an awl.
The point is that we need to align everything with respect to one self-tapping screw, and then tighten all the others.
The coordinates of the hole for the second facade are measured relative to the first, and so on.
When installing, the main thing is to maintain the verticals along their side edges (sometimes this is done even due to the fact that there is a slight distortion along the horizontals, since nothing is perfect, and boxes, no matter how you assemble or display them, sometimes still turn out slightly skewed (sometimes this is even facilitated by the curvature of the slab from which they are made).
And finally, install the handles:
This is not a complicated scheme, so use it.
It is also worth adding that the method in question is good in the case when there is no access to the inside of the drawer from the outside, or when the box has an upper horizon.
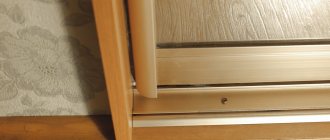
In the case where there are body strips on top of the box, all this can be done even easier.
It lies on the back wall, the fronts are laid out and exposed on it, and simply secured from the inside one by one.
You can read about the nuances when installing frame MDF here, and if you are still interested in interesting options, look here.
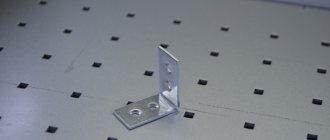
Installation of roller elements
Figure 2. Scheme of fastening roller guides.
Whatever type of drawer mounting you choose, you will need the following tools:
- drill with a thin wood drill bit;
- screwdriver with travel limiter;
- a set of screwdrivers with various blades (flat and Phillips).
Also, don't forget to have your measuring tools ready. You will need a tape measure or a long ruler and a square.
All necessary marks can be made with a simple pencil or colored chalk. The installation diagram of roller guides is shown in Fig. 2.
The process of installing guide systems on drawers occurs in 3 stages:
- Marking furniture walls and storage areas.
- Installing the bar on the drawer.
- Installing strips on furniture.
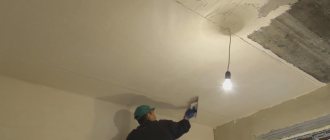
Figure 3. Diagram of the ball guides.
If you follow this sequence, you will be able to avoid possible mistakes.
The guide can be installed anywhere. But usually they are mounted strictly in the middle of the wall (this makes it easier to determine the location of the structure on the furniture) or flush with the top or bottom of the box. But roller systems are most often installed on the bottom edge.
It is wiser not only to mark the places for screwing in self-tapping screws, but also to drill them. This will ensure that the screw does not split the wood. You need to determine the location of the fasteners immediately both on the drawer and on the wall of the furniture.
The master should remember that the thickness of this type of guides is 1.25 cm. Accordingly, the width of the drawer should be 2.5 cm narrower than the internal width of the furniture (both sides are taken into account). Otherwise, the retractable structure will not fit into the housing. For freer movement, add 1-2 mm to this gap.
The length of the screws is selected based on the wall thickness.
The head of the fastener must firmly fix the guide, but not rise above the bar. In this case, the sting should not penetrate through the wall. First, the guides are fixed on the drawer, and then on the furniture. After which the storage system is placed in its designated place.
This is the most common type of loop. And since we are talking about updating the kitchen set, we will consider the option of installing a hinge with a built-in closer.
There is nothing complicated about installing a furniture hinge. But immediately before installation, you need to have an idea of how this is done, so as not to spoil the new facade.
Installing furniture fronts on drawers - a little trick
We have already discussed with you how modules with drawers are designed and how to correctly calculate their position in the boxes.
But, in my opinion, there is another serious question on this topic - how to properly hang facades on them.
I have come across guides on this issue on the “net” more than once, and each time I was slightly surprised, to say the least.
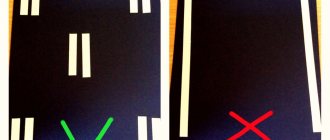
Some teach that in order to do this, you need to screw self-tapping screws into the front side of the box.
Then, placing the façade against the frame, cover it with these self-tapping screws.
Regarding this method, you can give a lot of arguments “against”, but I will give two - the fronts need to be attached to the boxes only when the box itself is set diagonally (accordingly, it already has a back wall).
But, if the back wall is packed onto the box, then it will not be possible to push the drawer so that it hits the facade with self-tapping screws.
Even if the module has a stiffening rib instead of a back wall, there will also be a certain inconvenience - you need to clearly fix the facade in the desired position.
At the slightest shift, the procedure will need to be repeated.
And in this case, it will be quite difficult to determine which of the tiny dents left by the screws is working...
The second, fairly common “option” is when everyone does this using double-sided tape.
Here the problem is approximately the same as in the first case.
In a word, all these methods are not successful.
Adjusting the hinges
After we have installed the hinges and hung the facades, we need to adjust the gaps so that the doors do not cling to each other.
The design of the hinges with a closer allows for horizontal, height and depth adjustments.
First, you need to visually determine the unevenness of the facade in relation to the body and whether the gap is even in relation to the adjacent door.
"Vertical adjustment"
We loosen the hinge screws, align the door and tighten it again. (Fig.1)
Tandems
Tandems are concealed mounting guides. There are two types: full and partial extension. The box is mounted on such guides from above, completely hiding them under the sides and bottom.
Soft sliding (even with a load of up to 50 kg) is ensured by the bearing principle: a block of steel balls located on four sides of the runners (quad system), or cylinders - needles. The fastening allows you to adjust the position of the drawer relative to the body and remove the drawer from the guides without tools. Tandems are available in several versions:
- with a closer - normal opening by the handle and smooth closing;
- with a tip on or push to open mechanism - opens by touching the facade;
- with electromechanical opening.
Multilayer
Another name for thermal panel. They should not be confused with. Sandwiches are used to construct walls and partitions. Thermal panels are used only for cladding load-bearing walls; they cannot be used as a full-fledged building material.
The multilayer panel consists of solid insulation and a protective outer layer. For insulation, extruded polystyrene foam, polyurethane foam, foam glass, and basalt mineral wool are used.
The protective and decorative layer must be durable, wear-resistant and beautiful. The coating of thermal panels is made of stone-based plaster, concrete-polymer plaster, concrete-polymer monolithic finishing layer.
Advantages and disadvantages of metaboxes
Metaboxes for the kitchen are different:
- capacity achieved due to the minimum thickness of the side wall;
- strength. The bottom of the metabox is usually made of 16 mm chipboard, which allows the box to be loaded up to 35 kg;
- ease of use. The guides of the drawer system are located in the upper part of the drawer, which eliminates the possibility of loosening, falling out, and so on;
- ease of assembly and installation. The box can be installed independently with a minimum set of tools. Adjusting the system also does not require special skills.
How to cover a house with facade panels with your own hands
Facade panels can be mounted in several different ways. The choice depends on several factors:
- Condition of the base. The panels are attached to a well-prepared wall without the use of glue or mounting foam using self-tapping dowels and anchors. If the base is uneven, then the panels are mounted with glue or construction foam. The frame mounting method is also used. It consists of creating a flat and durable base from metal profiles or wooden slats for installing single-layer or multi-layer panels.
- On walls covered with insulation sheets, single-layer facade panels are installed only along the frame. This technology is called a ventilated facade. There is a narrow layer of air between the insulation and the cladding. This is a ventilation duct for ventilating the inside of a suspended facade.
Installation is preceded by material calculation and preparatory work
The calculation is made according to the sketch of the facade. A layout is drawn on the sketch indicating all overall dimensions, the number of windows and doors. For an accurate calculation, it is better to contact a sales consultant. In large stores they are taught to quickly complete the calculation.
Preparatory work begins with sanitizing the façade and identifying problem areas. Then the surface is cleaned of remnants of the old coating. Everything that is hung on the facade from the outside is dismantled. Large cracks and chips are expanded and sealed with cement-sand mortar.
If the facade is affected by fungus or mold, then disinfection is carried out. The most effective method for etching is to saturate the surface with soil containing copper sulfate.
Copper sulfate is poisonous. It is dangerous for the human body, so work is performed in a respirator and rubber gloves.
Do-it-yourself installation of façade thermal panels
They can be installed in two ways:
- No glue.
- On glue.
No glue
An absolutely level base is required. One panel slides over the other and snaps into place with a special lock. This installation method reduces the overall time and complexity of the work.
Before attaching thermal panels in any way, markings are made. Using a laser level or level, the horizon line is determined on the facade. It may or may not coincide with the blind area line. If the lines match, then there will be no problems. Use sandpaper to mark the junction of the panel and the base.
If the house is on a hill and the blind area is not horizontal, then the starting line is drawn parallel to the blind area. The second dimensional line is set at the horizon level, to a height equal to the size of the panel from the bottom point of the facade. Thus, cutting the bottom of the panels of the first row, the top goes strictly horizontally.
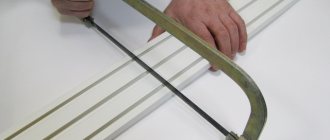
The panels are cut with a grinder and a diamond wheel. Goggles are used to protect the eyes. The grinder only cuts through the protective coating. To cut the insulation, use a regular hacksaw for wood.
The starting profile is set at the bottom mark. It is attached to the wall using self-tapping dowels.
Installation starts from the corner of the house. To fix the façade panels, disc dowels with a large flat head are used. For each dowel, a shallow hole is drilled in the insulation to match the diameter of the head. So that after installation the dowel is flush with the insulation and does not interfere with the joint of the panels.
For additional fastening of the panels, self-tapping dowels are used. Holes are drilled for them in the seams between the tiles. After installation, the traces of fastening can be easily matched to the color of the wall.
After securing the first panel, the second one is attached to it with a lock. In this way the entire façade is covered. The external corners between the panels are closed with additional elements.
If they are not there, then the corner ends are cut at an angle of 45 degrees. After installation is completed, the joint is sealed with putty. To connect the elements, you do not need to press hard on them. If it doesn’t work, then one of the panels is warped or there is a bump on the wall. Both defects are eliminated, continue installation.
On glue
Installing panels with glue is relevant when the base is wavy with deviations of 10-30 mm in the horizontal or vertical plane. The glue acts as a leveling material. After finishing the façade, there are no air gaps between the wall and the panels.
Marking and sawing of facade thermal panels is carried out according to the algorithm for the dry method.
The starting profile is fixed along the lower horizontal line. This is the support of the facade system. To improve the connection between the panel and the profile, polyurethane foam is applied to the shelf. The first row of panels is mounted on the foam.
Installation starts from the bottom corner of the house. To install thermal panels, special glue is used, which is purchased along with the cladding elements. If it is not there, then a dry mixture is suitable for installing foam plastic or mineral insulation on a brick, concrete or aerated concrete base.
The adhesive is applied in a thin layer to the entire surface of the panel using a notched trowel. For additional fastening, disc dowels are used. When joining panels, you must ensure that the size of the seams between the tiles at the joints does not differ from the neighboring ones.
All joints between the site and the installation site of self-tapping dowels are sealed with putty in the color of the surface.
We must remember that the material from which the wall is made affects the selection of insulation for the thermal panel. It is better to cover porous structures such as foam concrete and silicate blocks with thermal panels based on mineral insulation.
Removes moisture well. For brick and concrete walls, you can use polystyrene foam cladding.