Home / Sound insulation / Installation, repair, maintenance / Soundproofing the ceiling from neighbors above - how to do it?
Soundproofing interfloor ceilings is a problem that almost everyone has encountered. It is quite difficult to effectively protect yourself from the noise of upper neighbors and therefore, it is necessary to carefully understand how and with what to soundproof the ceiling from the neighbors above. There are several ways to solve this problem and the most popular of them will be discussed below.
First stage
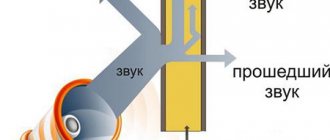
Before you begin any insulation work, you need to determine what type of noise disturbance bothers you the most. Sounds entering your apartment from above can have different origins and different solutions are needed to block them. There are three categories of noise:
- Shock
- Air
- Structural
Impact, as the name suggests, is formed by direct impact on the structure of the house - the stomping of children, the clicking of heels on laminate or parquet, as well as the sounds of a working hammer drill and other similar impacts. Airborne represents loud conversations, TV sounds or music turned on. The greatest difficulty is getting rid of structural noise, since it combines all previous sources into one and is transmitted by all structures of the building.
Sound insulation of suspended ceiling
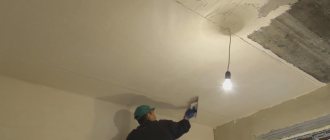
Let's look at the most famous soundproofing of a suspended ceiling (by the way, you can read about installing suspended ceilings here). Its basis is a frame made of galvanized U-shaped profiles with a cross-section of 50 x 50 mm. Plasterboard sheets (usually 12.5 mm thick) are attached to the frame from the bottom with self-tapping screws.
Ceiling soundproofing
Note: mats and slabs based on fiberglass are more often used as soundproofing materials for suspended ceilings, which have a number of advantages over basalt slabs (specifically in terms of sound insulation). Firstly, they have a lower density - about 15 kg/m3, for comparison, basalt-fiber slabs have 40 kg/m3 and higher. According to European standards, it is at a density of 15 kg/m3 that glass fiber material expresses the optimal ratio between the number of fibers and the volume of air contained in it. This guarantees maximum noise reduction over a wide range of acoustic frequencies. Secondly, materials based on fiberglass are the most elastic and resilient, and this will play an important role in filling the space between the racks of the suspended ceiling, preventing breaks in the soundproofing layer and achieving a tight fit to the frame. In addition, the width of special mats for sound insulation is 610 mm (for basalt fiber mats - 600 mm). With the condition of a step between the frame posts of 600 mm, we get a margin of 10 mm. Just right for securely laying the material out of the way.
How to fix the frame
The frame is fixed to the upper ceiling using special steel hangers (the sizes and types of hangers vary), or homemade hangers made by hand from scraps of U-shaped profiles.
Installation of suspended soundproofing ceilings (click to enlarge)
The distances between the hangers, as well as between the frame posts, depend on the format of the plasterboard sheet ( gypsum plasterboard ), the weight of the ceiling, and other things. Usually this is 500-600 mm. Suspensions are fixed to reinforced concrete floors with anchor nails or anchor dowels, and to wooden floors - with self-tapping screws. It is recommended to lay a sealing tape made of rubber or polyurethane in the places where the suspensions are attached to ensure their tight fit and at the same time reduce the transmission of structural noise. The same tape is also provided at the junction of the ceiling with other structures (for example, with partitions, columns).
Diagram of one of the suspended ceiling options
The most ideal option is to use special vibration-isolating suspensions. They contain elastic rubber elements that dampen structural noise.
Materials
To create a barrier to extraneous sounds, you need to choose the right sound insulator. The final result directly depends on what you use to soundproof the ceiling from its upper neighbors. All insulating materials intended for these purposes are divided into two large groups:
- Soundproofing
- Sound-absorbing
The former do not allow extraneous sounds to penetrate through them and reflect them back. The latter block the penetration of noise into the room, thanks to their damping inside the layer. In most cases, insulation will protect against impact noise, and absorption works effectively against airborne noise.
Causes and types of noise
In an apartment building, the penetration of sound waves into a room can come from various directions:
- noise from neighbors above or to the side;
- repair work in a neighbor’s apartment or on the landing;
- noise from the street;
- vibration from industrial facilities or railway tracks, if any are within reach of an apartment building.
Noise in an apartment building spreads in two ways - vibration transmission and sound wave propagation.
If noise in a neighboring apartment arises from shouting or listening to music at high volume, then this is the propagation of sound waves, and if it is the stomping of feet, creaking floors, slamming doors or noise from repair work, then this is the transmission of vibration.
Depending on the nature of the sound vibrations that cause noise in the apartment, you should choose an insulation method. However, it should be remembered that the most reliable sound insulation is comprehensive, in which not only the walls and ceiling, but also the floor are insulated, and double-glazed windows and door blocks are also replaced.
When carrying out such work, special attention should be paid to joints and seams, since neglecting these technological elements can significantly reduce the soundproofing effect.
Before starting work, you should evaluate your financial capabilities, the source and degree of noise, as well as the desired effect of future sound insulation. Based on such data, further work should be planned.
If you are only concerned about noise from neighbors above, then it is enough to install simple noise insulation in the form of additional layers on the surface of the walls and ceiling to absorb noise. This is the cheapest and easiest way to reduce noise from upstairs neighbors. However, it is also the least effective.
A complex approach
It is worth understanding that effective protection cannot be created using only one type of insulation. To obtain the maximum effect, it is necessary to use different insulators, with different properties and, most importantly, density. This approach will solve all problems at once. However, it also has certain disadvantages.
First of all, this is cost - the price of different types of noise protection varies greatly. The use of several varieties at once greatly increases the cost of creating an insulating layer. The second important factor is reducing the height of the room. There are no solutions with a thickness of less than two centimeters - this is the thickness of the structure made from a special membrane and external finishing. However, this design does not at all guarantee complete isolation from extraneous sounds.
Solutions
You should not count on a minimal reduction in the height of the premises. Ceilings will become lower by ten to fifteen centimeters at best. These are the standard dimensions of a plasterboard ceiling and it is this that can become the basis for creating an insulating structure. An insulating material is placed in the cavity of the frame, the frame is mounted on special vibration-damping suspensions, and otherwise, such a ceiling will be no different from a standard gypsum plasterboard composition.
In this solution, both the noise-absorbing layer laid inside the structure and the drywall itself act as insulators. A combination of two types of insulators of different densities will be quite effective protection against airborne noise, and special suspensions block the spread of vibrations from the ceiling.
When choosing how to soundproof a ceiling and looking through various solution options, one cannot help but pay attention to membrane insulation. This is a thin rolled material made from a special polymer. Works great against impact noise, while having a thickness of 3 millimeters. However, for high-quality blocking of extraneous sounds, only a membrane will not be enough. It is necessary, as in the previous case, to combine it with other types of insulators.
Specially designed slabs - sound insulators - have become very popular solutions to the problem of acoustic comfort. Schumanet slabs are the most affordable in price and have good characteristics.
They consist of a fibrous material that prevents the passage of sound. The effectiveness of protection against airborne noise of such slabs is very high. If you combine them in one design with a membrane or other sound insulators, the effectiveness of the solution will increase very significantly.
Soundproofing the floor in an apartment: desounding the cement screed
As mentioned above, to soundproof the floor in an apartment, you first need to completely dismantle the old screed - you need to remove it up to the floor slabs. After this work is done, you will have to pour a new floor screed using the floating principle, i.e. separate it from the floor slabs and walls of the room. How to do it?
To begin, the floor slabs must be covered with thick cellophane - this is done so that during the process of pouring a new screed, water from the solution does not leak out on the neighbors’ ceiling. You don't want to renovate them, do you? Therefore, there is no need to waste money on film, especially since it costs mere pennies.
Soundproofing floor screed photo
We lay foam plastic on top of the film, which will serve as sound insulation in our situation. The choice of polystyrene foam must be taken seriously - the requirements for it are as follows.
- Firstly, density - you don’t need to skimp on this either, since a screed poured over soft foam can burst over time. It is better to take polystyrene foam of maximum density. Better yet, opt for its denser relative - polystyrene foam.
- Secondly, the thickness of the foam - the ability of the floor to absorb noise completely depends on it. As a rule, when it comes to polystyrene foam, you need to purchase it with a thickness of 50mm. If you have chosen polystyrene, then 30mm is quite enough.
Soundproofing floor screed photo
The screed was separated from the floor slabs, now it’s up to the walls. Almost any hardware store sells polystyrene tape. If you don’t find it, you can use a similar backing for laminate, only in this case you will have to cut it into strips yourself. In general, the essence of this process is to lay a thin polystyrene gasket along all the walls.
Let's move on. At the next stage, soundproofing the floor under the screed involves strengthening the latter - care must be taken to ensure that the screed does not crack during operation. For this purpose, a metal mesh with a cell of 50 by 50 mm or 100 by 100 mm, made of 3 mm thick wire, is ideal. So we lay it on top of the foam.
How to soundproof a floor in an apartment photo
Well, then everything is standard - beacons are installed, along which an ordinary floor screed is poured. There are several nuances here.
- Firstly, this is the installation of beacons. You won’t be able to simply attach them to the foam. This circumstance is influenced by two factors - the foam itself, to which the cement mortar does not stick, and possible unevenness of the floor slabs, on which the foam bends and disrupts the plane of the installed beacons. There are two exits here. In the first case, you can cut holes in the foam for the beacons, and in the second, you can use modern adjustable fasteners for them. The second is preferable, since their plane of contact with the ceiling is minimal, and this affects the quality of sound insulation.
How to soundproof the floor from neighbors below photo
- Secondly, this is the thickness of the screed being poured. It cannot be less than 50mm - a thinner layer of mortar will simply crack after drying.
- Thirdly, this is the process of drying the screed - such a living structure cannot be disturbed until it is completely dry. In general, until the poured screed clears up, it is better not to walk on it - after all, polystyrene foam and even polystyrene foam are flexible materials. One wrong move and the screed will crack. And after drying, when the cement mortar has fully gained strength, nothing like this will threaten it.
That, in principle, is all the soundproofing of the floor screed. As you can see, the process is simple, but labor-intensive. Especially when it comes to preparing cement mortar. In this regard, a concrete mixer will be an indispensable assistant.
Soundproofing the floor under the screed photo