28Nov A corner sofa can perform various functions, which makes it indispensable in the interiors of small apartments. Finding a suitable corner sofa on the website www.nedorogaya-mebel.ru will help you get acquainted with their various designs, layouts, orientation (left or right) and other characteristics. The second question for the buyer is whether it is convenient to place it indoors. How to assemble a corner sofa will be suggested by the following methods for decomposing and assembling some models.
The simplest sofa is a corner side sofa, usually used as a kitchen corner. In addition to decorating the dining area, they also represent a convenient and modern solution for kitchen furniture. Corner kitchen sofas consist of two or three seats with backs, which are assembled like a construction set on the left or right side. To connect them, it is enough to dock the individual parts and insert the fastening pins into the grooves.
Corner folding sofas can be equipped with a different transformation mechanism, which is why their assembly method may differ. Usually one part of the sofa is not folding and complements the sleeping area formed by its folding part. The design can be solid or separate with attached blocks.
The design of the “Eurobook” consists of three parts – two sofas and a triangular insert between them, made in the form of a table. To unfold such a sofa, you need to pull the lower part towards you and lower the backrest into the free space. The collection of the “Eurobook” is carried out in the reverse order of the steps performed.
Corner sofas of the “Dolphin” design usually consist of two parts: central and side. The side part is motionless, and the central part folds out, forming a spacious sleeping area. By grabbing the hidden loop located at the bottom of the seat and pulling it towards you, you can pull out the platform in which the folding mechanism is located. The mechanism is disassembled by lifting the loop up and towards you. In this way, the sleeping bed is assembled flush with the side part. To put the structure back together, simply press on the front of the sofa and slide it under the seat.
The accordion design can have two or three components. As in the previous sofa model, here one part remains motionless. By pulling the seat towards you, you can move it forward. At the same time, the seat will pull the folded backrest along with it, which will lie flush with it. By sliding the seat back you can assemble such a sofa.
Atlanta corner sofa is one of the most popular models of corner sofas. Made from high-quality materials, it has strict and harmonious shapes that will decorate the interior of almost any style.
Upholstery types are represented by two main materials: eco-leather and textiles.
Eco-leather Textile
The built-in side table and wide armrest on the other side allow you to comfortably place all the necessary things, be it a laptop or a cup of hot coffee. And its angle can be changed depending on the layout of the room. When assembled, this piece of furniture has a length of just over 2.5 m, and when unfolded, it turns into a comfortable double bed.
Sofa unfolded
The combination of all these features makes many buyers choose the Atlanta model.
Professional furniture assemblers will deliver and assemble it in the shortest possible time. But if you decide to assemble the sofa yourself, then the assembly instructions included with each product will help, in which everything is written and illustrated in detail. In addition, if you decide to assemble it yourself, find visual photo and video examples that will allow you to understand exactly how to assemble the Atlanta sofa yourself with a direct modification.
When delivering new furniture, be sure to check that all parts are included as listed. This will save you from unpleasant surprises during assembly and will allow you not to waste time waiting for the missing leg or pillow to arrive.
Once you have made sure that the delivered parts fully correspond to the ordered sample and are delivered in full, you can begin the process of assembling the Atlanta sofa.
Make sure you have all the necessary tools prepared:
- hex keys of different diameters;
- crosshead screwdriver;
- open-end wrench.
how to make a Eurobook sofa
Instructions with video tutorials, drawings, dimensions and parts list.
I will tell you how to make the simplest Eurobook folding sofa. This time in the form of video instructions with comments, drawings for assembling the sofa and a complete list of parts.
This sofa has a sleeping area measuring 2 x 1.5 meters. You can do it yourself, without transformation mechanisms, without expensive tools. All materials for production are available to everyone. We will make the most economical and ascetic sofa, but we will not forget about quality. When purchasing materials, I spent 6 thousand rubles (at that time about $85). In the first video I will talk about the advantages of this sofa, the materials and tools.
Based on my instructions, you can easily change the appearance of the sofa to your liking. For example, it won’t be difficult to make a sofa in the following options (top option in the video):
If you make more significant changes (enlarge the drawer), you can make a sofa with armrests. And even on the basis of a Eurobook, adding an ottoman, you can make a corner sofa. We have already discussed how to make armrests and an ottoman in the instructions for the corner sofa. In addition, there is also a project for an armrest with a shelf for books.
Below you can see how much and what material was needed to make the sofa. The cost of all materials was less than 6,000 rubles or $85 at that time ($1 = 70 rubles).
Design
The assembly of a corner sofa depends on the complexity of its design. It includes:
- frame;
- transformation mechanism;
- fasteners;
- soft blocks;
- supporting elements.
To produce the base, natural wood or chipboard is used. If you purchase a sofa made of chipboard, you need to check the quality certificate, since this material may contain formaldehyde. The base is installed on supports in the form of fixed legs or wheels.
Several varieties of these systems are used as a transformation mechanism: Eurobook, French, American, dolphin.
List of parts for assembling the Eurobook sofa:
And the total amount of material (all dimensions in millimeters)
- Beam 40X40 (11 sticks of 2 meters each) 1960 - 4 pieces For the back and seat
- 650 – 14 pcs For the back and seat
- 320 — 2 pcs Seat legs
- 598 — 4 pcs. For a drawer
- 245 — 4 pcs Drawer legs
- 150 - 1 piece per box in the center
- From the remaining scraps we cut:
- about 160 mm - 8 pcs For the back and seat
- about 70 mm - 2 pieces per seat
- 1600 X 220 - 2 pcs Drawer side
- 1960 X 120 - 1 piece Per drawer (can be assembled from parts)
- 730 X 1300 - 1 piece Per seat
Plywood cutting map:
- 2000 X 750 X 80 - 2 pcs. For the seat and back
Note: If you want to add armrests to the sofa, then read about the necessary changes on the next page of this instruction.
Disclaimer: All instructional material is free for anyone who wants to make a sofa themselves. Use as you wish. The author is not responsible for any consequences of using this instruction.
Tools and materials for the sofa
In the manufacture of furniture in a factory, the simplest and most affordable materials are most often used. In your home workshop, you can expand the list, which will only make the furniture better. We will look at an example with cheap raw materials and elements.
To make the frame we use available materials:
- Chipboard or fibreboard panels.
- OSB board or plywood.
- Bars 50*50 mm and 25*50 mm.
- Self-tapping screws longer than 6 cm.
- Corner plates made of metal.
- Construction nails.
- Steel legs from a corner or furniture pipe.
- Guides, wheels for the retractable part.
For the soft part, you can use a factory orthopedic mattress. But it would be better to make the soft part from polyurethane foam. We choose thick, furniture-grade fabrics. For upholstery of hard parts we use thin foam rubber or quilted insulation for clothing.
The sofa consists of the following upholstery materials:
- Tapestry furniture fabric.
- Polyurethane foam with 25 hardness.
- Thin foam.
- Thick linen cloth for upholstery of internal parts.
Tools required for the frame:
- jigsaw or saw;
- drill;
- screwdriver;
- hammer;
- roulette;
- pencil;
- stapler
Draw a diagram with your own hands
The first step is to draw drawings or a sketch with dimensions. Our DIY Eurobook sofa is a structure with dimensions of 1000*2400 m. The dimensions of the bottom laundry drawer are 75*200 cm. We indicate the stiffening ribs in the drawing.
The rear panel will have a width of 240 and a height equal to the height of the armrests. We will make the reclining backrest 750 mm high and 2000 mm wide. The side armrests are made in the form of rigid boxes covered with foam rubber and fabric.
The drawings will ultimately consist of the following parts:
- box assembly diagram;
- drawing of the back wall;
- drawing of armrest frames.
We put down sizes everywhere and check their combination.
Advantages of assembling furniture yourself
A Eurobook sofa, assembled with your own hands, will always differ from a factory product in its individual design and quality.
- the price of furniture made by yourself is several times less;
- the master always has the opportunity to use expensive materials;
- personal quality control of materials and workmanship;
- DIY furniture is assembled for a specific room;
- a Eurobook sofa, when assembled correctly, saves space in the house;
- The product can be assembled in 2 days;
- Assembly of upholstered furniture does not require special training.
The Eurobook sofa can be used both disassembled and assembled. Neither in the first nor in the second case it will not take up much space. The design makes it possible to easily disassemble and assemble the sofa.
DIY Eurobook sofa
The primitive transformation mechanism makes it possible to make such a piece of furniture as a Eurobook sofa with your own hands.
Folding furniture is very popular among both owners of small living spaces and owners of large apartments. The Eurobook has many advantages over other sofa models: the design is simple and reliable, the sleeping area is flat, without sensitive surface changes.
Which sofa mechanism is the most reliable?
Most people argue that the most convenient and reliable transformation systems are: roll-out, as well as straight and angular models that use a type of layout such as an accordion or telescope.
When choosing a transformation mechanism, several factors should be taken into account:
- how much space does upholstered furniture take up when folded and unfolded;
- purpose of furniture (for daily sleep or as a guest option);
- intensive load mode;
- ease of operation;
- frame quality.
What is a Eurobook sofa
In order to understand how to make a Eurobook sofa with your own hands, you need to understand the design and features.
The main characteristic of the model is immobility during transformation, which is achieved by pushing the seat forward and lowering the backrest into the resulting space.
To ensure the movement of the seat, you can equip it with a special mechanism, but at home it is enough to make recesses in the side supporting bars and attach small supports-legs to the seat itself. Raising and lowering the backrest is carried out thanks to the simplest non-separable hinges.
The design of Eurobooks includes a base box with a linen drawer, which can be with two armrests or without them at all. There are models with one armrest, which allows you to create a corner sofa.
Such furniture saves space, because... there is no need to install further away from the wall to ensure transformation. After unfolding, the sleeping place will be large and comfortable.
Drawings and diagrams
In order to begin directly creating furniture, you need a detailed drawing of a Eurobook sofa, which is drawn according to individual preferences; you can take the finished project as a basis.
The main thing is that the drawing includes the size of the finished product with overall dimensions, with the dimensions of each component part. In addition, it is necessary to indicate the location of the hinges so that during the manufacture of the back and seat, reinforcing bars are placed in the right place for reliable fastening, the exact dimensions of the height of the box with legs, and the location of the parts. This model has 4 main legs on the frame and 2 on the retractable seat.
If the contractor is familiar with carpentry and has an understanding of the process of creating a sofa, you can rely on previously acquired knowledge and adjust the details in the process. It is better for a beginner to spend more time creating a diagram and drawing, carefully calculating all the parameters at this stage.
Rules for lubrication of the mechanics of a click clack sofa.
To lubricate moving parts, thick, high-quality machine oil is used that does not dry out for a long period. Maintenance is carried out according to the following scheme.
- The part of the mechanism located in the center is lubricated first.
- Four rivets at the junction of the linen drawer and the sofa seat.
- The last thing to lubricate is the rivet between the frame frames located in the center.
The click-clack sofa is reliable, practical, furniture that, if properly maintained, takes care of your health.
Assembling the frame of a Eurobook sofa
To assemble a sofa with your own hands, you need to make a linen box (base), back and seat, and armrests.
Materials you will need:
- timber 40x40 mm;
- plywood 5x15 mm;
- MDF or chipboard sheets;
- foam rubber 10-20 cm thick;
- upholstery fabric;
- 3 hinges and 2 support wheels;
- fasteners;
- wood glue.
- screwdriver;
- stapler;
- plane;
- electric jigsaw.
The production of a Eurobook sofa begins with cutting the material into blanks according to the drawing. All cuts are sanded with sandpaper.
Sofa base
The linen drawer of the sofa begins with the creation of side parts. On both sides along the edge of the chipboard (MDF) workpiece, screw the legs with self-tapping screws, departing 75 mm from the top.
A timber guide is fixed parallel to the upper edge of the side workpiece. On each side of it, smooth cuts are made with a plane or jigsaw to fix the wheels on which the seat will move. In places of cuts, the distance from the top edge of the MDF should be equal to the height of the wheel. The second side part is made in a similar way.
The back and front parts of the box are laid on a flat surface, the finished sides are placed between them, and the entire structure is fastened with self-tapping screws. Cross bars are installed in the center in the upper and lower planes for more reliable fixation of the box.
The bottom is sewn up with a sheet of plywood, at the corners of which square sections for the legs are pre-cut. At the very end, the box is turned over on its legs, and a vertical beam is installed between the transverse reinforcing bars in the rear part, to which the hinges are then screwed.
For reliability, you can additionally add metal corners to the box itself in the corners.
Assembling the seat and back
The manufacturing processes for the seat and backrest are almost identical and differ only in some respects. First, a base is assembled from 2 longitudinal and 2 transverse side bars, additionally reinforced at the ends with bars 20 cm long.
One side is covered with a sheet of plywood. In this case, it is necessary to carefully ensure that the right angle does not move during the process. Then 5 transverse bars are placed and secured in the seat at an equal distance from each other. In the back, the outermost reinforcing crossbars are placed at a distance of 195 mm, and 1 exactly in the center (at the locations of the hinges).
We sew up the back side of the backrest with a sheet of fiberboard (this is not necessary for the seat). The base for this part of the sofa is completed. Then we screw the frame to the front part of the seat, in which recesses have been pre-cut for transverse reinforcing bars.
At the next stage, legs are attached to the drawer using two self-tapping screws and a bolt with a nut, the height of which is equal to the height of the linen drawer. To decorate the sides of the product, plywood blanks are used, which in front are equal in width to the drawer frame, and in the back are beveled to ensure the consolidated movement of the sofa folding mechanism. They are secured with self-tapping screws to the side of the seat base and the leg itself.
This completes the production of the 3 main elements of the Eurobook. You can start covering it with fabric and filling it with soft material.
Armrest assembly
Most often, a Eurobook sofa is equipped with two identical armrests. They are made from chipboard. The bars are screwed perpendicularly; their length should ensure free movement of mobile furniture elements.
For reliability, longitudinal elements are fixed in the lower part parallel to the floor, in which holes are drilled for bolts. Their continuation should be done in the body of the sofa.
Assembling a sofa - drawings, diagram and 103 photos of simple step-by-step instructions for beginners
The interior of any modern apartment or private house involves the installation of upholstered furniture: a bed, an armchair or a sofa.
Previously, it was assumed that the living room served as the place where the sofa would be placed. Today, developers have presented so many different types of sofas that, in terms of their functional characteristics and appearance, they can be located in almost any room, from the kitchen to the balcony.
A new owner of upholstered furniture often has the question of how to assemble a sofa with their own hands. The installation process itself does not require any special technical knowledge or skills. The complete set of any sofas implies the presence of a user manual, which details the mechanism of how to do this.
But you need to take into account the fact that different shapes and fillers of soft parts make certain adjustments to the overall picture of the assembly. Therefore, it is worth paying attention to what sofas can be.
Sofa shapes and types of filling
The following types are distinguished:
Straight is a popular option, often called a classic sofa. Finding the required dimensions of such a sofa to suit the room will not be difficult.
Corner is a roomy and L-shaped option that is practical, saves space by being placed in a corner, and also combines the function of a bed.
Modular is a representative of a new generation of upholstered furniture that does not have a fixed configuration. There are sections that are transformed and composed in accordance with the ideas of the owner of the sofa. At the same time, they can either be fastened together or simply placed next to each other.
In the production of soft parts, two types of fillers are used, which determine the following varieties: spring sofas (with dependent and independent blocks) and foam sofas (they use polyurethane foam).
Spring sofas are heavier than foam sofas and during installation can cause a number of difficulties due to their weight.
Assembling a straight sofa
If, after purchasing a sofa, a decision was made to install it yourself, then a certain sequence of actions is necessary and a mandatory study of the sofa assembly diagram is necessary.
First you need to carefully, without damaging the upholstery, remove each part from the packaging.
After which it is recommended to simply leave them in this state for a while so that the material can “assimilate” the humidity and temperature conditions of the room.
At this time, you can check the quantity and quality of the accessories that come with the kit, and also prepare the required tools: screwdrivers, you may need a drill with drills of the required diameter, hexagons.
The next step is to screw the legs, if any. This needs to be done for the simple reason that when assembled the structure will be less agile and much heavier. In addition, it makes sense to free up space for further work so that all parts and tools are in sight.
The straight sofa includes the main frame and additional elements (back, armrests, decorative components).
The basic assembly process is carried out as follows:
We install the fasteners by aligning the holes and inserting bolts, self-tapping screws or screws into them as provided in the manual. Next, carefully twist them. Similarly, we connect the seat and back of the sofa. The design obtained at this step is the basis.
Then we install armrests and all decorative elements, if any, on the frame on both sides. There are cases where the mounting holes were not visible because they were hidden behind the upholstery. Then it should be carefully bent. The instructions should say this.
At the last step, we check the sliding mechanism, if the sofa is equipped with one. Its operation should proceed smoothly, without creaking or extraneous sounds.
It is important to remember that it makes sense to not tighten the internal fasteners all the way; later, if the sofa is not mounted correctly, it will be easier to disassemble it. However, after completing the work, we must not forget about tightening all fastening points.
Throughout the entire process, it is recommended to constantly check the sofa assembly instructions.
Corner sofa and the nuances of its installation
Assembling a corner sofa involves connecting two or three parts, which are seats, backrests and a retractable part. Any specialist will recommend assembling the large elements of the sofa first, and then the small ones.
First of all, you need to familiarize yourself with the design of such a sofa. It can be right-handed or left-handed, one part of it is longer than the other, the folding mechanism itself is also different for different models; The assembly sequence will depend on these facts.
The frame, armrests, seats and backrests are the parts of a corner sofa, the connection of which requires the following steps:
- First, the supports are attached to the base, corner sections and armrests using screws. Rollers are installed on the retractable part. All elements must be strictly recorded.
- Using screws, one of the armrests is connected to the corner section. It is necessary to check the stability of the fixed elements.
- The base section and backrest are installed, and the box is connected to the second armrest, after which the assembled structure is fastened to the corner section.
- The back wall is installed and fixed with the armrests. The stability of the resulting structure should be checked again.
- Finally, a roll-out mechanism is attached to the guides installed in the base part.
There are corner sofas (Atlanta) complete with a table that is attached to the side and serves as an armrest. The Atlanta sofa is assembled in the following sequence: first, the transport fasteners are removed and the roll-out seat, secured with a special stop, is pulled out, the screws are unscrewed with a screwdriver.
Next, the armrest is aligned with the back of the sofa and secured with two hexagon screws. Then, through the metal corner of the ottoman box and its wall, the backrest is secured with three screws.
A bar table is screwed to the ottoman with two hexagon screws, which also serves as a second armrest.
In this way, two modules are assembled, and subsequently they are tightened together with fasteners.
Assembling a modular sofa
Each furniture manufacturer has its own design of modular sofas; the only thing that remains unchanged is that they can be assembled and disassembled at your discretion. Another advantage of the modules is the fact that they themselves are often sold already assembled, and the buyer is given the opportunity to combine them at his discretion.
But if the sofa configuration requires a more complex module, you will need to do a number of additional steps taking into account the specifics of a particular model. Modular sofas come in two types: sectional and convertible.
The sectional option implies a rigid connection of ready-made modules, which the buyer chooses himself in the store.
The possibility of combination exists precisely at the pre-sale stage, when various layout options are considered. And here you may need sofa assembly drawings that reflect all the nuances of possible combinations.
Then, already in place, the sofa is connected with fasteners and remains in this form permanently.
A more interesting option is a transformable modular system. The number of purchased sections is unlimited, then any design is formed from them.
The initially purchased modular sofa, when rearranging the sections, can become a single bed or a set of armchairs.
In addition, sections can be given a variety of geometric shapes: square, rectangular, round, etc.
Thus, the process of assembling a sofa is quite a responsible task. But it can be done by anyone who has the time, the necessary tools and the desire to do it with their own hands. In any case, there is always the opportunity to contact professionals, assemblers from the company from which the sofa was purchased, or private individuals providing installation services.
Photo of the sofa assembly process
Source: https://mebelindesign.ru/sborka-divana/
Sofa finishing
The final stage of creating furniture is filling and upholstering the seat and back. To create softness, it is best to use foam rubber 20 cm thick; if the thickness is 10 cm, then lay it in 2 layers.
The fabric is selected taking into account individual preferences and price. The main thing is that it is not only beautiful and pleasant to the touch, but also durable enough. In addition, you should choose a fabric that is easy to clean and does not absorb moisture or odors. Especially if the sofa will be used constantly.
Seat filling materials
The materials used under the seat upholstery vary, directly affecting the cost of the sofa and its quality. Before purchasing products, you should carefully study the qualities of each material, which will allow you to choose the right one, based on the individual requirements for the piece of furniture:
- foam rubber The material has the lowest price, but is short-lived, as it quickly loses its properties and is destroyed.
- PPU. A significant advantage is the availability of the material, but the seat made using it is not soft and comfortable for sleeping.
- Latex. A wonderful filler, with the help of which softness and comfort of the sleeping place are achieved, but you will have to pay for it with a rather high cost of the material.
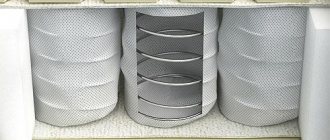
Instead of soft fillers, a spring block can also be used, which has excellent orthopedic properties and comes in 2 types:
- dependent. The spring block is attached to each other with a snake. The advantage is accessibility, but the service life is short. Inconvenience is also caused by the noise emitted by the sofa when moving on it, as well as the breakage of at least one spring, which means rapid failure of the entire product.
- independent. It is a set of spring blocks packaged in separate cases, providing an excellent orthopedic surface. It is silent, provides a comfortable sleep, but at the same time it is very expensive.
When purchasing, you can check the quality of the sofa yourself. To do this, you need to place a glass of water at the edge of the seat and sit in the middle. If the container does not move and water does not pour out, the mattress is truly of high quality.
How to make a Eurobook sofa with your own hands using drawings and diagrams?
Folding upholstered furniture is deservedly popular. It is an integral part of a modern living room, can serve as an additional, and sometimes is a permanent sleeping place. It is very important that the folding mechanism is light, reliable, and the product lasts a long time. This type of furniture is the Eurobook sofa.
To the question whether a Eurobook sofa can be made with your own hands, the answer is unequivocal - yes. The principle of transformation of this mechanism is very simple. It is intended for daily use. The Eurobook sofa consists of two soft parts: a seat and a back. To unfold, you need to pull the seat towards you, then move the backrest to a horizontal position, taking up the free space. As a result of the transformation, the sofa turns into a full double bed.
Creating a Eurobook sofa is not very easy. But if you carefully study the drawings and diagrams yourself, listen to the advice of experts and coordinate your actions with step-by-step instructions, everything will certainly work out.
Sofa book - what is it?
This type of furniture should be in every home. Due to its compactness, functionality and convenience, the Eurobook deserves respect.
The design of the Eurobook is simple. There is a movable part that extends due to special fittings. If you plan to make it yourself, then it is better to make a moving part on wheels.
During the daytime, the furniture is used as a sofa, and at night it turns into a spacious sleeping place.
When folded, this sofa can accommodate up to 6-7 people in a sitting position. This is convenient and allows you to spend time together with family and friends. And if you have guests from distant lands, you can always fold out the sofa, creating a comfortable sleeping place for two.
The most common is a sofa with a Eurobook folding mechanism.
Materials and tools for making a Eurobook sofa
To make a Eurobook sofa, you will need (all parameters are given in millimeters):
- Pine timber 40x40 – 11 pieces, 2 m each.
- 1 laminated chipboard 16 mm thick – 2200x600.
- 1 chipboard – 1960x850.
- 2 sheets of plywood 4 mm thick – 1500x1500.
- 3 sheets of foam rubber 40 mm thick and 1 sheet 20 mm thick – 200x100.
- Self-tapping screws of various sizes - 75, 51, 35.
- 4 screws M6 25 mm.
- 4 M6 mortise nuts.
- 3 furniture hinges 60x40.
- 2 furniture legs 50 mm.
- About 6 m of upholstery fabric, 140 cm wide.
- 4.5 m of padding polyester with a density of 100-150 g/m.
- Batting or foam rubber 10-20 mm thick for upholstery of the seat and back of the sofa.
- Furniture stapler, staples.
- A circular saw.
- Electric drill.
- Miter box.
- Sandpaper.
- Stain.
Simple and clear instructions on how to assemble a sofa bed with your own hands
An indispensable piece of furniture for the home is the DIY sofa bed. This design is ideal for receiving guests during the day and comfortable rest at night, which is especially important for small apartments.
A ready-made transformer can be purchased at a furniture store, but it will not be cheap.
If you assemble the bed yourself, using convenient diagrams, you can significantly reduce costs and make a piece of furniture that fits perfectly into the interior.
There are several ways to make a transformer, but the most popular is a model called “book”. It is relatively simple to manufacture, easy to use and compact. A book bed can have either a standard rectangular shape or an unusual, creative one (one of the most interesting options is a round folding bed).
Preparing to start work
In this article we will talk about how to assemble a transformer using simple drawings. The size of the finished product when assembled will be 100 by 220 cm, and when unfolded - 140 by 220 cm.
Before starting assembly, you need to stock up on all the necessary tools.
So, the master will need a tape measure, a square and a pencil, a saw, a hammer, an electric drill with a set of drills, a screwdriver, wrenches and a furniture stapler.
You need to purchase the following materials:
- Board 25 mm thick with dimensions 1900×200, 800×200, 800×50 2 pcs., 1000x50 – 12 pcs.
- Beam with a section of 40x60, length 1890 mm - 2 pcs., 1790 - 2, 530 - 6, as well as timber with dimensions 40x50x330 and 50x50x200, 4 pcs.
- 1 sheet of fiberboard with a thickness of 3.2 mm and dimensions of 1.7 × 2.75 m.
- Wooden slats – 32 pcs.
- Holders for slats – 64 pcs.
- 1 set of transformation mechanism for a sofa book.
- One sheet of 25 density foam rubber with dimensions 2000×1400×60, 2000×1600×40, 2000×1600×20.
- Glue for foam rubber.
- Non-woven fabric – 4 linear meters.
- Upholstery fabric 140 cm wide – 6 linear meters.
- 4 plastic feet.
- Furniture bolts 8×120 – 4 pcs., 6×40 – 4, 6×70 – 8.
- Nuts 8 – 4 pcs., 6 – 12.
- Nails 70 – 20 pcs., 100 – 40 pcs.
- Self-tapping screws 89D – 20 pcs., 51D – 16 pcs.
- Staples in sizes 10 – 1000 pcs.), 16 – 300.
When all materials and tools are prepared, assembly can begin. Some craftsmen find it easier to complete the job if they first draw diagrams of future design details.
Manufacturing of product frames and linen drawers
At the first stage of making a sofa, you need to make a drawer for linen. To do this, you need to assemble a frame from two 1900x200 boards and two more 800x200 boards. In this case, the transverse boards are located at a distance of 50 mm from the edges of the longitudinal boards. Then 50x50x200 bars (4 pieces in total) are inserted into these edges. They strengthen the structure.
After this, the box is additionally reinforced with two slats 800 mm long and 50 wide. The first slat is placed at a distance of 650 mm from the edge of the longitudinal board, and the second at a distance of 600 from the first. After this, a sheet of fiberboard measuring 1800x800 is attached to the bottom of the transformer.
Then you need to make two frames - one for the seat, the other for the back. To assemble the frame, it is necessary to connect the longitudinal beams 1890x60x40 and 1790x60x40 using three perpendicular beams 530x60x40.
There are 5 cm protrusions on both sides of the lower beam. 330x40x50 bars need to be nailed to these protrusions so that their sides are adjacent to the perpendicular bars.
The second frame is made in a similar way.
All parts of these structures are connected to each other using nails, for which holes are pre-drilled with a drill with a 3 mm drill bit. To prevent the frames from coming apart over time, they need to be additionally reinforced at the joints with 89D self-tapping screws. For the self-tapping screws, holes should be drilled with a 3 mm drill, and then with an 8 mm drill. The depth of the holes should reach 10 mm.
At the next stage, it is necessary to attach wooden slats to the frames, providing support for the soft parts of the seat and back.
Making armrests
One of the most difficult stages of making a transformer is assembling the armrests. The first thing the craftsman should do is cut out 4 walls from a fiberboard sheet for future products.
The width of the workpiece should be 900 mm, the height at the highest point should be 700, at the lowest place 500. It is necessary that the length of the highest part of the armrest be 100 mm, and the lowest part should be 460.
There is a smooth bevel from the high part to the low part.
The next step is to assemble the wooden frame of the armrest. It should be 20 mm shorter than the fiberboard blank. The wooden frame is installed along the contour of the workpiece. Then, transverse slats are placed inside the frame, which strengthen the structure and act as a support for the bolts that secure the side to the main part of the product.
The middle of the first batten should be at a distance of 100 mm from the high edge of the side, and the middle of the second batten should be at a distance of 700 from the middle of the first batten (880 from the edge of the product).
Then, in the middle of each rail, at a height of 150 mm from the lower edge of the armrest, holes are drilled for 8x120 bolts. The holes are formed using an 8.5 mm drill.
After this, you should sew up the open side of the side and make another side in the same way.
At the next stage of work, it is necessary to finish the armrest. To do this, you need to make a foam roller 40 mm thick. At the very beginning, the roller should be about 150 mm wide, but towards the middle it decreases to 50 and maintains this width until the opposite edge.
Foam rubber 20 mm thick is nailed onto the side on top, which covers the roller in such a way that its shape becomes round. Excess parts of foam rubber are cut off. On the side of the protruding bolts, the armrest is covered with foam rubber starting from a height of 320 mm above the lower edge of the structure.
Then the foam rubber is wrapped on the opposite side of the product, covering the existing round roller, and attached with a stapler. The protruding edges of the material are cut off.
After this, all that remains is to cover the side with fabric and equip it with fittings. The second armrest is made similarly.
Connection and plating of structural parts
In the sides of the laundry drawer you need to drill 2 holes with a 10 mm drill. Each hole should be located at a distance of 100 mm from the edge and 150 from the bottom of the structure.
At the next stage, you need to assemble all the parts of the sofa bed into a single whole and install the transformation mechanisms.
It should be remembered that the transformation mechanisms must be mounted in such a way that there is a gap of 10 mm between the seat and the back of the unfolded sofa, and the seat of the folded product should not protrude beyond the armrests.
When the sofa is assembled, you should move on to its upholstery. You need to nail interlining onto the slats, and then put 60 mm thick foam rubber on top of it. First, in those corners of the foam rubber that will be located above the transformation mechanism, it is necessary to cut holes measuring 50x95 mm. This will allow the foam to lie freely on the frame.
On top of the sheet of foam rubber on the edge of the seat, you need to glue another foam rubber strip with a thickness of 20 mm and a width of 200. Thanks to this strip, you will get a soft round cushion on the edge of the structure.
Then another layer of foam rubber 40 mm thick is glued on top, its edges are folded under the seat. Then the same is done with the back of the sofa. At the final stage of work, covers are sewn and put on the product, and the sides are attached to the seat.
Now the sofa bed can be used for its intended purpose!
At your request they are also reading:
Similar sectionsDIY sofabed
Source: https://mebelekspert.ru/gostinnaja/divan/divan-krovat-svoimi-rukami.html
Step-by-step instruction
Before you start assembling, cut all the blanks from the prepared materials.
- 14 pcs. length 650 mm (back and seat);
- 2 pcs. length 320 (seat legs);
- 4 things. length 598 (box);
- 4 things. length 235 (drawer legs);
- 1 PC. length 150 (box);
- 8 pcs. 160 each (back and seat);
- 2 pcs. 70 each (seat).
From laminated chipboard 16 mm thick:
- 2 pcs. 1600x200 (box sides);
- 2 pcs. 598x220 (drawer sides);
- 1 PC. 1950x150 (seat).
- 1 PC. 1960x120 (tsar, this part can be assembled from fragments);
- 1 PC. 1960x730 (back of the sofa);
From plywood sheets:
- 1 PC. 1300x730 (seat);
- 1 PC. 730x658 (seat);
- 1 PC. 1365x730 (back);
- 1 PC. 593x730 (back);
- 2 pcs. 800x630 (box);
- 2 pcs. 730x150 (seat end).
Below is an example of cutting plywood parts. It will help you use the material as efficiently as possible.
- 2 blanks 750x80 (back and seat of the sofa);
- 1 blank 2000x170x20 (tsar);
- 2 blanks 730x150x20 (seat ends);
- 3.5 m (total length) of 40x20 strips for the ends of the back.
The advantage of this model is the presence of a spacious drawer for linen. For this part we take timber, chipboard, and the bottom is made of plywood.
- From 40x40 timber you need to make guides with sloping soft cuts on both sides. Each cut occupies less than the outer quarter of a workpiece 598 mm long; approximately 15 mm of the timber thickness is removed.
- Grind down the corners in the lower halves of the blanks for the drawer legs and sand them with sandpaper. Cover these parts (they will be visible) with stain; if desired, you can decorate with finishing fabric.
- Screw the guide to the side of the drawer with 4 self-tapping screws (50 mm), the legs - 2 self-tapping screws for each. We carry out the actions in the following sequence: first, we attach the guide to the side panel, stepping back 50 mm from the edge, then we attach the legs on the sides, as the drawing below shows. The second sidewall must be made similarly to the first.
- We attach the longitudinal sidewalls to the sidewalls - 3 self-tapping screws for each connection. We ensure that the right angle is maintained between the directly connected main parts. To strengthen the box and give additional rigidity at the bottom in the middle of the structure, we install a longitudinal bar using 2 self-tapping screws.
- In the places where the legs will be installed, corner cuts (57x57) must be made on the plywood.
- We attach plywood (or 2 parts of the part) to the frame, align the edges of the frame and the bottom of the box. We fasten it using a drill with self-tapping screws in increments of no more than 13 cm to the end of the frame and the longitudinal beam.
- We turn the box over to install the upper longitudinal bar along the top edge of the box in the middle (with 2 screws on each side).
- On one side, between the edges of the upper and lower longitudinal bars, we use 1 screw to install a block under the loop for the leg.
Let's start assembling the frames for the Eurobook sofa:
- To make the frames, select 4 of the highest quality timber (1960 mm) for the longitudinal parts.
- Strengthen 4 transverse bars (650 mm), which will be the outermost ones in the structure, by attaching small blocks about 20 cm long to their ends (on one side) with self-tapping screws (70 mm).
- It is necessary to make markings for 2 screws in the places where the parts that form the frame are attached. We install short parts with a bar for reinforcement inward. For now, we make the connection with only one self-tapping screw at each joint, so that later we can align the angle of 90 degrees.
- We apply plywood and align the angle with it so that the sides completely coincide. We fasten one side with self-tapping screws. After making sure that the frame is level and the short base bars are parallel to each other, we fix the plywood to the frame with self-tapping screws. To ensure a reliable connection, it is advisable to coat all the necessary places in front of the screws with wood glue.
- We install 5 cross bars on the back frame. The first one is 195 mm away from the outermost one (we will attach the hinges to it), the next ones in increments of 392 mm.
- On the other hand, we stuff fiberboard onto the future backrest.
- On a similar sofa seat frame, we distribute the transverse strips (5 pieces) evenly over the entire area of the part (fibreboard is not needed on the seat). This difference between the back and seat frames is clearly demonstrated in the drawings.
If you do not use solid plywood, but pieces, then leave 1-2 mm free between the parts. The joints should be further strengthened by placing a transverse strip over the seam. Secure the edges of both parts to it with screws.
For those who plan to use decorative tie-downs for upholstery material when upholstering a sofa, now you need to make holes for the tie-downs (diamond or square). They should be drilled using a drill with a diameter of up to 13 mm. Immediately mark on the details where you have the top and where the bottom is. On the back, step back from the top and sides 23 cm, from the bottom -25 cm. At the back of the seat, measure 25 cm, and in front, the space is 23 cm. Make the remaining holes according to the chosen pattern. Drill through plywood and chipboard into the back. If you end up on a beam, it’s better to step back.
What to look for when choosing
A corner sofa is a good solution for small apartments, as it allows you to make the most of the available space. Corner sofas have many different options for their use. This became a reality thanks to their design and different installation options for corner sofas. For example, they may have a right or left corner position and vary in size and shape.
When buying corner sofas, you need to consider what room they will be installed in: living room, bedroom, children's room. Depending on this, the model and corresponding characteristics are selected.
Type of execution
Soft models are mainly intended for relaxation; they are installed in living rooms. They do not have a sliding mechanism; they have large pillows and small ones to support the head or back. Assembling a corner sofa of this type is easier than other models.
Modular - consist of three parts: a chair part, a corner part and a canape. They can be arranged in different sequences, depending on the user’s wishes.
Sliding ones are a good choice for small apartments. The sofa is installed in the bedroom, as it can easily be transformed into a sleeping place. Inside the structure there is a niche for linen.
Multifunctional are corner models that are equipped with additional functional elements: shelves, pull-out tables, internal bedside tables, drawers.
Filler
It is important not only to know how to properly assemble a corner sofa, but also what type of filling to choose for its soft elements. The filler affects the well-being, health and even quality of rest of a person.
- The role of orthopedic filler is played by spring blocks. Thanks to them, the shape and good elasticity are maintained. In the lying position, the load on the human spine is reduced and the hammock effect is eliminated.
- Foam rubber is one of the inexpensive fillers used to reduce the cost of furniture. Thanks to it, furniture blocks become soft, but their service life is short.
- Polyurethane is a synthetic material that also provides softness to the sofa. Its service life is longer than that of foam rubber.
- Holofiber is a good filler in the form of spiral fibers. It is characterized by high wear resistance, it does not harbor fungi and insects.
How to make a Eurobook sofa with your own hands
The main feature of a book sofa is that it does not move when assembling and disassembling the sofa; this is achieved by pulling out the top part and lowering the back into the free space that appears.
To ensure the movement of the seat, it can be equipped with special fittings, but when assembling at home, recesses are simply made in the side supporting beams, and the legs are fixed directly to the seat. The back is assembled using non-separable hinges.
The design of the sofa contains a base box with a drawer for bed linen; it can be equipped with two armrests or one, this allows the product to be used as a corner sofa.
Attention! The furniture does not take up much space because it does not require installation at a certain distance from the wall to ensure assembly/disassembly. When the sofa is unfolded, you get a fairly large sleeping area.
Materials and tools
The following materials are used to assemble the frame:
- plywood sheets;
- chipboard;
- self-tapping screws;
- timber 50x50 and 25x50 mm;
- nails;
- metal corner pads;
- rollers and guides;
- angle steel legs;
- batting or foam rubber.
Tools for assembling the frame:
- electric drill;
- sandpaper;
- jigsaw;
- hammer;
- miter box;
- screwdriver;
- furniture stapler;
- stain;
- marker;
- roulette.
How to take measurements
It is much easier to correctly calculate the size of a Eurobook, unlike corner sofas, since you do not need to take into account additional elements. The sofa has one line that divides it into equal parts. Since the sleeping place is located along, this line is almost not felt.
It is necessary to take into account the size of the bed both when folded and unfolded, since in the latter case the sofa will double in size. As a rule, a standard width of 140-150 cm and an unfolded length of 180-210 cm are selected.
Drawings and diagrams of a Eurobook sofa
To begin directly assembling the bed, a detailed drawing is required; it is drawn up taking into account personal preferences; you can use ready-made diagrams.
The most important thing is that the drawing indicates the dimensions of the finished sofa with the overall dimensions, as well as the dimensions of each individual element. In addition, you need to note the location of the hinges so that when assembling the structure, you can install reinforcing bars in the required place for a more durable fastening; the exact location of all elements and the height dimensions of the product, taking into account the legs, are also required.
Important! Standard models have 4 legs on the base and 2 on the folding part.
Types of folding sofas: designs and transformation mechanisms (9 videos, 40 photos)
A folding sofa is something more than a relic of the Soviet past. Modern design trends boldly use this multifunctional piece of furniture even in the most newfangled interiors.
It doesn't matter whether you're looking for a classic sofa bed for yourself or a sleeper sofa for occasional overnight guests, sleeper models can save significant space in a small apartment.
To make the best choice, you should thoroughly study the features of the folding mechanisms of various types of sofas.
Book
The book is the most popular model of the types of folding sofas: it can easily be found in any furniture store. This variation unfolds in such a way that the back and seat create a single flat surface.
The big advantage of book sofas is the way they are transformed: the longer side is the length of the sofa, and when unfolded it protrudes no more than 50-60 centimeters towards the middle of the room.
Thus, you don’t have to worry that the sofa will make it difficult to move in the room when unfolded.
Book sofas come with or without armrests. They pleasantly please with the huge capacity of the internal drawer for storing bed linen.
However, not everything is so rosy: there are some disadvantages in this model. Firstly, the book-type sofa has a clear division in the middle. Because of this recess, it cannot be called very comfortable.
Secondly, the classic version of this sofa cannot lie against the wall - the manufacturers recommend that it be moved away from it at a distance of about 20-30 centimeters.
This requirement is due to the design features of the folding mechanism.
Sofa book: how to unfold (video)
Click-clack
You can also choose a more advanced model with the unusual name “Click-clack”, in which there are three positions: sitting, half-sitting and lying down.
The sofa received its original designation due to the characteristic clicks heard when unfolding it.
Sofa click-klyak: how to unfold (video)
Eurobook
Another name for this sofa is Eurosofa. Among the mechanisms for transforming sofas, this model definitely occupies a leading position. Its elementary system does not require any special physical effort, so both a child and an elderly person can easily unfold such a sofa. All you need to do is pull the seat all the way, and then lower the backrest into the resulting void.
Since the Eurobook transformation mechanism is designed in such a way that even when unfolded, the back of the sofa does not touch the wall, it can be moved close to it. The sofa looks no less interesting in the middle of the room: designers offer a wide variety of designs for models of this type, so the Eurosofa may well become the central element of the interior of the living room or bedroom.
Eurobook sofa: how to unfold (video)
Tick tock
An improved version of the Eurobook mechanism is called “tick-tock”. If, when unfolding a conventional model, there is a certain risk of scratching the floor covering, here the transformation system is supplemented with a pantograph, which slightly raises the seat above the floor, preventing damage.
Comparing the “tick-tock” sofa with other models, you can see that it has the greatest number of advantages, including: a moderately soft, wide, and most importantly flat sleeping area, a reliable but very easy to use transformation mechanism, and compactness. A spacious drawer for linen successfully complements this ideal picture, making the “Eurobook” sofa, and in particular its “tick-tock” subtype, the best choice as an alternative to a bed.
Tick-tock sofa: how to unfold (video)
Roll-out sofa
A sofa with a roll-out mechanism is another popular offer from furniture stores. To unfold this model, just pull the seat towards you: an additional part will appear, which helps to form a sleeping place.
A roll-out sofa is a very convenient solution for the living room. Despite the relative simplicity and ease of the sofa layout mechanism, it is still more oriented towards guests rather than daily use.
It should be borne in mind that when unfolded, the sofa is a thin and soft mattress - this certainly affects the quality of sleep. Moreover, the sofa of this model when unfolded requires a lot of free space.
A big plus of a roll-out sofa is a spacious niche for bed linen.
Roll-out sofa: how to unfold (video)
Sedaflex
Sedaflex, a sofa with an American folding mechanism, partially combines the characteristics of the “book” and “roll-out” models.
Comfortable seating, a soft and high back, as well as slightly larger dimensions than a pull-out sofa make this piece of furniture an ideal solution for a comfortable daytime rest.
And what quality of night's sleep awaits those who choose an American sofa?
The model consists of three modules connected by hinges. When folded, two of them are installed vertically, and the third is a seat. To unfold the sofa, you need to pull the seat and all three modules will fold together to form a bed. To return everything to normal, just lift the backrest and push the entire structure back.
Sedaflex-type sofa folding mechanisms are characterized by small and shallow drawers for linen. Another significant drawback is the transverse grooves between the modules, which create noticeable discomfort during sleep.
Sedaflex sofa: how to unfold (video)
French sofa
The “French” folding mechanism is a rather specific model of a sofa bed. Definitely, the manufacturers relied on relaxation rather than sleep. This sofa is characterized by a comfortable backrest, a thick, soft seat and durable armrests.
If you remove the seat, you will find a folded steel structure underneath. When unfolded, this sofa with its mattress stretched on steel springs, which are attached to a steel or aluminum frame, is somewhat reminiscent of an army field bed.
Comfortable sleep on a French sofa is a rather controversial pleasure. But the fact that the designs of sofas of this type take up too much space (unlike many other models, where this space is usefully used as drawers for bed linen) is a fact.
Of course, the structure of the sofa is also characterized by positive nuances, the main one of which is a flat surface for sleeping.
A French sofa with a folding mechanism is worth a closer look if your priority is comfortable relaxation in the living room with the option of an extra bed in case of emergency.
French sofa: how to unfold (video)
Accordion
The principle of the folding mechanism of the accordion sofa is in many ways similar to the previous model. The simplicity of the design ensures its durability. If you also choose a model with removable covers, then with proper care the sofa will serve you for many years in almost perfect condition. Another undeniable advantage of the accordion sofa is its high and level sleeping area.
If the accordion transformation mechanism takes up little space when folded, when unfolded it requires a lot of additional space. Therefore, the dimensions of the sofa are both a plus and a minus. On the one hand, it is certainly more comfortable to sleep on a wider bed, but on the other hand, you have to sacrifice a larger area of the room (which is critical for tiny spaces).
Therefore, although the “accordion” can still be placed in a small living room, this option is categorically unacceptable for a narrow bedroom.
Accordion sofa: how to unfold (video)
Dolphin
If the folding systems for dolphin-type sofas are made of high-quality materials, they are quite durable and reliable. In such cases, the sofa can easily be used as a full-fledged sleeping place, because to unfold it, you just need to pull the inner strap.
The smooth surface created during transformation contributes to comfortable sleep. The lack of a linen drawer in regular sofas is a little disappointing.
But just in corner models (where exactly such folding mechanisms for sofas are most often used) there is volumetric space reserved for it in the side compartment.
Eurobook sofa yourself: step-by-step instructions
To properly assemble a Eurobook sofa, you must follow the following instructions:
- Base. You need to start assembling the Eurobook from the base. To do this you will need beams with a section of 15x5. Most often, the frame size chosen is 80x200 cm. The beams are connected to each other using self-tapping screws. Additional boards are attached to the corners for better reliability.
- A chipboard sheet is usually used as the bottom of the frame. To secure it, you need to cut down the slats at the base, and fix the chipboard on top of them.
- Chair and backrest. These elements are also made from beams with a cross-section of 15x5 cm. The manufacturing method is exactly the same as the bed frame, dimensions are 80x200 cm. For these parts, chipboard sheets must be secured on both sides.
- 7x7 cm beams are sawn into the assembled base, which are placed in increments of 9-12 cm. Afterwards, the chipboard sheets are fixed and the legs are attached.
- When the structure is assembled and the back is positioned vertically, its soft part faces outward. Therefore, you need to additionally use polyurethane foam pillows wrapped in some kind of material, this can add greater softness.
- Side parts. For these elements, a wooden box is used or it is made from fiberboard.
- Folding mechanism. To make the bed fold and unfold, hinges are used; they are attached to the back and directly to the bed. To make the area for fixing the hinges on the headboard more durable, instead of beams, you can choose a board measuring 15x5 cm, turned edge-on.
- When all the elements of the bed are prepared and assembled, polyurethane foam is attached (using a special adhesive composition), then batting or padding polyester is laid. The finished Eurobook is covered with fabric using a furniture stapler.
- The beams between two plywood sheets can be placed on glue and secured on both sides with a construction stapler.
- Instead of chipboard, solid plywood sheets 5 mm thick are often chosen. Moreover, the thickness of the beams is reduced to 25 mm.
- The sofa cover is made with a zipper, or the material is stapled at the bottom to the boards. Upholstering a bed does not take much time.
- For the soft part of the bed, it is advisable to choose synthetic padding with a density of more than 25 kg/m2. Foam rubber with a thickness of 12 cm is attached to one part of the backrest, and 3 cm to the second part.
The Eurobook can successfully replace a bed. This design will provide the owner with a spacious and comfortable place for comfortable rest and good sleep. Due to its small size, the Eurobook can be placed in a small bedroom.
Shield
Self-assembly of the sofa
This method is suitable for people who do not have woodworking skills. This option is a little simpler and to implement it you need to stock up:
- two used door leaves;
- metal staples;
- wood hemp;
- foam;
- upholstery material.
Wooden version
The base and back of this sofa model will be two used wooden door leaves. You will need to first clean them of old coatings and dirt, and then treat them with a grinding machine.
Next, the doors are painted in the color of your choice, while trying to ensure that it matches the overall interior of the room in which the sofa will be installed in the future. You may prefer finishing the wooden surface with veneer.
Using nails, fasten one sash to a wooden stump of the appropriate size, and then use metal staples and glue to secure the second part (the back) to it.
After this, start making the mattress: cut out the foam rubber of the same size as the seat and cover it with thick fabric (matting is ideal for this). Already on top of this material a bright fabric of good quality will be stretched.
The main requirement is the construction of the most durable and reliable frame foundation. It bears the entire main load, and if you neglect this requirement, you can get injured during operation, and it will not last long. Based on this, you can choose a different base material that meets the requirements.
You can play with the finished design in any way you like, it all depends on your preferences and imagination.