When purchasing furniture for their bedroom, everyone expects to get maximum convenience and comfort from it. This is especially true for the bed, on which, according to experts, up to one third of a person’s life passes.
Regardless of the design, be it a wide double bed or a folding sofa, these furnishings should provide comfortable rest, healthy sleep, and convenience during use.
Thanks to modern achievements of scientific and technological progress, there are many designs to choose from, made from the most modern materials: latex, polyurethane foam, polystyrene balls and so on.
But ordinary springs, which have long been used to make various furniture, have not lost their popularity. Moreover, metal wire twisted into a spiral - naturally improved and modified - is used both for the production of mattresses and sofa cushions, and to facilitate the control of the lifting mechanisms of the described furnishings.
Everyone is well aware of a sofa bed with a spring block, a bed with a Rio spring-type lifting mechanism and other similar products.
In this regard, many are faced with the problem of choice: what to prefer? Inexpensive and much-criticized foam rubber or springs, which also have many disadvantages? After all, the price of products sometimes differs by an order of magnitude, so a mistake can be costly in the future.
Below are recommendations that you can follow to choose a spring mechanism for a folding bed or a sofa bed with a spring mattress. They will last for many years. Naturally, this instruction does not answer all your questions. After all, for example, only you can choose a style and color that suits your interior.
Independent spring block design
What is needed for a full-fledged sleeping place
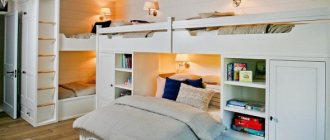
Elements of furniture that can provide a good night's sleep are legs, headboard, footboard, base for the mattress and the soft part itself, which is purchased additionally. Based on this, the main effective part of the bed is the base under the mattress, the remaining parts perform supporting and decorative functions. In addition, such pieces of furniture can be additionally equipped with storage space, bedside tables that are part of the headboard and various accessories for the canopy.
When starting to remodel an old sofa, pay attention to the safety of the soft, spring or foam part; it can be used as a mattress. If small fragments have survived, it is better to use them for decoration. Wooden/plywood elements can be useful for the bed frame, headboard, footboard.
After disassembling used furniture and assessing its condition, make a list of purchasing materials necessary for the work. It may include the following items:
- Boards or plywood about 1.5-2 cm thick for lining the footboard, headboard, frame. You can use textile decoration.
- Boards or plywood about 0.6 mm thick for lamellas.
- Beam 4x4 cm for legs and support parts for the base under the mattress.
- Foam rubber with a thickness of 3 to 5 cm (as needed).
- Decorative textiles.
Craftsmen, when using the soft part of an old sofa as a mattress, as well as in transformer models, advise connecting the two halves (seat and back) with large door hinges. If you plan to assemble an open structure, you can choose decorative fittings.
Areas of use and benefits
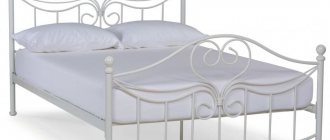
Beds with iron mesh of different sizes are used in the following places:
- military barracks;
- children's camps;
- medical institutions;
- boarding schools;
- sanatoriums;
- student dormitories.
Where does this popularity come from? It turns out that these designs are reliable and durable. In addition, neither adults nor children will experience discomfort during sleep.
An armored bed has many advantages:
- High strength. The design can withstand heavy weight and loads. This feature is useful where the bed is used continuously, for example, in a hospital.
- Saving. A bed or cot with a metal mesh is much cheaper than other models.
- Long service life. This piece of furniture will last at least 15 years, which is convenient for medical institutions that do not have the opportunity to frequently update furniture.
- Hygiene. Metal structures do not harbor insects. In addition, they are easy to care for. There is no need to buy any special detergents - just wipe all parts with a damp cloth.
- Reliability. The use of metal almost completely eliminates the risk of breakage.
A full-fledged sleeping bed made from an old ottoman
It happens that you still can’t throw away not just old, but almost ancient furniture. You can get rid of it quickly, but at the dacha it would be nice to have a new bed, and at home it’s not very comfortable on the sofa. The solution comes naturally. You have almost nothing to lose if you try to transform an old but still strong foundation into a new place for healthy sleep. Of course, the main role will be played by a good modern mattress, for which we will make a bed from what we have.
Materials and tools for remodeling
We will use legs, base boards, and partially surviving foam rubber from an old ottoman. Additionally you should purchase:
- A sheet of plywood about 1.5 cm thick.
- If the legs are not very strong, stock up on a 4x4 cm block.
- Foam rubber with a density of 3-5 cm.
- Thin foam rubber or padding polyester.
- Leather substitute for surface decoration.
- All-purpose or wood glue.
- Screwdriver.
- Sandpaper.
- Decorative nails.
- Screws.
Use a tape measure, pencil, drill, jigsaw, hammer, scissors, and a furniture stapler with staples.
Step-by-step description of the alteration
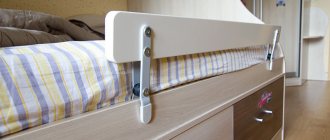
- Remove the railings. Fully expand the sleeping area. Check its integrity and stability by pressing on the outer corners of the structure.
- Mark the places where additional legs need to be installed. Use a tape measure to measure the size you need.
- Cut 2 (or all 4) extra legs from the block. Sand them lightly with sandpaper. Install the legs with screws and glue to the strongest areas of the structure being used.
We recommend connecting all parts using screws and glue. Thus, the product will be stronger and more reliable.
- Measure the length of the outer sides of the frame. Using these measurements, cut planks about 30 cm wide from boards or plywood.
- Install the outer panels along the outside of the base with glue and screws.
To prevent laminated or not very dense wood material from cracking when screwing in, first drill a hole, then apply glue and screw in the screw using a screwdriver.
- Cut long strips of leatherette 5-7 cm wider than the outer panels. And made of thin foam rubber - 2 cm wider than the boards.
- Attach thin foam to the outer panels using glue. Then decorate it with leatherette on top. Attach the material to the back of the bottom of the panel first, using slight tension, securing the position with staples at the top.
- Start making the headboard. Cut the plywood into the desired shape or just leave it rectangular.
- Glue thick foam rubber onto the plywood using wood glue.
- Cut a piece of leatherette at the top and sides 4-5 cm larger than the parameters of the plywood for the headboard.
- Use a furniture stapler to attach the decorative material to the back of the plywood.
- Mark the mounting locations with decorative nails.
The shape or pattern of arrangement of decorative nails can be arbitrary. But if you do not have experience in this method of decoration, use traditional squares or diamonds, reminiscent of a carriage tie.
- Using a cloth or rubber pad to avoid damaging the decorative nail heads (if using a regular hammer), drive the nails in at the marked points.
- Use a drill to carefully attach the headboard to the bed frame using screws.
Advantages and disadvantages
The main advantage of an armored bed is its low cost. For very little money you can purchase a durable and durable model.
Buyers are also attracted by the following advantages of such a bed:
- reliability - the metal frame is very durable, which reduces the chance of breakdown and frequent repairs;
- hygiene - the material used for the base of the bed (metal) and armored mesh eliminate the risk of dust accumulation and the development of insects. The metal frame is very easy to wash and clean with abrasives. If necessary, it can be painted in any color;
- Duration of operation - the product can be used for at least twenty years. The long service life determines the demand for such furniture by government agencies, where the purchase of new beds is extremely rare;
- the affordable price attracts buyers even with very low incomes. An armored bed is an ideal option for arranging rental housing, a country house, and cabins for workers;
- strength - the product can withstand very heavy loads (up to 130 kg);
- ease of transportation - the armored bed can be easily disassembled into its component elements and transported disassembled over any distance.
The products also have disadvantages:
- a bed with armored mesh creaks very much when a sleeping person turns over on it;
- furniture of this type will not add home comfort, a touch of style and individuality to the interior. Often the paint on metal parts begins to crack, which does not add to their beauty;
- The weaving of the mesh quickly weakens and it stretches. As a result, a person lies down in bed and sinks almost to the floor;
- the “hammock” property affects the condition of the spine and can cause back problems. There are models of beds in which the legs are located not only at the edges, but also in the middle. When the mesh sag, the sleeping bed completely loses its functional load and becomes just a piece of furniture on which it is impossible to sit, not to mention a full, high-quality sleep;
- A cotton mattress (an element of a bed) is not always distinguished by quality, practicality and convenience.
As a result, we can conclude that an armored bed is just a good, budget option for a short stay.
Required tools and materials
The base with legs and partially the remains of foam rubber will be used from the old sofa. You will also need to additionally purchase a number of products:
- a plywood sheet with a thickness of at least 1.5 cm (if the condition of the legs leaves much to be desired, it is recommended to take a 4x4 cm block);
- foam rubber or padding polyester, the density of which is 3–5 cm;
- leatherette to decorate the surface;
- universal or wood glue;
- screwdriver;
- sandpaper;
- decorative nails with screws;
- ruler for measuring;
- marker;
- drill;
- scissors;
- hammer.
Shield
Self-assembly of the sofa
This method is suitable for people who do not have woodworking skills. This option is a little simpler and to implement it you need to stock up:
- two used door leaves;
- metal staples;
- wood hemp;
- foam;
- upholstery material.
Wooden version
The base and back of this sofa model will be two used wooden door leaves. You will need to first clean them of old coatings and dirt, and then treat them with a grinding machine.
Next, the doors are painted in the color of your choice, while trying to ensure that it matches the overall interior of the room in which the sofa will be installed in the future. You may prefer finishing the wooden surface with veneer.
Using nails, fasten one sash to a wooden stump of the appropriate size, and then use metal staples and glue to secure the second part (the back) to it.
After this, start making the mattress: cut out the foam rubber of the same size as the seat and cover it with thick fabric (matting is ideal for this). Already on top of this material a bright fabric of good quality will be stretched.
The main requirement is the construction of the most durable and reliable frame foundation. It bears the entire main load, and if you neglect this requirement, you can get injured during operation, and it will not last long. Based on this, you can choose a different base material that meets the requirements.
You can play with the finished design in any way you like, it all depends on your preferences and imagination.
Step-by-step instruction
After preparing the necessary tools and materials, you can safely begin the process of converting the sofa into a bed:
- First, the railings are dismantled: the sleeping place is completely unfolded and checked for integrity and stability. You should press on the corner parts of the structure and make sure they are strong.
- Mark the places where the mount in the form of legs will be installed. A tape measure is used to measure parameters.
- Additional block legs are cut off and then sanded using sandpaper. The legs are installed on screws and glued to the most reliable places in the structure.
- The length of the outer frame sides is measured. Taking into account the data obtained, strips are cut out of plywood elements, the width of which should be at least 30 cm.
- Installation of outer panels is carried out along the outer part of the base (glue and screws are used for this). To prevent the wood from accidentally cracking during screwing, it is recommended to first drill a hole, then apply glue and screw in the screw with a screwdriver.
- Several long strips are cut out of leatherette, the width of which is 5 cm greater than the outer panels. Strips of thin foam material should be 2 cm wider than the boards.
- The outer panels are glued with foam rubber. All this is decorated with leatherette. This material is attached to the lower panel part, slightly stretched and secured with staples at the top.
- Then you can proceed to the headboard: any shape is cut out of plywood.
- Wood glue is used to secure thick foam rubber to plywood.
- A piece of leatherette is cut out several centimeters larger than the dimensions of the plywood for the headboard.
- Using a furniture stapler, the decorative element is secured to the plywood back.
- Places for fastening are marked with decorative nails.
- A layer of fabric or rubber is used so that the decorative element is not damaged by nails. Using screws and a drill, the headboard is carefully attached to the sleeping area.
Features of the sofa bed
These models are in particular demand among the population. The developers, having provided for all the positive qualities of sofas and beds, received the ideal design. The piece of furniture is placed in houses where there is no place to install an ordinary bed. The design is convenient and easy to transform. When creating a sofa bed with your own hands, you work with the following tools:
- Table saw.
- Electric jigsaw.
- Drill and drill bit.
- A screwdriver.
Work on assembling furniture does not begin until the design has been thought through and the drawings have been re-examined.
Materials used
The frame of the product is represented by a structure that takes on the maximum part of the load. When assembling upholstered furniture with your own hands, the following materials are used:
- For the load-bearing part, they work with bars and boards made of pine, spruce, birch or alder.
- Panel elements and fragments that fill the frame frames are created from plywood, chipboard and fiberboard.
- Natural latex, cotton, and thermal fiber are added to the soft parts.
- Pillows and side parts are made from non-woven fabrics and layers.
- Upholstery fabrics: velor, flock, tapestry or genuine leather. When upholstering the product, use cotton or wool velor. Natural tapestry fabric washes perfectly.
Upholstered furniture assembly process
The frame can be made in any shape and size. Assembly is carried out using a screwdriver. Wood glue is applied to the joints and then reinforced with self-tapping screws. The inside of the back is left hollow. The upper and front parts are covered with mats made of foam rubber.
Cover the sofa with fabric according to pre-prepared patterns. Having covered all parts of the structure, the assembly is completed. Experts recommend sewing removable covers. The design provides for auxiliary supports and legs, thanks to which the load will be distributed evenly. It takes three days to make a sofa bed with your own hands.
Transformable sofa - its types
Types of transformable sofa
There are several types of transformable sofas:
- Book. This model is one of the simplest. By unfolding the sofa, an additional sleeping place is formed. And for convenience, springs are installed in the back.
- Eurobook. By slightly pulling the seat towards you, the sofa is conveniently unfolded, and pillows are placed on the resulting free space.
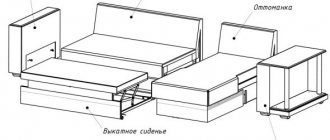
- Roll-out. The lower part is movable. As a result, a full-fledged sleeping place is extended. This model has the main drawback - rapid wear of the mechanisms.
- Dolphin sofa. This type of structure is most often made angular. When it is extended, two sleeping places are obtained. And an additional sleeping place rises from under the fixed part.
- Sofa accordion. This model is quite compact, consisting of 3 parts that unfold and fold.
Video: assembling a Eurobook on a plywood block
Video: making a Chester sofa
If you still decide to buy a sofa or have it made to order, then contact an online furniture store. On the Internet you can find inexpensive options of various shapes: both straight and angular.
Making furniture yourself
In order for you to get a beautiful ottoman, created with your own hands, you need to choose the model that suits you, create a drawing and decide on the dimensions. Don't forget to take measurements of the space where the ottoman will be located.
Prepare slabs for the frame and several wooden beams measuring 3 by 4 centimeters. After all the preparations, the assembly of the ottoman begins:
- First the parts are cut out. You will need two side, one front and one back piece. Please note: the height of the front part is lower than the back (depending on the height of the future back), and the left one should be lower than the right one.
- Assemble the parts, fastening them with screws. Attach the beams as well, leaving about a centimeter on top. Two more crossbars need to be attached in the middle of the ottoman.
- Prepare pads that secure the edges of the slab. Use glue and nails. Then comes the primer and painting of the frame (if desired, you can varnish instead of paint).
- Now it's time for the pillows. You will need three seat cushions and three back cushions. Cut the foam to the required size and make two covers for each pillow. The inner cover must be solid. For the outside, take two hemmed pieces of fabric. There should be eyelets along the edges that are tightened with lace. After this, the ottoman, created with your own hands, will be ready for use.
Tips for reupholstering
Old ottoman
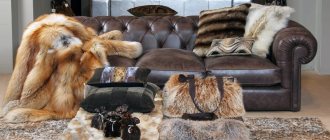
When the upholstery is frayed and worn, upholstered furniture, even quite strong ones, takes on an extremely pitiful appearance. And it’s a shame to invite guests. But you can fix this with your own hands by buying seven meters of suitable upholstery fabric and setting aside time for work.
- First you need to disassemble by removing all the overhead elements (in particular, the back).
- Then, using an anti-stapler, side cutters and a flat-head screwdriver, you need to remove the old upholstery. We try to do this as carefully as possible - after all, all these removed pieces will serve as patterns for fresh upholstery.
- Next, we look at what’s underneath: if the foam rubber or spring blocks are out of order, then they will need to be replaced. In any case, a layer of fresh foam rubber will not be superfluous.
- We ripped out the old upholstery and cut out new parts from it.
- Then we sew them where necessary.
- All that remains is to secure the fabric with a furniture stapler, avoiding distortion and pulling it well.
- Then we assemble the updated ottoman.
The following video will tell you how to reupholster an old chair, difan, sofa or, for example, ottoman with your own hands:
Next, we’ll talk about reupholstering spring sofa cushions with our own hands.
Spring cushions
The spring block of the pillow is still quite good, but the upper layers have become unusable - this happens quite often. In this case, the best option is to cover the spring block on all sides with felt, and then with three-centimeter polyurethane foam grade 4065.
If the springs fail, they will have to be replaced. However, if the price for them seems too high, you can make new pillows from the same polyurethane foam. It will be cheaper. For softness, we wrap them in padding polyester.
Old sofa with new pillows