A few decades ago it was a real problem to get a kitchen set or at least a wall. Today you can find many types of home furniture on sale, and among them there are many unique items. The step stool, which has an unusual appearance, deserves special attention.
Use in the kitchen
This is transformable furniture , a 2-in-1 product that can transform from a stool into a stepladder. Trying to understand why such a combination is necessary, it should be pointed out that a stepladder is a useful and necessary thing in any apartment. This is a tool that allows you to get to any thing you need located at a height. If you place this object in the kitchen, then there will be no need to use a stool to reach products lying on hanging cabinets.
The stool will be useful primarily for owners of small-sized kitchens or minimalist interiors. This is an object that allows you to save space. The model can be used as a stool for sitting and, if necessary, transformed into a stepladder. To do this, just one movement of your hand is enough. The number of steps, depending on the stool model, can vary from 3 to 5. The main advantages of this furniture are:
- convenience;
- ease of use;
- the ability to quickly perform various tasks.
A folding step stool is made of metal or wood. Most often you can see metal products on sale. The aluminum step stool is durable and resistant. A wooden step stool for the kitchen would also be appropriate. You can make it yourself if you have carpentry skills. Plastic stools usually do not have a transformation mechanism.
Making a simple stepladder with your own hands
If this is your first time picking up a tool to build a sliding stepladder with your own hands from wood, you need to thoroughly prepare. First of all, arm yourself with the necessary equipment: a hacksaw, a chisel, a tape measure, a pencil, drills, an electric drill, a hammer.
We determine the configuration and dimensions
The process of making a wooden stepladder with your own hands begins with a drawing, for the preparation of which you need to know the dimensions of the structure and its constituent elements. In addition, the sequence of actions is important. Therefore, strict adherence to step-by-step instructions is the key to success.
Structure height
Considering that the stepladder is used mainly in everyday life, there is no need to perform complex calculations. The optimal linear length of a ladder is recognized to be 150 – 170 cm. It is enough for a person of average height to reach from the penultimate step to the ceiling of living and utility rooms.
Determining the height of the structure
Structures of the same height are suitable for work in the garden: for harvesting fruit trees growing in your country house, or for trimming branches. Manufacturing large stepladders is irrational. They are inconvenient to handle, heavy, and require increased consumption of lumber.
Children's models
A transformable stepladder can be used to help a child quickly adapt to adult life. For example, you can move this product to the washbasin and ask your baby to stand on it. He will quickly learn to turn on the tap, wash his face and brush his teeth. In the future, he will not need adult help.
To get a toy or book from a shelf, a child can climb several steps on such a ladder. He can use the stool to help his mother get her things out of the closet or water her indoor plants. For children, it is necessary to select high-quality products that are stable and safe to use.
Features and types of wooden stepladders
A wooden stepladder has a fairly simple and uncomplicated structure. However, several characteristic features of this design can be identified:
The following types of construction can be distinguished:
- models with narrow steps,
- with wide steps
- one-sided designs,
- double sided stairs,
- models with a top platform,
- step stool,
- wooden transformable stepladder.
Benefits of a bar stool
Many residential owners place bar stools near an impromptu bar counter. They organize gatherings behind it, but the functionality of this product does not end there. It can be used as a stepladder. This piece of furniture is ideal for this, as it has the following advantages:
- durable frame;
- the optimal height of the stool, allowing you to reach the ceiling of a standard-sized apartment;
- suitable platform width, which ensures the stability of the product;
- ease of operation.
The stool frame is made of metal and is welded. The ladder is fixed on the stepladder without the use of unnecessary elements, making the maintenance process simplified and cost less. Bolt wear is not a problem. You can replace them yourself. Suitable parts can be found at any hardware store. You can sit at a bar stool while cooking on the stove. This will make the process more enjoyable and convenient.
If the apartment is undergoing renovation, you won’t have to buy an additional stepladder to get to hard-to-reach places. A transforming bar stool can easily cope with this function.
Requirements for finished products
The material used for wooden step stools must be quite durable, otherwise it will not be able to withstand the load. It is better to use wood species such as beech and oak. Birch and pine will do. The first two varieties are good, but are quite expensive, so home craftsmen resort to cheaper options. Usually they are replaced by pine boards. But when using such wood, one must take into account that it:
- tends to crumble;
- subject to rotting;
- after some time it becomes less durable and cracks.
It turns out that you have to make a choice between quality and price. If you want the finished object to last a long time, it is better to purchase boards made of high-quality wood, even if you have to overpay for them. Metal rods must be installed on the sides. This will make the structure more reliable.
Types of step stools
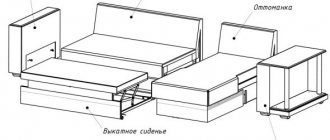
Folding designs can be different. Tall models look like large stools equipped with retractable steps. Transformable chairs with three stages are available.
Once folded, they look like regular chairs. Some modifications have a screw module. It allows you to extend the steps. The transformable staircase combines steps that are pulled out using runners for drawers.
“Transformers” differ slightly from simple chairs with backs. This is furniture that looks harmonious in any room.
Manufacturing using standard drawings
The need to use stairs is present in any home. In the absence of a stepladder, housewives have to build incredible structures from stools and chairs, which can lead to injuries. You can use a regular ladder , but a step-stool model will be more convenient. To install such an object at home, you will not need to allocate additional space. When there is no need to climb to a height, you can simply fold the product into a chair.
It is permissible to use various drawings and projects to create a folding stool with your own hands. Plywood and wood are suitable for assembling a transforming chair. These are materials that can be processed without much difficulty and are characterized by reliability, durability and long service life. You will also need:
- glue for wood manipulation;
- dowels;
- screws;
- jigsaw;
- guides (310 mm) for steps - 2 sets;
- sandpaper;
- paints and varnishes.
After preparing all the necessary materials, they begin preparing the drawings.
Drawings of wooden stepladders and instructions for making them yourself
A stepladder is a portable folding ladder - a useful device often used in everyday life and at work. Different materials can be used to make a stepladder with your own hands. The characteristics of the design, such as strength and lightness, as well as the complexity of the manufacturing process itself depend on this.
A metal stepladder is highly durable, but making it with your own hands is not easy. To do this you will need a special tool and skills in working with metal. A more suitable option that you can make yourself is a wooden stepladder. If there are no special requirements for the design (weight, appearance), then even a non-professional can create it with his own hands. Everything you need to make a stepladder chair with your own hands according to the drawings: your desire.
Element sizes
There are standard sizes, indicated in millimeters, which are used when creating a transforming staircase yourself. According to this drawing, the size of the 2 side panels located in the front is 20*270*400. The rear ones should have indicators of 20 * 325 * 850, the columns for the back of the chair - 20 * 50 * 400. The dimensions of the front seat should be 20*90*400, the rear - 20*165*400. You will need to install 3 steps and 6 slats. The steps should have dimensions of 20*120*360, and the planks should have dimensions of 20*20*95.
The transformable staircase requires such parts as side walls (280*620), seats (280*360), 2 bases with dimensions 280*320 and 200*280, 4 cross bars - 25*60*360, support bars - 2 pieces of 20*250*60, rear walls - 230*240 and side walls - 200*230.
To create the correct drawing, it is necessary to draw in detail all the main components of the product. Patterns should be prepared in accordance with the finished sketches.
DIY wooden stepladder
Before you begin manufacturing parts and installation, you need to select a staircase model and prepare a drawing.
We offer you a standard option for manufacturing such a staircase.
The whole process takes place in several stages:
- A beam with a cross section of 6x6 cm is cut into strips. You should end up with 4 strings, 2 bars to support the steps, and 2 for support.
- Two bowstrings are provided with grooves 2 cm deep and 2.5 cm high throughout. The first groove is placed 12 cm from the top, the next grooves are cut at a distance of approximately 29 cm from each other.
- 3 grooves with the same dimensions are cut in the bowstrings. Jumpers will be attached to them (bottom, top and middle of the structure).
- The upper edge of the support bars is rounded, and the lower edge is trimmed so that the ladder stands stably on the surface. Rubber is attached to the legs.
- Next, the steps are made. For them, a block 2.5 cm thick is used. Each of them is equipped with spikes 2.5 cm wide and 2 cm long on both sides.
- The assembly process begins with fixing the steps on the support posts. To achieve greater structural strength, you will need wood glue. They lubricate the spikes with it before installing them in the grooves of the bowstrings. Each tenon should fit very tightly into the groove. For convenience, you can use a hammer in this process. Finally, the steps are additionally fixed at the ends of the strings using nails.
- If boards, rather than timber, are used to make a staircase, then the attachment to the string is made not in a groove, but using steel corners.
- Next, at the top of the structure, hinges are fixed on both sides using self-tapping screws. A limiter is installed on each side to control the opening angle.
- The design can be supplemented with hooks or short pieces of pipe with a small diameter. They can be used if during work it is necessary to secure some tool, for example, insert a hammer or hang something.
Preliminary work
In accordance with the drawing, the internal outlines of the elements are cut out using a jigsaw. Next they move on to the formation of external outlines. Then cut out the outer contours. This procedure is repeated for all elements of the transformer. The end area requires sanding.
To prevent chipping under excessive loads, sharp edges are milled. Finished furniture components are connected in a certain order.
Assembly of components
Pre-assembly is required before all system components can be secured. This will ensure that the components fit together optimally. Next, the final assembly is carried out using dowels and wood glue. Any furniture with a folding mechanism has installation requirements. To assemble a transforming chair, you must adhere to the following order:
- The finished components of the side panels and back are polished and secured with self-tapping screws.
- The seats and steps are installed in the grooves of the small sidewalls in the area of the joints, fixed with glue and screws.
- Furniture parts are connected with a piano hinge.
The step stool is made a little differently. The end area is filed down to make the structure stable. This should be done at an angle of 10 degrees. Dowels connect the ends of the collets and the middle legs. The crossbars should be cut at an angle of 80 degrees. The high legs are connected with screws to the upper drawers. Combine the parts located at the top of the treads using screws. Fix the middle legs on the crossbar and install the steps.
In the case of a transforming ladder, the ends of the chair located on the side are secured and secured with self-tapping screws on the rungs. After this, fix the steps on the stool using a piano loop. If there is a screw module in the structure, the internal areas of the middle and lower tread are milled. A 38 mm hole is made in opposite areas and the leg is fixed. The remaining elements are assembled using self-tapping screws and wood glue.
How else can stepladders serve?
A wooden stepladder is an almost finished easel, a stand for painting. It can be used by both adults and children. The only difference will be in the height at which the paper is attached and the location of the shelf for paints, jars of water, etc. To secure the paper, it is advisable to equip the structure with a plywood board.
You can also make a table from one stepladder. All you need is a tabletop - a board made of chipboard or plywood. Part of the upper steps is removed, the crossbar on the support is installed flush with the highest remaining step. The shield is placed on the step and crossbar.
If you have two identical stepladders, you can make a bed and a gazebo with your own hands. In the first case, you will need a long shield to create a bench on the top of the stepladders. The lower parts can be used as tables (see above) or as the lower tier of a bed (you will need another long board). A gazebo can be made similar to a bed.
Final processing
The final stage in creating transformable furniture with your own hands consists of sanding the surface and applying protective agents. To ensure better adhesion of the latter to the wood, the parts should be carefully sanded. Next, apply latex primer to the screws. Wooden or plastic plugs that match the shade of the wooden parts can be used as plugs.
At the end of all manipulations, the structure is coated with varnish of a suitable color. It is better to do this in three layers. After each application, dry the product thoroughly. Contrasting coloring of the back and seat will improve the decorative qualities of the furniture. By following the step-by-step algorithm, you can build a transforming staircase of excellent quality with your own hands. Creating a detailed drawing greatly facilitates self-assembly.
Use of old furniture
Not everyone has the opportunity to use expensive materials. In this case, you can resort to making a step stool from old chairs. A special feature of these products is the excellent quality of the wood. Commonly used parts are made from cedar, beech or larch. That's why the finished structure has every chance to last for many years. To make such an item, you will need one functional and sturdy chair, as well as components from several other chairs. Even a soft type of stool can be used.
First, the front legs are removed, and grooves are cut out on the rear legs, stepping back 5 cm from the supporting surface. This is done with a router in order to fix the diagonal strips. It is best to equip them from fragments of old chairs. The slats are glued into the chair using the mounting grooves from the front legs. The holes on the rear support are also used. It is necessary to make a jumper between the diagonals and install the last step, which is a component of the stepladder.
To arrange the rotating part, you need to use elements of the backrest with rear legs. They are combined in pairs with the front supports that were cut off earlier. For each such pair, reinforcement is made by means of an internal spacer. The first step is installed on it. The result is the creation of a structure resembling the back of a chair, which is equipped with additional legs. They are bent at an angle of 60 degrees. The stationary and rotating parts are combined using a piano canopy, after which the step-stool can be considered ready.
Coping with the manufacture of a step-stool will not be particularly difficult for people who are familiar with carpentry. Beginners also have every chance to cope with such work, but they need to remember that all parts are connected using a “mortise-tenon” pattern. The joints must be glued. The most important parts are reinforced with corners and metal plates. In addition to the attractive appearance, the safety of the finished stool is also important.
A simple stepladder made of timber
To make a simple garden stepladder from wood with your own hands, you will need 13–14 meters of timber with a cross-section of 60×40 mm. For support posts you need 2 m beams (4 pcs.).
The following bars must be prepared for steps and crossbars:
The same markings are applied to the two support posts to which the steps will be attached. The distance between the steps is 400 mm, the first (lower) step is no less than 100 mm from the edge. According to the markings, 5 grooves with a depth of 15 mm are selected.
To assemble the main part, the support posts are placed with the grooves up and aligned. The distance between the upper ends is 400 mm, between the lower ends – 600 mm. The steps are placed in grooves and secured with self-tapping screws or nails. An additional crossbar is mounted at the top on the reverse side.
The support does not have steps, so its supports are connected by crossbars only at the bottom and at the top. The design is complemented by a jib. It is important not to make a mistake with the distance between the upper ends - it is 300 mm.
Having assembled both parts, all that remains is to connect them together. The support is installed so that its “horns” are between the top step and the additional crossbar of the main part. This design will not require fasteners at the top, and the lower ends can be moved to a suitable distance, choosing the most stable position.
In wooden stepladders, when the steps are fixed in the grooves simply with glue, knitting needles can be used to increase the reliability and strength of the structure. A metal spoke is inserted under the step (holes are pre-drilled) and secured with bolts and nuts.
To prevent the supports from moving apart, use nylon cords or metal chains. They are mounted at the same height on both sides, connecting the support to the main part.
Important! In many cases, rubber attachments on the legs are mandatory. They prevent slipping.
By creating a stepladder from wood with your own hands, you can immediately add useful elements to the structure. The upper part, for example, can be equipped with hooks on which it is convenient to hang a bucket of tools. Another option is a cutting 10–15 cm high from a pipe with a diameter of about half a meter. Attached to a stepladder, it is perfect for storing large tools.
Step-by-step manufacturing of a wooden stepladder: