Attachment methods
A small child spends a significant part of the day in his crib. Here he sleeps, looks at the world, plays with toys hanging from the crib. Therefore, his corner needs to be protected, and this can be done by placing a curtain over the crib. Then the absence of unnecessary visual stimuli with the canopy closed will allow the baby to fall asleep faster, at the same time such an elegant accessory will decorate the room. The lightweight fabric removes dust that settles on it, and not inside the crib, and is washed instantly, so maintaining the hygiene of the children's corner is not difficult at all. How to attach a canopy so that it is a barrier to excessively bright daylight, drafts, dust, and insects? Of course, with the help of the holder purchased along with the canopy.
A correctly selected canopy for a crib will not only be an elegant accessory, but will also protect the baby from external irritants while sleeping.
Before attaching the canopy over the children's bed, you should determine its exact position:
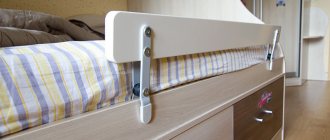
Image 1. The crib is located along one of the walls.
- if the bed is located along the length of the wall, then the fastening is placed on one of the long sides of the bed fence (see Image 1);
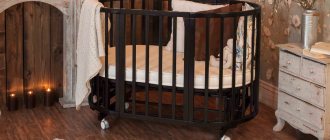
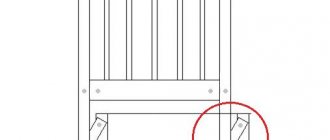
- When the crib is positioned widthwise along the room wall, the cover holder is attached to the headboard. In this case, the canopy covers the bed less, leaving more space for air to pass through (see Image 2);
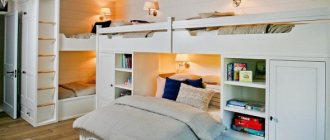
- it is possible to mount the holder on the ceiling, but with this method it will be much more difficult to move the crib to another place (see Image 3);
- The holder can be attached to the wall, which also secures the location of the crib (see Image 4).
How to assemble a canopy holder correctly
Among many parents, disputes often arise about the benefits and harms of such a simple device as a playpen canopy. Today this accessory is very common and is sold complete with almost all playpens. In terms of its functionality, the canopy is designed to protect the child from bright light, insects, and drafts. In addition, it will become a very beautiful room decor. If you want to attach the canopy not to the playpen, but to a regular bed, you will need instructions on how to do this job correctly.
If you purchase a canopy separately from the playpen, then it should include:
- racks (straight and curved);
- clamping brackets with fasteners;
- a wire ring on which the canopy is placed.
Before you start attaching the canopy, you should decide on the location of its attachment. It can be fixed both at the head and on the sides of the bed. The location of the canopy will depend on how the bed is positioned. If the long side of the bed is adjacent to the wall, then the holder should be attached to this side part. If a narrow frame is pushed up against the wall, then it is better to attach the stand to it. The mounting method will not affect the appearance.
It is better to install the canopy on the sides, since in this case it will be possible to cover the child completely. This will protect your baby from mosquitoes and other insects. To determine the required length of the holder, you need to assemble it according to the instructions to the maximum size. After that, placing it on the bed, adjust the required height.
Using clamping brackets, the lower straight part of the holder is fixed to the bed with a fastening screw, after first removing the upper part with the ring. As a rule, the ring has special hooks covered with elastic bands. In order to put on the canopy, you need to remove the elastic bands. After the fabric is put on the ring, the elastic bands are put back on. The fabric is carefully leveled over the entire ring and fixed in the upper part of the bracket. After this, you should thread the second clamp, connect the holder through the upper and lower parts and secure it. The side fasteners on the bed need to be tightened tighter.
According to the instructions, the holder is fixed with special screws, but it will be more secure to drill holes and make fasteners through them. If this is not done, the little one may pull on the canopy and be injured by broken parts.
Mounting the holder
It is easy to install the purchased ready-made holder on a baby crib on your own.
Image 2. The crib is positioned near the wall in width.
Then the junction of the bracket to the side of the crib will look like in Image 5, where: 1 – sidewall (top of the side) of the crib, 2 – fastening screw, 3 – mounting bracket, 4 – straight tube of the bracket rod, 5 – hoop connecting to the curved tube. Tools must be prepared for work:
- screwdriver;
- drill.
Materials:
- crib;
- a metal bracket consisting of two tubes, two mounting screws, two mounting brackets and a hoop;
- canopy.
Image 3. Attaching the canopy to the ceiling.
The actions are performed in this order:
- Prepare the canopy for use by washing and ironing it.
- Lay out all the parts of the metal bracket on a flat surface.
- The straight part of the rod (4) is inserted into the mounting brackets (3).
- The structure is applied to the place of the crib pre-selected for fastening and the bar is fixed to the side using screws (2).
- The holder ring (5) is threaded into the fabric drawstring (through the holes on the wrong side of the product) from both ends of the rim at once, collecting ruffles.
- The ends of the holder are placed on the wrong side of the cape so that they are covered with fabric.
- Connect the ring to the curved tube of the holder stand (5).
- The curved and straight parts of the rod are fastened together.
- Finally, all parts of the structure are aligned and its height is adjusted in relation to the crib.
The ribbons on the canopy can be tied with a bow or their ends can be left free. Now the bed can be made. If everything is done correctly, the canopy covers both the bracket and the sides, leaving space for air to enter the crib.
Attaching the holder to the ceiling
A crib canopy can be purchased at any children's store. They are often included in baby cots. Most often it can be purchased in sets along with a mattress and a pillow for a crib. In this article we will tell you how to hang a canopy.
- On a pipe with a loop
- Wall mounted
- Ceiling
Purpose of the canopy:
- Protects baby from direct sunlight
- Allows him to sleep more soundly
- The sleeping place protects from insects
- Creates the illusion of limited space
All this makes the baby's stay in the crib more comfortable and safe. Performs a purely decorative function to decorate the room.
Canopy for a boy
Nowadays there are a huge number of similar products on sale. Initially, you should decide how you want to mount the canopy and what kind of ceiling you have in your house. The most optimal models are canopies, which are sold with fastenings. They can also be purchased separately. They resemble a large diameter pipe with holes at the top.
The pipe itself is attached to the wall of the crib, and a canopy is placed on top of it, or rather on a loop. Please note that it is best to choose cribs in which the fastenings are on the longest side, that is, in length. Many crib models have a hole approximately in the middle. This option will help to completely cover the entire area of the crib.
Instructions:
- The existing structure, which consists of a pipe, must be screwed onto the bed wall using a screw
- Place a loop on top of it. There are several features and designs of such a loop.
- It can be detachable and connected in the middle with a flexible elastic band. In this case, the canopy is simply inserted onto a thick wire, like a pin
- After this, everything is held together in the center with a soft tube, an elastic band
- Can also be hung with strings. In this case, the canopy is pre-tightened in the center with a ribbon in order to create beautiful folds and narrow the product upward
- After this, you need to check how firmly the canopy is attached, whether the loop can fall out of the tube if a child accidentally pulls on it
- Some well-known companies offer canopies, the loops of which are screwed to the pipe and there is no possibility of removing it from the mounting tube
- Therefore, the design is quite reliable
Canopy standClassic holder with loop
There are other canopies that are attached directly to the narrow part of the crib. In this case, it has more of a decorative purpose than a functional one.
The most interesting thing is that such a structure can be built with your own hands from thick wire. Please note that pieces of wire should not stick out.
We suggest you read: How to hang a canopy on a children's bed
So that if the child moves around the crib, he does not get hurt.
Scheme for attaching a canopy to a loopScheme for attaching a canopyAttaching a canopy to a holderAttaching a canopy to a holderAttaching a canopy to a holderAttaching a canopy to a holderHow to decorate the place where a canopy is attached?How to decorate the place where a canopy is attached?
It is also possible to attach the canopy directly to the ceiling. This option is suitable if you have a stationary crib and you are not going to move anywhere in the near future.
Instructions:
- A cornice is attached to the ceiling, into which hooks with organza and a canopy are directly inserted, which will cover the crib
- Most often, it is possible to purchase fasteners that describe a semicircle or square. It all depends on the stylistic decision of the bedroom
- Later, when the child grows up, the canopy can be made into a cute decorative element in a girl's nursery. It can become a princess dress, a sail. It all depends on stylistic decisions
- The ceiling mounting option is suitable if it is strong enough. It is possible to embed this cornice into a concrete ceiling
- It is better not to use this option if you have plasterboard ceilings. Because a small child can pull this canopy, hang on it, get caught or touch
- In this case, you risk tearing out the cornice along with part of the ceiling, which will compromise the integrity of the structure
Canopy on the ceilingCeiling canopyAttaching a canopy to the ceilingAttaching a canopy to the ceilingHow to decorate the place where the canopy is attached?
One option to secure the canopy is to use forged products that are attached directly to the wall.
Similar products are sold in children's stores, as well as at sites with garden tools, which sell a variety of forged products. Thus, the semicircle is screwed into the wall, and a canopy is attached to it with ties.
Please ensure that the fasteners are secure and that a child cannot tear out the forged product. Because if it falls on the head, it can cause injury to the baby.
It is best if it is natural, soft fabrics such as silk, tulle or organza. You should not give preference to dense canopies that have poor air permeability.
This can cause an increase in the temperature inside the crib, which will be surrounded by a canopy, and the baby’s restless sleep.
Forged canopy on the wallWall canopyPrincess room
Remember, the main purpose of a canopy is to create the illusion of comfort, as well as protect the child from insects and dust.
How to decorate the place where the canopy is attached? How to decorate the place where the canopy is attached? How to decorate the place where the canopy is attached? How to decorate the place where the canopy is attached?
- frame;
- frame;
- cornice;
- barbell;
- holder.
The last of these are most often used for cribs; they are divided into:
- Beds. There are special models that attach directly to the crib ledges.
- Wall-mounted. Round products that are attached to vertical partitions.
- Ceiling. This variety can have a round or square shape and allows you to hang fabric of any length.
- Floor-standing. The mobile version moves freely around the room, can be taken outside, or installed above the playpen.
Homemade option
Image 4. Attaching the canopy to the wall.
You can also make a canopy for the crib yourself by attaching a simple wooden frame to the wall, over which light tulle or chiffon fabric will be draped. Then a crib is installed under such a canopy. Tools needed for work:
- drill;
- screwdriver;
- hammer;
- pencil.
Image 5. Attaching the bracket to the crib.
Materials:
- wooden beam (40×50 mm, 1 m long);
- two wooden slats (20×30 mm, 50-60 cm long);
- dowels;
- wood screws;
- fabric canopy (1.5×6 m).
Do the work:
- Mark on the wall at a height of 1 m above the headboard of the crib (in the center) a place for the bracket.
- Holes are drilled in the wall and a thick wooden beam is attached horizontally to it using dowels.
- Along the edges of the block at right angles to the wall, the slats should be secured using self-tapping screws.
- A canopy is thrown over the fixed frame, allowing the fabric to sag between the slats to balance it.
If you install a canopy on a children's bed, a space will be created under it in which the baby will be comfortable and calm. The curtain will create a small child’s own corner and will allow, even if the crib is in the parent’s bedroom, not to distract his attention to the light of the lamp and movement. Such a cozy environment will help your baby fall asleep quickly and have a restful sleep.
Beautiful protection
The technique of arranging a sleeping place with a light cape attached to the ceiling came to Europe from Ancient Persia. At some point, a person realized that on a hot summer night it was not very convenient and pleasant to protect himself from insects by covering the body directly with a cloth. This is how the first canopy was invented.
To do this, you definitely need to hang a canopy made of beautiful, cheerful fabric on it.
The canopy, fixed according to the instructions, will reliably protect the baby and give him and his parents peace, comfort and tranquility.
For centuries, this practical tool was used by both ordinary people and members of the nobility. At the same time, of course, the products placed in the royal bedchambers were distinguished by their beauty and luxury.
You can sew it yourself, but for those who are not confident in their tailoring abilities, special stores offer inexpensive kits that include the interior of the crib and a canopy.
To decorate the cornice, a lambrequin is attached to it with Velcro.
A canopy is one of those things that, in addition to an aesthetic component, also contains a purely functional component. Such things never go out of furniture fashion, they can be transformed, the demand for them may increase or decrease, but they have been and will be. Today, this interior element is returning to widespread use. However, it is intended primarily for cribs.
But it’s not enough to buy a beautiful canopy; it’s important to correctly assemble the canopy for a baby’s crib, which the instructions will help you with, and also to hang it correctly.
This is the most reliable fastening, since the screws will not become loose from the inevitable touching of them during manipulations inside the crib.
Types of cornices for canopies
If you nevertheless decide to decorate your bedroom with such a design element as a canopy, and want to make it yourself, then first of all you should decide on its appearance. You can use photos of ready-made options as a source of imagination. Here you can really find a wide variety of options for how to implement this idea.
Otherwise, you just need to have all the necessary tools at home, such as a drill, hammer, knife and sewing machine. This is enough to make a beautiful curtain that will especially decorate your room, and it will look like the bedroom of aristocrats.
You can buy elements for the curtain at any store, as they are often sold as separate elements to create a design. You can simply combine several of these products and create your one and only curtain. This method is the most practical, since buying ready-made curtains for the bed is quite expensive, and besides, they do not have a large assortment, so making your own bedroom decor is the best option.
Why is it important to choose a canopy style? Don’t think that they are all the same and that they are all equally convenient to use. Not really. There are a lot of styles. It is clear that each has its pros and cons, but you need one that will be convenient for you. The most important thing is that the fabric does not constantly move under your hands. There should be nothing stopping you from putting your baby in the crib and then picking it up from there.
Also pay attention to the length of the free edge. It should reach the legs of the crib. This is necessary so that the product can perform its role well, that is, not allow midges and dust into the crib.
You can also match the color of the canopy to the design of your room. It's good if it matches other furniture. This way you will make the nursery very cozy.
If the child’s room is very sunny, then you can choose a canopy made of medium-strength fabric. It will protect the baby from scorching rays. In moderate lighting, it is better to use a product made of lightweight material.
It’s worth noting right away that you can attach it to a crib in different ways. It all depends on the type of fastening. The installation method depends on what type of holder it is.
It is worth noting that holders can not only be different in shape, but also made of different materials - plastic or metal.
The canopy is attached to the crib using the fastening:
- mobile;
- stationary;
- made around the perimeter of the crib.
The mobile canopy holder is the most popular. This is explained by the fact that it is attached directly to the crib. Neither the walls nor the ceiling are involved in the process, so no trace remains on them. In order to preserve the appearance of the walls and ceiling, you can also purchase a mobile holder.
Another plus of this model is its lightness. It weighs little and is easy to attach. True, such a holder also has disadvantages. First of all, this is mobility. If you constantly cling to such a holder, then you can completely knock it over. A grown-up child will definitely want to pull it towards himself. This does not pose any particular danger, but is still undesirable.
Also, mobile holders do not serve a decorative function. They do not decorate anything, as they are completely hidden under the canopy.
When thinking about the textile addition to the bedroom, it is important to understand on what device the canopy will be attached. The choice of design depends on this.
An effective solution is a ceiling cornice. It is usually made of easily bendable plastic, so it can be given almost any shape. Ceiling structures installed in a suspended ceiling with lighting look especially interesting. In this case, the canvas softly frames the bed, and a light glow gives coziness to the bedroom.
Important! The ceiling cornice for a canopy can withstand even heavy fabric due to its design features.
It is very convenient to use a holder on the ceiling for zoning space, for example, if a child lives in the same room with his parents or a boy and a girl share a nursery.
We suggest you familiarize yourself with how long the refrigerator should work when first turned on and what is the cyclicity of its operation
It is important to remember that such a solution can visually reduce the size of the room, so it is used only for spacious rooms with high ceilings.
Since the time of kings, the semicircular canopy cornice has been extremely popular. It resembles a crown from which delicate folds of material hang. More often than not, the first option is used for bedroom interiors and costs much less.
If the bed is near the wall, then such a cornice will decorate it perfectly. Of course, this solution will not allow you to completely close the bed, but its decorative component is simply invaluable. The room immediately creates a cozy atmosphere with a touch of luxury.
Advice! For a small bedroom, the presence of a canopy on the wall semicircular cornice will help to visually increase the height of the ceilings.
The range of curtain rods for canopies is now so wide that you can get confused in the multitude of offers. In order to choose the right design for a bedroom, it is important to understand what material it should be made of. There are several options here:
- Plastic is a budget solution, which, although stores offer it, is rarely chosen due to its low quality characteristics. You can use a similar cornice, but only for the lightest fabrics at the head of the bed.
Advice! You can hide the design of a plastic cornice by adding a lambrequin to it.
- Tree. You can get amazingly beautiful design solutions if you choose carved varieties of canopy cornices. Semicircular wall structures made of precious wood inlaid with shining stones will add sophistication and solemnity to the bedroom. And for minimalist designs there is a solution - laconic options without unnecessary decor, complemented by metal elements.
- Metal is the heaviest curtain rods, requiring thoughtful installation and reinforced fastening. Suitable not only for light tulle and muslin, but also for draped heavy curtains. Forged, bronze, aluminum pieces - the range is truly amazing in variety. You can easily choose any pattern that suits a certain interior style. If desired, the design can be made to order.
An additional decoration for the cornice will be painting, creating an aged effect, or combining it with other materials. Long service life, magnificent appearance, strength - these are the qualities that wall curtain rods for canopies made of metal have.
Important! The integrity of the stylistic concept of the interior depends on the correct selection of material and design.
For a children's room, the canopy plays an even more important role than for an adult bedroom. It not only decorates it with its presence, but also allows you to fence off the child’s personal space. The choice of cornice and fabric for a canopy in a nursery should be taken more seriously and pay attention to some tips:
- If the canopy will serve only a decorative role, then it is better to choose a short canopy framing the crib. Otherwise, a long model is selected.
- It is better to purchase products made from practical fabrics that are easy to care for.
- Hypoallergenicity is important, since most children are very sensitive to materials.
Strong fixation of the canopy on the wall is very convenient due to its functional component. If possible, it is better to opt for it, so that the decorated crib looks as organic as possible in the bedroom. In addition, an active baby will never break or drop a curtain rod tightly attached to the wall.
Now you can decorate a nursery with a canopy not only for a girl, but also for a boy. When choosing an option for a boy, the canopy material can resemble camouflage or look like a ship’s sail. This will make it easy to please young adventurers.
Studio apartments that are now fashionable require additional zoning so that zones with different functionalities do not coincide with each other. Installing a canopy will help with this perfectly.
To separate, for example, a bed from a common living room, it is not necessary to install partitions; it is enough to fix a cornice on the wall and hang a curtain on it, acting as a canopy. This will create that very cozy space where you can relax without worrying that the light or the presence of household members will annoy you.
The main criteria when choosing a cornice for a studio apartment are:
- strength;
- practicality;
- ease of care;
- the ability to place a canvas made of the selected material;
- simple fastenings for fabric;
- design suitable for the style of the room.
In bedrooms of various styles today it is possible to see a wall canopy framing the head of the bed. The variety of solutions is great, so you can take ideas from photographs for yourself and bring them to life in an apartment or private house.
It is not necessary to buy a holding device and the canopy itself for the bedroom. If you want to save some free time, you can try to do it yourself. To do this, you will first need to prepare the necessary materials:
- hollow metal pipe or profile;
- steel screws with dowels;
- tools: drill, screwdriver, tape measure, pencil, screwdriver, grinder, sewing needles;
- canopy material.
Let's start with sewing the canvas itself. First of all, you will need to take measurements. To do this, calculate the perimeter of the bed and add a certain amount of textiles to the sides so that it hangs beautifully on the sides.
Advice! It is better to take a larger supply and then arrange the excess with tiebacks than to receive a short product.
The sewing algorithm is as follows:
- Cut the fabric according to the selected design.
- Processing the edges of the canvas on a machine.
- Forming loops on the top of the canopy for attachment to the cornice. It is best to make them with Velcro or in the form of ties for ease of removal.
- Decorating the product as desired and depending on the project.
After finishing sewing the canvas, it’s time to start making a cornice for it. We will consider a wall-mounted version of the arc type. To do this, the pipe or profile is cut to the required length and shaped into a semicircle. At the same time, its ends are bent in order to subsequently install it with their emphasis on the wall.
Frame over the bed
In fact, a canopy is a canopy over a bed made of light and transparent fabric. Previously, it had a practical purpose, as protection from drafts, mosquitoes and other insects. In addition, this attribute was used as a luxury item, since a four-poster bed was considered a mandatory attribute of nobles or rich people.
We suggest you familiarize yourself with How to glue moldings on a wall. How to glue moldings with wallpaper to the wall: step-by-step instructions
In modern design, other than privacy, it has no practical function. Most likely, this is a decorative design element. Of course, if the owners of the house do not use a fumigator or other means to protect against insects, then this design element will be practical, but this happens extremely rarely.
If you want to add variety to your design with a bed curtain, then you can do it in many ways, the most important thing is that the new element fits nicely into the existing interior.
The most common way to create a canopy for an adult bed with your own hands is a frame. It can be attached to the bed itself or have an independent base. This type of frame is the most stable and simplest method. You can use simple curtains as a curtain.
You can make a frame from metal pipes or wood. The design is as simple as possible, four vertical posts and four horizontal ones for the top of the frame. The simplest and most reliable version of the frame is the one that is attached to furniture.
In addition, you can make the canopy temporary using this design if it is collapsible. This is the most practical option, since in this case you can simply create the appropriate atmosphere in the bedroom at will.
Frame making
It is more difficult to make a frame for a canopy. It can be ordered from a forging workshop, but you can make the device yourself. You will need the following tools:
- hammer drill with SDS chuck;
- pobedit drills 5x100;
- cordless screwdriver;
- Phillips bits, screwdriver;
- level, tape measure, pencil.
To do this, bend a metal rod in a semicircle (or U-shape) and attach the rings to it. Then the rod is attached to the wall at both ends or mounted on vertical supports.
The frame of the canopy can be made of wood. In this case, it is necessary to attach a thick beam to the wall. Wooden slats are mounted along its edges perpendicular to the wall. For this design you need fabric that is as light as possible. It is thrown onto the frame with some sagging between the slats.
You can also attach the canopy holder to the ceiling. The design uses slats and strings to hang fabric. The device is finished with wood or plasterboard. An antique canopy holder is often installed. Supports are placed along the edges of the crib, allowing the structure to be strengthened and a variety of fabrics to be used. More elegant supports are also installed - forged or metal.
You can assemble a canopy for a crib in different ways. It may be stitched in a different way and require different hanging devices. These can be a kind of string-ties with which it is tied to a metal oval. There is an option in which the canopy is simply thrown over a metal oval.
There are ready-made canopy cribs for newborns on sale. All elements in them are selected in the same style. There is no need to select the color and texture of the fastenings to the crib itself.
Historical reference
The history of the appearance of canopies goes back to the Ancient East (Ancient Persia), when these structures played the role of an umbrella that saved from the heat. They were primarily used by members of the nobility, including kings.
Later, the canopy was used in the bedroom as a curtain, protecting sleep from insects and drafts. At that time, people began to order such handmade fabrics made from fairly dense fabrics (velvet, satin), decorated with embroidery and precious stones.
READ MORE: How to insert a file into a jigsaw How to insert it into a manual model and into a jigsaw Types and features of blade holders
MK for making a canopy
Sewing a canopy is quite simple, especially following the master class, which explains all stages of the work step by step.
4) Several meters of fabric for the main part;
5) Narrow multi-colored fabric;
6) Lace, ribbons.
Step-by-step instruction:
1) By analogy with the diagram presented above, draw your own pattern of the desired size on paper. Next, take the main fabric and cut it in half.
2) Then we stack the blanks on top of each other so that the front side is on the inside. We lay the pattern on one side and outline the contours. Next, cut off the rounding marked in the diagram.
3) We sew the long side together on a sewing machine, leaving about 30 cm open on the top side. Don't forget to baste the edges.
4) On the top of the workpiece, mark two lines at a distance of 5 and 20 cm from the edge. Then, using a needle and thread, we gather the upper edges of the fabric so that their length is 1 m.
5) Cut the decorative fabric into two parts, processing the cuts on all sides. Sew the sections along the marked stripes, making a hem. It's better to sew on a typewriter.
The canopy is ready! All that remains is to pull it onto the mount and spread it beautifully on the bed.
Taking this scheme as a basis, you can make a variety of canopies using various decorative elements. Some possible options are shown in the photo below.