A soft and pleasant blanket adds warming coziness, it gives sweet dreams and comfort. This practical product will not only warm you up in severe frost, but will also decorate the interior of any home. By choosing the right color you can get a stylish decorative element; the blanket is also perfect for walking with your baby in the winter. By placing it in the nursery, we get a wonderful place for a child where he can play in warmth and comfort. Thanks to the variety of models, you can choose a blanket for both children and adults.
Bonbon blanket: description of sewing
It is classified as one of the types of patchwork quilts, which is distinguished by its special sewing technique. An unusual manufacturing method turns an ordinary household item into a charming and airy creation that decorates the interior. The original idea of tailoring is that its components are small pillows or ottomans of the same or different colors.
This unique blanket, reminiscent of a cluster of clouds, will look great in a child's room. Based on the general atmosphere, you can choose delicate and soft shades, or you can choose bright and colorful ones. Cream and pink tones are reminiscent of sweet treats, such colors would be appropriate in the room of a little princess. Adults will also like this unusual bedspread, because its light and weightless structure will not leave anyone indifferent. It is called by many names: bombon, fluffy, ottoman blanket, or bonbon. Sewing it yourself will require some effort, but the finished product is definitely worth the time spent.
Sewing a bombon blanket
For this procedure you will need some tools and, of course, fabric:
- material for the base on which the pads will be sewn (any one will do, even old ones, since it will not be visible);
- fabric for the miniature pillows themselves, one or different colors;
- filler, holofiber, comforter or synthetic winterizer are suitable;
- threads of a suitable shade;
- sharp scissors;
- sewing machine
- a simple pencil or chalk;
- long ruler.
We sew a bombon blanket with our own hands
When planning a day off, it would be a good decision to spend it...
Hobby How to make cat ears with your own hands: step-by-step instructions and recommendations
Cat ears are an indispensable part of some costumes for a carnival, children's matinee or adult themed party. Modern stores provide a wide selection of costumes. However, in some cases...
Hobby How to make a paper crane with your own hands: step-by-step instructions
Origami has long ceased to be just a form of handicraft. This is art, an outlet, a way of understanding yourself and the world around you. It takes your breath away when you see how an ordinary sheet of paper in the skillful hands of a master turns into a...
Fashion How to sew a sundress for the summer with your own hands: step-by-step instructions
Despite the fact that modern shopping centers, markets and fashion boutiques are overflowing with various women's clothing, it often happens that it is impossible to buy a thing that fits well on the figure, is made of quality...
Cars How to change brushes on a generator with your own hands - step-by-step instructions and recommendations
Alternator brushes are one of the important elements that are needed for the proper operation of any vehicle. Thanks to these components, the current is redirected through the circuit. If there are no brushes...
Home comfort How and how to repair a crack in a brick wall at home with your own hands? Step-by-step instructions and recommendations
Many owners of brick country houses face such a problem as cracks in the walls. Of course, such defects need to be eliminated as quickly as possible. Cracks in the walls not only spoil the appearance of the house, but...
Home comfort Floor heating: how to do it yourself? Step-by-step instructions and tips
Warm floors cannot be called an achievement of modern technology; such systems were installed back in ancient Roman times. This has been repeatedly confirmed by excavations. Russia is a country where the climate is quite harsh, ...
Home comfort How to make a stove from disks with your own hands: step-by-step instructions. Stove for a cauldron
Many craftsmen today make wood-burning stoves and boilers using thick-walled pipes. But sometimes such products become too expensive, while several old discs may be on hand...
Preparing for sewing and choosing fabric
The first thing you need to do is decide on the shape of the blanket. It can be square or rectangular. The side of the squares should not be very large - from 10 to 35 cm; larger ones do not look so beautiful. It is worth remembering that the base must be made larger than the size of the top material for the pads. You should choose a fabric that is pleasant to the body; for an adult’s bedroom, silk or satin is suitable, and for a child it is better to choose cotton, linen, calico or chintz. If you have a lot of scraps of different fabrics, they will make a colorful and unusual blanket.
Making a bombon blanket: sequential stitching
In this master class we will look at sewing a baby blanket. For it you will need to cut 80 squares with a side of 17 cm, eight pieces will be placed in width, and 10 in length.
Bedspread from "ottomans"
We will need:
- cotton (we have 3 colors);
- cotton to create the wrong side of a blanket measuring 100 by 120 cm;
- piece of fabric for edging 100 by 120 cm;
- holofiber 700-1000 grams;
- threads;
- tape measure;
- scissors;
- fabric marker or pencil;
- sewing machine.
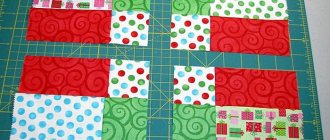
Let's start sewing. Since we are using three colors of fabric, it is necessary to create a color scheme.
For the intended arrangement of squares and a given size, we cut out and cut out 80 square elements with sides of 17 cm.
We sew the parts together in rows, observing the colors as indicated in the diagram. Be sure to iron the seams. In the first strip we iron the seams to the right, in the second to the left and so on, alternating the direction. This technique will make further work with fabric details easier.
Read this: How to make a fly agaric hat for a themed party
We draw the fabric for attaching the squares with a marker into squares with sides of 11 cm. You should get a rectangle of 8 by 10 squares. It is important to leave 1 centimeter between the squares for allowances and seams.
We draw about 4 centimeters along the perimeter of the workpiece to frame the blanket with edging.
We pin the square blanks onto the lined base, forming folds. Carefully, following the lines of the base, sew the top of the squares, and then the side seams.
It is very important that the lower part of the element folds with the main one at the place where the allowance strip ends. Note! Not by the square, but by the allowance.
We form the folds as you like - longitudinal or transverse. We sew the side seams strictly in the middle of the line between the squares.
Forming folds at the bottom of the squares, we fill the resulting bags with holofiber. It should be enough to make circles that will not “fall” if you press on them. However, there should not be too much filling, as the blanket will press.
Read this: Master class on a stocking doll using a special technique
We form folds at the bottom of the squares, cut them with a basting needle and sew them together. To make it easier to stitch the stripes, you should mark with needles so that all the seams match.
For the next strip of squares, we repeat the sewing sequence: fold the side seams into pleats, stitch; fill with insulation, form a fold, baste, stitch. And so on.
We repeat row after row.
This is the base of the bedspread:
The standard solution in this situation would be to sew on the back side of the blanket so as to hide the working seams. However, we offer another, more interesting solution.
We fold the fabric face up with the base of the blanket and stitch it. We do not sew the blanket at the bottom - through this hole we will turn the blanket inside out and stitch it with a hidden seam.
Carefully steam the blanket on the flat side, but do not iron it. The bombon blanket is ready.
Sewing with this technique makes it possible to create not only children's blankets or bedspreads. Using the same method, you can sew a pillow into a set. The set will look very cute in a newborn’s crib and can be a very original gift for the birth of a child or a baby’s baptism. A smaller blanket will look really nice in the stroller.
Read this: How to Alter Jeans into a Skirt: Simple Alterations
It will be beautiful and practical to create a complete set for a newborn’s crib. This technique allows you to create sides according to the size of the crib. Due to the bombons, the side is wide in thickness and, of course, soft. The child will not be hurt if he falls; the bombons will not allow him to hit the wooden slats of the crib.
As decoration, you can sew matching pillow toys.
We hope that the technology is clear, which means that you can safely change the size of both the blanket itself and its elements. This blanket will warm not only babies, but also older children.
Using the bombon technique, you can create children's toys, for example, this rug for the development and play of a baby. It’s quite simple to sew arcs using thick wire, foam rubber and fabric and attach them to a pom-pom base. You can attach loops to the arches. You can not make any fastenings, but simply use it as a play mat for a baby.