How to sew a patchwork quilt with your own hands
Tools and materials
- First, we will need many different colored pieces of fabric. It is advisable to select natural materials, with approximately the same thickness and texture, and quite dense. Cotton, linen or chintz work well. If you don’t want to bother with them, cutting out the necessary squares from scraps, you can purchase a set of fabrics for patchwork at any sewing store in your city. It will be much easier to work with them.
- Secondly, in addition to the scraps themselves for the front side, you will need a large thick canvas as a base - it will be the wrong side of our product. It is needed to hide the ugly seams and joints on the left side of the part that is made from scraps of fabric.
- Also, for a neat and high-quality finishing of the edges of the finished product, you will need a beautiful border in color. You can use strips of fabric about 10 cm wide as it.
- You will also need filler materials. A padding polyester or something like it will do.
- But the equipment used is undoubtedly a sewing machine. The simplest one will do, so that a novice seamstress can easily handle it.
- Iron.
- Among the small, but no less important tools, you need a seam ripper for cutting even, clear squares and rectangles. It will work much better here than scissors.
- Although you will also need scissors. Moreover, it is advisable to have 2 pairs. One is larger, for cutting out appliqués, and the other is smaller, for smaller details and processing protruding threads in the finished product.
- Pins and various needles, and you will need quite a lot of them.
- Multi-colored threads, in accordance with the specific colors of the fabrics. You can choose a shade that matches or contrasts with the color of the fabric.
DIY patchwork quilt: diagrams
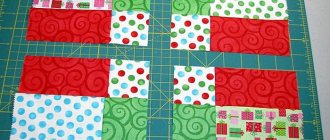
As a rule, fabrics using the patchwork technique are made according to certain patterns; there are many of them. Here, for example, is one of these. It is simple, but it looks quite interesting and at the same time simple, it will fit well into the bright interior of a nursery.
It is necessary to give a little explanation to this diagram.
Capital Latin letters here indicate the “type” of fabric, that is, its certain color, which will be repeated from element to element . That is, parts painted in the same color on the diagram and marked with the same letters must be cut from the same fabric. Of course, this condition does not have to be fulfilled unquestioningly; it may be better to swap some details for a more holistic composition and combination of colors.
It is important to consider the principle of color selection. Colors that are either very similar, related to the same shade, or, on the contrary, contrasting, such as green and red, yellow and blue, will look good next to each other. In addition to color combinations , it is important to consider the patterns on the fabrics used. You should not combine several patches with large, heavy ornaments next to each other. It’s better to have more solid colors or colors with light stains.
The number of centimeters indicated in the diagram is the width of the part, the height of each of them is the same - 22 cm. Moreover, all dimensions are indicated taking into account allowances, which are approximately 1.5–2 cm on each side.
Patchwork technology
Styles
Even at the stage of conceiving and planning the future patchwork product, it is necessary to think about its size, as well as the style in which the work will be performed. This is very important, as there may be a conflict of patterns and textures. Patchwork products are most often suitable for rooms made in Provence, country or Scandinavian style, but with the right selection of colors, material and ornament, such a patchwork blanket can successfully fit into the style of minimalism and hi-tech.
Today, there are a wide variety of trends and themes in the design and production of patchwork blankets. As a rule, each style adheres to a specific idea and color scheme.
Mainly classic, oriental, non-standard and knitted styles are distinguished.
Classical
In the classical direction, it is necessary to maintain clarity of forms and a calm, and even in some details, a conservative approach to the choice of color. There is no great emotionality and a riot of shades and colors here; very often this is a combination of 2 to 5 colors no more. As a rule, the shapes of the flaps are square or triangular.
Non-standard
In a non-standard or crazy direction, there is a whole variety of ideas, as well as an abundance of decorative elements. The flaps can be of different shapes and sizes; beads, seed beads or buttons are often sewn on. It may seem that this is a rather chaotically made product without observing the rules of color compatibility, but often with the help of decorative elements a general idea or pattern is visible.
For example, for a little boy in a crib, an excellent solution would be to make a patchwork quilt in a nautical style, where blue-green shades will dominate, and the shape of an anchor, maybe even a ship, will be visible. It is always interesting for a child to look at such a bedspread, as well as touch the sewn buttons or decorative knots.
You can also make a “rustic” patchwork fabric in this style. It is sometimes distinguished by the incompatibility of colors or the dominance of green, earthy or red-burgundy shades. Moreover, the pattern on the flaps themselves can be either ordinary peas or “Indian cucumber”.
Oriental
The eastern direction in the patchwork style is due to the presence of more refined fabrics (silk, satin), and also has some similarities with the classical direction. Here you can find golden, ocher, silver and metallic shades. There is also the presence of fringe along the entire perimeter of the edge or tassels at the corners.
As for the ornament, small details and a fine pattern on the fabric itself predominate. Most often, not only blankets are made in this style, but also napkins and pillows. They complement the interior very beautifully, making it more refined and sophisticated.
Knitted
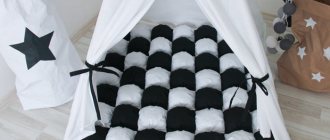
Knitted patchwork is a very original style, as it combines simplicity of shape and softness of texture. Craftswomen who know how to knit and crochet advise using a thread made of acrylic and wool, half mixed with each other, and also that it be of the same thickness. This product is easy to use and clean. It will be very voluminous and warm.
Patchwork quilt: master class
This master class describes the sequence of actions for making a bedspread according to simple patterns, such as ours. For more unusual variations containing irregular figures and polygons, a slightly different technique is used. Also, in addition to the traditional method described here, other types of patchwork are known, for example, the double-sided technique.
- Before starting work, you need to prepare the necessary materials. In our case, this is fabric. You need to smooth it out and start cutting out rectangles. For convenience, it is better to first make markings with chalk: draw rectangles according to the given dimensions, and inside it - a smaller rectangle, taking into account allowances (step back 1.5 cm inward on each side and draw new lines).
- Cut out the details along the outer lines. If you are creating a project from leftover fabric scraps, you may need to figure out how best to arrange the pieces several times so that you don't find yourself missing a particular color of fabric. If, however, there is not enough fabric, the missing scraps can, of course, be replaced with a similar fabric or even an element from a different type of fabric.
- When all the parts are cut out and ready for further work, you can begin to connect them. You need to sew fabrics strictly in accordance with the diagram; here it is better to be more careful and connect all the parts consistently and correctly so that you don’t have to redo anything later. You need to start with any 2 parts, pin them together and sew a seam along the lines of the inner rectangle so that there are allowances. Thus, the first 2 parts are connected. Let's smooth out what happened. Then we add a few more to them, thereby building a strip of several (in our case, seven) elements. Each of the seams will need to be smoothed, it is best to do this on 2 sides.
- Each such strip will correspond to 1 horizontal stripe in our diagram. In this way we make all the remaining (in this diagram - only 5) strips. Then all that remains is to sew them together and the front part of our blanket is ready!
- Now let's move on to preparing the remaining parts of our bedspread. You need to sew together the back part of the blanket (base fabric) and the insulation. And then connect them to the front part. Do this with pins first and then stitch around the edge. To ensure that all parts are connected tightly, the blanket must be quilted along all the seams of the connection and along its perimeter. Then trim off all excess fabric and insulation.
- To make the edges of the finished blanket look neater, cover it with a strip of plain fabric on each of the 4 sides. The total width of the strip is 10 cm. 2 cm for the allowance on each side and 3 cm for the visible part of the frame. Pin the border to the product and sew on 4 sides.
- All that remains is to remove the protruding threads and minor defects, the patchwork bedspread made according to our master class is ready!
If everything is done carefully and soundly , it should turn out very beautiful, as in the photographs below. Well, if everything didn’t work out the first time, then don’t be upset, because you will definitely succeed the next time, you just need practice.
After completing several works using the patchwork technique , you will develop a skill, and soon you will be able to create a wide variety of products - not only blankets and pillows, both with and without their help, but also create patterns for patchwork yourself. In addition, you will have the opportunity to experiment with fabrics; you can use, for example, denim or knitwear. On the Internet you can find a huge number of master classes on a wide variety of products that can be sewn from scraps of fabric. Try more complex patterns if you feel like you've already mastered proper quilting techniques as a beginner.
The process of making a quilt
Working technology step by step
The main stages of making patchwork bedspreads with your own hands:
- drawing a sketch;
- choice of material;
- stitching flaps;
- formation of the finished product;
- Drawing a sketch.
The most important part of the process, because the appearance of the product depends on it. You can draw a sketch on paper, take it from the Internet, or lay it out on the floor from fragments, following the patchwork style. Many ideas on how to sew a bedspread are available in master classes, which greatly simplifies the creation process.
Material selection
Choosing fabrics to match is not easy, but it is very important. The appearance of the bedspread depends on this. In this matter, it is worth relying on the taste preferences of the craftswoman. For two-color products, the only choice rule is dark and light colors. With multi-colored bedspreads the situation is more complicated. Colored fragments should be sewn not in disorderly chaos, but by laying out a pattern, based on existing patchwork patterns.
Technique of stitching flaps
The sequence of actions when stitching fragments is as follows:
- You need to cut two equal strips from textiles of different colors.
- They are folded inside out to each other, stitched, and ironed.
- Now from the textile of the third shade you need to cut a strip equal in width to the first two.
- The third and first two are folded right sides together and stitched.
This technology allows you to make a double-sided sleeve, from which squares are then cut. Next, you need to decide on the pattern, and then you can start connecting.
Fragments of a certain shape are sewn together in pairs if the pattern is complex. Then you should connect 4, 8, and so on until the composition is complete. If the bedspread is made of squares, the joining technology is slightly different. Square blanks are sewn into strips, and after carefully ironing the seams, they are assembled into a finished patchwork product.
Formation of the finished product
When the front part is ready, you should start sewing the back side. To do this, a piece of selected fabric is laid out on any flat surface, face down. If the bedspread is insulated, then a layer of synthetic padding should be placed on the reverse side.
The front side with a patchwork pattern is placed on top, and the product is stitched around the perimeter. The edging is made from a strip of fabric approximately 8 cm long, sewn along the edge. If the edging according to the sketch is wide, then more fabric is needed to make it.