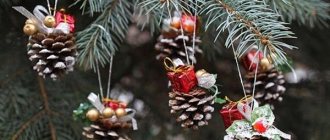
Before the New Year holidays, there is an incredible desire to decorate the house, decorate the Christmas tree, and make beautiful gifts. To bring your ideas to life, it is proposed to make Christmas tree balls with your own hands - such original crafts will become worthy toys for the New Year's tree. They are much better than factory products, as they contain a particle of human thought and warmth.
On this topic:
Beautiful DIY decorations - Christmas tree decorations in...
Oct 27, 2018
We make original Christmas tree decorations from pumpkin seeds -...
Oct 26, 2018
Christmas decorations from tape reels - we make beautiful things from...
Oct 25, 2018
Christmas tree toy Snowman made of papier-mâché - master class
Oct 24, 2018
BACK FORWARD 1 of 4
How to make a Christmas tree ball from ribbons?
Over the past few years, a new handicraft art, kanzashi, has come into fashion. This technique involves the use of satin ribbons and scraps of fabric to make a variety of crafts. The Kanzashi Christmas ball is an elegant and stylish toy that brightly decorates the New Year tree. This technique seems complicated to many, but by choosing an easy master class, you can create a masterpiece yourself.
To work, you will need a foam ball with a diameter of 7 cm, and satin ribbons cut into pieces are also needed. The size and number of ribbons are as follows: light satin lilac ribbon 2.5 cm wide – 5 cm pieces, 40 pieces; purple ribbon 2.5 cm wide – 5 cm pieces, 40 pieces. You will also need 1 square of purple ribbon 5 cm. You need to purchase small pins and nails at a craft or stationery store.
The process of making a kanzashi Christmas ball looks like this:
- Take a square of purple ribbon and pin it in the center of the ball.
- Now we begin to form the product: we bend the corners of each segment inward to form an isosceles triangle.
- Apply 4 triangles of purple ribbon with the top to the center, around the square. Each part must be secured with nails on both sides.
- The Christmas ball craft begins to take on original shape when layers of colors alternate: it is necessary to decorate the entire foam base, changing colors one after another.
- When the entire blank is filled, you need to attach a loop for the Christmas tree. To do this, you need to take 20 cm of thin tape and glue it to the ball using hot glue.
To make the finished craft look more like a cone, you can use brown ribbons and make a loop from green ribbon.
Even a child can make handmade Christmas balls using the kanzashi technique. The products are bright, original and at the same time delicate.
On this topic:
Homemade Christmas tree decorations made of beads
Dec 22, 2017
Classics of the genre or simple but charming Christmas tree...
Dec 22, 2017
BACK FORWARD 1 of 4
Painting the Christmas ball with paints
Another simple option for decorating crafts is painting with colored paints. Beginners and those who have never made Christmas balls with their own hands can cope with this task. The essence of the technique is to first apply a sketch to the toy and then color it.
To work, you will need the ball itself - it is better to take plastic options of a suitable color, thin brushes and acrylic paints. If you already have experience in this technique, you can use ready-made acrylic contours with attachments instead of paints.
Since the craft is dedicated to the New Year, it is better to choose a thematic design for it. These can be images of birds, holiday candles and wreaths, bears, deer, characters from a fairy tale.
Having prepared all the materials, you can start painting Christmas balls with your own hands:
- In this master class we will talk about the winter landscape. First, the base is primed - for this a light blue background is used, as a symbol of a snowy winter. After decorating the background, you need to wait for it to dry for 10 minutes.
- Using brown color, we draw a house and tree trunks.
- We use green acrylic to decorate the thick branches of the Christmas trees.
- Yellow color is necessary for drawing light in the windows of the house.
- Using white color, we decorate the snowy details - the roof of the house, the tops of the trees.
So the DIY painted Christmas balls are ready: the master class completes the finishing of the toy with small white sparkles - it will be snow. You can safely try on your finished holiday craft on the Christmas tree.
VIDEO: Snow balls
We offer you a master class on making an accessory, without which it is simply impossible to imagine the New Year holidays. We will make a glass snow globe - a decoration that is always liked by both adults and children.
These snow balls are simply mesmerizing. Once you shake them, it seems as if something magical is happening. Beautiful flakes slowly swirl behind the glass, as if there is a whole snowy world in your palms.
Of course, these traditional New Year's souvenirs are not difficult to find on the eve of the holiday. But it’s much more pleasant (and, by the way, much cheaper) to make them yourself. At some point you will even feel like a wizard!
What do we need?
- transparent glass jar
- water (it’s better to take distilled water so that it doesn’t “go rotten”)
- glycerol
- white glitter
- small figurine for the base
Progress
- Glue a figurine to the back of the lid (Christmas tree, snowman, birds - to your taste).
- Mix water with glycerin in a ratio of one to three and fill the jar to the very top.
- Add glitter.
- Carefully coat the edges of the lid with glue and screw the jar on.
- All that remains is to tie a beautiful ribbon around the neck and turn the jar over.
- The magic begins!
Tip: if the neck and, accordingly, the lid are too narrow, glue the figurine directly to the bottom of the jar. To do this, drop glue not on the bottom, but on the figure and fix it inside.
We offer you some ideas for inspiration.
Please note that even the simplest jars look very beautiful. You don't have to look for a round or grooved patterned container - a regular quart jar will also work for making a snow globe. In this case, you just need to choose a larger figure.
Magic is always present in our lives, you just need to believe in it. Take, for example, a New Year's snow globe filled with liquid, by shaking which you can watch for a while how snowflakes dance merrily inside it, isn't that magic?! Did you know that you can make such a ball yourself, from a simple jar with a screw-on lid. So, the topic of today’s article is: “How to make a snow globe with your own hands.”
The snow globe was first presented in 1889 at the Paris Exhibition; it was small, about the size of a palm, and inside it was a miniature copy of the Eiffel Tower. The ball was filled with water, and the role of snowflakes was played by crumbled porcelain and sifted sand.
Making a ball using a crochet hook and yarn
When looking for options for unusual Christmas tree decorations, you should pay attention to crafts made from yarn. Knitting such a product with knitting needles is not very convenient, but a crochet hook will do the job perfectly. It will help you knit small loops and create a structural pattern. Crocheted Christmas balls will harmoniously live on the New Year's tree all holidays.
To work, you will need knitting skills with this tool and the ability to read schematic symbols. It is important to select in advance the appropriate pattern, thin threads, such as “Iris”, as well as a balloon, PVA glue and a brush. To decorate the loop you will need an organza ribbon. Having learned how to make such toys, in the future you can decorate Christmas balls and sell them.
The master class consists of simple steps:
- knitting the ball according to the pattern;
- inserting an inflatable balloon inside and filling it with air;
- coating the yarn blank with a brush and PVA glue.
The final stage of making crocheted Christmas balls is to pierce the air auxiliary ball. After this, you are left with a durable and beautiful Christmas tree toy in your hands. To complete it, you need to cut 50 cm of organza ribbon and carefully tie a bow with a loop so that the product has a place for fastening.
On this topic:
Charming DIY Christmas tree decorations made from salted...
A detailed master class on making Christmas tree decorations from…
Making Christmas tree decorations from polymer clay
We decorate the street Christmas tree with handmade toys
BACK FORWARD 1 of 3
To add originality to your DIY Christmas tree balls, you can diversify the master class by adding bright colors to your knitting. For example, red, yellow and green threads on a product look individual and stylish.
How to make a snow globe at home.
To recreate this magical item you need to prepare:
- A jar with a screw-on lid, it is better to select a small container (ideally it is better to use a rounded vessel, but it is also quite possible to use a regular elongated jar);
- A plastic figurine or even several tiny plastic figurines;
- Glue gun or waterproof glue;
- Artificial snow and several shades of glitter (you can use glitter for nails);
- Glycerin (sold in pharmacies, inexpensive);
- Clean, filtered water.
Master class: how to make a snow globe.
We remove the lid from the jar and glue a pre-selected figure onto the inside of it with a glue gun. To make the composition inside the jar look impressive, you can use many different small objects: houses, Christmas trees, benches, bushes, etc. This point, in fact, will largely depend on your imagination. In this example, the figure of Queen Elsa from the cartoon “Frozen” was used.
Pour water into a clean jar, and add glycerin here (you can even pour out the entire bottle). The more glycerin you add, the smoother the snowflakes and sparkles will swirl.
We also add the prepared glitter into the jar, do not add too much, everything should be in moderation, first add half a teaspoon of each shade of prepared glitter to the water, then you can add more if you think that this is not enough. Instead of glitter, you can add artificial snow to the water.
Close the jar with a lid with a glued figurine, and to prevent water from leaking during use, we recommend pre-treating the inside of the lid with glue.
The snow globe is ready, shake it and enjoy the snowfall raging inside it.
DIY snow globes, photo.
Below are various variations of snow globes made with your own hands, pay attention to all sorts of spectacular compositions inside them, perhaps you will like some of them and you will try to make a similar snow globe.
How to make a snow globe with your own hands:
Today we showed you how to make a snow globe, the process of creating it is absolutely not complicated, and the result is very impressive. The snowflakes dancing inside it calm you down, immersing you in bright thoughts and dreams. In addition, children should like such a ball; try making it together with your child, he will definitely be delighted. Moreover, the entire process of creating such a ball can be completely entrusted to the child, he will cope, you will only have to watch from the side how your child deftly copes with the task.
A fascinating and magical holiday. At this time of year, everyone wants to give and receive gifts. In this article you will read how to make a “snow globe” with your own hands to please your loved ones.
Making a ball in eco-style
This stylistic direction led to a fashion for natural raw materials. Eco-style dictates to the master the choice of exclusively natural materials. The following materials are required for work:
- twine or twine;
- foam blank or ready-made Christmas ball;
- white lace 5 cm wide;
- mother-of-pearl half-beads – 10 pcs;
- hot glue;
- scissors.
During work, you can even use Christmas balls with a logo - the surface of the toy will be completely covered.
The master class begins with the need to carefully and carefully wrap the workpiece with twine. For this, hot melt adhesive is used: a small amount of glue is applied to the surface and the cord is laid.
When the entire workpiece is formed, the tip of the twine is beautifully masked. Next, take white lace, measure the circumference of the ball and cut off the required amount of decor. The lace is glued to the surface and decorated with half beads. After you finish making your own Christmas ball, you should attach a loop of twine.
To improve the appearance of the craft, you can use a cinnamon stick, star anise or dried lemon slice as decoration.
Balls made of thin flexible twigs will be an unusual decoration on the Christmas tree.
A ball made from saw cuts, natural berries, will also surprise guests.
Decoupage of Christmas balls with your own hands
New Year's balls can be bought at any store. Their choice is huge, but you always want to have an exclusive toy on your Christmas tree or in the holiday decorations at home that no one else has. You can create such a toy yourself. We bring to your attention several master classes with different ideas for decorating New Year's balls with your own hands.
DIY Christmas balls with sparkles inside
Light, as if weightless, Christmas tree balls with snowflake patterns and sparkles inside will add frosty freshness to the interior of the New Year's table or to the decoration of the tree itself. Making New Year's decor with such an interesting pattern with your own hands is quite simple.
Materials
To make an original Christmas ball with sparkles inside, prepare:
- transparent Christmas ball without drawings;
- white sparkles;
- decoupage glue;
- glass glue;
- snowflake stickers;
- paper;
- two funnels;
- small bowl;
- brush;
- measuring spoon.
Step 1
. Mix a spoonful of decoupage glue in a small container with two tablespoons of water.
Step 2
. Carefully remove the fastener from the ball. Insert the funnel into the neck and pour in the glue mixture. Take out the funnel and, covering the hole with your finger, distribute the adhesive solution along the walls of the ball. Pour excess glue back into the container. Remove the glue from your fingers with a damp cloth so as not to leave fingerprints on the outside of the ball.
Step 3
. While the glue is still wet, insert a second clean funnel into the ball and add glitter. Distribute them along the walls of the toy, shaking the latter. Pour the remaining glitter onto paper.
Step 4
. Separate the snowflake sticker from the adhesive base. Take a brush and use it to apply glass glue to the snowflake. Glue a snowflake to the outside of the ball. Gently press it with your finger and wait until the glue sets.
Step 5
. Leave the balls to dry overnight. After this, you can insert the mount into place and use them as New Year's decor.
DIY ombre balls
Christmas balls painted using the ombre technique look very interesting. Oddly enough, making a similar pattern at home is not difficult. You just need to be patient and know a few tricks that will allow you to do all the work as accurately as possible.
Materials
To paint the balls using the ombre technique with your own hands, prepare:
- transparent glass Christmas balls;
- large capacity;
- glass paint;
- plastic film or thick paper;
- long lace;
- toothpicks;
- a rag;
- wet wipe.
Step 1
. Take glass paint and carefully pour it into the container in a thin stream. You need to pour carefully so that bubbles do not form in the liquid. If this happens, do not be lazy and pop all the bubbles using a toothpick. If the bubbles remain, they will form unsightly streaks on the glass.
Step 2
. Tie a long string to the ball in the form of a loop. You will need to hang the toy from it while the paint dries. Decide on a place and make sure that the distance from the height where the ball hangs to the surface is no more than 30 cm. Based on this, measure the length of the lace.
Step 3
. Wipe the ball with a dry cloth. To keep the lace out of the way, wrap it around your fingers and grab the toy itself by the top. Carefully dip the ball halfway into the paint. Lift it above the container. Allow the paint to dry for a few minutes. Then lower the ball into the paint again, but immersing it only a third. Let the paint drip a little again and lower the toy so that its bottom is painted.
Step 4
. Move the ball to a place where it will dry. To prevent paint from dripping onto the floor, keep paper or film under the ball. Hang the toy and cover the surface with paper.
Step 5
. Check the ball every ten minutes. The paint, as it drains, will form a drop at the bottom. Remove it carefully with your finger, but so that it does not leave marks on the glass. Immediately wipe the finger with a damp cloth.
Step 6
. After the paint has completely dried, your ball will be ready. If the intensity of the color does not suit you and you want to get more saturated shades, paint the toy again using the same technology.
{google}
New Year's ball made of beads and sequins
You can make a bright and colorful ball for the Christmas tree from beads and sequins. This toy is very easy to make. Even a schoolboy can handle this job. You won’t need complex weaving patterns, and the toy itself can serve you as a New Year’s decoration for more than one year.
Materials
To make a New Year's ball from beads and sequins, make sure you have:
- foam ball of the required diameter;
- packaging of sequins;
- packages of beads;
- nails for attaching notes to boards;
- glue;
- ribbons or twine.
Step 1
. First you need to make blanks for the ball. To do this, take a nail and string a bead on it. Thread a nail through the hole in the sequin. You can do without beads, but this way the head of the fastening will stand out too clearly against the background of the base. For the same reason, try to use transparent beads.
Step 2
. Apply a thin layer of glue to a small area of the foam ball. Take strong glue so that it holds the nails securely, preventing you and your loved ones from the risk of being pricked by a fallen part of the toy.
Step 3
. Insert the workpiece into a foam ball. Press firmly until the sequin is set.
Step 4
. Fill the entire surface of the ball with such blanks, leaving only a small area free.
Step 5
. Glue tape or twine in the form of a loop to the empty space. This is necessary so that the ball can be hung. After this, fill the remaining area with blanks.
A bright and original Christmas ball is ready!
DIY New Year's ball with a pattern
You can make your own ball, which will depict what you want, at home. With this decor you can not only decorate your Christmas tree, but also give it as a souvenir to your family and friends.
Materials
To make a New Year's ball with a pattern, you need to prepare:
- transparent glass balls;
- glass paints;
- contours for paint;
- glitter and stickers;
- brushes;
- aerosol varnish;
- disposable cups;
- funnels;
- a rag.
Step 1
. Remove the mount from the Christmas ball. Pour paint into the container, which will be the main color for the ball. Insert a funnel into the ball. Pour some paint into it. Distribute it evenly over the inner surface of the toy and turn it over, placing it upside down in a disposable cup.
Leave the entire structure in this form for a day until the paint is completely dry.
Step 2
. Take a paint palette, prepare glitter, outlines and stickers. Wipe the ball with a rag and, having cleared it of dust, start drawing whatever you want. Stickers can make your work easier, while glitter and outlines can help add color and texture to your design.
Step 3
. To allow the ball to dry, hang it after inserting the fastener into place. After the paint has dried, hang the toy in the yard and cover its surface with spray varnish. Cover the surface with a thin layer of varnish, making sure that no drops form. Leave the toy to dry. The varnish will help you protect the design from paint chips and make the overall appearance of the ball neat.
Exclusive New Year's decoration for the Christmas tree is ready!
Decoupage of Christmas balls with your own hands
4/5 — Ratings: 44
Similar articles:
- DIY soap – Blue windows
- DIY papier-mâché maracas
- DIY funny children's backpack "Minion"
- DIY drawing on a T-shirt
Options for Christmas tree balls using photo printing
You can approach making a toy from a creative side if you have a printer at home. When working, a foam blank or a transparent plastic base is still used.
Making Christmas balls with a photograph will vary depending on the technique:
- Decoupage. This technique involves cutting out a finished picture printed on a laser printer and somehow transferring it to a blank. When working, PVA glue, a flat synthetic brush, and paint are used. It is better to print paper on Christmas tree balls using a laser printer so that the color of the photo does not change. The cut out pictures must be turned over and with wet hands try to remove the layer of paper. After this, the photo is pasted onto the workpiece, applying glue from the center to the edges so that wrinkles do not form. The decor is designed at your own discretion.
- Simple option. This technique involves using a transparent blank that is divided into two parts. All you need is to beautifully cut out the picture in a circle and insert it into the blank. The Christmas tree balls with the photo are ready, all that remains is to tie a loop.
This version of the toy is considered the lightest and most original. It can be placed on a Christmas tree or hung on a lamp hook in the room. It will remind you of the moments spent and create a festive atmosphere.
If you constantly make toys yourself, you can put an individual stamp on your Christmas tree balls. To do this, it is recommended to use a rubber eraser, where the master’s logo will be depicted. By dipping the eraser into the paint, you will be able to leave an original imprint on the surface of the product. It will characterize the work of the artisan.
Using handmade Christmas balls to decorate your home interior will bring warmth, tranquility and comfort. The products will lift your spirits by adding bright colors to the snowy weather outside your window.