Advantages and disadvantages of do-it-yourself furniture restoration
If you have the opportunity to restore aged interior items with your own hands, you should take advantage of it.
The advantages of restoring old furniture with your own hands include:
- Saving money;
- No need to transport furniture;
- The opportunity to realize your idea down to the smallest detail.
Disadvantages of working independently:
- This may take a long time;
- Dust, chemical odors.
Considering the pros and cons of this method of furniture restoration, you can decide for yourself how it is more convenient to carry out your plans - on your own or with the help of professionals.
Wood carving
So, if you bought antique legs, then that's great. But if not, then don't despair. Try making them yourself. To do this you will need three wooden beams. With some effort and time, you can transform ordinary pieces of wood into something elegant and beautiful. Once the threads are finished, you need to drill a small hole in each end and insert a nut into it. This way you can later screw it onto the screw and fix the legs on the tabletop. This fastening method is one of the simplest from a technical point of view and at the same time very reliable.
Yudashkin's daughter showed her wedding dress, which her father sewed for her
A parrot sleeps sweetly in a hammock made from a protective mask: amazing video
In Iceland they want to open a bar in the lagoon. What it will look like very soon: photo
You can make wooden cartridges from wood scraps. To give them a more stylish and attractive appearance, it is better to make the edge beveled.
After this, mark the holes for the cartridges, drill them with a drill of the required diameter and equip them with nuts for the screws.
Updating Wood Items
Restoration of wooden furniture is the most common issue in the field of working with aged interior items.
Before you begin restoring furniture, you need to pay attention to the presence of any signs of antiques - stamps, branding, fastenings, fittings.
If these elements are found, it is better not to touch the furniture yourself, but to entrust this matter to professionals, so as not to spoil anything or lose its value.
If no signs of antiques are found, you can begin processing yourself.
Studying photos of restoration of old furniture, you can discover many non-standard solutions and unusual methods.
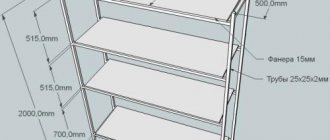
General information about the project
The goal is to make a small antique table with carved legs in a twist style. At the same time, the project must be economical. The estimated budget is $20. This may seem impossible to many, but everything is quite possible. The main cost is associated with the purchase of three carved legs. They come complete with all the necessary screws, so you don’t have to purchase anything extra. If you know how to work well with wood and you have the tools for this, then you can make them yourself. But this is not as simple as it seems at first glance, so it is better not to waste time and materials, but to immediately buy ready-made products in a specialized store.
New child support amount and court date. New details of the divorce of Pelageya and Telegin
Sia “butted heads” with Nicki Minaj and Cardi B, and later apologized
A Russian soldier went to the front and disappeared. After 80 years, my daughter found out what happened
It’s worth saying a few words about the legs. Their height should be sufficient to make the table high and comfortable. If you make a mistake with the sizes, it's okay. They can be shortened later. At the same time, the project involves the use of antique legs, which will not be straight, but slightly rotated. Wooden chucks are best suited for mounting them. But the problem is that they are quite difficult to find. Therefore, if they are not available in the nearest stores, then try to make them yourself or find some alternative. Today there are many options, so there will be no problems with this.
Stages of restoration
Acclimatization. To prevent the elements of wooden furniture from becoming deformed after restoration, you need to let it “get used” to its environment. Air temperature and humidity are important for wood.
The optimal temperature for the room in which furniture restoration work will take place should vary from 18 to 25 degrees, air humidity should not exceed 75%. You should also pay attention to the harmful effects of direct sunlight and heat from radiators.
Dismantling of elements. For better processing, it is better to disconnect all furniture parts from each other and work with them separately. You need to use tools as carefully as possible without damaging the wood. If it is important to keep the elements and fastening system in their original form, it is better to disassemble them and lay them out in order.
Cleaning. Each element must be cleaned in the most gentle way possible - with a soft brush wrapped in a cloth, a vacuum cleaner and non-aggressive chemicals.
First, the parts are washed from dirt with a rag and dishwashing detergent. Dust is carefully removed with a vacuum cleaner. All parts are dried in a horizontal position.
Removing dents and scratches. To do this, use special wax pencils, “liquid wood” or steam from a regular kettle. These options are suitable for small, shallow damage; otherwise, the entire module may need to be replaced.
Area of use of stainless fasteners- Modern do-it-yourself book shelf: drawings, diagrams, options and best bookcase designs (140 photos)
How to make a mini bar with your own hands - the best ideas for a modern bar counter at home and in the country (75 photos)
Repair of fastenings. This implies complete or partial replacement of fasteners. Restoration of the top layer of wood. To do this, you may need to glue a sheet of plywood to the old surface.
Coloring. First, a primer is applied, then painted with alcohol-containing paints. Varnishing and polishing. Decoration and intentional aging of furniture. Assembling elements into a finished product.
If everything is done carefully and correctly, the value of the furniture after restoration with your own hands will not be lost. Work should be carried out slowly, carefully, using all the recommendations of the chemical manufacturers and allowing the necessary time for their exposure.
Restoring chipboard furniture with your own hands will allow you to control the entire process step by step, make adjustments at any stage and ultimately get a completely exclusive item.
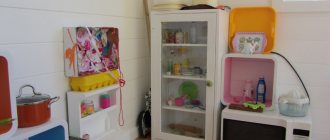
Without extra money for new furniture, you can easily restore what is available in your home, at your parents’, or at your grandmothers’. Soviet furniture is famous for its quality, and the atmosphere and comfort that familiar interior items create from childhood cannot be bought for any money.
Original edging
This original cabinet is also covered with film, but not monochrome, but colored. That is, you must act as described above. But after pasting the wall you will have to work harder. Prepare decorative edging. In our case, these are narrow gold stripes. Apply markings to the film and carefully glue the edging.
Last year Efremov lost his mother. What she looked like in her younger years
Kate and William may “repeat” the mistakes of Megan and Harry: the Queen will not allow this
Wash more often: an experienced motorist told how to protect your car from the heat
There is another option. You still have the decorative beads that decorated the wall! Clean them of old varnish, degrease, prime and cover them with gold. And then glue it in place or nail it with tiny furniture nails. In the photo below you see a cabinet with the “original” decorative finish, only updated.
Restoring an old cabinet
Once the bedside table has been reassembled and all its fastenings have been replaced or strengthened, you can start transforming its appearance. Restoring a bedside table with your own hands can be done in different ways. But if you are not going to use dark opaque paint for this, then it is wiser to first coat all surfaces with one layer of colorless acrylic varnish. This will prevent yellow spots from appearing.
Then you can paint your furniture, use the decoupage method, laminate and veneer its surfaces, or simply treat it with stain and varnish. In addition, if desired, these techniques can be combined and supplemented with others. For example, it is now fashionable to artificially age furniture using the craquelure technique. It all depends on your personal tastes and preferences.
Related article: How to properly saw a cast-iron bathtub with your own hands?
Of course, painting furniture is the simplest and most affordable restoration option. It can be used by people who do not have drawing skills, and the use of stencils will help give your cabinet a unique and very original look. Ideas can be gleaned from fashion magazines, but floral and folklore motifs are especially relevant. A bedside table intended for a children's room can be decorated with funny animals, flowers or cartoon characters. You can even involve children in this work. Such furniture, improved with your own hands, will become much more valuable for kids.
Decorating a bedside table using painting
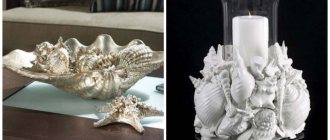
To make the cabinet look antique and worn, you should use acrylic paints along with liquid silver and silver leaf.
Before applying the paint, the bedside table is washed again, degreased with a weak soda solution (1 tablespoon per 2 liters of warm water) and dried thoroughly.
Then the primer is applied in 2 layers, allowing each of them to dry completely. The easiest way to prime the surface is with a small foam roller or sprayer. Next, the background paint is applied. It is best to use acrylic paints, as they dry very quickly and do not have an unpleasant odor. To apply an image to a varnished surface, use automotive spray paint.
First, paint the inside of the bedside table. Using a brush, apply paint to the corners and joints of the walls, and then paint the surfaces with a roller. This technique will help you avoid drips. The bedside table must be painted at least 2 times.
After the paint has dried, the outside of the bedside table is treated in a similar way. Then you can start painting. Now you can purchase ready-made stencils. They are sold in art supply stores. But you can create the pattern yourself. To do this, print out the design you like on a printer and copy it onto thick cardboard. The thicker your stencil, the longer it will last.
Then remove the places where the paint will be applied using a stationery knife or nail scissors. The stencil is applied or glued to the surface with masking tape and paint is applied with a sponge or roller. It is necessary to remove the cardboard before the coloring composition dries. But this should be done extremely carefully so as not to damage the drawing.
In the same way, you can decorate the cabinet with relief patterns. In this case, decorative plaster is used instead of paint.
Decorating with decoupage and craquelure
Decoupage is the decoration of a surface using images printed on paper. At its core, this technique is very similar to ordinary children's appliqués. Only the drawings are applied to special paper, which after drying becomes almost invisible. But if you do not have the opportunity to purchase special sets, then you can use ordinary disposable table napkins with a pattern. It must be remembered that the lighter the pattern, the paler the image on the surface of the bedside table will be.
Related article: Making a sun lounger out of wood with your own hands: progress of work, drawings and photos
Before restoring a bedside table using this technique, it is also better to paint it. Then you need to prepare the selected images. They should not be cut out, but the edges should be torn off, trying to make them as fluffy as possible. This will help the application become less noticeable on the surface of the furniture. Then the drawing is completely dipped into glue (special or colorless PVA) and fixed in the desired place on the bedside table. Using a large, dense brush, the image is smoothed out, removing air bubbles, creases and folds.
Paint the cabinet with your favorite shade of paint, apply the prepared designs and cover the entire surface of the furniture with varnish.
After the application has completely dried, the entire surface of the furniture is coated with transparent varnish. But you can achieve a much greater decorative effect if you use craquelure varnish.
Craquelure is an effect in which a network of characteristic cracks appears on antique items. This technique is nothing more than artificial aging of furniture. If you decide to use it, you can get a bedside table that will look like a real antique.
The craquelure composition is applied to a painted or varnished surface without waiting for it to dry. Under the influence of special substances, the furniture becomes covered with cracks, but the protective properties of the paint do not suffer at all.
This way you can achieve amazing effects. For example, when it seems that gold shines through a dark varnish layer damaged over time. The intensity of surface cracking depends on the composition of the varnish. More detailed instructions can be found on the packaging of the product or from the seller upon purchase.
These are not all the ways you can restore the appearance of furniture. Restoring a nightstand is a creative work that largely depends on your imagination, imagination and patience.