Cladding with regular tiles is necessarily accompanied by the installation of joints between the tiles. What does "regular" mean? Tile production is divided into several stages. Depending on the manufacturer and equipment, ceramics receive one or another degree of compliance with the standards and expectations of consumers. But in any case, technologies for serial production of ceramics imply certain geometric flaws. At first glance, the tiles are ideal in terms of size and rectangularity, but this is not the case. Seamless tiles are the same ceramics, but with processed edges, which leads to dimensional standardization.
Quick navigation through the article
What is rectification
Not everyone enjoys the absence of a monolith in a tiled interior. The desire to get rid of seams and bring the canvas closer to the monolithic ideal gave rise to the technology of rectification - the final processing of the edges of the slabs. On a special machine, porcelain stoneware, pressed and fired, is beveled. As a result, the facing material receives a clear rectangular geometry and can be laid end-to-end.
Seamless tiles do not result in a complete absence of seams. By composing a composition from individual components, it is still impossible to achieve an ideal layout. But, using rectified porcelain stoneware, they achieve much greater integrity of the coating. This is what attracts consumers to edged ceramics. It is worth mentioning that the range of “seamlessness” extends from close contact of the plates with each other to gaps of 1.5 mm between them. Often, when facing with ordinary tiles, it is difficult to achieve this width; calibration does not allow it.
The world is imperfect, and rectified porcelain tiles also lead to polar consequences. Next, we will consider the advantages and disadvantages of seamless technology.
Pros and cons of rectification
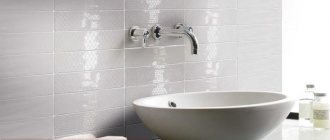
Millenium Concept collection, Porcelanosa (Spain).
Among the advantages:
- Aesthetics. Seamless styling looks much more beautiful in many cases.
- No dirt, mildew or mold in the joints.
Among the disadvantages:
- Complexity of cladding.
- Limited operating temperature and insufficiently wide range of places in which rectified material can be installed.
- Restrictions imposed by the curvature of the tile plane.
Now about each of the points in more detail.
Visual appeal
By and large, seams are just a necessity that you have to put up with in most cases. A monolithic fabric, devoid of joints, is the ideal that manufacturers of finishing materials strive for. Rectified porcelain tiles bring you closer to this peak; minimal joints with proper cladding increase visual appeal.
No dirt!
Seams are a great place for dirt to accumulate.
High-quality grout resists this, but not everyone can afford expensive grout. In addition, no putty can compare with the density of ceramics. Tight joints are not equal to their complete absence, so we are not talking about unconditional surrender of microscopic foreign objects. But the influence of the latter in the case of seamless cladding is minimal. Well, how can there be no shortcomings?
Complexity of cladding
Unfortunately, seamless installation is more labor-intensive. Conventional cladding involves “playing” with the seams; the gaps hide not only flaws in the ceramics, but also the possible inaccuracy of the tiler’s manipulations. When working with rectification, all actions must be carefully verified. In the “hardest” case, the tilemaker does not have the treasured millimeters to maneuver with the tiles. Although the processed slabs themselves make the work easier - there is no need for additional calibration (other than tonal calibration), and there is no need to worry about the accumulation of dimensional discrepancies.
Temperature and zone restrictions
“Floating” tile dimensions are not the only reason for creating joints. The gaps protect the tiles from temperature fluctuations that cause deformation of the adhesive or mortar. Microscopic displacements of the mixture are enough that in many situations close contact of the plates is undesirable. The seams provide a margin of potential movement of the ceramics.
In addition to thermal changes, displacement is caused by shrinkage of the house and seismic activity. Don't think that only new buildings are susceptible to shrinkage. To one degree or another, the house shrinks throughout its “life.” Yes, a few years after construction, the rate of shrinkage decreases, but the movement does not stop completely. The same applies to building structures located in seismically active zones or near quarries.
For these reasons, you need to “vote” for rectified porcelain tiles using common sense. Needless to say that seamless installation is only possible indoors and only at a uniform temperature? Forget about warm floors if you strive for an architectural ideal. These limitations are overcome by using narrow seams: 0.5–1.5 mm. Let us repeat, for ordinary tiles such a width of gaps is unattainable, so you won’t have to grieve about wasted money on “seamless” ceramics. Millimeter seams are enough to smooth out the negative impact of the described factors without spoiling the overall picture.
Influence of slab plane
When relying on cut edges, many people forget about one more dimension. Coming out of the kiln, the tile does not have a strict geometry, but at best only the edges are processed, the plane of the canvas remains untouched. Meanwhile, the curvature of the front part of the ceramics is an eternal problem for tilers and consumers. High-quality tiles have very small horizontal flaws, but they are there. The stitches smooth out the imperfections, but the rectification exposes the problem.
Seamless ceramic tiles are only possible with a miniature “propeller” and, preferably, subject to additional calibration. In other situations, it is recommended to make narrow seams.
Dimensions
Before you go to the store for ceramic tiles, you should decide which size will be most optimal for your room. There are sizes for each category of ceramic tiles, there are 3 of them: wall tiles, floor tiles and mosaics.
Wall models
They come in both square and rectangular. The standard dimensions for square tiles are considered to be 150x150 mm. But the sizes 100x100 and 200x200 mm are also quite common. Rectangular tiles are much more varied: 25×150, 75×150, 100×150, 100×200, 150×200, 150×225, 250×300, 250×333, 275×400, 150×900, 300×900 mm. However, the standard size of rectangular facing tiles is considered to be 200×300 mm.
To choose the optimal size, you need to pay attention to several factors. First, you should take into account the layout of the tiles on the wall. It is advisable to first draw an approximate layout diagram with a pencil for clarity. From such a diagram it will be immediately clear how it will fit on the wall and whether it will need to be trimmed along the edges of the walls.
The optimal choice of sizes is such that it does not need to be cut at all. Also, after such markings, it will become clear how many tiles you will need. In addition, one rule should be taken into account: the smaller the tile, the more difficult it will be to maintain the parallelism of the tile seams, especially on uneven areas of the wall.
Floor models
They are also rich in variety, and just like wall-mounted ones, they are square, the standard size of which is 300x300 mm. But they can also be much smaller in size - from 48x48 mm. Floor tiles can be made in rectangles, the sizes of which are 10x20, 20x30, 10x20, 20x25, 25x40, 30x60, 20x40, 20x10, 25x33, 60x30, 25x35, 25x50, 10x40, 30x10 cm.
READ MORE: Dimensions of floor plastic plinth
But that’s not all - floor tiles also come in the form of a pentagon (86.5×150, 98×170, 115×200 mm), a hexagon (150×173, 170×196, 200×230 mm) and even a triangle (58 ×83, 68×97, 83×118, 98×139 mm).
Mosaic
It is placed in a special category of ceramic cladding, since it does not belong to certain standards due to its small size. It consists of pieces of ceramics, stone or glass. Thanks to its miniature size, it can be called a truly universal cladding material. Firstly, because it fits perfectly on any uneven surfaces, while hiding their defects, and secondly, with its help you can create real works of art, be it paintings or an interesting ornament.
Mosaic tiles require the least amount of glue to complete the job. In addition, it is equally suitable for cladding walls, floors and even ceilings. The shape of the mosaic is most often square. As for its dimensions, it varies from 10×10 mm to 50×50 mm. In addition, mosaics are found in round and rectangular components. The largest sizes of such tiles are 100, 200, 250, 300 and 330 mm.
Both long and narrow tiles may suit you; the choice is always yours. The most common sizes are 25, 30, 40 cm and 60 cm.
Rectified cladding
Video instruction: Seamless tiles are a godsend for an esthete. Despite the limitations, the end result is worth the effort to overcome the influence of negative factors. The rules for facing with cut tiles do not differ from the usual ones. But adhere to certain rules:
In fact, the best solution for getting rid of seams is not cut porcelain tiles at all. Laying very large format slabs (and there are even 3x1.5 m slabs) in small rooms (a bathroom as an example) allows you to do without any gaps at all. But this is a costly business and requires not only money, but also assistants. Therefore, today the shortest path to maximum visual monolith lies through processed porcelain tiles. Using the recommendations given, you will definitely achieve a “seamless” interior. comments powered by HyperComments
Seamless tiling is becoming increasingly popular. There continues to be debate as to whether seams are necessary when laying ceramics.
This article is devoted to this issue and seamless installation technology.
Positive and negative aspects of using the material
Seamless ceramic tiles have aesthetic and practical advantages over conventional tiles:
- The integrity of the ceramic canvas looks very beautiful both on the floor and on the wall.
- The absence of seams allows you to avoid the appearance of mold and mildew between the tiles.
- The absence of seams allows you to keep the surface covered with such tiles clean. No seams - no places for dirt to accumulate.
The disadvantage is largely related to the production process of the material. Mass production allows for slight variations in the size of tiles from one batch. Considering that the laying process requires precision in size to create the integrity of the covering sheet, it will take time to adjust the sizes of all the tiles prepared for work.
It is necessary to grind the tiles, which will allow all the tiles to fit together. If this is not done, then it is possible that because of one tile the entire installation process will be disrupted and the integrity of the surface will be compromised. The process of fitting all the tiles is time-consuming.
In order to have as few problems as possible with the size of the tiles, it is recommended to choose a well-known brand manufacturer. The work of tiling walls or floors with seamless tiles requires skill. It is not recommended to undertake such work without them. It will take a lot of patience and precision to get the perfect ceramic canvas.
Laying tiles without seams is a well-developed technology that helps to achieve a smooth surface. It is simply necessary to observe all the subtleties in the work. This requires specialist knowledge and skills. The labor involved in laying seamless tiles costs more than laying regular tiles.
Advantages and disadvantages of seamless tile laying
So, if we consider the advantages of laying tiles without seams, we can highlight the following:
- High aesthetic appeal of the finish (due to the creation of a visually monolithic product);
- Prevents moisture and debris from getting into the gaps between the tiles;
- Fungus does not form at the junction of adjacent tiles;
- Over time, there is no need to re-grout (renew) the joints.
If we talk about the limitations of seamless laying of finishing material, it should be noted that the creation of such masterpieces requires the performer to have the appropriate experience. Since during the work it may be necessary to adjust (grind the ends) of a large number of tiles. In addition, such a procedure is highly labor-intensive and takes much longer than standard tile installation.
Also, laying tiles without seams is not permissible on surfaces subject to constant temperature loads (heated floors, saunas, etc.). This is due to the lack of compensation gaps between adjacent tiles, which can even cause deformation of the finishing material when temperatures change.
Pros and cons of seamless floor tiles
Seamless ceramic tiles do not guarantee complete removal of seams. But rectified porcelain tiles allow you to achieve a more holistic coating as much as possible. This approach to an ideal monolithic coating has earned the popularity of tiles without seams. But this type has both its positive and negative aspects of use.
Even the maximum amount of laid tiles creates a seamless, seamless coating
Advantages of seamless tiles:
- Aesthetic appearance;
- Dirt, fungus, and mold do not accumulate in the joints.
The presence of seams slightly spoils the visual perception of the picture. Many manufacturers strive for a smooth and monolithic coating. It was seamless tiles that came closest to this ideal. It looks much more attractive in the interior.
The joints between slabs are an excellent breeding ground for fungus, mold and dirt. With good grouting using an expensive grout, this can be avoided, but not everyone can afford it. In addition, even the most expensive grout cannot compete with ceramics. Of course, when joining the plates, a small seam remains. But much less pathogenic microflora accumulates in it.
Cons of seamless tiles:
- Difficulty in installation;
- Restrictions on installation locations and temperature;
- Unevenness of slabs.
Traditional tile laying allows you to use seams to hide small flaws and irregularities. But when working with seamless tiles, this does not work. A perfectly flat surface is required.
The gaps in the tiles serve as protection against temperature changes that could affect the cement or adhesive. Small movements of the tiles due to changes in the mortar may not be noticeable due to the joints. They allow the tile to move a little.
The adhesive may shift due to shrinkage of the home or environmental conditions.
In this case, installation of a seamless coating is possible only in rooms with a constant temperature. To create heated floors, it is necessary to have a gap between the plates of 0.5–1.5 mm. You can make a small seam of 1 mm so as not to spoil the overall impression of the field and to have the possibility of slight shifts in the solution.
It is worth remembering that when producing porcelain stoneware, the slabs do not have a perfectly flat surface. It was the seams that smoothed out all the defects. Therefore, when using seamless tiles, additional calibration and minimum gaps will be required.
Preparation for work
If you decide to finish the surfaces with tiles using a seamless method, then first of all you should carry out preparatory work, namely: form the fencing structure, prepare all the necessary components and equipment.
So, the following elements are often used as equipment for laying tiles:
- Construction level and measuring tools;
- Tile cutter or alternative tool (for example, glass cutter);
- Set of spatulas + comb spatula (with ridge height 8 – 12 mm);
- Pliers, rubber hammer, whisk for solution, container.
As for the components, first of all you should take care of the tile itself. Indeed, unlike traditional positions, tiles for seamless installation should not contain materials subject to linear expansion. Therefore, ordinary clay tiles are not the best option for seamless surface design.
It is for these reasons that today it is proposed to use porcelain stoneware or lithoceramic tiles for seamless installation.
After all, these materials are characterized by increased density and have a low coefficient of linear expansion. In addition, these properties allow you to create tiles with maximally identical dimensions and rectified (perfectly smooth) edges without chamfering.
For the convenience of users, we suggest considering the main characteristics of materials for seamless tiles
| Lithokeroamics | Porcelain tiles |
| Made from natural marble (a cut is used), which is fixed to a ceramic base | Eco-friendly material of artificial origin (due to high-temperature firing of a clay mixture with mineral fillers) |
| Due to its natural origin it has a wide range of colors | The color imitation of any natural material is artificially recreated |
| Features wear resistance, durability, impact resistance | Due to the homogeneity of the layer, it is characterized by high hardness, even superior to natural analogues. |
| Has a fairly high cost | Inexpensive, but difficult to process and cut |
| Does not absorb moisture and resists aggressive influences, can be used for indoor and outdoor use | |
| Available for both seamed and seamless installation and have smooth edges | |
During the preparatory work, special attention should be paid to the choice of glue. After all, the final quality of the work depends on the correctness of his choice. Well, in order not to make a mistake in choosing, it is advisable to purchase only the glue that is recommended by the manufacturer of the finishing material.
In addition, you should stock up on tile grout, because be that as it may, it is impossible to completely eliminate the presence of gaps at the junctions of adjacent tiles and during the work you will have to grout the seams, albeit not as large as in traditional versions.
Well, of course, you should take care of preparing the base base on which the tiles will be laid. After all, given the fact that with seamless installation it is almost impossible to compensate for deviations due to gaps, quite high demands are placed on the base base. And not only must the surface be strong, dry and level (potholes or bumps are not allowed), in addition, the geometric correctness of the enclosing structures must be observed. That is, walls, ceilings, floors, corners must be of the correct shape and free from blockages and distortions.
Ideally, laying tiles without seams is best done on walls covered with sheet material (gypsum plasterboard, gypsum board, etc.) and treated with putty mixtures; read about how to do this.
Preparatory work for seamless laying of porcelain tiles
Preparation for laying seamless tiles is the same as for installing traditional tiles. The floor surface or wall covering must be smooth and durable. That is why before laying porcelain tiles, it is necessary to level the coatings.
The best base for laying tiles without joints is concrete. Before installing the tiles, it is necessary to make a concrete screed. You can prepare the solution yourself using cement and sand or buy a ready-made mixture. It is important to strictly follow the instructions. The screed is poured onto a well-cleaned and primed floor. This coating can be insulated.
Method of insulating a concrete floor:
- Waterproofing
lining . If the room is large, then the film is overlapped by 10-15 cm. The joints must be secured with tape. The film should extend 10 cm onto the wall. You can also attach a damper tape around the entire perimeter of the room. - Laying insulation
. Material for this purpose is presented in a wide range. You can choose a more porous option. In this case, additional waterproofing will be required on top. If the material is dense enough, then you can pour the screed directly onto it.
If your home has wood floors, you can install on top of them. This has become possible thanks to the emergence of new technologies that make this process possible. This is also facilitated by the emergence of advanced materials.
It is important that the screed dries well. After a day it will be possible to walk on it, but it is optimal to start laying tiles after 5-7 days.
Before installing the tiles, you need to make sure that the surface is perfectly flat. To work with seamless tiles, you need to have some experience in this type of work. This is not an easy technology, and if you do not place the material correctly, you can completely ruin the coating.
Schemes for laying tiles without seams
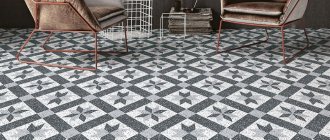
The seamless technique of laying tiles is used mainly to create an impeccable design effect, in which the entire surface appears visually monolithic. However, not all material laying schemes are suitable for obtaining the specified effect, because if you lay out the tiles in a single tone, you may feel a “emptiness effect” (especially for the floor). And it is precisely for these reasons that they try to combine seamless tiles according to a certain algorithm, namely: in a checkerboard pattern, herringbone, zebra, rows, circles, highlighting the perimeter, chaotic mosaics, etc.
Given the complexity of selecting patterns, modern finishing involves preliminary design of a laying pattern using software products that take into account the dimensions of the room and the dimensions of the tile itself.
Laying technology
All work, both preparatory and laying seamless tiles, is carried out according to the same technological methods as for ordinary tiles. Installation of this facing material can only be carried out on a level base that has sufficient strength. Such a base can only be a concrete floor, the surface of which must be leveled by filling it with a screed to eliminate defects on the surface, having previously cleared it of debris. The presence of any protrusions, cracks or dips is unacceptable, so all of them must be eliminated.
To technically correctly prepare such a base using the leveling method, you should sift the sand for the solution in order to remove large fractions. When purchasing cement, it is necessary to take into account the date of its production, since over time it loses some of its properties. If this is not significant for brickwork, then a seamless tile coating on such a mortar may sag over time.
The use of ceramic tiles without seams is impossible in rooms where sudden temperature changes are observed. It also cannot serve as a covering for so-called underfloor heating with electric or water heating. On a floor heated from below, tiles with a minimum gap between them are subject to deformation and crack.
Often, especially in private housing construction, there is a need to insulate concrete floors. Therefore, such an operation should also be classified as preparatory work before laying seamless tiles.
To accomplish this, roll-type waterproofing material is laid on the floor. This can be a membrane, glassine coating, polymer film, etc. If the floor area is large enough, it is impossible to cover it with one strip. In this case, the strips are laid overlapping so that they overlap each other by 10-15 centimeters, fastening the joints with tape. In this case, be sure to place the edges of the strips on the walls to a height of up to 10 centimeters.
Next comes the installation of insulation. The choice is now huge and acquiring the necessary material will not be a problem. If the choice fell on a porous thermal insulator, then it will be necessary to lay another layer of waterproofing material on it. If it has a high density, then the screed can be poured on top of this insulated layer.
Tile installation
As already mentioned, gluing seamless tiles is completely similar to the usual procedure for installing any other types of tiles. It consists of marking a surface prepared in advance, determining the place where the first element will be laid, and soaking the material.
Then the adhesive composition is prepared, which should be applied to the base for uniform distribution using a notched trowel of equal thickness over the entire plane. Tile adhesive is very elastic, but hardens quickly, so to avoid drying out, it needs to be prepared in small volumes.
Next comes the installation of the first tile on the floor. It must be accurately placed in the chosen place and aligned horizontally. After this, it is pressed down with light blows of a rubber or wooden hammer on the front surface.
READ MORE: Warm floors using penoplex: fast, practical, effective!
The following elements are laid in such a way that each subsequent tile is pressed tightly against the previous one. Moreover, after laying each fragment, the entire surface is checked for alignment and horizontality using a building level. If the interior of the room contains protruding parts, columns, pipes and similar technological or architectural “complications,” then you will have to cut the tiles to fit their profile.
As for the need to grout such a floor, it is absent due to the absence of seams, which is another unique advantage of seamless tiles. However, some experts believe that even the most experienced craftsman still cannot lay the material without gaps, even the smallest ones. Therefore, they still use grout to get rid of the smallest imperfections. In this case, you should select the grout according to the color of the ceramic floor to create a monolithic effect.
After the glue has dried, those craftsmen who see the need for this proceed to treating the seams with tile grout. Since the flooring will subsequently be subject to wet cleaning and, therefore, possible moisture penetration under the tile layer, this operation makes sense. The grout, as already mentioned, is matched to the same color as the coating, and the best grade is the one that is resistant to mold. The grout is applied with a spatula to the surface of the seamless tile and rubbed with a sponge, and after filling the joints with it, the excess is removed with a sponge soaked in water.
Today, many different schemes for laying tile coverings are known, but not all of them can be used for seamless installation. This is explained by the fact that the formation of a periodically repeated pattern occurs precisely due to the seams. The formation of exquisite patterns when using a seamless installation method is achieved due to the contrasting textures of marble, porcelain stoneware and other materials.
Laying plain tiles on a large floor area is not recommended for the entire room, so as not to create a feeling of emptiness. Therefore, laying with a mosaic, a ladder, in a checkerboard pattern, with a rosette in the center and a frame in the form of a perimeter, and many other options are used. It is quite natural that such complex designs and patterns on the floor, made using a seamless method, can only be created by professionals.
If we are talking about laying mass-produced seamless tiles with a single-color texture on the floor, then craftsmen have to adjust such tiles to minimize gaps and create conditions for ideally even laying by grinding their edges. Such work requires significant time and labor effort, but the result is genuine masterpieces that embody any design ideas.
You can study the process of laying seamless floor tiles in more detail in the following video.
Seamless tile laying technology
By and large, seamless tile installation is not much different from the standard tile installation procedure. However, taking into account the design features of the material, it is necessary to pay attention to the following features.
So, first of all, it is advisable to imitate the laying of tiles, for which it is recommended to lay them out on the floor according to the worked out diagram and make sure there are no deviations.
In the future, before direct installation, it is necessary to check all the tiles for identity and wipe their edges with a soft cloth in order to exclude the presence of foreign objects and construction debris.
If we talk about preparing the adhesive mixture, then in most cases, for seamless laying of tiles, a two-component composition is used, which is recommended to be diluted in small portions, sufficient to fix 1 - 2 rows of material. Well, the direct choice of glue should be made only according to the recommendations of the finishing manufacturer.
Taking into account the high accuracy of installation (vertical and horizontal seams must match perfectly), the adhesive composition should be applied to the back surface of the tile in such a way as to ensure maximum contact between the materials (air voids are not allowed). But at the same time, it is not desirable for the adhesive substance to be excessively squeezed out from under the fixed tile. In view of this, to solve these problems, it is advisable to use a comb spatula, which will help to apply the composition most evenly.
Considering in more detail the method of laying seamless tiles, it should be noted that here, as in the standard method, there are certain recommendations:
- Laying tiles should begin from the corner furthest from the entrance, gradually moving towards the exit from the room;
- The tile should be glued by laying a special solution on its back surface, followed by pressing the product in a given place on the wall or floor;
- Check the correct laying of the tiles in two planes (vertical and horizontal) using a level;
- To adjust the position of the tiles, you can use a rubber hammer or press in manually;
- After laying the first row, all the remaining finishing material is laid in the same way;
- Excess adhesive (from under the tiles) should be immediately removed using a rag;
- If possible, it is best to place the cut ends of the tiles under elements of furniture or household appliances;
- Seamless tiles should be cut using specialized tools;
- At the end of the work, the surface is cleaned of glue and the tiles are grouted with specialized compounds of the appropriate shade.
If you liked the material, I will be grateful if you recommend it to friends or leave a useful comment.
If you take on the task of laying tiles yourself, then you need to think through all the nuances in advance so as not to run into trouble during the work. At first glance, there is nothing complicated. We apply a layer of glue to the floor or wall and lay the tiles, after which we do not forget to strengthen it with plastic crosses. After drying, they can be removed and the resulting seams can be rubbed. The result is beauty.
However, grout joints darken over time, dirt accumulates in them, and they become an excellent breeding ground for microbes. In this case, the seam is cleaned and renewed. Is it possible to avoid such regular repetitions? The craftsmen know well what seamless styling is. In this case, porcelain tiles are placed much closer, which changes the appearance.
Design
When designing rooms in white, be sure to add bright shades. Their texture should be as rich as possible. If we talk about the tiles themselves, then a barely noticeable blue tint will give a cold atmosphere to the room, while cream or beige will give a warm one. This feature of white color will create a background for the design of an original interior space.
And if you also use ceramic tiles of various textures, then such a room will become even more interesting. For example, you can use matte tiles on the floor, and glossy tiles on the walls. You can add mosaics of different colors to the walls, which will add originality to your room.
In addition, to prevent the interior design of the room from looking boring, some different techniques are used for this. For example, one of them is bright colored accessories. If this is a bathroom, then they can be all kinds of floor mats, bright towels, mirror frames, soap dishes, brush holders and much more that will help avoid the monotony of the space.
Plumbing will add sophistication and luxury if decorated with various gold elements. Glass shelves will look much richer if their edging is also decorated in golden color. In addition, you can experiment with contrast by installing black plumbing fixtures or furniture. This is a rather bold decision that will look very effective.
If we are talking about a room, then such accessories can be paintings, shelves, furniture, lamps. Bright fruits or vegetables in a white kitchen will look great, diluting the space. To do this, you can use a bowl unobtrusively placed on the table with red bell peppers, oranges and other bright foods. In addition to accessories, you can play with light.
READ MORE: Warm floor in a wooden house, water film, electric base for heating
White tiles perfectly reflect the shades of the color spectrum falling on them: ceramic tiles perfectly play the role of a chameleon, which takes on the light burning in the room. Blue will give the tile a blue tint, red will give it a pink tint. Yellow will add a warm atmosphere.
Nowadays, the use of large massive tiles in combination with small mosaics is becoming quite a popular design solution. Mosaics can also be used in various colors. This format will definitely add uniqueness to your interior. Textured wall tiles also look very sophisticated.
If you do not want to use bright colors in your white interior, but want to see your room in white, then the following techniques will help you. If this is a bathroom, then you can give it a spa-like atmosphere by adding various plants, shells and pebbles to the white background. An aquarium with fish serenely swimming in it against the backdrop of mirrors will look quite interesting.
What's behind this?
In fact, you shouldn’t take construction terminology literally. implies that they simply become less noticeable. Usually this is 1.5-2 mm; it is not recommended to do installation without them at all. Why not? Because there is a risk of the glue shrinking, as a result of which the tiles will begin to creep on top of each other, swelling and cracking. Therefore, even taking into account the characteristics of the coating, glue and the room itself (bathroom or corridor), you still need to lay it taking into account the minimum gaps of 0.5 mm. But in general, the picture turns out to be monolithic, however, it all depends on who is laying the porcelain tiles. Seamless styling is simply a technique that can be done in different ways.
Subtleties of styling
They are present in every business, therefore, before starting a business, you should consult with a master. The tiles are laid obliquely, after which it is important to prevent the appearance of air bubbles. Laying porcelain tiles on the floor without seams is very difficult, so you will have to prepare the entire layout in advance. However, first things first. So, the laid tiles are tapped diagonally in the corners, twice at each crosshair. This is how all existing bubbles are driven to the center so that the risk of breakage is minimal.
Hackwork or quality work
In fact, you can find craftsmen of any level on the market. That is why the quality of the delivered object will vary greatly. Some people claim that seamless installation is a technology for reducing them, using good grout, matched to the color. At first it will look like a truly monolithic picture.
However, there really is a way to lay porcelain stoneware without seams. Butt-joint technology is popular today, it’s really very beautiful. At the same time, a master who takes on this for the first time is doomed to failure. With a cutting accuracy of +/- 5 mm in a room 3 meters wide, the discrepancy can be up to 2.5 mm. Of course, it can be hidden by moving the seam along the rows. But there will be a gap near the wall, covered with baseboards.
What are seams used for?
Indeed, why is it not possible in any particular case to proceed with laying porcelain tiles on the floor without seams? Even the tile certificates clearly indicate the requirements - the minimum joints should be 2 or 3 mm. The reason is the instability of the parameters of mineral raw materials, due to which the tiles differ even within the same batch. And such parts will either “ruffle” or crumble at the edges against each other. But what about examples of work presented on the Internet? Where are porcelain stoneware floors shown without adhesive joints? This is a professional job that is quite expensive.
Seamless styling
To make the picture perfect, you will need to follow a number of rules. First of all, purchase material from one batch, with a large excess. If suddenly there is not enough, it will be impossible to purchase another one, because the TKR may already be different. Now, with the help of special programs, cutting and laying schemes are developed. The fragments are cut on a cutting machine with a special diamond cutter.
Now the final touch: you need to lay out the entire picture on the prepared surface, after which all the parts are numbered in the order of final laying. The first time this is done dry, without glue. Final adjustments and sanding are carried out if required. In compliance with the resulting diagram, the parts are laid out on glue. Having done this work, you can get a beautiful floor.
Grout
This is not the end of laying porcelain tiles on the floor. The nuances and subtleties of the process will also have to be learned in practice. Beginners often encounter the fact that an ideal picture laid out on a dry floor refuses to fit together with adhesive. The drawing “floats”. This may indicate that too much foundation has been laid. On the other hand, as it dries, these flaws usually go away on their own. Therefore, try to reproduce the entire picture exactly as it was on a dry floor, and leave it for several hours, or better yet, overnight.
After the coating has dried, it is necessary to grout. Yes, it is still needed, despite the minimal seams. A special silicone-based mixture with an antiseptic is used. Be sure to match it to the color, then the presence of seams will not give itself away.
Advantages and disadvantages of rectification technology
Even seamless floor tiles do not guarantee a complete absence of seams. When laying ordinary tiles, it will not be possible to achieve the effect of a monolithic floor covering even with careful selection of elements. Only rectified porcelain tiles make it possible to achieve the integrity of the coating thanks to the cut edge.
Seamless porcelain tiles ensure tight joining of adjacent elements. As a result, the gap ranges from 0 to 1.5 mm. Laying ordinary tiles without a seam does not allow achieving this result due to the calibration of the elements. However, even such an impeccable coating as seamless floor tiles has its advantages and disadvantages.
The advantages of this material include the following:
- Seamless floor tiles benefit from an aesthetic point of view - they look much better in the interior and allow you to create the effect of a solid monolithic stone floor;
- for this type of coating you do not have to buy grout;
- Dirt does not accumulate in the seams, mold and mildew do not form.
The disadvantages of seamless coatings include the following:
- laying such a floor is quite complicated;
- the curvature of the tile surface also imposes certain restrictions;
- Seamless ceramic tiles operate in a certain temperature range, so there are not many places where they can be laid.
Attention! Laying seamless porcelain tiles is only permissible in a room with a constant temperature regime.
Now let's talk about the pros and cons in more detail.
No dirt and beautiful coating
Seamless tile laying is the ideal that manufacturers of facing materials have strived for. This is explained by the fact that tile joints in most cases are a necessity that cannot be avoided, so you have to put up with it. When rectified porcelain tiles are installed correctly, the seams are almost invisible, which increases the aesthetic appeal of the floor.
Dirt even collects in the seams between wall tiles, let alone the floor covering. High-quality, expensive grout protects against the formation of mold and mildew in the joints, but it still cannot be compared with a solid coating. Of course, minimal seams do not guarantee a complete absence of dirt, but the accumulation of dirt will be significantly reduced.
If you figure out how to lay seamless tiles, it will become clear that this is a more labor-intensive process than tiling with regular tiles. The difficulty is that:
- when laying without a seam, you do not have a few millimeters of seam left to correct inaccuracies in work or discrepancies in size (although the latter are practically absent);
- It is also important to select adjacent elements according to tone so that the coating looks like a solid monolith, and the joints are not visible due to discrepancies in the shade of the tiles.
Temperature and application restrictions
When laying traditional tiles, seams are made not only to correct the sizing, but also to protect the material from temperature deformation. As a result of temperature changes, deformation of the solution or glue occurs. With tight joints, even microscopic changes in size can lead to damage to the floor.
Important! Seams are needed as expansion gaps when the linear dimensions of ceramics change due to temperature changes.
Seamless floor tiles cannot be used:
- In rooms with large temperature changes. This is why seamless tiles in the bathroom are not the best solution.
- It is not suitable for installing heated floors. The technology for laying such a floor requires mandatory gaps between the tiles (at least 1-1.5 mm thick).
- This format of floor finishing is not used in seismically active zones or regions located near quarries.
- It is better not to install seamless porcelain tiles in a new house, which will shrink.
- It is unacceptable to lay such a covering outside the house, that is, it is not suitable for cladding porches, verandas, terraces and paths.
Curvature of the front surface
Don't forget about the texture of the seamless tiles. Although the edges of these products are cut to maintain strict geometry, the same cannot be said about the front surface. In other words, the horizontal plane of the tile remains untouched. As a result, due to small deviations in thickness, curvature of the front surface is observed.
Of course, high-quality tiles have minimal these flaws, but tilers face certain difficulties even when laying them. That is why during installation it is necessary to carefully select adjacent elements in height in order to maximally smooth out this drawback of rectification.
Materials and tools
Seamless tile installation does not mean that there will be no seams at all. But with the right grout, this type of installation will look like a single whole.
- Tiles (it is better to choose expensive ones, for example, Italian or Spanish production).
- Tile adhesive (the composition must be suitable for the selected tile).
- Grout (cement-based, silicone or epoxy).
- Silicone (liquid sealant and sealant).
- Tile cutter (preferably with forced water supply to avoid chipping).
- Roulette.
- Level (small and medium).
- Spatula (notched, rubber).
- Rubber hammer.
- Container for solution.
Basis for work, recommendations for processing
The base must be level, dry, clean, and have good load-bearing capacity. First you need to fill the cracks and uneven areas with a trowel or trowel.
The surface of the base must be carefully prepared. It is necessary to perfectly level the base until there are no cracks, bumps or depressions. The flooring must be without displacement and at the same level. For a longer service life of this type of installation, it is better to use a concrete screed, which is suitable for any tile products. A wooden base is not suitable due to fluctuations in humidity and drying out, which subsequently leads to a change in the adhesive layer and cracking of the tile covering.
It is worth taking seriously the choice of cement and sand. The sand must be well sifted, all large particles must be removed from it. The cement should be taken from a recent production date, otherwise the installation will have a short service life due to the loss of its qualities by the cement. If the cement is of high quality, then it is homogeneous and flows freely.
Technique and process steps
The trowel profile is selected depending on the size and structure of the back side of the tile - for a large profile, large teeth are selected.
Once the base is flawlessly prepared, you can begin the process itself. Seamless tile laying consists of the following stages:
- Plan the installation location and mark it.
- Clean and wet the tiles.
- Prepare the adhesive and apply it to the surface of the tile, covering it evenly and spreading it with a notched trowel over the entire back part, not just in spots. It is worth working with a spatula at an angle of 30 degrees so that the tops of the glue are proportionate.
- Laying must begin with solid material. Install, firmly attaching to the already prepared surface, gently tap with a rubber hammer, achieving the required evenness of the coating.
- Check the result with a level.
- Next, finish laying out all the tiles end-to-end in the same way. An example of a subsequent stripe will be the previous one.
- After the glue has dried, it is necessary to cover the seams with grout in color using a spatula and wipe with a sponge. Wipe off excess grout with a damp sponge.
Seamless tile installation does not mean that there will be no seams at all. But with the right grout, this type of installation will look like a single whole. If you follow the technology and instructions, the result will be wonderful.
Seamless porcelain tile cladding
When laying seamless ceramic flooring, standard rules are usually followed, but there are some nuances:
- The base for installation must be perfectly level. This is necessary not only because it simplifies the joining of elements, but also for reasons of applying the same layer of glue, which will give uniform deformation of the solution during temperature fluctuations.
- Installation of tiles is carried out only on a solid base. It is permissible to use a cement-sand screed or concrete coating. It is prohibited to use unstable materials such as wood, drywall, etc. as a base.
- Since the rectified material is quite large, to trim it you will have to purchase a professional tile cutter with separate guides and a bed.
- Special suction cups make the work much easier. With their help, it is easier to carry the product, lay it down and press it without getting dirty with glue.
- If you need to make minimal seams up to 1.5 mm thick, you can use a knife blade or the smallest plastic crosses.
- To perform the beveling of the rectified paper (this is what is called filing the outer corners at 45 degrees), a wet cutting machine is used. To grind down the long side, use a grinder equipped with a diamond blade. You can also finish the seams with a “turtle” (grinding wheel) or a diamond sharpener.
- Grouting joints is not always required, but it will help smooth out the difference in color between the joints and the surface of the slabs, especially if you choose the material to match the tone of the tiles.
Important! For rubbing seams, only an elastic fugue is suitable, which has good adhesion.
Seamless ceramic tiles: description and properties
It is no secret that material such as tiles, used in cladding, has already become quite firmly established in our everyday life, having proven itself only on the positive side. But time does not stand still and today new types of it are appearing, one of which, namely seamless tiles, will be discussed in today’s article.
Description
Seamless ceramic tiles are what you need to create a unique interior.
In order to understand how seamless ceramic tiles differ from ordinary ones, let’s start with the process of its manufacture. As a rule, in an ordinary tile, after its manufacture, there is a specific small rounding, which appears as a result of its heat treatment. For clarity, we can give an example of the process of baking dough, when upon completion the pie has smooth and slightly rounded edges. And as practice shows, it is the existence of such a small defect that leads to the appearance of seams after installation is completed. Therefore, there is no fundamental difference in how tightly the tiles fit together, since a seam will still appear.
But everything changed dramatically with the advent of an innovative line for finishing calibration, which is performed at the end of firing. It is then, for all its edges inclusive, that trimming is performed with a special machine, which forms its correct geometry, making it possible to lay this tile with the smallest seam (05-1.5 millimeters). Another distinctive feature of this tile is its dimensions (20x60, 30x90).
Important!
By matching the grout to the color you can get the incredible effect of a solid wall.
Properties
Seamless tiles in the bathroom
Its undeniable advantages include:
- No accumulation of moisture, dirt or fungus.
- Attractive appearance.
- Durability and practicality in operation.
- Varied design.
But it is worth noting a few negative points:
- Serial production, which negatively affects the perfect match of shapes.
- Damage to at least one of its even insignificant parts may become the reason for its further and complete replacement.
Attention!
Taking into account all its advantages, and especially its disadvantages, seamless laying of ceramic tiles is carried out following certain instructions.
Laying
The process of laying seamless tiles
The process of laying it begins, as a rule, with preparing the base.
Note!!!
It is how long it will serve you that depends on how well it is prepared.
Therefore, the base of the surface must be perfectly flat and not include any deviations. After this, you need to remove all wooden structures and make a concrete screed. Next, we mark the covering area and determine the area where the laying will begin.
After this, we wet the tile, remove any possible dust and prepare a special glue, which we subsequently apply to its rough side. Next, using a spatula, distribute it over the intended area and install it. If necessary, we bring it to the desired level using small taps with a mallet.