Before you start decorating the walls, you must decide where to start wallpapering the room. Each room (be it a kitchen, a corridor, etc.) has its own characteristics, manifested in the presence/absence of niches, protrusions, corners, as well as in the nuances of lighting. In addition, you also need to take into account the type of wallpaper and the layout of the apartment.
Where to start gluing wallpaper in a room
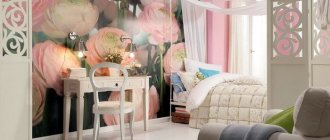
Beautifully and evenly hung wallpaper always changes the interior and makes it more comfortable
Preparing for wallpapering
First, decide what the sequence of actions will be. And the first stage should always be preparatory work, which includes:
- purchase of everything necessary (wallpaper, adhesive, edging, primer);
- preparing the required tools (for work you will need a roller, knife, brushes, tape measure, scissors);
- covering the floor with protective material;
- preparation of communications and, of course, walls.
The preparation stage includes purchasing wallpaper, selecting tools, covering floors, cleaning walls
Purchase materials in advance. Moreover, you need to think not only about how much glue and wallpaper will be needed, but also about the tools with which the composition will be applied. You can use PET film to cover the floor, although old newspapers will also work. It is recommended to turn off the electricity supply; it would be a good idea to remove sockets and lighting fixtures. It’s better to move the furniture out (alternatively, just move it to the center of the room and cover it with foil) to make the room as spacious as possible.
How to protect furniture and equipment from dust and dirt?
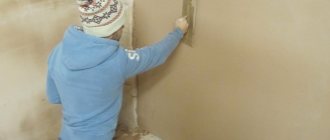
Walls that will be covered require especially careful preparation. The old coating must be removed, then the walls are puttied, leveled and primed. Also, before gluing, the room is well ventilated, after which the doors/windows are tightly closed to avoid drafts.
Walls and ceilings must first be cleaned of old coating
Preparing walls before wallpapering
Preparing for wallpapering
Priming the walls
What to do if the walls are completely crooked
Note! Also make sure that there is a special place on the floor where you will mark, cut and apply glue to the wallpaper. Below we will tell you how to glue different types of wallpaper in different rooms.
Calculator for calculating the number of rolls of wallpaper for pasting a room
Where to start wallpapering the ceiling?
If the entire room, and the ceiling in particular, will be covered, then you should start there. There are 2 gluing methods that can be used for the ceiling:
- from the wall;
- from the center.
The ceiling decoration has two methods of wallpapering: from the wall and from the center
In the first case, the work will be easier and faster, but the method is applicable only for wallpaper without a pattern (and this is what is used in most cases for finishing ceilings).
But if there are patterns on the wallpaper, it is better to start gluing from the center in different directions - thanks to this, you will use the same number of solid strips. In this case, the design will also be symmetrical, which means it will be visually perceived correctly (the width of the stripes along the edges will be the same, which will ensure a harmonious and attractive appearance).
Ceiling pasting
When gluing, mark the entire ceiling from the center. To determine the central point, the entire area is divided into diagonals using a thread. The point where the threads intersect will be the center of the ceiling. Measure a distance from it that is equal to 1⁄2 the width of the roll (this is usually 53 cm: 2 = 26.5 cm). You need to lay the first strip between the markings, and the rest of the pattern will go from it.
On a note! If gluing is done from the wall, first draw a strip 50 cm wide (it is important that it is strictly perpendicular to the window). The first sheet is glued to this mark, and excess material near the wall is cut off using a construction knife.
How to choose the point and direction of working with wallpaper?
In Soviet times, wallpaper was glued from window openings. The reason for this choice is quite simple - the wallpaper of those times was quite thin, they had to be glued overlapping. In order for the light to fall on the joints at the desired angle, making them invisible, the wallpaper was glued starting from the window openings and ending on the other side of the window.
Today there are no problems with choosing a material; the buyer has a huge choice at his disposal - from paper to non-woven fabric, liquid wallpaper and cork. And, nevertheless, the correct choice of gluing direction is still very important today. There are several reasons for this:
- Wallpaper is glued around the perimeter of the room - from the starting point to the ending point. Thus, the first canvas is the place from which the direction of work is set. If you have insufficient experience during the work process, it is easy to make a mistake; as a result, the drawings on the first and last canvas may not match.
- Very often the last part of the wallpaper has to be cut to length because it does not fit. Therefore, it is best to start work and maintain the direction from a place in which the discrepancy between the patterns on the canvases will be unnoticeable.
Where to start wallpapering the walls?
In this case there are also several possible ways. The choice of one or another of them depends on the specific situation, while the type of wallpaper used must be taken into account. Almost all modern wallpaper needs to be glued end-to-end using one of the following methods:
- from the corner;
- from the door;
- from the window;
- from the center of the wall.
There are several options for wallpapering walls: from the middle of the wall, window, door, corner
First you need to make marks perpendicular to the floor surface, using a plumb line or level. Wallpaper can also be glued diagonally - in this case, a thread is stretched from the bottom corner to the diagonally opposite one, and a line is drawn along it. Wallpaper strips are glued obliquely, moving along the drawn line. It is better not to use this method for beginners - it is designed more for experienced craftsmen.
DIY wallpaper sticker on the wall
When using wallpaper with a pattern, difficulties may arise in any variant of perpendicular gluing. The most inconspicuous place is selected (for example, above the door) and gluing begins from there if there are difficulties in joining the patterns.
Gluing wallpaper from a window is quite simple. The height of the room is measured, another 10 cm of margin (for allowances) is added to the resulting figure, then the canvases are cut to match the pattern. The first strip is glued in accordance with the perpendicular guideline, and the rest - sequentially (in most cases - counterclockwise).
The method of finishing wallpaper from a window involves gluing counterclockwise
A few more important points
It is better to glue combined type wallpaper from the middle of the wall, the same applies to wall panels, when creating which you need to maintain a clear symmetry of the picture.
It is recommended to glue combined wallpaper from the middle of the wall
Chic wallpaper pattern
Note! You need to remove the covers from the sockets in advance, and then glue the wallpaper on top. The holes for them are cut out after the glue has dried. It is also better to trim off the excess after the glue has dried.
When gluing wallpaper from the corner, you should consider a few more important points. So, the corners are almost never perfectly straight. To check the evenness, use a building level or plumb line. You can draw a straight line perpendicular in the corner, and then start pasting from there.
In addition, you should not glue a whole strip in a corner, because when the glue dries, folds or distortions may appear on the material, which will cause the pattern to mismatch in the future. To correctly design a corner, follow the recommendations below.
- Choose the most inconspicuous corner and start gluing from there.
- Coat the corners thoroughly, as this is where the wallpaper comes off most often.
- Also treat the corners with a fungicide, because mold “loves” to grow in them.
It should be noted that there is no single algorithm for decorating walls with wallpaper in different rooms.
How to glue wallpaper
Having chosen the appropriate wallpaper, you need to figure out where to start gluing it. In this room they operate according to a special scheme. Usually they are glued in the direction from the light; they do the same in the corridor - you should start not from the front door, but towards it.
Although the corridor is often a narrow and small room, there are many places where it is necessary to adjust and re-glue pieces of wallpaper. These can be areas above the doors or between them.
Currently, many wallpapers are glued end-to-end. Therefore, it is not so important where to glue them from. Any convenient method will do.
You can choose any of the options:
- from the door. A complex method that requires clear verticality. To correctly stick the first sheet, use a plumb line;
- from the corner. Suitable for corridors with flat surfaces. There are almost no ideal right angles, so you need to carefully check the angle from where you will start working;
- from the lines. The method is used as a last resort, because it creates many joints.
Basic principles of wallpapering
Let's look at a few more basic principles, knowledge of which will greatly simplify your work.
Applying glue and pasting flat areas
The type of glue depends on the type of wallpaper used. To stir the diluted glue, it is better to use a special construction mixer so that the mixture is lump-free and homogeneous.
To apply the glue in an even layer, use a medium-width fluffy roller and a special paint bath. The glue is distributed on the strip of wallpaper (you need to move from the middle to the edges), then, when enough time has passed for impregnation (this is usually from 5 to 10 minutes), the strip is folded in half inward with the front side, without bending, and pressed against the ceiling. You need to focus on a vertical line made in advance.
After pressing the upper half, the lower half is released down and pressed in the same way. Bubbles are removed with a wallpaper spatula (you also need to move from the center to the edges), and if you use embossed wallpaper, you need to go over them with a rag. Excess material from above and below is cut off, and the knife should be as sharp as possible.
Wallpapering corners
The main stages of finishing an internal corner are discussed below, but they are also quite suitable for an external one.
Table No1. Instructions for wallpapering an inner corner.
| Steps, photo | Description of actions |
| Step 1 | According to the height of the wall and the pattern, prepare 2 strips (one whole and the other 10-15 cm wide). Apply glue to the stripes and wall. |
| Step 2 | A solid strip is applied to the wall in accordance with the pattern. Press the wallpaper firmly, then cut off the free edge. |
| Step 3 | It is advisable to glue a single strip with a slight overlap at the corner. After that, cut it along the contour of the corner (even if the corner is curved). |
| Step 4 | Then glue another strip, bringing it to the corner, press it well against the wall, but do not go to the edge that is on the adjacent wall with a wallpaper spatula. |
| Step 5 | Go over the joint with a narrow rubber spatula and remove excess glue. That's it, you have a finished, perfectly glued corner! |
How to glue vinyl wallpaper in corners
Video - Gluing wallpaper correctly
Wallpapering near doors, windows and behind radiators
In such hard-to-reach places you will have to try. But don't despair, we'll tell you how to deal with it.
Table No2. Instructions for wallpapering behind the radiator.
| Steps, photo | Description of actions |
| Step 1 | Measure a strip of wallpaper whose height is equal to the distance from the floor to the window sill. If it is impossible to remove the battery, make cuts in the places where it is attached and where the pipe connections are located. Apply glue to the strip and wait the required time. |
| Step 2 | Paste a strip of wallpaper behind the radiator. |
| Step 3 | Carefully insert it behind the radiator and press it firmly against the wall. Smooth the material with a rag, moving outward from the center. |
To hang wallpaper near doors/windows, do the following:
- prepare strips of the required length (from floor to window and from window to ceiling);
- apply glue;
- press the wallpaper to the wall, overlapping the slope/platband by a few centimeters;
- in the corner, make a cut at an angle of 45 degrees, cut off all excess, and push what is left behind the casing with a spatula;
- for the window, make a margin of a few centimeters around the slopes, then press the wallpaper well with a spatula. When the glue dries, carefully cut off any excess.
We glue wallpaper with our own hands near the doors
Making invisible joints
Gaps between strips are usually caused by too much glue. Because of this, the wallpaper becomes very wet, and its width increases by several millimeters. Then, when the glue dries, the wallpaper returns to its original size and, accordingly, a gap forms between the sheets. How to avoid this? Remove the facing layer from the unnecessary piece of wallpaper using sandpaper. Mix the resulting powder with PVA glue. You will end up with homemade grout that needs to be used to process the seams. Although, if you use plain wallpaper, you can also use paint.
Perfect joining of wallpaper sheets
Sometimes the seams are visible because there is glue on the front part. In this case, the problem can be solved with a special liquid for removing glue stains. If the liquid does not help, the wallpaper will have to be re-glued. Curled or loose edges of the wallpaper can be glued with a special glue for joints, and then re-rolled.
Where to start gluing wallpaper in a children's room, bedroom or living room
Features of gluing concern not only the type of wallpaper, but also depend on where exactly they are glued. When deciding where to start gluing wallpaper in the room, you need to pay attention to the presence of any large landmark in the room and start finishing work from there. This could be a corner, window or door. It is important to determine the maximum and minimum height of the walls based on preliminary measurements in different places. The first strip must be glued taking into account the average indicator.
Helpful advice! The peculiarity of wallpaper on a non-woven basis is the thickness of the canvas, so gluing them overlapping is unacceptable - only end-to-end.
If the room has a balcony door, and the distance from its door frame is very small, then you can choose the most distant corner. Since there are practically no perfectly straight corners, wallpapering must begin after making vertical marks on all walls.
It should be noted that there is no single algorithm for decorating walls with wallpaper in different rooms.
It should be noted that there is no single algorithm for decorating walls with wallpaper in different rooms. A special approach in each individual room is important here. A particularly popular method among craftsmen is to start work from the entrance doors and glue the wallpaper in the room in two directions, or move clockwise and place the strips from left to right.
Thus, when gluing wallpaper in living rooms, it is necessary to follow the joining rules. Then the joints, even when exposed to direct rays of light, will not be noticeable, and the surface of the wall will take on the appearance of a solid canvas.
Where to start gluing wallpaper in the hallway: tips and nuances
When deciding where to start gluing wallpaper in the hallway, you must take into account that this room has a number of significant differences from other rooms. The main one is the lack of windows. In addition, there are more doors, openings and corners here than in any other room - both internal and external. Often the corridor is decorated with arches. Therefore, it is better to start gluing wallpaper from the farthest inner corner.
When the angles are straight, the work will go quickly and easily. Otherwise (which happens quite often), the order of work will be as follows:
For wallpapering in the hallway, it is advisable to use a special compound with increased adhesiveness.
- On the wall opposite the entrance doors, you need to make a vertical mark using a building level or plumb line at a distance of 10 cm from the nearest corner and stick the first strip.
- The next strip should be glued so that its edge touches the adjacent wall, where a vertical line is also applied.
- If the room has complex geometry, then a vertical line must be drawn for each strip.
To apply wallpaper in the hallway, it is advisable to use a special compound with increased adhesiveness, and the walls should be thoroughly primed beforehand. The adhesive solution is not applied to the wallpaper; they are applied dry to the wall so that their edges exactly coincide with the vertical mark. The edge is pressed and the canvas is lightly ironed in the middle with a special spatula. Next, the surface is smoothed in the direction from the middle to the edges in a Christmas tree pattern.
Important! Applying an adhesive composition simultaneously to walls and canvas can lead to complications during work. Bubbles and wrinkles often appear on the surface, which do not always disappear even after complete drying. It is best to follow the manufacturer's instructions that come with the wallpaper.
Applying an adhesive composition simultaneously to walls and canvas can lead to complications during work
Nuances of choosing wallpaper
In order to choose the appropriate type of wallpaper, consider several important points, including:
- room area;
- its purpose;
- humidity level;
- the condition of the ceiling/walls.
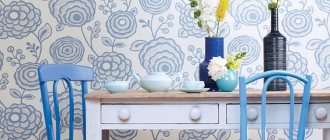
You can create a bright accent in the room by decorating one wall with wallpaper that will stand out in color.
Based on everything listed above, we can conclude that you can buy wallpaper of any type for dry rooms with smooth walls. Only after choosing the appropriate option can you decide where exactly to start gluing. If the room has high traffic and high humidity, then it is better to give preference to vinyl wallpaper.
In dry rooms with smooth walls, it is permissible to use any type of wallpaper
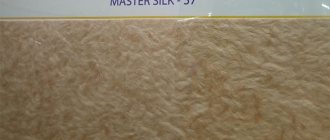
A good option for the living room is silk-screen printing, its shiny surface will give the room respectability
Paper wallpaper is a “lifeline” for inexpensive cosmetic repairs
Let's get acquainted with the characteristics of various types of wallpaper present on the modern market.
- Paper . They are characterized by the fact that they fit well on any surface (even the most difficult to reach) and can be combined with any other wallpaper.
- Fabric . This is the most expensive variety, ideal for a living room or bedroom. Able to hide minor damage on walls.
- Non-woven . They are very popular because of their density, relief, texture; They also mask imperfections well. External coatings vary greatly.
- Liquid . More reminiscent of decorative plaster, they can be used in any room. Read more about liquid wallpaper here.
- Vinyl . Very durable and dense, used for walls that are subject to serious dirt and stress.
Non-woven wallpaper has earned popularity due to its texture, reliefs with a dense structure
In rooms with high humidity and high traffic, it is better to use vinyl products
For the kitchen, the most suitable wallpaper options are vinyl or special canvases for painting.
Video - Gluing non-woven wallpaper
There is another variety - photo wallpaper, which allows you to create a unique interior and visually enlarge the space. When gluing them you must:
- use special glue for photo wallpaper;
- first lay out the fragments on the floor so that you end up with a complete picture;
- glue them onto perfectly flat surfaces.
Table No3. Instructions for gluing photo wallpaper.
| Steps, photo | Description of actions |
| Step 1 | Apply glue to the first sheet and to the wall. Fold the sheet in half so that the mixture is well absorbed for a few minutes. Then expand. |
| Step 2 | Smooth out the wallpaper using a rubber spatula. Treat the joints with a rubber roller. The fabric is absolutely not suitable for this! |
| Step 3 | Attach a second sheet, try to very carefully match the pattern (literally down to the millimeter). Smooth with a rubber spatula. Remember that many wallpapers provide trimming between the joints. |
| Step 4 | After gluing the wallpaper, cut the joint and remove the unnecessary strip. |
| Step 5 | Re-inspect the joints, try to ensure that they fit as closely as possible. Apply glue and roll over it. |
| Step 6 | Prepare a set of multi-colored pencils. Choose a color that matches the design and chop the lead with a blade. |
| Step 7 | Using the crushed stylus, carefully cover all scratches and joints with your finger. |
You can learn more about gluing photo wallpaper from the thematic video below.
Video – Proper gluing of photo wallpaper
Which side is wallpaper glued on?
Before gluing, you need to determine the side from which to start gluing the wallpaper correctly. When choosing a method, take into account the lighting features. Several decades ago, wallpapering was done exclusively with an overlap; on one side of the canvas there was a strip for gluing the next canvas onto it. The gluing began from the side of the window to hide the transition.
Nowadays, various gluing methods are used, as a result of which the question of choosing the side on which to start gluing is not so relevant. When using high-density wallpaper, overlapping wallpaper is generally undesirable, so it is unacceptable to glue such wallpaper from the window side.
Methods for wallpapering
- From the door. In the case when the walls are pasted vertically, strict geometry must be observed; for this reason, you can start gluing near any vertical landmark. The first canvas is pasted vertically, this is ensured by special devices (plumb), then the pasting continues in any direction.
- From the corner. This method is suitable only when the corners of the room are perfectly even. However, this condition is met extremely rarely, so it is preferable to glue noticeable strips of canvas near ordinary landmarks.
- From the largest landmark. If the room has many passages and windows, it is better to stick from the largest landmark.
- From two or more lines. This is the correct answer to the question of where to start gluing wallpaper in a situation where there is a large window in the room. The gluing is carried out in 2 directions from this window.
In the TAM.BY catalog you will find contacts of craftsmen for any type of finishing work, including wallpapering, as well as addresses of stores where you can buy everything for construction and repair.
If you notice an error in the text of the news, please highlight it and press Ctrl+Enter
To decorate the walls, it is not enough to choose high-quality wallpaper and good glue. If the room is covered with crooked paper strips, the renovation will look sloppy. The same applies to joints or thickenings that clearly appear under the light if the trellises are attached with an overlap. Where to start gluing wallpaper? There are several ways to start, all of which take into account the levelness and placement of doors, windows and other elements.