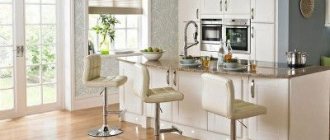
A modern kitchen is not only the heart of the home, a place for gatherings and a food preparation area, but also a technically equipped room that requires powerful electrical wiring. A kitchen from 40 years ago is radically different from a modern one. If previously one outlet for a refrigerator was enough in the room, now you need at least six of them.
How to properly place sockets on the kitchen apron so that they are completely safe and easily accessible?
What to consider when locating outlets
The kitchen is one of the most energy-consuming rooms in the house. A large number of electrical appliances require powerful wiring and, accordingly, many contact connections. The layout of sockets and switches in the kitchen before starting renovation is a must . Drawing up a diagram begins with calculating the total power of all equipment planned for installation.
An approximate list of electrical appliances and their power consumption:
- lamps – 150-200 W;
- refrigerator – 100-500 W;
- Microwave oven – 500-3000 W;
- electric kettle – 2000 W;
- TV – 50 W;
- oven – 2000-4000 W;
- induction hob – 7000-9000 W;
- electric hob – 5000-7000 W;
- hood – 100-300 W;
- multicooker – 1450-1500 W;
- coffee maker – 900-1500 W;
- mixer – 100-500 W;
- toaster – 700-900 W;
- washing machine – 2000-2500 W;
- dishwasher – 1800-2500 W;
- instantaneous water heater – 3000-8000 W;
- coffee grinder – 200-900 W.
Attention! Keep in mind that not all devices will be turned on at the same time, but the total power must be calculated.
The maximum power consumption of several simultaneously switched on electrical appliances in a typical apartment, as a rule, does not exceed 7000 W, but there are exceptions. If your figure is higher, seriously think about distributing the load across phases or introducing 380 V.
The choice of cable for powerful electrical wiring begins with calculating the cross-section of the common supply wire and the wiring going to the pantographs:
| Total load of all electrical appliances | Cable cross-section | Material |
| Up to 3500 W | VVGng-Ls 3x2.5 sq. mm | copper |
| Up to 5500 W | VVGng-Ls 3x4 sq. mm | copper |
| Up to 10000 W | VVGng-Ls 3x6 sq. mm | copper |
| Up to 15000 W | VVGng-Ls 3x10 sq. mm | copper |
Advice. Even if your house has an old type of grounding, in rooms where major repairs are being carried out, do the wiring with a three-core cable. When it comes to replacing all the electrical wiring, you won't have to remodel your entire home.
Installing a glass apron with your own hands
Such plates are attached to the wall using special parts designed for this purpose and a product based on silicone. During installation, the joints between the panels and the countertop are sealed.
To attach all surfaces, you will need a special hole made in advance. The size of the fasteners is two centimeters.
Important! Please note that when choosing glass panels for kitchen decoration, you get rid of uneven walls.
Preparatory stage before installing the apron
Before installing the glass surface:
- It is necessary to make sure that the working surface does not have any protruding elements and cannot damage the glass.
- It is worth double-checking that the panel size matches the connector.
- All holes should be located symmetrically relative to each other and have a diameter slightly larger than the fasteners.
- The calculation of fasteners should be based on the fact that at least four special hardware are needed per square meter.
Important! If there are electrical sockets or switches on the wall serving as an apron, you should remove the top covering on them.
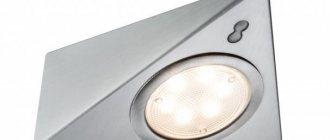
Work surface illumination
An additional decorative element when decorating a glass apron for the kitchen with your own hands is lighting. Thus, it is recommended to use an LED strip around the perimeter, which serves as additional light for the panels and a light source for the working surface of the tabletop.
Installation
Installing a transparent product is the final stage of your renovation. At the time of installation of panels made of transparent material, you should already have all the plumbing installed in the kitchen, there should be sockets and the furniture should be arranged.
At the initial stage, it is necessary to attach the slab blank to the wall and mark the drilling locations. After this, the surface is attached using dowels. Installation takes little time. After installation, you must remove the protective film that is attached to the glass.
Important! The final step is to attach the “caps”, which can come with the panels. At this stage it is also worth putting the disassembled sockets back in place.
Rules for the location of sockets in the kitchen
Taking into account the total power of electrical appliances and the cable cross-section, we draw up a diagram of the location of contact connections. This is influenced by the installation location of kitchen electrical appliances and compliance with safety requirements.
Rules for the location of kitchen sockets on the apron:
- Behind the lower modules for built-in appliances, sockets are located at a height of at least 10 mm from the baseboard level.
- The selected location for the contact connection must be dry.
- Switches for power supplies, if necessary, are located at a height of at least 0.5 m from the floor.
- The socket must be located no further than 1 m from the pantograph connected to it.
- Often, contact connections are installed on the inside of the lower kitchen modules.
- Power sources for appliances built into the upper modules of the kitchen (hood, microwave, coffee maker, etc.) must be located at a distance of 6 cm from the top edge of the kitchen cabinets.
- The height of sockets for small electrical appliances for temporary use (coffee grinder, mixer, kettle, etc.) is no more than 1-1.5 m from the floor level.
It is allowed to connect several low-power current collectors to one socket, if the total energy consumption does not exceed the capabilities of the electrical wiring and contact connection.
The maximum power consumption for sockets of a Russian manufacturer is 1300 W, for imported ones - 3500 W. Experts recommend purchasing sockets with an automatic power shutoff function. In the event of a current leak, the relay is activated and the socket is turned off.
High-power electrical appliances must be connected to their own power sources.
Attention! Installing sockets in the kitchen on the apron near the sink or stove is prohibited.
The arrangement of sockets on the apron in three lines is considered the most convenient. Thus, the upper line of power supplies is used to connect lighting fixtures, hoods and other equipment installed in the upper modules of the kitchen unit.
The middle line is free-use sockets for connecting small electrical appliances that are not constantly in use.
The bottom row is used to connect equipment built into the lower modules and retractable sockets on the worktop (if available).
Installing skins: rules and nuances of installation in the kitchen
Skinali is a very broad concept. This includes all decorative panels - for walls, ceilings and furniture, which use glass and photo printing. In addition, the Russian consumer is accustomed to classifying any glass wall panels in the same category - plain, covered with film, painted, etc.
But no matter what design option is chosen, you can install the panels yourself.
Varieties of skinali
You need to choose a material for a kitchen apron taking into account not only the design, but also the characteristics of the room itself.
- Glass panels - this means they are made from tempered glass, since regular glass is too fragile and dangerous: if damaged, it crumbles into sharp fragments. Hardened is much stronger, and fragments, if any appear, have rounded edges and are much less dangerous. In the photo they were made of tempered glass.
Photo printing on such glass is extremely durable and perfectly conveys color. The image is chosen to suit your taste - in the company catalog or on a video with samples of work.
- Plexiglas - more precisely, panels made of acrylic and polycarbonate. Photo printing on them has the same advantages, but the material itself is somewhat different. While superior to silicate glass in strength and safety, plastic tends to deform when heated. This option is recommended for kitchens with an electric stove or induction hob. The photo below shows acrylic panels with photo printing in the kitchen.
- MDF. Making an apron from laminated MDF or with photo-printed material is a fairly popular option. MDF is relatively resistant to moisture and is not prone to swelling like regular wood. However, the service life of such panels is much shorter.
- Chipboard is not the best option for sheathing boards, as it is noticeably more sensitive to moisture. For the skinali, chipboard laminated on both sides is used. This is a budget, but short-lived option, and you can only choose it as a temporary solution.
- Laminated plywood . A material is used that is laminated on both sides to prevent the absorption of condensation that appears in the gap between the wall and the panel. In the next photo it was made from laminated plywood.
Plywood is even more resistant to moisture than MDF, but images are rarely formed on it. As a rule, this is an option for kitchen interiors in rustic, rustic or classic styles.
Skinals are attached in several ways. The method is determined by the size of the apron, the condition of the wall and the desire of the kitchen owners. Installation depends little on the nature of the material.
Some restrictions
Real skinals are made to order, as they involve photo printing. Sometimes they try to replace the panels with ordinary glass, with a vinyl film glued to the inside. The appearance of such an apron is quite decent, but the durability is much lower. On the other hand, this option can always be updated by replacing one image with another, while photo printing can no longer be removed from the surface of the glass. The photo shows vinyl film under glass.
- Installation of the skin is possible only after installing the headset. Moreover, it is desirable that the dimensions of the product be determined after assembling the furniture. The following video looks at how to take measurements for panels.
- Before ordering, it is necessary to determine exactly how the skins are supposed to be mounted: whether the railing will be installed (the latter is attached to the wall through the glass), whether there are sockets and switches in this area. All holes for fastenings and accessories must be made in advance at the manufacturing stage.
- Triplex, that is, two- or three-layer panels, where the film with the image is located between layers of glass, does not allow the formation of holes. In this case, the skinals can only be attached with glue or in a profile, and the sockets and switches will have to be moved to another part of the wall.
Preparatory work
Glue installation requires a perfectly flat wall. Installation using a mount or profile is less demanding. But still, height differences of more than 1 cm on the wall are unacceptable.
- The surface of the area is carefully leveled. If the apron is angular, you need to make sure that the angle between the walls is 90 degrees.
- Covers for sockets and switches are dismantled. The rosette cups are extended to a length equal to the thickness of the skinal – 6–10 mm. It is preferable to leave this work to a specialist.
- The width and length of the panels are quite large, especially when the apron is made as a single structure. Care must be taken to remove pieces of furniture from the “path” and, if possible, empty the kitchen. You need to be especially careful when delivering the apron.
Installation skinned
Most often, the panels are mounted on special glass holders. Firstly, in this case there is no need to level the walls so carefully. Secondly, dismantling is much easier than installing with glue.
Installation of kitchen apron panels.
- The glass or MDF plate is pressed to the area where it is attached, and the fixation points are marked, which will facilitate subsequent installation.
- Holes are drilled in the wall for a plastic dowel - 6 mm. If the apron in the kitchen is mounted on drywall, then use a butterfly dowel.
- The dowels are driven into the holes.
- The panel is pressed against the wall so as to align the holes and places where the dowels are attached.
The glasses of sockets and switches must fit exactly into the holes intended for them. - Installation of a corner kitchen begins with the fragment that is placed end-to-end against the wall, and then a slab is attached that rests on the first one.
- Silicone bushings are inserted into the holes to prevent contact of the screw with the glass, and then a brass bushing with threads is inserted. Screw in the self-tapping screw to its full length. Do not tighten the fasteners: the glass may be damaged. Pay attention to how the panels are secured in the video.
- Self-tapping screws are masked with decorative caps. The seams between the panels, if any, are sealed with silicone sealant. The photo shows the fastening of the caps.
- A glass apron is often combined with lighting - this adds glamor. The backlight is LED and should be mounted following certain rules. The distance between the diode strip and the panel with photo printing must be at least 70 mm, between the backlight and the triplex - at least 30 mm.
- Install removed covers for sockets and switches.
The installation of the skin is presented in the following video with all the details.
Installation with glue is technically very simple and boils down to uniform application of silicone glue or liquid nails to the surface of the slabs. The difficulty is that the glue must be applied during the process, and not in advance. Therefore, first, the skins are placed on the tabletop, checked to see if the dimensions match, then the product is tilted at a certain angle and glue is applied to the entire surface. The panels are then pressed down and left to dry.
The following video provides more information about this method of fastening, however, even after watching the video, you will not be able to become a good installation specialist.
Installing a glass apron is not particularly difficult, especially if you watch the video instructions, but it requires accuracy and the participation of at least one assistant. The panel is quite heavy, and when fastening it must be held tightly to prevent slipping or damage.
Source: https://idealkuhnya.ru/steni/fartuck/ustanovka-skinali.html
Preparing for installation
According to the drawn up plan, we mark the walls. We measure and mark with a construction pencil the places where the power supplies are attached. When applying markings, pay attention to the drawing of the future apron. Sockets should not spoil it.
Advice. If you order skinals, do not forget to warn the manufacturer about the holes for sockets in the installed locations.
Tools for installing sockets will include:
- perforator;
- level;
- wall chaser or grinder;
- core drill;
- pliers;
- roulette;
- indicator screwdriver;
- multimeter;
- pencil.
Necessary materials:
- three-core cable of the required cross-section;
- socket boxes;
- junction box;
- express terminals;
- alabaster;
- cambrics;
- required number of 16 A sockets;
- dowel-nails;
- self-tapping screws
How to properly install a glass splashback in the kitchen?
An apron or protective screen is an incredibly useful device. It is no secret that soot, steam, temperature changes, and condensation quickly destroy finishing materials and significantly limit their choice. A glass, plastic, or ceramic panel near the stove and worktops prevents damage to materials and prolongs their life.
Installation of a kitchen apron is often done independently. This is quite a difficult but doable job.
How to make a rosette on a kitchen apron
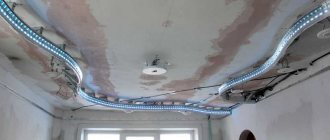
After de-energizing the room, using the finished markings, we make holes in the wall for the internal boxes and grooves for the cable. We make the holes for the boxes using a core drill of the required diameter, and the grooves with a grinder or wall chaser.
Immediately, as we go along, we try on the inner boxes. If they do not fit neatly into the prepared sockets, we expand the latter with a hammer drill. Inside the grooves, we drive plastic dowels into the wall in half-meter increments. They will be needed to secure the electrical wiring. We fix the boxes in place, lay the cable, fixing it with self-tapping screws and clamps in the groove.
Advice . Instead of dowels with clamps, simple alabaster will help to grab the wiring inside the groove for further work. The material sets quickly and is easy to apply.
We cut the wires so that a margin of about 5 cm comes out of the box and socket boxes. We connect the cables to the sockets and test all contact connections with a multimeter. If everything is in order, we move on to the next stage of repair - plastering work.
We install a kitchen apron made of tiles, glass, mosaics, MDF or other materials on the prepared walls. The holes on the panels must completely coincide with the installed socket boxes. Upon completion of all work, we connect the sockets to the wires protruding from the socket boxes.
Types of glass for a kitchen apron
The following types of glass are used for finishing:
- Stalinite;
- triplex;
- organic glass;
- polycarbonate
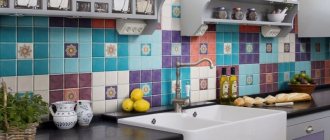
Stalinite and triplex are very popular. The drawing for them can be made to order according to your own sketch. Colorless glass can be transparent or frosted. The only function of the transparent version is to protect wallpaper or paint from splashes. A frosted glass backsplash looks better and produces less glare.
Glass panels for the kitchen with photo printing look impressive. The design on them does not fade when exposed to ultraviolet radiation and always retains its original freshness. Not only colorless glass, but also colored glass is used. A large number of shades allows you to choose any color.
Stemalite is often used, the inner surface of which is coated with fusible paint. Firing gives it strength and resistance to environmental influences. A budget apron for the kitchen will be made of glass, having a vinyl film with a pattern . It is rolled onto the reverse surface. The downside is that the film may peel off.
The mirror version looks great. It is suitable if the person working in the kitchen is satisfied with his appearance, and the reflection in the mirror does not cause him discomfort. Some manufacturers offer crystal trim. In this case, it is necessary that it matches the interior.
Step-by-step algorithm for connecting sockets
Among the wires removed from the boxes, we find the same colors, connect them on one side to the socket, and on the other to the distribution box using terminal blocks.
Important! To avoid the risk of short circuiting, properly strip wires before connecting to terminals. The wire should be stripped exactly as far as it will go into the terminal. If you have removed an excess fragment, it is better to cut it off with wire cutters.
We insert the wire into the terminal and tighten the clamping screw well. It is important that no bare area protrudes from the terminal, and that the cable itself is held firmly in the terminal. We fix the case in the socket box, installing it evenly. We hide the body behind a decorative protective cover.
Types of fastenings
Have you decided to install a kitchen apron made of glass with lighting or any other? Then you need to decide how you will attach it to the wall. In general there are three options:
- Using screws . Fastening is carried out using screws, which are then covered with decorative plugs. This method is very reliable, and it allows you to install the panels even on an uneven surface. The apron, secured with screws, can be easily removed and reinstalled if desired.
After fastening, the screws are visible on the surface of the panels
The downside is that the plugs will be visible, however, if they are chosen correctly, they will not greatly spoil the appearance of the apron.
- On glue . Can only be used if there are smooth, plastered walls. The main advantage is that glass kitchen aprons installed with glue or liquid nails do not have noticeable fasteners.
The glass apron can only be glued onto a perfectly flat surface.
- Using hanging fastenings . Small metal clip-plates are inserted into the panels (as in the photo). Best suited for cases where a non-solid apron is to be installed. Fastenings allow you to smoothly dock all its halves.
Clamps allow convenient installation of panels from several halves
The instructions for installing glass aprons state that after installation, the surface is covered with a decorative corner. This will prevent moisture from entering the gap between the panel and the work surface, and, accordingly, the formation of mold. If you purchased skins consisting of several parts, then it becomes necessary to treat the seams with a thin layer of sealant.
Common mistakes
Most often, people make mistakes in installing sockets due to ignorance of the basic rules for their installation.
The most common mistakes:
- Start of work without drawing up drawings and markings. If you do not calculate what furniture and equipment will be located where, after completing the long-awaited renovation, there is a high probability of encountering problems such as sockets hidden behind cabinets and the need to use carriers.
- Connecting sockets for powering “wet” electrical appliances through a regular automatic machine. Equipment such as an instantaneous water heater, dishwasher or washing machine must be powered through a residual current device or differential circuit breaker.
- Installing regular sockets near the faucet , under the sink, near the gas pipe or hob. This arrangement is prohibited by safety regulations. The distance from potentially hazardous areas should be at least 0.5 m. If the wiring is already installed and there is no possibility to change the location of the outlets, the best option would be to install waterproof power supplies.
- Connecting the refrigerator through an extension cord that does not meet safety requirements. Connecting powerful electrical appliances through non-factory-assembled electrical extension cords or old carriers can cause a fire.
Note! Some refrigerator models have an additional power cord for connecting the freezer. When planning the layout, be sure to take into account the model of the future refrigeration appliance and its features.
If there are hidden pipelines in the apartment, be careful when chiselling the walls to install the bottom line of outlets. Water supply and sewerage pipes can be installed at a distance between 10 and 25 cm from the floor.
Glass apron with photo printing
The photo printed pattern on the glass panels is reliably protected from moisture, dust or any household contaminants. Working with glass requires precision execution and reliable methods of fastening during installation. Therefore, for the correct placement of glass panels, preliminary measurements and markings of the walls are necessary. An original option for the kitchen could be a glass apron with lighting.
To do this, you need to select an LED strip that will softly illuminate the kitchen furniture and apron from the inside, advantageously emphasizing the photo printing pattern. To locate the backlight behind the panels, it is recommended to maintain a distance of 70 mm for UV printing to the light source, and for artistic triplexes - 30 mm.
Features of making a pattern using high-quality photo printing and installing a glass apron are shown in the video.
Do sockets spoil the look of the backsplash?
Not everyone is ready to sacrifice beauty for convenience. For some customers, it is unacceptable for sockets to spoil the appearance of the apron, especially for photo printing. The cutout for the electrical outlet will cover an important element of the picture, and the plugs sticking out of the wall will further aggravate the picture.
Electrical stores have a huge selection of hidden sockets for the kitchen. The range includes retractable socket blocks for countertops and cabinets of different shapes, sizes and number of possible consumers. To install them, a hole is drilled in the countertop or wall of a wall cabinet, and a wire of the required cross-section is connected.
IMPORTANT! Before making a cutout, make sure that the pullout unit will not interfere with the use of the cabinets.
Installation of a glass apron in the kitchen, installation rules
A healthy alternative to wall tiles in the kitchen is a glass backsplash. Expressive glass sheets with an original pattern inside allow you to avoid most problems, because the skin is durable, hygienic and resistant to aggressive environments. Well, tell me, isn’t this the dream of every housewife?
A stylish kitchen design solution can be the installation and installation of a glass apron (skinali). To make such an apron, the following types of glass are used:• transparent• frosted
• tinted.
When making the apron, glass with a thickness of 6 mm is used; for large areas it is possible to use glass up to 10 mm. The maximum size of the glass sheets of the skinali can reach 3 meters. An apron for the kitchen can be made from one solid fabric or several panels. Drawings made using high-quality photo printing are applied to the back of the apron.