The use of LED lamps in kitchen lighting allows you to solve several problems at the same time: diversify the interior, add more light to the work area, highlight interesting details and instantly transform the kitchen from a place for cooking into a room for a holiday or a romantic dinner. Installation of LED backlighting is easy to do with your own hands; materials for it are easy to find in electrical equipment stores. With minimal investment of time and money, you can give your kitchen a completely different look.
Benefits of using LED backlighting
Why are LEDs replacing traditional lamps? There are several reasons for this:
- Energy savings - energy consumption is 10 times less than incandescent lamps and 3 times less than fluorescent lamps.
- Strength, safety and resistance to mechanical external damage.
- Durability – LEDs can last about 11 years of continuous operation.
- High variability of colors.
- Excellent lighting brightness - the device heats up instantly.
- Minimum heat generation and operation at low temperatures.
- Easy to install and use.
The advantages are very serious; the LED strip is worthy of, if not taking the main role in kitchen lighting, then at least significantly supplementing it.
Options for using LED strip in the kitchen interior
In addition to traditional lighting of the work area, lighting can be used in other places in the kitchen interior. Each zone will be played out differently. Examples of all works are shown in the photo at the end of the article.
Working surface
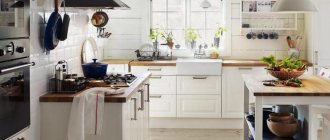
Functional illumination of the work surface - for these purposes, lighting is installed under wall cabinets, using either direct LED strip or ready-made lamps. Important! Choose warm white light to illuminate your work area to make your food look more appetizing.
Kitchen set
Decorative lighting for kitchen units - when installing the tape on the upper surface of wall cabinets, it is not threatened by external influences and you can use any open LED strip; when installing lighting on the bottom of floor cabinets, you should choose a tape with an increased level of protection to eliminate the risk of getting wet during wet conditions cleaning
Apron
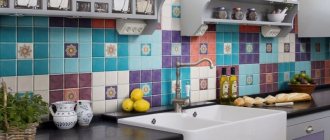
Decorative lighting for the apron - looks especially impressive when using a glass apron; in this case, both front and back lighting options are possible when the equipment is located on the back side of the apron
Ceiling
Ceiling lighting - easy to install are contour lighting (when the LEDs are located on a shelf and shine upward) and directional lighting (when the light goes along the ceiling). This is exclusively decorative lighting, which is not capable of fully illuminating the room.
Cabinet drawers
Functional lighting inside drawers and cabinets - Pay attention to the touch-sensitive LED lamps, they will be activated when the door is opened.
Dinner Zone
Illumination of the table and dining area - here it is also important to choose a device that will have a protective layer that protects against fumes, dirt and moisture. The possibilities of using lighting in the interior are not limited to these options, it all depends on your imagination.
LED lighting selection criteria
When selecting devices, you should pay attention to a number of important parameters so as not to change them to new ones in the future
Power
Wattage (W) is used to indicate the luminous efficiency of fixtures and reflects the rate at which electricity is consumed. If for other types of lamps the power determines the intensity of the glow, then for LEDs it is a secondary figure. Even low wattage ratings produce light so bright that it would require 10 incandescent light bulbs to provide it. Instead of a 100-watt conventional light bulb, you should choose a 9-10-watt LED.
Glow power
The luminous intensity in lumens (lm) is directly related to the power. The luminous flux of diodes represents the power of the beam energy, or a set of quanta emitted into space. The higher the diode power, the greater the luminous flux will be. So, at 5-7 W the lamp produces 250 lm, at 10-13 W - 400 lm, at 25-30 W - 1200, etc.
Also, when choosing a lamp, you need to take into account the temperature of the glow in Kelvin. Higher values give a cold glow, low values give a warm glow:
- 2500-4000 K – warm white;
- 4000-6500 K – neutral white;
- 6500-9500 K – cool white.
The human eye adapts best to a warm white glow; such lamps should be chosen for LED lamps.
Protection
The instructions for any diode kitchen lamp always indicate the degree of protection against dust and moisture. It is designated by two letters (IP) and the same number of numbers. The first (0-5) indicate protection from solid pollutants, the second (0-8) - from water. The first marking “5” means reliable protection from even the finest dust, the second “8” makes the lamp completely waterproof.
Type of LEDs
All lamps have sockets, diode bulbs are screwed into them
Therefore, when purchasing LED lamps, you need to pay attention to the suitability of their base for a specific socket. All of them are classified into types B, E, P, G, S
In addition, lighting diodes are divided into the following types:
- SMD LED. By design, these are phosphor-coated crystals on a heat-removing substrate made of copper or aluminum. They have great power and are available in white. They emit light at an angle of 100-130 degrees.
- COB LEDs. They are chips on a board, consisting of dozens of SMD crystals under one housing coated with a phosphor. Their luminous flux is even more powerful than that of the previous variety. Due to the large scattering angle (180 degrees) of light, such diodes are not suitable for creating highly targeted radiation.
- Filament LED. Most often used for decorative lighting. They have a spectrum of light that is very pleasing to the eye, reminiscent of incandescent lamps. The angle of the light flux is 360 degrees due to the cylindrical shape of the substrate.
Choosing the right LED strip
In order not to get confused in the abundance of types of tapes, we will tell you in detail about their types. Tapes are classified according to several criteria:
- LED density - the greater the number of LEDs per linear meter, the brighter the glow will be (30 pcs/m, 60 pcs/m, 120 pcs/m, 240 pcs/m)
- Degree of moisture protection - for the kitchen, choose a tape marked IP65
- Number of colors - SMD strips shine in one color, the brightness of which depends on the number of crystals in the diode, RGB strips are made of crystals of three colors, which allows it to glow with all the colors of the rainbow.
The RGB tape can be equipped with a remote control, which can be used to change colors.
Now you can choose a tape depending on what role the lighting will play in the interior.
How to choose lighting intensity
The main characteristics that interest the buyer when choosing a strip for the kitchen are the power and color of the luminous flux. The power (or illumination intensity) of the strip is regulated by the number of LEDs and their characteristics. The brightest strips contain 120 LEDs per linear meter. In this case, SMD 5050 LEDs are used (each LED contains three crystals measuring 5.0 x 5.0 mm, with a power of up to 3500 mCd). Such strips combine the function of design and basic kitchen lighting.
LED strips perfectly combine both design and basic kitchen lighting
Tapes with more modest luminous intensity contain 30 or 60 point sources per 1 meter. The source dimensions are small (for example, SMD 3528 LEDs have dimensions of 3.5 x 2.8 mm, one chip and are characterized by low power - 1400-2200 mCd). These are decorative strips for design and lighting, highlighting individual interior decorations in the kitchen.
This is what a waterproof SMD3528 LED strip looks like in the kitchen
Types of LEDs
LED lighting for kitchens and living rooms uses the following types of LEDs:
- SMD 3528 - characterized by medium power and a wide angle of light distribution - about 120º, used in the kitchen as lighting for furniture, decor and multi-level ceilings.
- SMD 5050 is a bright and powerful LED made of three crystals, with a wide light distribution angle from 120º to 160º, used for basic lighting.
- SMD 5630 and 5730 are the brightest LED main light sources, also with a wide illumination angle of up to 160º. These LEDs allow you to brightly illuminate any corner of the kitchen.
- SMD 2835 - new elements, characterized by high brightness with small sizes (2.8 x 3.5 mm), long-lasting lighting power (up to 50,000 hours of operation).
LED lighting for the kitchen is most often used as backlighting
The SMD marking indicates surface mounting of the LED in the strip. It provides a wide beam angle. In addition to the common type of SMD, DIP LEDs of the “piranha” type are used (technology for deep mounting of an LED in a strip). They provide directional light and a light propagation angle of 80 to 90º. These are cheaper tapes; they are used in the kitchen for design purposes, and they are also often used to replace neon lighting in outdoor advertising.
The lighting intensity determines the energy consumption of the tape and is measured from 4.8 to 32 W/m. Indicators of 28 W/m and 32 W/m correspond to very bright main lighting in the kitchen. The white and mirror base board helps to further increase the power of LED lighting.
What is needed to install an LED strip with your own hands?
Everything you need can be easily purchased at electrical supply stores. Pay attention to the quality of components.
- LED Strip Light. Sold by the meter, so please take measurements of the surface to be installed in advance.
- Power unit. Since the voltage of the LED strip is 12 W, and the network produces 220 W, a power supply is required. It is better to select it with a power reserve of 30%.
- Flexible two-core wire with a cross-section of 0.75 mm.
- Soldering iron with solder.
- Electrical tape or heat shrink tubing.
- Switch or toggle switch
Once you have purchased everything you need, you can begin installation.
Selecting a power supply
LED strips are connected to a network with a voltage of 12 or 24 V. Therefore, in order to power the LED from a simple outlet, you will have to purchase a converter. Selecting the necessary transformer parameters is quite simple, since the power per linear meter of tape is always indicated by the manufacturer. If this indicator is 12W, then with a strip length of 4 meters, its total power will be 48W. For a margin, add about 25% to this figure and purchase a 60W transformer.
Power supplies vary in design. Sealed models with a plastic or aluminum body are ideal for use in the kitchen. Models with a perforated body are highly powerful and affordable, but they will have to be additionally protected from moisture. If you plan to use network units, then you will have to install a separate device for each of the tapes. In addition, in order for the LED strip to work longer, it will not hurt to protect it from power surges.
By connecting several tapes, use amplifiers, and add a dimmer to the system, you can additionally adjust the brightness of its glow.
How to do the installation yourself
Let's look at the process of installing LED strips under kitchen cabinets step by step.
Determine the place where the power supply will hide; the length of the wire used depends on this. You can choose a place closer to the outlet, you can plug into the connection point of the kitchen hood. It all depends on the “topography” of your kitchen.
Measure the surface of the intended installation.
Cut the required amount of tape.
Pay attention to the cut marks! By cutting the tape in another place, you risk ruining it
You can read how to properly cut an LED strip here.
Either two cables are soldered to the contacts, or two connectors are installed (pictured)
Then insulation is performed (with tape or tube).
We connect the wires in parallel, observing the polarity - plus to plus, minus to minus. We connect the resulting connections to the output of the power supply.
The base of the tape is self-adhesive, so after first cleaning and degreasing the surface, we simply glue it on.
Do not turn on the backlight immediately after installation; let the glue cool and set.
Once you've carefully hidden the wires and secured the power supply, voila! Your backlight is ready.
Examples of finished works
We will demonstrate the best work on lighting the kitchen with LED strips.
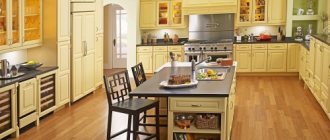
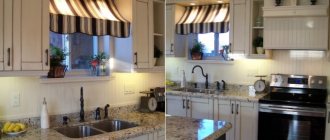
In this photo, the work area is illuminated; overhead strips are located along the edge of the lower part of the wall cabinets, effectively reflected in the glass apron.
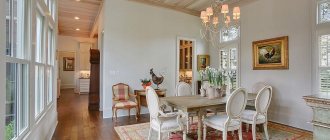
The lighting of the dining area is used in an original way.
In addition to illumination of the work area, this interior uses lighting for floor cabinets.
For ease of use, there is lighting inside the box.
Which lighting to choose for the kitchen
A modern kitchen can be equipped with different types of lighting that perform specific tasks. Among the lighting options it is necessary to note:
Natural lighting in the kitchen depends on the location and size of the windows.
- Lighting under the canopies of the lockers. It allows you not only to illuminate the work area, but also to ensure ease of use of kitchen furniture. Often the light simply does not reach the distant shelves, and with the help of this type of lighting this problem is easily solved. Here you can use various options: LED strips, long halogen lamps. If you choose not very bright ones, then the lighting will become more decorative than useful, since the shadow from the shelves will not allow you to properly use the lower ones.
- Surface-mounted lights for the bottom surfaces of wall cabinets. Such lamps are elongated, they are covered with frosted glass or special plastic, LEDs are often used. They allow you to perfectly illuminate the entire surface of the countertop, so that cooking is simple and convenient. But grease and dirt accumulate on the lamps; they will have to be cleaned regularly.
- Clothespin lamps are a portable version of lamps that allow you to illuminate any necessary surface, for example, on the floor, above the dining table, worktop, or stove. Such lamps have special fastenings that allow them to be installed literally in a matter of seconds on almost any surface.