Where to put a microwave in the kitchen - 25 successful solutions
To place the necessary attributes - a refrigerator, sink and stove, we have already come up with the rule of the working triangle, which allows you to rationally organize the kitchen space. A microwave in the kitchen has become an equally important item in any modern family. But there are no specific recommendations for its placement.
Where to place the microwave in the kitchen so that it is convenient to use? Choose the option that suits you from the recommendations below.
You can get a lot of ideas from this video:
Basic rules for placement
Since you have to use a microwave oven often, you need to pay due attention to where it is placed.
General requirements for placement:
- optimal height from the floor – 60-150 cm;
- should not be placed near a stove, oven, radiator or other heating appliances;
- position it so that you can easily reach it with your hand;
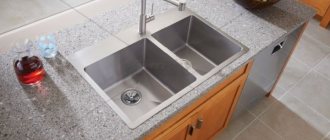
- do not place the microwave oven next to the sink;
- make sure that nothing prevents the door from opening and closing;
- ventilation openings must not be blocked. They are usually located on the top panel. If particles of food or water get there, the device may burn;
- Do not store interior items or kitchen utensils on the appliance.
Ignoring advice on ergonomic and safe placement is not recommended. Due to improper use, the microwave oven will quickly break down, and if it is inconveniently positioned, you risk spilling hot food on yourself and getting burned.
Installing a built-in microwave oven
Microwave ovens can be simple, with a minimal set of functions (heating and defrosting), or complex, which cook grilled foods and have many additional options . Appliances equipped with a convection system can replace an oven. The method of installing a microwave oven depends on its type, as well as the installation location.
The classic option is installation in a kitchen unit. Modern furniture has special sections for various types of household appliances, or a microwave cabinet is ordered along with a kitchen set. Appliances are placed above the stove, under the countertop, in the upper cabinet or other place.
It is possible to install the device in a plasterboard niche. This method is more labor-intensive. It is planned during renovation. A microwave oven is selected in advance, a niche is made to fit the size of the equipment, while thinking about how the additional spaces will be filled.
A modern option for placing built-in appliances is installation in a drawer of kitchen furniture. This is a separate line of models, the housing of which is designed for such installation. To use the equipment, the drawer is pulled out from the front. This method is easy to use and saves a lot of free space.
Attention. Microwave ovens in a drawer have a significant drawback - very high cost.
There are much more options for placing conventional free-standing microwaves. They are placed on a tabletop or other flat surface. But they take up a lot of space. To save space, a conventional microwave oven is also built into kitchen furniture. At the same time, important nuances are taken into account.
To prevent the microwave from overheating during operation, it is provided with adequate air circulation. Therefore, it cannot be placed in a niche that is too narrow, where the influx of cold air masses and the removal of warm ones is impossible. The built-in model does not require any gaps, since circulation is realized through the front panel. For conventional equipment, complete air exchange is considered the main condition for proper use.
Installation Features
Such placement will free up additional space in the kitchen.
When deciding how to hang a microwave in the kitchen, you should take into account that it has quite a significant weight for hanging on the wall; it ranges from 10 to 30 kg. Therefore, to hang it, you cannot use stands for TVs and radio equipment, shelves for books and other home accessories.
Particular attention should be paid to the wall - it must be made of solid, durable materials (concrete, brick). It is also advisable to avoid installing a microwave next to a refrigerator (the oven emits heat during operation), a hob, or a kitchen sink.
For a small kitchen, the best option is to hang the microwave on the wall opposite the work area above the dining table. This is quite convenient from the point of view of cooking and heating food - plates and cups do not need to be carried a long distance to another place in the kitchen, they are immediately lowered onto the table.
There are many options for where to hang a microwave, but the most optimal place for a small kitchen is above the table; hot food and plates do not need to be carried far to another part of the room.
Choosing hanging brackets
Before installing a microwave oven, you should first decide on the fasteners. A standard microwave hanger consists of two metal corners with a powder coating. On one side there are holes for mounting on the wall, the second serves as a stand for the microwave. The length of the fastener under the microwave can be standard or adjustable by extending it forward.
A bracket with two slots may not support the weight of a heavy microwave oven.
Each bracket is equipped with anti-slip pads or special clamps to prevent falls. The main colors of brackets produced are the most common white, black, gray, and gold. There are no significant differences between designs from different manufacturers; they mainly differ in design and color.
When purchasing a bracket, pay attention to the rubberized gaskets; they will securely secure the microwave
Before purchasing, you need to measure the depth of the oven and select fasteners of the appropriate size and color. There is no point in worrying about strength - each bracket can withstand the weight of a microwave oven with a margin of 2-3 times.
Preparation
The first thing you need to do before installing the microwave on the bracket is to prepare the place where it will be mounted.
Attention! Since the bracket and the device placed on it have significant weight, it is worth making sure that the wall on which the structure will be attached is strong. It is preferable that the wall be concrete or brick - drywall does not always guarantee complete safety of the fastenings.
The second thing you need to do is measure the dimensions of the device, select suitable brackets for them, calculate the distance between the holes for fastenings, and check the building level.
In order not to make a mistake with the location of the wall-mounted microwave oven, it is worth consulting several times with all family members on this issue. Moving the bracket will be problematic, and there will be traces of the fastenings on the wall, so it’s better to immediately think about all the possible nuances.
Step-by-step installation instructions
Before hanging the microwave on the microwave oven bracket, you need to prepare the necessary tools and fasteners. You will need a drill with a perforation function or a construction hammer, a tape measure, a pencil, a level, a concrete drill and screws with dowels.
- First, the required distance between the corners is measured - it should correspond to the distance between the legs of the stove. On the wall, at the location of the stove, two vertical lines are drawn with a pencil, corresponding to the measured value.
- One of the corners is applied to the line and holes for fastening are marked on it. Next, using a hammer drill, the necessary recesses are made and dowels are driven in. The corner is placed against the wall and screwed into place.
Installation diagram for built-in microwave oven
Installation of built-in equipment is not difficult and does not require special knowledge. You can do it yourself.
Advice. Before installation, carefully read the operating instructions for the household appliance. It contains data for a specific model.
Installation of a microwave oven in a cabinet is carried out according to the following scheme:
- Prepare a place for installation - it must correspond to the dimensions of the device. The required furniture dimensions are indicated in the operating instructions.
- New equipment is unpacked and inspected for damage.
- Check for the presence of a separate outlet. The mains voltage must correspond to the voltage specified in the technical documentation. If there is no connection point to which the cord can reach, install a new one. This should be done by a qualified electrician. The use of extension cords, adapters, and tees is not recommended.
- A hole is made in the back wall of the furniture so that equipment can be connected to an outlet. When installing some models, it is required that this part of the cabinet be completely absent.
- A plastic-paper stencil, which comes with the microwave oven, is placed on the lower surface of the niche. Marks are made on it for fastening.
- Fix the fastening element (clamp) with bolts in the designated places. Then carefully install the microwave oven. The cord is passed through the hole.
- Then install the decorative frame that comes with the microwave.
- The cord is connected to the power supply and the functionality of the device is checked.
How to hang a microwave on the wall: procedure
The microwave oven is attached to the wall in two ways. It is fixed directly on the wall surface or built into a kitchen cabinet, in which it will also take up little space and can function normally.
The installation procedure begins with the selection of the element to which the fastening will be made. Most often it looks like two metal or plastic supporting parts parallel to each other, on which the fixation takes place.
It is possible to mount the supports on a beam for stronger mounting and support of a microwave oven with a large weight.
To select the type of fastening, you should compare the weight of the microwave with the technical parameters of the fastener on which it is installed.
To carry out installation work, you will need a drill or hammer drill, which will be used to drill holes for dowels. But, before that, it is recommended to take measurements of the product itself and the wall on which it will be installed. Draw a preliminary installation location with a pencil in order to attach the microwave evenly and efficiently.
Install the dowel into the base that is drilled for it. When attaching a plastic dowel, use your hands; if it is metal, you will need special equipment in the form of a dowel gun. Next, place the microwave bracket piece on the wall and nail it in place. Check the connection strength.
If you are concerned that these fasteners will not be able to support the weight of the microwave oven, it is better to replace the nails using anchor bolts.
If you plan to install a microwave oven in a kitchen cabinet, you will need to purchase a special frame that can secure it in the cabinet. To save on buying a frame, make it yourself using metal corners welded or bolted together. Paint the structure to match the color of the cabinet. Fix it to the wall surface using dowels or anchor bolts, as in the first option.
What tools are needed to install a built-in microwave oven in a cabinet?
To install a built-in microwave you will need:
- a jigsaw to make a hole on the back wall of the cabinet for the cord;
- plastic-paper stencil that comes with household appliances;
- pencil for marking;
- screwdriver or screwdriver;
- clamp and bolts for fastening.
Main process
So, in order to install a built-in microwave oven in the kitchen yourself, you need to complete the following steps:
- Unpack your purchase and check it for defects/damage.
- Make sure that there is a connection point near the installation site that the electrical cord from the equipment can reach. If there is no suitable point nearby, you need to connect the outlet yourself to protect yourself from using unreliable extension cords. The installation height of the socket should be not only convenient, but also safe (it cannot be mounted next to a sink, hob, etc.).
- Install all fasteners, if included (for example, guides, as shown in the diagram).
- Make a hole in the back wall of the furniture to connect the built-in microwave oven to an outlet.
- Carefully place the cabinet inside the niche/cabinet/drawer.
- Unplug the cord and connect it to the electrical outlet.
- Install the decorative frame that comes with the equipment.
Here are the instructions for installing and connecting a built-in microwave oven with your own hands. As you can see, you can handle this kind of work yourself, and installation can actually be done in 5 minutes (maximum 10) if everything is prepared. Finally, we recommend watching the video, which provides visual instructions on how to install the microwave housing in a niche!
We hope that now you know how to properly install and connect a built-in microwave oven without calling a technician. As for the latter, the price of a specialist’s work will cost at least 1,500 rubles, which you can easily save!
Also read:
Built-in microwave ovens are mounted in special niches, cabinets, and pencil cases in the kitchen. This allows you to save space and not clutter the interior with unnecessary wires and equipment that stands out from the general style. Let's look at the pros and cons of integrated microwave ovens, their features, placement options, and also make a rating of popular models.
How to install a microwave in the kitchen
When choosing kitchen appliances, including microwave ovens, consumers increasingly prefer more compact, easy-to-use models. Microwave ovens can be either free-standing or built-in – it’s up to you to decide which one to choose. But it’s better to choose a place for the equipment in advance. And based on this, you should select a model. We will tell you how to install a microwave oven and where it is best to place it. It is also important to know how to properly connect an electrical appliance so that it can be used conveniently and as safely as possible.
What types of microwave ovens are there?
Before moving directly to the installation stage, let's look at what microwave ovens exist. So:
- the simplest microwave ovens with a minimum set of functions (heating and defrosting);
- Microwave ovens with grilling function;
- models with a convection system that can easily replace your built-in oven.
Choosing a location and method of embedding
The installation method for microwave ovens depends on their type and location. Today there are several options for installing a built-in microwave oven. After familiarizing yourself with them, you can determine the location for the electrical appliance.
The traditional and, perhaps, the most aesthetic installation method is to integrate the microwave oven directly into the kitchen unit.
You can order a cabinet for a microwave oven along with kitchen furniture. Or find a suitable size cabinet in an existing set.
In this way, you can place the stove, for example, under the countertop, above the stove, in the upper cabinet or any other place. The built-in model can also be placed in a plasterboard niche. This type of installation is more labor-intensive; preparation for it should begin during the renovation.
The most modern, compact type of installation is placement in a drawer. The body of the electrical appliance is built directly into the drawer of the kitchen furniture. To use the microwave, you just need to pull it out of the front. This placement saves kitchen space as much as possible, and also ideally disguises the appliance itself.
As for freestanding microwave ovens, there are more options for their installation. The easiest way is to place them on a countertop or other flat surface.
But such placement often takes up a lot of space, which is sometimes not enough in the kitchen. How to install a microwave, where to put it to save work space? And most importantly, can a regular microwave be built into kitchen furniture? We'll talk about this below.
In principle, installing a conventional microwave oven is possible, but important points should be taken into account.
The main thing is to ensure proper air circulation so that the microwave does not overheat during operation.
If the niche is too narrow, it will simply be impossible to ensure the flow of cold air and the removal of warm air. For the built-in model, this process is carried out through the front panel. Therefore, it does not require any gaps in the cabinet. For free-standing electrical appliances, this is the main condition for proper operation of the device.
In the case of a conventional microwave oven, the size of the niche directly depends on its dimensions.
For models with convection, the height and width of the niche should be 20 cm greater than the height and width of the oven, the depth - 10 cm. For conventional models, 10 cm on all sides will be enough. Select the installation location taking into account the location of the free outlet.
It is not advisable to use an extension cord to connect equipment to the network.
It is not recommended to place the device close to the hob, sink, or refrigerator. This may cause it to break. The distance between household devices must be at least 45 cm.
How to disassemble a door
Reading the comments on the article, Microwave oven door, it becomes clear that many site visitors have difficulty disassembling the door. This is not surprising, because in the article, as an example, only one design option for this part of the microwave is presented, when in fact there are a great many of them. To fill this gap, I decided to write several articles in which special attention is paid specifically to disassembling the door and removing from its structure the parts that most often fail, such as safety glass or deadbolt.
Despite the wide variety of designs, all microwave oven doors have the same layered structure, and can differ from each other only in the number of layers, as well as in the way they are attached to each other. The load-bearing element of any door is the metal base - this is the main layer. All other layers are attached to the base, and it is on the base that the hinge joints are located, through which the door is attached to the furnace body.
Figures 1 and 2 show the door of the microwave oven that we will disassemble. In Figure 1 you can see the outer layer of the door in the form of a decorative finish made of white plastic, as well as the outer protective glass. Figure 2 shows the door from the other side - the inside. Here you can see the metal base of the door with a protective mesh in the form of many holes, and a frame of plastic seal that frames the entire perimeter of the door. In order to gain access to the fasteners between the layers, you first need to separate the seal frame from the door base. These layers are secured to each other using latches.
Figure 3 shows the seal frame already removed. Pay attention to the nature of the latches; all latches face inside the frame. So, to remove the seal, you will have to deform the plastic so that the latches bend outward. As a tool for this operation, oddly enough, an ordinary kitchen knife with a narrow and durable blade was best suited. The whole difficulty lies in the fact that at first we do not see in what places the latches are located and how many there are in general. Therefore, you should start prying off the seal frame from the side of the crossbar. In this place, it is most often attached not to the base of the door, but to the decorative layer and is separated more easily.
And so, we insert the knife blade into the gap between the seal frame and the outer layer on the side of the crossbar, tilt the knife in the direction away from the door, prying the frame. This must be done very carefully, without much effort. If the frame does not budge, try moving the blade to one side or the other along the gap and try again. But, as a rule, the seal comes off quite easily in this place. Then we move on to the corners. It doesn't matter which angle you start from. We move the knife to the long side of the door, at the same time, using our fingers, lift the frame from the side of the crossbar and pry it with the knife along the long side. The corner of the frame should come free. We continue like this around the entire perimeter. With one hand we lift the frame, with the other, using a knife, we pry it off. Sometimes you have to use a knife on the inside of the seal frame. I repeat, this all needs to be done very carefully. The doors of old ovens, in which the plastic has lost its elasticity, deserve special attention. In such cases, if we lose caution, we risk not only breaking the latches, but also the frame itself. That's it, we'll assume that we've removed the seal.
Next, you should separate the decorative trim from the base of the door. After removing the seal, we have good access to the fastenings between these layers and can now visually examine the presence of mounting screws, determine the number of latches and their location. First, let's check for the presence of screws. In our case there are no screws, only latches. Detaching the layers, again, should start from the corner. To do this we need two screwdrivers with a wide, flat blade. We insert screwdrivers between the base and the decorative layer on both sides, not far from the latches, as shown in Figure 5., and use them to bend the plastic outward.
Read also: Size of galvanized iron sheet
Here you don’t have to be shy with effort, within reasonable limits, of course. After releasing the two corner latches (the latches in the figure are indicated by red arrows), one of the screwdrivers should be left in place, otherwise the latches will return to their original position. We move the second screwdriver further along the side on which the first one remained and repeat the action until the next latch is released, and so on around the entire perimeter. Well, the metal base is separated from the decorative trim. At this moment, we have full access to the crossbar, which is fixed to the base, and access to the glass, fixed to the decorative layer (Figure 6). In other words, if you disassembled the door in order to wash the glass from the inside or replace the deadbolt, you can do this now and then proceed with assembly. And we will move on.
The glass is secured to the plastic trim using latches. The recipe for separating one from the other is the same as before - we start from any corner. It’s just not advisable to use any tool here. Glass is a very fragile material and when prying, say with a screwdriver, it can simply crack. We will separate with our bare hands. To do this, we take the plastic in our hands, with our thumbs we bend the sides of the trough outward on both sides and at the same time, with our index and middle fingers, we press on the glass from below. In Figure 7, green arrows indicate the expected places of application of force to bend the plastic, and red arrows indicate the locations of the latches. As before, after releasing the two corner latches, we move to one of the sides and repeat the action along the entire perimeter. And now, plastic and glass are in our hands separately (Figure 8). After that, if, say, there was a crack in the glass, and you disassembled the door in order to replace it, you can take the dimensions, cut out a new one and put it in place. By the way, the installation method is the same - bending the plastic with your hands, only you need to press on the glass from the other side.
The last thing left before completely disassembling the door is to remove the protective film from the inside of the metal base. In order to do this, it is not at all necessary to disassemble the door; it is enough to remove it and place it horizontally for convenience. This layer is designed to protect the door window mesh from the adhesion of food fragments during cooking and is a thin, transparent, heat-resistant film with a sticky layer on one side. As you probably already guessed, we will begin separating the film from the base from a corner, from any corner. Everything here is very simple, you need to take a blade or thin knife and pry the film from one corner so that you can grasp the raised corner of the film with your fingertips. Then slowly and smoothly pull the film by the corner towards the center of the door window. The film is removed very easily, the main thing is not to make sudden movements.
That's all, the door has been dismantled, as they say, “to the ground” (Figure 9). Agree, there is nothing complicated about this. “To break is not to build.”
The process of installing a microwave oven
If the location for the device is chosen taking into account the above recommendations, you can safely proceed to the installation process itself.
Let's look at the most common installation instructions. It involves performing the following steps:
- Carefully inspect the equipment for damage and various defects.
- In the operating instructions, find the installation section and read it.
- If a mount is included, install it.
- Make a hole in the cabinet wall to provide easy access to the electrical outlet when using the device.
- Place the device in the cabinet, remove the cord, and insert the power plug into the outlet.
- Install the frame if it is included with the built-in oven. How to secure it can be found in the instruction manual. In the case of a regular microwave, there are no decorative frames. Remember its need for proper heat dissipation.
As you can see, if you look at all the points, installing the equipment yourself is quite simple. But if you doubt your abilities, consult a specialist.
However, installation of a microwave oven should be carried out taking into account all recommendations and rules. Then the electrical appliance will work correctly and will serve you for many years.
Source: cosmo-frost.ru
Installation process
To install a built-in microwave oven in your kitchen yourself, you must complete the following steps:
- Unpack the products and check them for damage.
- You should make sure that there is a point nearby to connect it. If you have not found a suitable place, then you need to connect the outlet yourself. The height of the socket connection must be safe.
- If the microwave comes with fasteners, then they need to be installed.
- Make a hole in the kitchen unit so that you can pull out the cord.
- Place the case in the cabinet.
- Connect the cord to the electrical outlet.
- Check the functionality of the microwave.
These were all the instructions for installing and connecting a built-in microwave oven with your own hands. As you can see, almost anyone can perform this process. Below we have provided video instructions that will help you connect a built-in microwave.
We hope that now you know exactly how to connect a microwave oven without calling a technician. Thanks to this you will save your money.
Built-in microwave ovens are mounted in special niches, cabinets, and pencil cases in the kitchen. This allows you to save space and not clutter the interior with unnecessary wires and equipment that stands out from the general style. Let's look at the pros and cons of integrated microwave ovens, their features, placement options, and also make a rating of popular models.
How to choose a built-in microwave oven (2019)
It is difficult to imagine a modern kitchen without a microwave. For some, it is just a convenient way to quickly heat up food, while others use it as a small oven for full-fledged cooking. In modern kitchens, a fully integrated microwave oven is increasingly being chosen.
Built-in technology has one undeniable advantage - aesthetics. Fitting harmoniously into the overall set, it does not take up extra space, does not get in the way, and does not distract attention to itself. Instead of the old-fashioned way of placing the microwave on top of the refrigerator, hiding it in the corner of the table, or coming up with a separate shelf for it, the built-in model has its own specific location.
Most often, microwave ovens are built above the oven in a corresponding high cabinet. But if you have a set made entirely to individual sizes, you can come up with your own separate wall cabinet for the device or build it under the countertop.
Dimensions
The size of the built-in microwave is the first point from which you need to start selecting a device. The width, height, and depth of the stove are important. To clearly understand which models to choose from, you need to measure the inside of the microwave cabinet without taking into account the outer walls. Most models are available in the range of 55–56 cm in width, about the same in depth and about 38 cm in height. It should be taken into account that in the height parameters a decorative frame takes up several centimeters, which covers the outer walls of the cabinet. The height of the oven “box” itself will be less by about 4 centimeters.
Power and features
Conventionally, microwaves can be divided into two types - for heating food and for cooking. Low-power microwave ovens usually have rather limited functionality, while more advanced models may already be equipped with convection, grill and other useful options.
Models up to 800 W are mainly suitable only for heating food. In principle, you can cook in them, but the process will be slow, and not all recipes will be suitable. At the same time, such devices will also not warm up quickly - at least several minutes.
800–1000 W is the most standard power of devices. Allows you to cook any dish and quickly heats up food. Most often, such microwave ovens have several power modes – from low to high.
1000–1500 W – high-power devices. They handle cooking with ease, heat up food with lightning speed, and also have several operating modes.
The functionality of the microwave also needs to be selected based on your needs. It is worth saying that modern devices cope perfectly with any culinary tasks no worse than an oven. If 10–15 years ago food in microwaves did not always turn out well, now there are no such problems. Baked goods can be as tender and fluffy as in the oven, and various stews, porridges and other dishes can be juicy and cooked evenly.
Convection is the main assistant for cooks. Convection is the uniform ventilation of hot air inside the chamber. Due to the movement of hot air, any dish is cooked evenly on all sides. This is especially true if you cook in large quantities or love baking - in the convection mode, any dough rises better and better.
Grill – an additional heating element on the upper wall of the chamber. Allows you to achieve a crispy crust for any dish. The presence of a grill is worth paying attention to if you like hot sandwiches, fried meat and chicken, and grilled vegetables.
Defrosting - usually presented in several automatic modes depending on the type of product. Just select the desired option, and the microwave itself will select the power and defrosting time.
Cooking programs – in most models you can find ready-made modes for certain dishes. In some cases you need to choose the type and weight of the product, in others - a specific recipe. It is convenient because the device itself operates at optimal power and cooking time. All you have to do is press a couple of buttons and you can forget about cooking.
Rating of built-in microwave ovens
Popular models of built-in microwave ovens:
| Title and photo | Characteristics | Price |
| Bosch BFL554MW0 | Budget model with electronic control. 38x59x37 cm - dimensions, 25 l - volume, 31.5 cm - tray. Maximum power is 900 W. The feature of the model is 7 installed operating programs that help not only to heat and defrost food, but also to prepare original dishes. The inner surface of the oven is covered with a layer of stainless steel, which reliably protects against damage and overheating. White color | RUB 21,650 |
| Tesler MEB-2070X | One of the smallest microwaves with dimensions of 32x46x34 cm and a volume of 20 liters. Heats food in 5 power modes with a maximum of 800 W. Equipped with a grill mode, automatic defrosting and 8 cooking programs, including a crisp setting. The body color is silver, the internal coating is enamel. The door frame design is made in a high-tech style | 9990 rub. |
| Gorenje BM6240SY2B | Microwave with a hinged door and a system of protection against accidental opening by children. Dimensions - 59.5x39x39 cm with a volume of 23 l and a tray diameter of 27 cm. Power - 900 W. Model with quartz grill (grid included), defrosting, automatic cooking. The inside of the oven is covered with enamel. The black case with a minimalist timer design and touch buttons gives the microwave a modern, stylish look | RUB 26,370 |
| Weissgauff HMT 203, 404315 | A small oven with dimensions 39x59x29 cm and a volume of 20 liters. The reduced depth allows the model to be easily integrated into standard upper kitchen cabinets. Maximum power - 700 W with 5 different modes and the ability to smoothly change when cooking. Additionally, an auto-defrost function is built-in depending on the type and weight of the product. Ecological bio-enamel as a coating and a child protection system make the model one of the safest, and the stylish beige body with discreet buttons will allow it to fit into classic kitchens | 12490 rub. |
| Bosch BFL 520 MS0 | A model specially designed for installation in an upper cabinet with a depth of 30 cm. Dimensions - 38.2x59.4x31.7 cm, volume - 20 l, tray - 25.5 cm. Convenient control of two rotary switches. Power modes - 90, 180, 360, 600, 800 W with defrosting and automatic cooking functions. The inner lining of the camera is made of stainless steel, the body is black | 21990 rub. |
The popularity rating among Russian users includes mainly small-sized budget models. Fans of wide functionality should pay attention to microwave ovens from Samsung, Hansa, Siemens, Kuppersberg, Ariston.
Additional options
The comfort of using technology depends not only on the main functions, but also on the little things. Everything from the door opening to the interior materials matters.
The maximum timer time is important if you plan to use the microwave for cooking. Varies mainly from 30 minutes to several hours. If you like recipes with long simmering times, choose 90 minutes or more so that you don’t have to manually start the process again.
Delayed start is not present in all models, but it can be useful if you clearly plan your time and do not like to be distracted by household chores. You can, for example, marinate meat in the morning by programming the microwave to turn on for the evening - a delicious, hot dinner is ready for your arrival.
Mute the sound. All microwave ovens indicate the end of the cooking cycle with a sound signal. But this can become a hindrance if there is a small child with a light sleep in the house or you do not live alone in a studio apartment. Although this is not the most important option, it is sometimes very pleasant.
Design
Built-in microwaves have an attractive facade and a “rough” body that is completely hidden in the furniture. The front part of the device can be made in a variety of styles - from strict steel high-tech to vanilla Provence with bronze handles. Selecting a model to match the overall style of the kitchen and other appliances will not be difficult.
If we talk about design features, it is worth mentioning that not all modern microwave ovens have a traditional door opening. Nowadays there are many models with a door that hinges from top to bottom in the style of an oven. The choice depends solely on your convenience. However, it is worth considering the height of the microwave - if it is installed too high, the hinged door can create significant inconvenience.
The diameter of the tray will dictate how you can use a particular dish. Usually it is from 24 to 32, less often 36 cm in a microwave oven. There are trays that are larger, but this is already rare. Pay attention to this detail if you not only plan to cook with it, but also in large quantities. Due to the fact that the tray rotates during operation of the microwave, it is strictly not recommended to use dishes that are significantly larger than the tray.
By the way, modern microwave ovens are often equipped not only with a rotating tray, but also with baking trays at different levels.
The inside of microwave ovens is usually lined with either stainless steel or enamel .
Enamel is more affordable, easy to clean, and looks nice (if it’s important for you to admire the inside of the device). It cannot be cleaned with powders or hard brushes. Over time, it can gradually chip and provoke rust in the cracks.
Stainless steel is much more practical. It is much easier to wash away greasy deposits or soup that accidentally spills from a plate. Over the years, nothing happens to her. If you clean too hard with abrasives, it may get slightly scratched, but this will not affect performance in any way. It is worth noting that most models of built-in microwave ovens are made of stainless steel.
Child lock needs no introduction. Of course, microwaves automatically turn off when the door is opened. But in order to avoid unwanted children's experiments and other unforeseen circumstances, the blocking function is still a necessary and useful thing.
Source: club.dns-shop.ru
yourmicrowell.com
Reading the comments on the article, Microwave oven door, it becomes clear that many site visitors have difficulty disassembling the door. This is not surprising, because in the article, as an example, only one design option for this part of the microwave is presented, when in fact there are a great many of them. To fill this gap, I decided to write several articles in which special attention is paid specifically to disassembling the door and removing from its structure the parts that most often fail, such as safety glass or deadbolt.
Despite the wide variety of designs, all microwave oven doors have the same layered structure, and can differ from each other only in the number of layers, as well as in the way they are attached to each other. The load-bearing element of any door is the metal base - this is the main layer. All other layers are attached to the base, and it is on the base that the hinge joints are located, through which the door is attached to the furnace body.
Picture 1
Figure 2
Figures 1 and 2 show the door of the microwave oven that we will disassemble. In Figure 1 you can see the outer layer of the door in the form of a decorative finish made of white plastic, as well as the outer protective glass. Figure 2 shows the door from the other side - the inside. Here you can see the metal base of the door with a protective mesh in the form of many holes, and a frame of plastic seal that frames the entire perimeter of the door. In order to gain access to the fasteners between the layers, you first need to separate the seal frame from the door base. These layers are secured to each other using latches.
Figure 3
Figure 3 shows the seal frame already removed. Pay attention to the nature of the latches; all latches face inside the frame. So, to remove the seal, you will have to deform the plastic so that the latches bend outward. As a tool for this operation, oddly enough, an ordinary kitchen knife with a narrow and durable blade was best suited. The whole difficulty lies in the fact that at first we do not see in what places the latches are located and how many there are in general. Therefore, you should start prying off the seal frame from the side of the crossbar. In this place, it is most often attached not to the base of the door, but to the decorative layer and is separated more easily.
Figure 4
And so, we insert the knife blade into the gap between the seal frame and the outer layer on the side of the crossbar, tilt the knife in the direction away from the door, prying the frame. This must be done very carefully, without much effort. If the frame does not budge, try moving the blade to one side or the other along the gap and try again. But, as a rule, the seal comes off quite easily in this place. Then we move on to the corners. It doesn't matter which angle you start from. We move the knife to the long side of the door, at the same time, using our fingers, lift the frame from the side of the crossbar and pry it with the knife along the long side. The corner of the frame should come free. We continue like this around the entire perimeter. With one hand we lift the frame, with the other, using a knife, we pry it off. Sometimes you have to use a knife on the inside of the seal frame. I repeat, this all needs to be done very carefully. The doors of old ovens, in which the plastic has lost its elasticity, deserve special attention. In such cases, if we lose caution, we risk not only breaking the latches, but also the frame itself. That's it, we'll assume that we've removed the seal.
Next, you should separate the decorative trim from the base of the door. After removing the seal, we have good access to the fastenings between these layers and can now visually examine the presence of mounting screws, determine the number of latches and their location. First, let's check for the presence of screws. In our case there are no screws, only latches. Detaching the layers, again, should start from the corner. To do this we need two screwdrivers with a wide, flat blade. We insert screwdrivers between the base and the decorative layer on both sides, not far from the latches, as shown in Figure 5., and use them to bend the plastic outward.
Figure 5
Here you don’t have to be shy with effort, within reasonable limits, of course. After releasing the two corner latches (the latches in the figure are indicated by red arrows), one of the screwdrivers should be left in place, otherwise the latches will return to their original position. We move the second screwdriver further along the side on which the first one remained and repeat the action until the next latch is released, and so on around the entire perimeter. Well, the metal base is separated from the decorative trim. At this moment, we have full access to the crossbar, which is fixed to the base, and access to the glass, fixed to the decorative layer (Figure 6). In other words, if you disassembled the door in order to wash the glass from the inside or replace the deadbolt, you can do this now and then proceed with assembly. And we will move on.
Figure 6
Figure 7
The glass is secured to the plastic trim using latches. The recipe for separating one from the other is the same as before - we start from any corner. It’s just not advisable to use any tool here. Glass is a very fragile material and when prying, say with a screwdriver, it can simply crack. We will separate with our bare hands. To do this, we take the plastic in our hands, with our thumbs we bend the sides of the trough outward on both sides and at the same time, with our index and middle fingers, we press on the glass from below. In Figure 7, green arrows indicate the expected places of application of force to bend the plastic, and red arrows indicate the locations of the latches. As before, after releasing the two corner latches, we move to one of the sides and repeat the action along the entire perimeter. And now, plastic and glass are in our hands separately (Figure 8). After that, if, say, there was a crack in the glass, and you disassembled the door in order to replace it, you can take the dimensions, cut out a new one and put it in place. By the way, the installation method is the same - bending the plastic with your hands, only you need to press on the glass from the other side.
Figure 8
The last thing left before completely disassembling the door is to remove the protective film from the inside of the metal base. In order to do this, it is not at all necessary to disassemble the door; it is enough to remove it and place it horizontally for convenience. This layer is designed to protect the door window mesh from the adhesion of food fragments during cooking and is a thin, transparent, heat-resistant film with a sticky layer on one side. As you probably already guessed, we will begin separating the film from the base from a corner, from any corner. Everything here is very simple, you need to take a blade or thin knife and pry the film from one corner so that you can grasp the raised corner of the film with your fingertips. Then slowly and smoothly pull the film by the corner towards the center of the door window. The film is removed very easily, the main thing is not to make sudden movements.
Figure 9
That's all, the door has been dismantled, as they say, “to the ground” (Figure 9). Agree, there is nothing complicated about this. “To break is not to build.”
Dimensions
First, let's separate the flies from the cutlets.
There are two versions of microwave ovens, and each of them has its own requirements for the size and shape of the cabinet.
- The built-in microwave oven is installed in a cabinet without a back wall in the compartment for its installation. The rear wall above this compartment must be separated from the wall by a gap of at least 45-50 mm;
Captain Obviousness suggests: this requirement automatically makes it very problematic to install a built-in microwave in a wall cabinet.
- For a freestanding microwave oven, installation in a cabinet with a rear wall is permissible. In this case, the depth of the cabinet must be at least 100 mm greater than the corresponding dimensions of the stove, there must be a 150 mm gap on top, and gaps of at least 50 mm on the sides.
The size of the compartment must ensure free operation of ventilation
Hint: ventilation of the microwave working chamber can be organized either through the back wall, or through the top or side.
Location
The microwave oven must not be installed:
- Under the sink or boiler. A leak at any water supply or sewer connection (in the case of a boiler, the safety valve drain outlet) can lead to a short circuit and fire;
- Above the oven or stove. The rising flow of hot air will heat the stove to high temperatures that threaten to damage the insulation.
The microwave compartment is located away from the stove
In addition: when the microwave oven is located in the lower cabinet, next to the oven, its compartment must be additionally insulated with a heat-resistant material with low thermal conductivity (for example, multi-layer lavsan).